


AI高速发展,版本更新相当快(11月25日才安装的版本v.0.3.4,27日版本就已经更新到v.0.3.5了),在遇到问题,找到问题原因所在的过程中,ComfyUI版本、python版本、节点对环境版本的依赖,本文就是在为了解决自己遇到问题过程中,如何快速安装ComfyUI及节点而作的笔记。
1、安装ComfyUI
方法①:下载 Windows 的可移植独立版本ComfyUI 的某个版本,并解压到某个文件夹,最方便。但Python版本固定,不能选择你想要的Python版本,而有些节点,无法在Python3.12运行,例如下面节点在Python3.12下会出错(在DownloadAndLoadFlorence2Model选择flash_attention_2时的错误信息:FlashAttention only supports Ampere GPUs or newer. 由于我的显卡是20系列,不支持BF16运算,在python3.12的flash_attention中则使用了BF16),在Python3.11则没有问题。

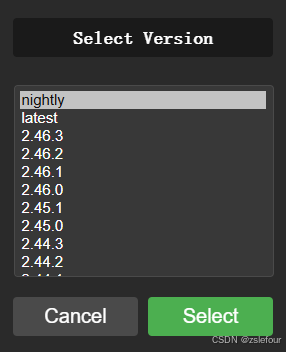
方法②:通过ComfyUI-Manager升级ComfyUI,但只能升级到最新版本,不能升级到指定版本。
方法③:选择①中的Python环境(选择需要的python版本),将ComfyUI文件夹删除,然后用git命令安装指定版本的ComfyUI(直接下载ComfyUI 不同版本的Source code (zip) 解压会少了 .git 文件夹少了版本信息):
git clone -b <版本号> <仓库地址>
git clone -b v0.3.3 https://github.com/comfyanonymous/ComfyUI.git通过gitcode.com加速(注意:gitcode更新可能不够及时)
git clone -b v0.3.3 https://gitcode.com/gh_mirrors/co/ComfyUI.git
使用下面命令,将ComfyUI更新到最新版本:
H:\ComfyUI_cp3.11.9\ComfyUI>git pull origin master
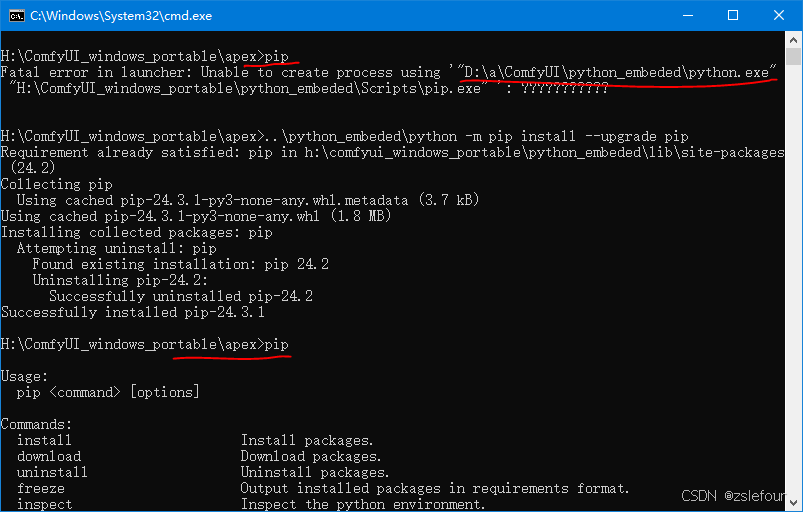
补充:升级一次或强制重装一次pip,以消除原安装包所带来的环境变量依赖。
当设置环境路径,指向 python.exe 及 pip.exe 时,运行 python.exe 没有什么问题,但直接运行pip.exe 会有下面错误信息,升级一次 pip 后,问题解决:
设置环境路径,指向 python.exe 及 pip.exe:
set path=H:\ComfyUI_windows_portable\python_embeded;H:\ComfyUI_windows_portable\python_embeded\Scripts;%path%
(当然也可以用①中的压缩包,只解压包中的ComfyUI文件夹即可)
| ComfyUI版本 | Python版本 |
| v0.0.1--v0.0.3 | 3.11.8 |
| v0.0.4--v0.2.3 | 3.11.9 |
| v0.2.4--v0.3.10 | 3.12.7 |
注意:对于wheel模块,根据需要卸载或安装,可能需要反复进行卸载或安装,原因看第8点。
建议:安装编译环境。因为有些依赖项如果不下载whl安装,是需要编译安装的,编译环境安装可参考《在ComfyUI的python_embeded下编译安装module》
附:ComfyUI 可实现的功能的示例(ComfyUI官方示例工作流)
2、使用 extra_model_paths.yaml 来引用模型
为了重装环境而不需要理会模型的放置,又或者需要安装多个不同版本的ComfyUI而共用模型,可以将模型放在固定位置,并通过文件extra_model_paths.yaml 来引用模型,但有些模型,是不能通过指引来引用的,必须放置到特定的目录下。附:《extra_model_paths.yaml解读》。
我的 ComfyUI\extra_model_paths.yaml 文件如下(根据自己的情况,只修改base_path即可):
#put this file in base_path like G:\ComfyUl windows portable\ComfyUl
#BiRefNet, LLM, facedetection, facerestore_models, ultralytics, insightface..... do not support references

#  H: is SSD
a222:
    base_path: H:\SSD_models\

    checkpoints: checkpoints/
    vae: VAE/
    loras: |
         Loras
#         models/LyCORIS
    clip: clip/
    clip_vision: clip_vision/
    controlnet: controlnet/
    instantid: instantid
    upscale_models: upscale_models
    diffusion_models: diffusion_models
    pulid: pulid
    BiRefNet: BiRefNet
    blip: blip
    LLM: LLM
    sams: sams
    unet: unet
#Only 1 path is allowed except for checkpoints, VAE, etc
    inpaint: inpaint
    stablesr: stablesr
    style_models: style_models

a1111:
    base_path: G:\HD_models\

    checkpoints: checkpoints/
    vae: VAE/
    loras: |
         Loras
#         models/LyCORIS
    clip: clip/
    clip_vision: clip_vision/
    controlnet: controlnet/
    instantid: instantid
    upscale_models: upscale_models
    diffusion_models: diffusion_models
    unet: unet
    style_models: style_models
3、第一类节点:下载Zip包解压即可使用、或者再需要安装依赖项(requirements、[参考第5点安装所需]module,节点缺少的module与你的环境不同而会有差异,缺什么就装什么就是了)
架梯子联网,从已安装节点中,发现有更新日期较新的节点,可以进行更新( 运行命令: git pull origin main 进行更新,如果不行,就下载Zip解压覆盖更新)
| 节点名称及下载地址 | 在路径ComfyUI\custom_nodes下 执行命令 | 备注 |
| 在节点上显示节点 Id 右键单击节点,pin 固定节点 | 设置--->Lite Graph(画面)--->Node lD badge mode(节点ID标签)Show all--->(显示全部) 新版点击选中节点后,就已经有工具栏显示: 1、设置节点颜色;2、bypass 3、固定节点;4、删除节点 这个执行窗口可以移动的,如果没发现在顶栏 菜单,认真找找移到哪了。
| ComfyUI官方示例工作流 中模型下载: |
| 节点: CR Text Concatenate 文本连接 CR Text 文本输入 | ||
| Show fast toggles in Group Headers 在 Group Headers 中显示快速切换 | 只有删除安装路径缓存temp文件,并退出 ComfyUI,才能彻底释放内存, Image Comparer (rgthree) 才不会显示图像 | |
| 运行时将狐狸头图标变紫色 | 工具箱,🐍型图标,在设置中的pysssss项 节点:preset text,提示词预设 | 设置 Image Feed Location 为hidden 不显示生成的图片在窗口的 4 边框上 设置:LinkRenderMode 节点间连线样式 |
| 在节点上显示执行时间 ,要及时更新,否则显示的时间会不正确 | ..\..\python_embeded\python.exe -m pip install -r ComfyUI-Easy-Use\requirements.txt | If else 条件执行,点击参考B站使用视频 for 循环,点击参考B站使用视频 节点:easy setNode、easy getNode |
| ..\..\python_embeded\python.exe -m pip install -r comfyui-mixlab-nodes\requirements.txt models\clip_interrogator\Salesforce \blip-image-captioning-base models\prompt_generator \text2image-prompt-generator zh_en_model路径: models\prompt_generator\opus-mt-zh-en | ♾️Mixlab, 提示词翻译,以及许多强大的功能 节点:Prompt Slide,提示词预设 Chinese Prompt 、ChatGPT & Local LLM | |
| 提示词翻译,需要架梯子 | ||
| ..\..\python_embeded\python.exe -m pip install -r ComfyUI-KJNodes\requirements.txt | 节点: SetNode、GetNode 与 easy setNode 比较 SetNode 有输出 | |
| NameError: name 'apply_gaussian_blur' is not defined点击连接有修复方法 | 兼容 Clothing Migration Kit 节点 | |
| 需要安装如下module: insightface、dlib 当protobuf<3.20.0时,只能用dlib 与ComfyUI-FluxTrainer对protobuf的要求可能冲突 | 把下载的模型解压到路径: ComfyUI_FaceAnalysis\dlib models\insightface\models\auraface\ models\insightface\models\buffalo_l\ 节点:Face Bounding Box ,剪裁脸部(长方形), 可通过padding_percent=0.3《填充百分比》或padding来调整剪裁脸部大小 | |
| 需要安装如下module: insightface、onnxruntime-gpu、onnxruntime | 把下载的模型解压到路径: models\insightface\models\antelopev2\ | |
| 153个节点 下载模块并安装: docopt-0.6.2-py2.py3-none-any.whl ..\..\python_embeded\python.exe -s -m pip install -r ComfyUI_LayerStyle\requirements.txt 下面这个先不执行,看看运行情况再定: ComfyUI_LayerStyle\repair_dependency.bat | 模型只能放在该路径下ComfyUI\models\ 节点所需模型: LayerMask: PersonMaskUltra V2 models\mediapipe LayerMask: SegmentAnythingUltra | |
|
| 70个节点: Collage:将输入图像随机拼贴成一个大图像 QWenImage2Prompt:根据图像推断提示词 LlamaVision:使用视觉模型进行局部推理。可用于生成提示词 JoyCaption2:可用于生成提示词 PhiPrompt:使用 Microsoft Phi 3.5 文本和视觉模型进行本地推理 Gemini:将 Google Gemini API 用于文本和视觉模型以进行本地推理,在 Google AI Studio 上申请你的 API 密钥 GeminiImageEdit:实现多模态图像编辑 DeepSeekAPI:在 DeepSeek 免费申请API 密钥 ZhipuGLM4:使用智谱 API 进行文本推理 SmolVLM:使用 SmolVLM 轻量级视觉模型进行局部推理 PromptEmbellish:提示美化,在 Google AI Studio 上申请你的 API 密钥 Florence2Image2Prompt:推断提示词 LaMa:根据蒙版从图像中擦除对象,该节点是 IOPaint 的重新打包,由最先进的 AI 模型提供支持。 ImageAutoCrop: 图像自动裁剪 AddBlindWaterMark:添加盲水印 SAM2Ultra | 模型只能放在路径ComfyUI\models\ models\ florence2\ BiRefNet\ .....模型下载: vitmatte LLavacheckpoints LlamaVision:LLM JoyCaption-alpha-two:LLM、LLM 、clip、Joy_caption SegmentAnythingUltra: bert-base-uncased、grounding-dino、sams Florence2Ultra:使用 Florence2 模型的分割功能,同时还具有超高的边缘细节 BiRefNetUltra:使用 BiRefNet 模型去除背景具有更好的识别能力和超高的边缘细节 TransparentBackgroundUltra:使用透明背景模型去除背景具有更好的识别能力和速度,同时还具有超高的边缘细节 |
| ..\..\python_embeded\python.exe -m pip install -r ComfyUI-BrushNet\requirements.txt | 会将 accelerate版本降到 0.31.0 | |
| ..\..\python_embeded\python.exe -m pip install -r ComfyUI-Crystools\requirements.txt | 当ComfyUI中的参数Menu设置Top或bottom时, 参数Position要设为top才能显示 | |
| ..\..\python_embeded\python.exe -m pip install -r comfyui-tensorops\requirements.txt | ||
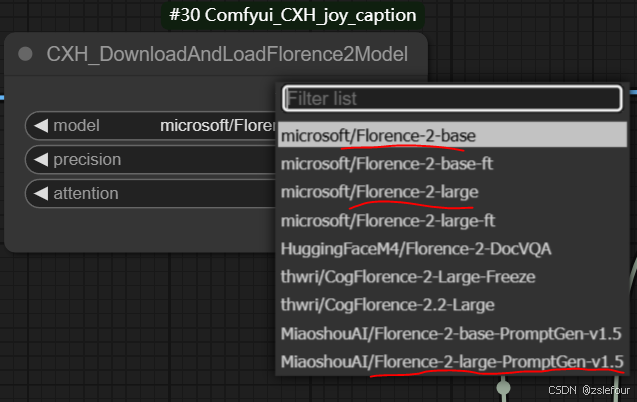
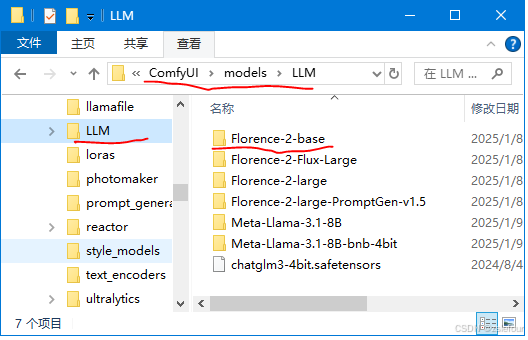
| ..\..\python_embeded\python.exe -m pip install -r ComfyUI-Florence2\requirements.txt 需要安装如下module:timm、accelerate 在DownloadAndLoadFlorence2Model选择flash_attention_2时,需要安装:flash_attn | 模型只能放在该路径下ComfyUI\models\LLM 要将模型下载到不同的模型子目录下, 下载链接里面的所有文件都需要下载: | |
| 因为涉及路径,需要使用git安装, 不能从其他安装位置复制。 ..\..\python_embeded\python.exe -m pip install -r was-node-suite-comfyui\requirements.txt Image Crop Face 剪裁脸部(正方形), 不放大,不能处理批量图像 | (下载所有文件)放到模型路径: models\clipseg\models--CIDAS--clipseg-rd64-refined\snapshots \583b388deb98a04feb3e1f816dcdb8f3062ee205 节点: Text Concatenate 文本连接,可以去除前后空格 Text Multiline 文本输入 | |
| ..\..\python_embeded\python.exe -m pip install -r ComfyUI-Easy-Use\requirements.txt | If else 条件执行,点击参考B站使用视频 for 循环,点击参考B站使用视频 在节点上显示执行时间。 | |
| 抠图 | ..\..\python_embeded\python.exe -m pip install -r ComfyUI-Inspyrenet-Rembg\requirements.txt | packaging版本降到23.2 很奇怪,试过没放置模型时,很慢,放置模型\transparent-background后,很快,然后删除了模型,依然很快。 |
| ..\..\python_embeded\python.exe -m pip install -r ComfyUI-GGUF\requirements.txt | ||
| ComfyUI_PuLID_Flux_ll | ||
| 需要安装如下module: facexlib、ftfy、insightface | 模型放在(可引用) models\pulid 20系列显卡因为不支持BF16, 用不了这个节点点击办法解决 | |
| 原版(作者已经不提供支持,而且错误较多) | ||
| 我修改了模型加载节点FaceRestoreModelLoade, 可以加载另外2个模型,实现 黑白变彩色、inpainting。 | 需要安装如下module:lpips models/facerestore_models:GFPGANv1.4.pth 、 codeformer.pth、 models/facedetection: detection_Resnet50_Final.pth detection_mobilenet0.25_Final.pth | 我最早接触的大名鼎鼎的脸部修复CodeFormer (被它的效果震撼到了)的comfyui实现节点 节点:CropFace ,剪裁脸部,并缩放到512*512 |
| ..\..\python_embeded\python.exe -m pip install -r ComfyUI-SUPIR\requirements.txt | ||
| Zip 打标 | 提示词反推 需要安装如下module: scikit_build_core、llama-cpp-python ..\..\python_embeded\python.exe -m pip install -r Comfyui_CXH_joy_caption\requirements.txt | 模型(需要放在默认models路径): models\clip\siglip-so400m-patch14-384 models\LLM\Meta-Llama-3.1-8B-bnb-4bit models\LLM\Meta-Llama-3.1-8B models\Joy_caption models\Joy_caption_alpha 模型 Meta-Llama-3.1-8B 只支持FP32,15G大小 在我的2系显卡上用出现占用GPU 的Copy 1 性能情况,而且超慢,不知道什么原因。 |
| 提示词反推 ..\..\python_embeded\python.exe -m pip install -r ComfyUI_SLK_joy_caption_two\requirements.txt 模型下载需要下载全部文件,包括子路径,文件名要一致 Llama-3.1-8B-Lexi-Uncensored-V2-nf4 效果不错 | 模型(需要放在默认models路径): models\clip\siglip-so400m-patch14-384 models\LLM\Meta-Llama-3.1-8B-Instruct-bnb-4bit models\LLM\Meta-Llama-3.1-8B-Instruct models\LLM\Llama-3.1-8B-Lexi-Uncensored-V2-nf4 models\LLM\Llama-3.1-8B-Lexi-Uncensored-V2 models\Joy_caption_two | |
| 节点: Load Images (Path) 装载路径下的所有图片 | ||
| 打标,节点: Iterate Images、Save With Text File、Describe Image、Save Description | ||
| ..\..\python_embeded\python.exe -m pip install -r ComfyUI-FluxTrainer\requirements.txt | 需要安装如下module:protobuf版本要求<=3.20.0 可能与ComfyUI_FaceAnalysis 的要求冲突 | |
| 示例工作流使用了ControlNetInpaintingAliMamaApply,对重绘区域先剪裁,重绘后再黏贴回原图 | 当使用Clipseg自动蒙板时,会发生错误: Batch size of images and masks must be the same,Clipseg 为同一图像返回多个蒙版, 因此节点不起作用 | |
| ComfyUI_IPAdapter_plus Zip | 节点 ComfyUI-JakeUpgrade 兼容该节点 | 模型文件多,可查看参考文章。 |
| 节点: Save Face Model Build Blended Face Model 参数: send_only 设置为NO,则每次都重新构建 face_model name 可带路径保存构建的模型 Load Face Model 使用的路径: models\reactor\faces | 模型路径及模型: ComfyUI\models\insightface: inswapper_128.onnx ComfyUI\models\facerestore_models: GPEN-BFR-512.onnx models\ultralytics\bbox: face_yolov8n.pt models\sams:(可引用) sam_vit_b_01ec64.pth | |
| ComfyUI- | Load Face Detector Model (Dlib): 模型放置路径:models\facedetection shape_predictor_68_face_landmarks.dat 其他模型:models\checkpoints、vae(可引用) | |
| ..\..\python_embeded\python.exe -m pip install -r comfyui_ controlnet_aux\requirements.txt | 需要安装的模块 svglib ,要使用 wheel 编译 模型: comfyui_controlnet_aux\ ckpts\ depth-anything\ Depth-Anything-V2-Large\ depth_anything_v2_vitl.pth | |
| 模型:
| ||
| ..\..\python_embeded\python.exe -m pip install -r ComfyUI-Impact-Pack\requirements.txt | 模型放置路径: models\sams | |
| ..\..\python_embeded\python.exe -m pip install -r ComfyUI-Impact-Subpack\requirements.txt | 节点:UltralyticsDetectorProvider 从 ComfyUI-Impact-Pack 拆分出来 | |
| 节点:Crop Face ,剪裁脸部(正方形),不放大,不能处理批量图像 节点:Load RetinaFace, 加载模型 detection_Resnet50_Final.pth 模型路径:ComfyUI\models\facexlib\ | ||
| sd-ppp Zip | 在 Photoshop 和 ComfyUI 之间进行通信 | |
| 语言包,至少从版本v0.3.10开始,已经不需要了。 | ||
| ..\..\python_embeded\python.exe -m pip install -r Comfyui_segformer_b2_clothes\requirements.txt | models\segformer_b2_clothes models\segformer_b3_fashion | |
| ..\..\python_embeded\python.exe -m pip install -r ComfyUI_Sapiens\requirements.txt 如果ultralytics的版本是8.3.41,务必卸载, 安装其他版本,因为该版本被植入挖矿脚本 | 最近又出来个很强的人体分割大师 models\sapiens\yolov8m.pt models\sapiens\depth models\sapiens\normal models\sapiens\pose models\sapiens\seg | |
| comfyui_fk_server Zip | 需要申请个人百度翻译密钥, 无需添加新节点,在原节点输入后双击即可进行翻译 | 模型引用修复功能 |
| models\photomaker:V1、V2 | ||
| comfyui_facetools Zip | 需要下面节点支持: | models/landmarks\ |
| x-flux-comfyui | ||
| ComfyUI-utils-nodes Zip | ||
| ComfyUI_Sonic Zip | 数字人 | |
| ComfyUI_NTCosyVoice Zip | 由于pynini模块无法在便携版python中安装, 需要使用 anaconda 布置 , | 文字转语音 |
| ComfyUI-WanVideoWrapper | 通义万相,图生视频。我用kijia的这个节点及流 竟然没能跑通,爆 Got an OOM,而用comfyui 的流及节点则没有问题。最后发现,720p需要采用 fp 精度,否则爆显存。 comfyui-wiki介绍 | 下载模型后放置路径: Text encoders to : Transformer to :
Vae to : |
| ComfyUI-Janus-Pro | 一个统一的多模态理解和生成框架:deepseek | |
| ACE_plus | ali 阿里:git clone后需将子文件夹 ComfyUI-ACE_Plus复制到custom_nodes 通过上下文感知内容填充创建和编辑 | 模型下载 |
| quick-connections | 添加电路板连接(节点间的连线) | 有些原来有的连线可能显示不出来 |
| ComfyUI-nunchaku | 需要安装对应版本的模块:nunchaku | |

4、 第二类需要用 git 命令安装
使用 gitcode.com 加速,地址构成为:https://gitcode.com/gh_mirrors/ + 节点名首2个字母/节点名,例如:
原GitHub地址 :https://github.com/ssitu/ComfyUI_UltimateSDUpscale
则Gitcode地址:https://gitcode.com/gh_mirrors/co/ComfyUI_UltimateSDUpscale
原GitHub地址 :https://github.com/Coyote-A/ultimate-upscale-for-automatic1111
则Gitcode地址:https://gitcode.com/gh_mirrors/ul/ultimate-upscale-for-automatic1111| 节点名称 | 在路径ComfyUI\custom_nodes下 执行命令 | 备注 |
| ComfyUI_UltimateSDUpscale | git clone https://github.com/ssitu/ComfyUI_UltimateSDUpscale --recursive git clone https://gitcode.com/gh_mirrors/co/ComfyUI_UltimateSDUpscale --recursive 如果上面命令执行失败(要用到加速大概率会失败),则继续执行下面命令安装子模块: git clone https://gitcode.com/gh_mirrors/ul/ultimate-upscale-for-automatic1111 repositories\ultimate_sd_upscale | 从错误信息中找到需要安装的子模块信息: /ultimate-upscale-for-automatic1111' into submodule path '..../ComfyUI_UltimateSDUpscale/repositories/ultimate_sd_upscale' failed |
| ComfyUI-Inspire-Pack | git clone -v --recursive --progress -- https://github.com/ltdrdata/ComfyUI-Inspire-Pack git clone -v --recursive --progress -- https://gitcode.com/gh_mirrors/co/ComfyUI-Inspire-Pack | 需要同时安装:IPAdapterPlus |
5、依赖 module 的安装
缺少什么模块就安装什么。
有些 module 还是比较大的,每次直接用 pip 安装,可能会下载比较长时间,将安装 whl 保存下来,下载安装时直接安装 whl ,将会节省你不少时间。要注意,有些模块是与环境版本匹配的,要下载匹配环境的。
| 模块名称及下载地址 | 备注 |
| insightface whl | 需要下载 whl 安装 numpy版本不能太高,需要安装较低版本: |
| dlib whl | 需要下载 whl 安装 |
| onnxruntime-gpu whl | 模块文件大小:279M |
| onnxruntime whl | 文件较小,可以pip命令直接安装 |
| facexlib whl | 依赖项 :filterpy 在python 3.11时无法自动Building wheel for filterpy ,从而无法安装 可以下载 filterpy 安装 ,或者使用 pip install facexlib --no-deps 不安装依赖项 filterpy。 模型放置路径: \python_embeded\Lib\site-packages\facexlib\weights parsing_bisenet.pth (PuLID-Flux需要) parsing_parsenet.pth (PuLID-Flux需要) |
| filterpy whl | 需要下载 whl 安装,在python 3.12下可用pip直接安装 |
| ftfy whl | |
| 下载 whl 安装,自行编译安装需要2-5个小时。 | |
| xformers whl | 模块文件大小:160M 没安装 xformers 时:Using pytorch attention Using xformers attention 使用下面命令可以直接安装: pip install xformers==0.0.28.post2 --index-url https://download.pytorch.org/whl/cu124 |
| apex whl | 没安装 apex 时: (只有安装了节点ComfyUI-PuLID-Flux-Enhanced) 会有下面信息 Nvidia APEX normalization not installed, using PyTorch LayerNorm |
| llama-cpp-python whl | 需要下载 whl 安装,否则需要自己配置编译环境 |
| wheel | |
| triton whl | |
| NATTEN whl | 使用 whl 下载连接里面的(参考说明README.md): WindowsWhlBuilder.bat build 命令可以构建wheel 构建输出到:NATTEN\dist |
| SageAttention whl | |
| nunchaku whl | |
比较重要的module版本对应关系:
| torch | torchaudio | torchvision | xformers | 备注 | CUDA版本 | 支持的torch版本 | |
| 2.4.0 | 2.4.0 | 0.19.0 | 0.0.27.post1、0.0.27.post2 | 11.7 | 1.13.0--2.0.1 | ||
| 2.4.1 | 2.4.1 | 0.19.1 | 0.0.28 、0.0.28.post1 | 不建议安装这2个版本的torch, 因为这2个版本没找到flash_attn预编译whl | 11.8 | 2.0.0--2.5.1 | |
| 2.5.0 | 2.5.0 | 0.20.0 | 0.0.28.post2 | 12.1 | 2.1.0--2.5.1 | ||
| 2.5.1 | 2.5.1 | 0.20.1 | 0.0.28.post3、0.0.29.post1 | 12.4 | 2.4.0--2.5.1 | ||
| 2.6.0 | 2.6.0 | 0.21.0 | 0.0.29.post2、0.0.29.post3 |
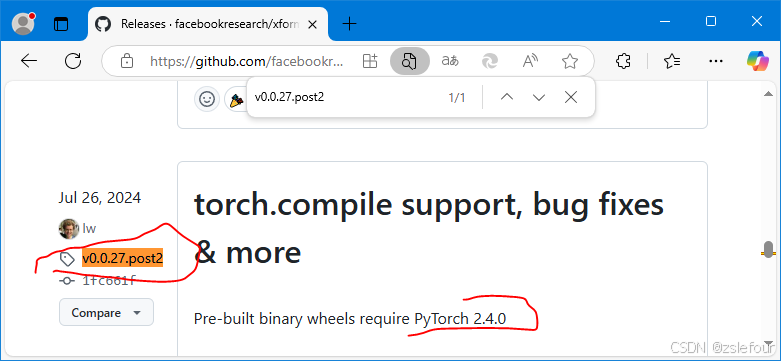
从 https://github.com/facebookresearch/xformers/releases 及 https://github.com/facebookresearch/xformers/tree/v0.0.28 查询xformers版本对应的torch版本要求

6、批量去除文件夹名中字符-main、-master
上面第3点下载的Zip压缩包解压后,文件夹名称后面会带-main、-master,将下面命令复制到一个 bat 文件,放置到 ComfyUI\custom_nodes 路径下,双击运行即可批量 除文件夹名中字符-main、-master,例如文件夹 ComfyUI-KJNodes-main ,修改为 ComfyUI-KJNodes。
echo 批量去除文件夹名中字符-main、-master
@echo off
setlocal enabledelayedexpansion

set "old_string=-main"
set "old_string_2=-master"

for /d %%D in (*) do (
    set "folder_name=%%D"
    set "new_folder_name=!folder_name:%old_string%=!"
    set "new_folder_name_2=!folder_name:%old_string_2%=!"
    if "!folder_name!" neq "!new_folder_name!" (
        ren "%%D" "!new_folder_name!"
    )
    if "!folder_name!" neq "!new_folder_name_2!" (
        ren "%%D" "!new_folder_name_2!"
    )

)

@echo on
7、ComfyUI缓存路径
C:\Users\Monday\.cache
H:\ComfyUI_windows_portable\ComfyUI\temp

8、python 3.11与python 3.12的一点区别引起的问题以及解决办法
①、在python 3.11环境中,想要安装 python.exe -m pip install filterpy包时,会报如下错误:
Collecting filterpy
Using cached filterpy-1.4.5.zip (177 kB)
Preparing metadata (setup.py) ... error
error: subprocess-exited-with-error× python setup.py egg_info did not run successfully.
│ exit code: 1
而在在python 3.12环境中,安装过程显示的信息如下:
Collecting filterpy
Using cached filterpy-1.4.5.zip (177 kB)
Installing build dependencies ... done
Getting requirements to build wheel ... done
Preparing metadata (pyproject.toml) ... done
发现 Preparing metadata 这个过程是不一样的,但在完全安装的 3.11环境中,安装filterpy包时是与 3.12 一样并能成功安装。花了一天时间各种尝试,终于从 get-pip.py 发现 3.11与3.12版本区别的地方,只要执行 python.exe -m pip uninstall wheel 卸载了 wheel 即可以。
②、 而在安装comfyui_controlnet_aux的依赖项时,则出现了用 pyproject.toml 不能编译的错误:
Collecting svglib (from -r requirements.txt (line 15))
Downloading svglib-1.5.1.tar.gz (913 kB)
---------------------------------------- 913.9/913.9 kB 2.6 MB/s eta 0:00:00
Installing build dependencies ... done
Getting requirements to build wheel ... done
Installing backend dependencies ... done
Preparing metadata (pyproject.toml) ... error
error: subprocess-exited-with-error× Preparing metadata (pyproject.toml) did not run successfully.
重新装回 wheel 后,依赖项安装成功。
Collecting svglib (from -r requirements.txt (line 15))
Using cached svglib-1.5.1.tar.gz (913 kB)
Preparing metadata (setup.py) ... done
9、一些节点告警信息以及解决方法
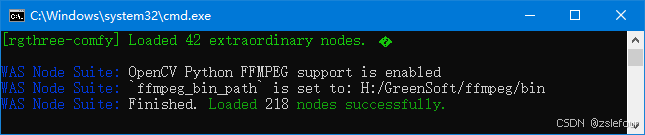
①、节点was-node-suite-comfyui 、comfyui-mixlab-nodes加载出现如下信息:
WAS Node Suite Warning: `ffmpeg_bin_path` is not set in `H:\ComfyUI_cp3.11.9\ComfyUI\custom_nodes\was-node-suite-comfyui\was_suite_config.json` config file. Will attempt to use system ffmpeg binaries if available.
ffmpeg could not be found. Using ffmpeg from imageio-ffmpeg.
下载 https://gitcode.com/gh_mirrors/ul/ultimate-upscale-for-automatic1111 并解压到某个路径下,修改was_suite_config.json中的行:
"ffmpeg_bin_path": "H:/GreenSoft/ffmpeg/bin",
当设置系统环境变量path,指向 ffmpeg 安装路径后安装节点,则上面警告信息不会出现。
对comfyui-mixlab-nodes,则需要设置系统环境变量path,指向 ffmpeg 安装路径:
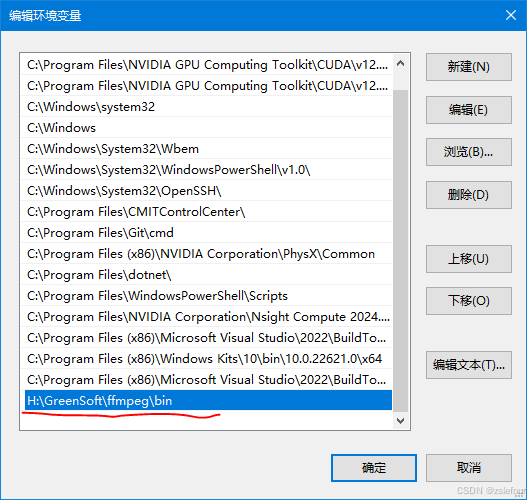
如果只是简单使用pip install ffmpeg ,则还是会报上面警告信息。
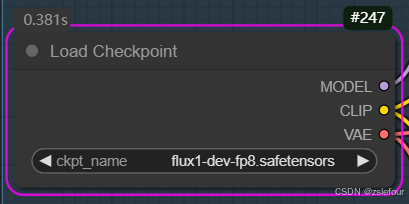
②、 要使用 Load Checkpoint 加载 flux1-dev-fp8.safetensors 模型,需要下载17G的模型,而不是11G的模型。(参考)
③ comfyui_controlnet_aux节点告警信息:
UserWarning: DWPose: Onnxruntime not found or doesn't come with acceleration providers
H:\AI\ComfyUI\custom_nodes\comfyui_controlnet_aux\node_wrappers\dwpose.py:26: UserWarning: DWPose: Onnxruntime not found or doesn't come with acceleration providers, switch to OpenCV with CPU device. DWPose might run very slowly
warnings.warn("DWPose: Onnxruntime not found or doesn't come with acceleration providers, switch to OpenCV with CPU device. DWPose might run very slowly")
节点问题讨论区里面好像也没有什么好的解决办法:
Onnxruntime not found or doesn't come with acceleration providers #75
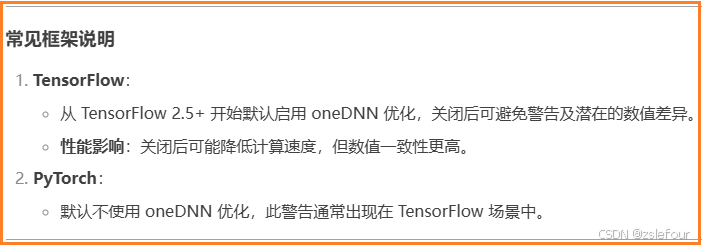
④ tensorflow错误信息
2025-03-18 11:30:44.238256: I tensorflow/core/util/port.cc:153] oneDNN custom operations are on. You may see slightly different numerical results due to floating-point round-off errors from different computation orders. To turn them off, set the environment variable `TF_ENABLE_ONEDNN_OPTS=0`.
参考《关于tensorflow实战中出现错误记录 》修改H:\AI\ComfyUI\main.py中增加环境变量,问题解决:
import comfy.options
comfy.options.enable_args_parsing()

import os
.....
    os.environ['TF_ENABLE_ONEDNN_OPTS'] = '0'
将告警信息丢给deepseek,结果如下,说明上面关闭是合适的:
⑤ ComfyUI-Easy-Use告警信息:
[ComfyUI-Easy-Use] web root: H:\AI\ComfyUI\custom_nodes\ComfyUI-Easy-Use\web_version/v2 Loaded
F:\miniconda3\envs\comfyui_cp311\Lib\site-packages\timm\models\layers\__init__.py:48: FutureWarning: Importing from timm.models.layers is deprecated, please import via timm.layers
  warnings.warn(f"Importing from {__name__} is deprecated, please import via timm.layers", FutureWarning)
F:\miniconda3\envs\comfyui_cp311\Lib\site-packages\timm\models\registry.py:4: FutureWarning: Importing from timm.models.registry is deprecated, please import via timm.models
  warnings.warn(f"Importing from {__name__} is deprecated, please import via timm.models", FutureWarning)
F:\miniconda3\envs\comfyui_cp311\Lib\site-packages\timm\models\helpers.py:7: FutureWarning: Importing from timm.models.helpers is deprecated, please import via timm.models
warnings.warn(f"Importing from {__name__} is deprecated, please import via timm.models", FutureWarning)《CSDN相关文章》
⑥ 安装了模块 Triton 后报下面的错误,启动失败:
WARNING: Failed to find MSVC.
Traceback (most recent call last):
  File "D:\AI\ComfyUI\main.py", line 136, in <module>
    import execution
  File "D:\AI\ComfyUI\execution.py", line 13, in <module>
    import nodes
  File "D:\AI\ComfyUI\nodes.py", line 22, in <module>
    import comfy.diffusers_load
  File "D:\AI\ComfyUI\comfy\diffusers_load.py", line 3, in <module>
    import comfy.sd
  File "D:\AI\ComfyUI\comfy\sd.py", line 11, in <module>
    from .ldm.cascade.stage_c_coder import StageC_coder
  File "D:\AI\ComfyUI\comfy\ldm\cascade\stage_c_coder.py", line 19, in <module>
    import torchvision
  File "C:\Users\Monday\.conda\envs\comfyui_cp311\Lib\site-packages\torchvision\__init__.py", line 10, in <module>
    from torchvision import _meta_registrations, datasets, io, models, ops, transforms, utils  # usort:skip
    ^^^^^^^^^^^^^^^^^^^^^^^^^^^^^^^^^^^^^^^^^^^^^^^^^^^^^^^^^^^^^^^^^^^^^^^^^^^^^^^^^^^^^^^^^
  File "C:\Users\Monday\.conda\envs\comfyui_cp311\Lib\site-packages\torchvision\models\__init__.py", line 2, in <module>
    from .convnext import *
  File "C:\Users\Monday\.conda\envs\comfyui_cp311\Lib\site-packages\torchvision\models\convnext.py", line 8, in <module>
    from ..ops.misc import Conv2dNormActivation, Permute
  File "C:\Users\Monday\.conda\envs\comfyui_cp311\Lib\site-packages\torchvision\ops\__init__.py", line 23, in <module>
    from .poolers import MultiScaleRoIAlign
  File "C:\Users\Monday\.conda\envs\comfyui_cp311\Lib\site-packages\torchvision\ops\poolers.py", line 10, in <module>
    from .roi_align import roi_align
  File "C:\Users\Monday\.conda\envs\comfyui_cp311\Lib\site-packages\torchvision\ops\roi_align.py", line 7, in <module>
    from torch._dynamo.utils import is_compile_supported
  File "C:\Users\Monday\.conda\envs\comfyui_cp311\Lib\site-packages\torch\_dynamo\__init__.py", line 3, in <module>
    from . import convert_frame, eval_frame, resume_execution
  File "C:\Users\Monday\.conda\envs\comfyui_cp311\Lib\site-packages\torch\_dynamo\convert_frame.py", line 33, in <module>
    from torch._dynamo.symbolic_convert import TensorifyState
  File "C:\Users\Monday\.conda\envs\comfyui_cp311\Lib\site-packages\torch\_dynamo\symbolic_convert.py", line 27, in <module>
    from torch._dynamo.exc import TensorifyScalarRestartAnalysis
  File "C:\Users\Monday\.conda\envs\comfyui_cp311\Lib\site-packages\torch\_dynamo\exc.py", line 11, in <module>
    from .utils import counters
  File "C:\Users\Monday\.conda\envs\comfyui_cp311\Lib\site-packages\torch\_dynamo\utils.py", line 1752, in <module>
    if has_triton_package():
       ^^^^^^^^^^^^^^^^^^^^
  File "C:\Users\Monday\.conda\envs\comfyui_cp311\Lib\site-packages\torch\utils\_triton.py", line 9, in has_triton_package
    from triton.compiler.compiler import triton_key
  File "C:\Users\Monday\.conda\envs\comfyui_cp311\Lib\site-packages\triton\__init__.py", line 8, in <module>
    msvc_winsdk_inc_dirs, _ = find_msvc_winsdk()
                              ^^^^^^^^^^^^^^^^^^
  File "C:\Users\Monday\.conda\envs\comfyui_cp311\Lib\site-packages\triton\windows_utils.py", line 230, in find_msvc_winsdk
    winsdk_inc_dirs, winsdk_lib_dirs = find_winsdk()
                                       ^^^^^^^^^^^^^
  File "C:\Users\Monday\.conda\envs\comfyui_cp311\Lib\site-packages\triton\windows_utils.py", line 207, in find_winsdk
    winsdk_base_path, version = find_winsdk_registry()
    ^^^^^^^^^^^^^^^^^^^^^^^^^
TypeError: cannot unpack non-iterable NoneType object
请按任意键继续. . .
将告警信息丢给deepseek,说 缺少 Windows SDK ,安装SDK后能运行。
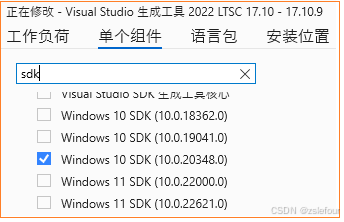
但依然会有警告信息如下,因为是新装的操作系统,没安装CUDA Toolkit及isual Studio 2022 C++ 开发工具(MSVC),安装后告警信息消失:
Prestartup times for custom nodes:
   0.0 seconds: D:\AI\ComfyUI\custom_nodes\ComfyUI-Easy-Use
   0.0 seconds: D:\AI\ComfyUI\custom_nodes\rgthree-comfy
   6.4 seconds: D:\AI\ComfyUI\custom_nodes\ComfyUI-Manager

Checkpoint files will always be loaded safely.
Total VRAM 22528 MB, total RAM 130987 MB
pytorch version: 2.6.0+cu126
WARNING: Failed to find MSVC.
WARNING: Failed to find CUDA.
xformers version: 0.0.29.post3
Set vram state to: NORMAL_VRAM
Device: cuda:0 NVIDIA GeForce RTX 2080 Ti : cudaMallocAsync
Using xformers attention
ComfyUI version: 0.3.27
ComfyUI frontend version: 1.15.0
10、如何查找插件模型放置路径等信息
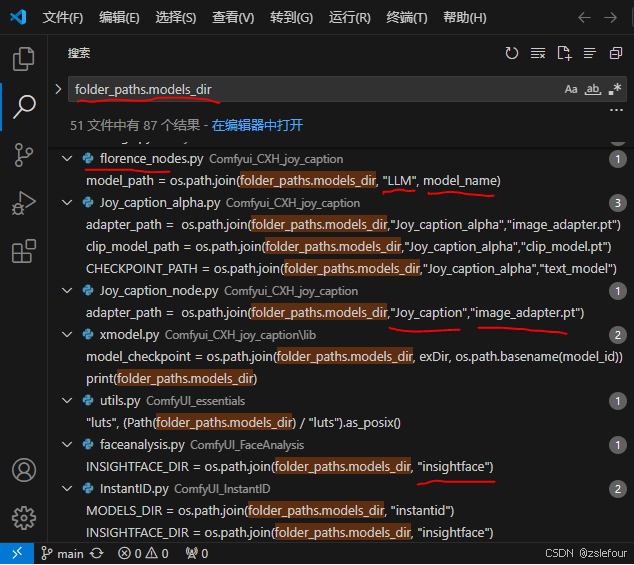
大多时候,插件GitHub页都有比较详细说明,而当没有详细说明,不清楚模型该放置到什么路径时,求人不如求己,我们不妨用vscode来查找相关信息。
启动vscode,打开节点文件夹(我这里是打开ComfyUI\custom_nodes路径,实际使用只需打开要查找的插件路径即可),ctrl + shift + F (在文件夹中查找关键字),输入:folder_paths.models_dir 进行查找
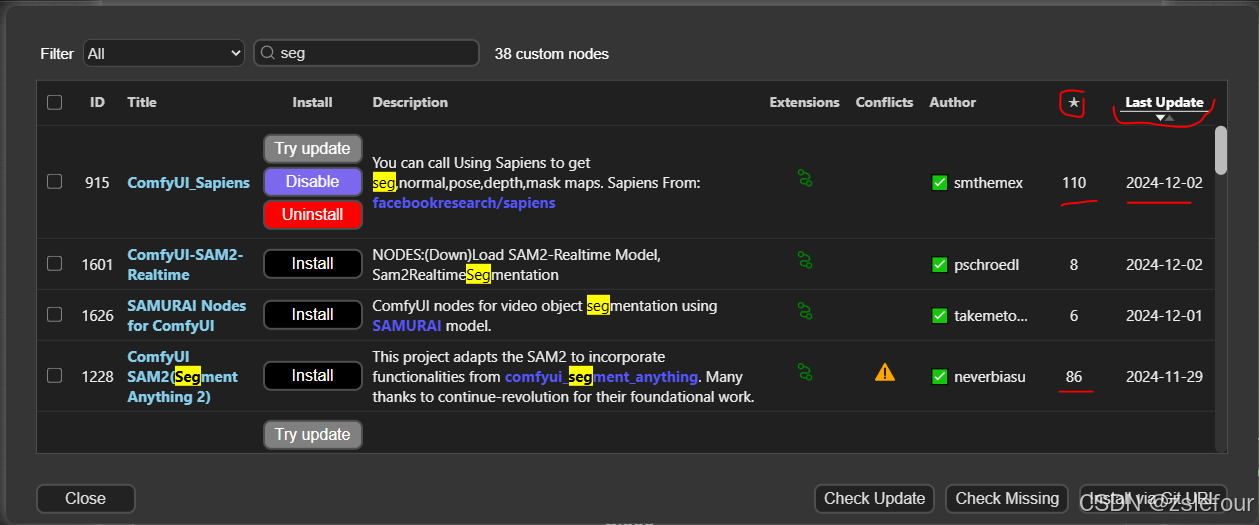
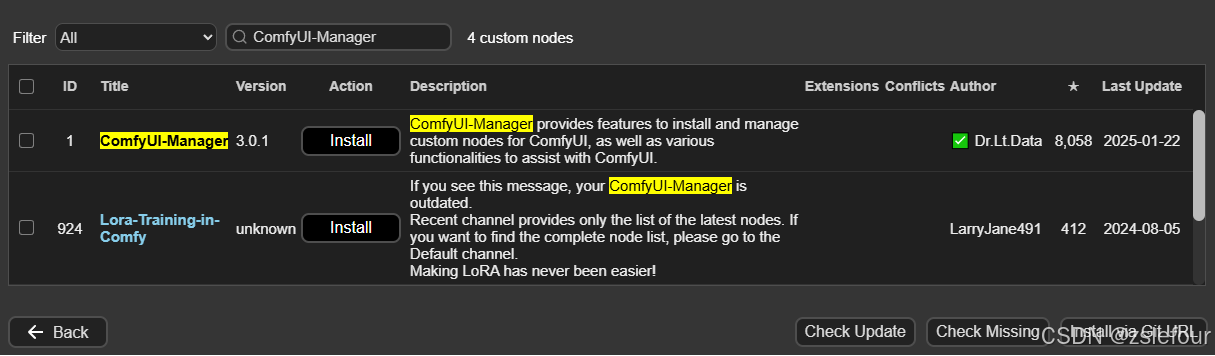
11、如何查找实现想要功能的插件
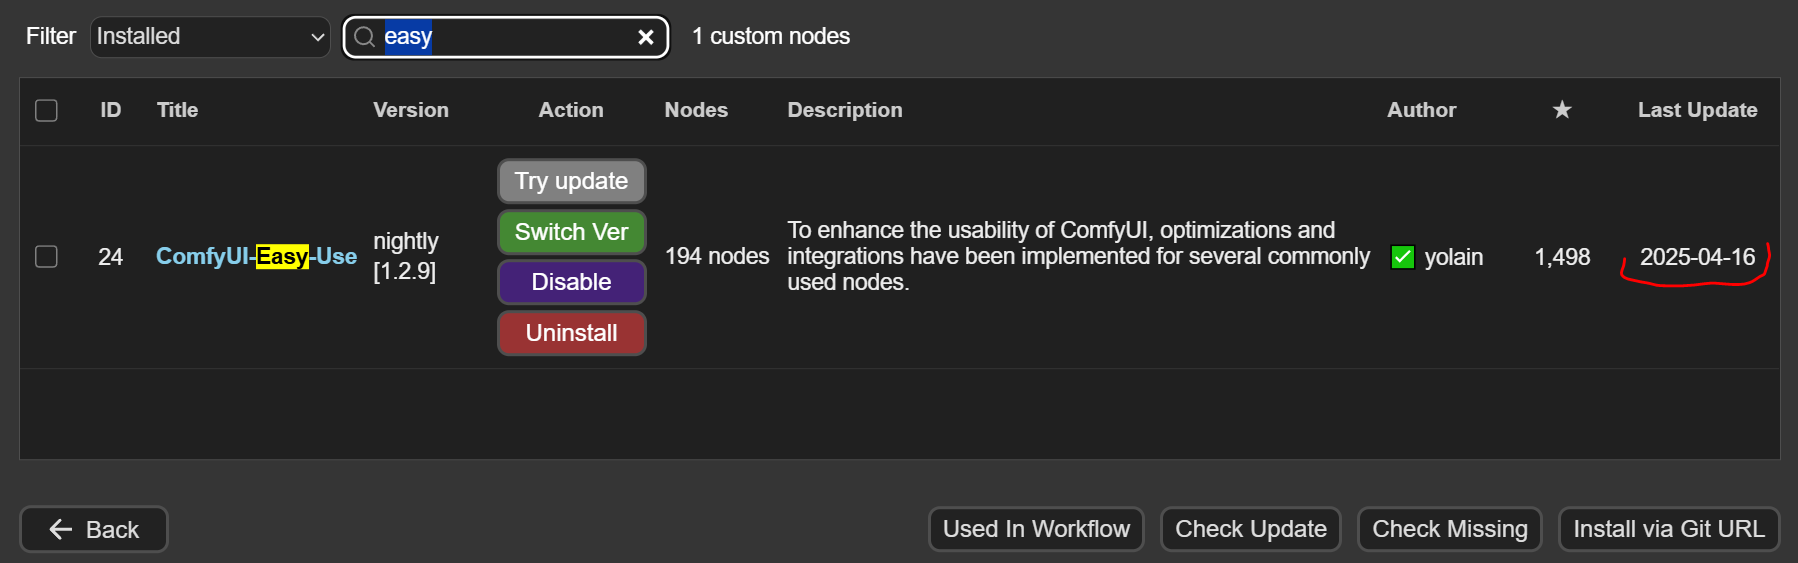
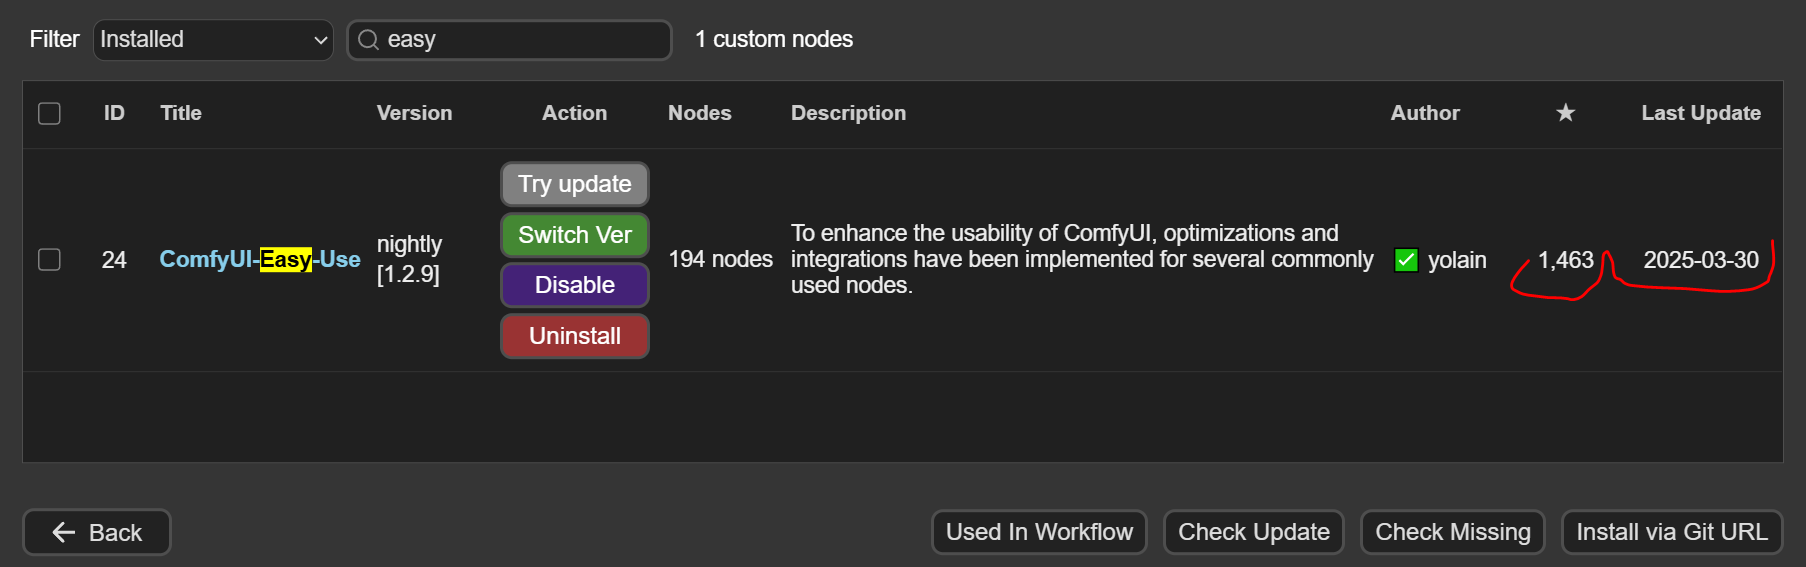
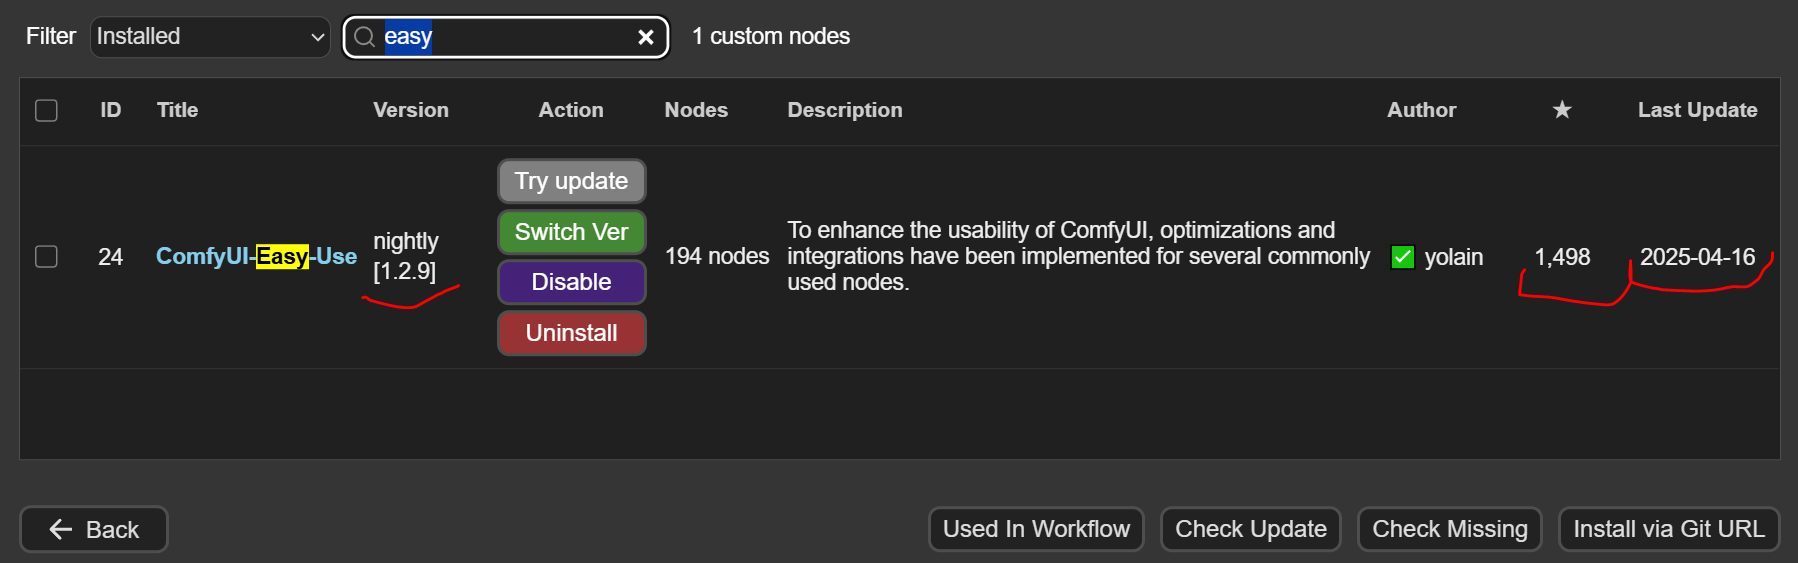
想要找个自动蒙板插件,所安装的插件里面也有很多自动蒙板的节点,但都不是十分满意,于是想要找个更符合自己想要的,用一般的搜索引擎去找,或在GitHub上搜,都是大海捞针,面对众多搜索的结果,也没那么多精力一一筛选,于是想到在comfyui-manager中搜索,应该要容易点,从更新日期、所获得的*,安装了comfyui-sapiens,符合自己要求:
再找个翻译插件,发现这个挺不错的。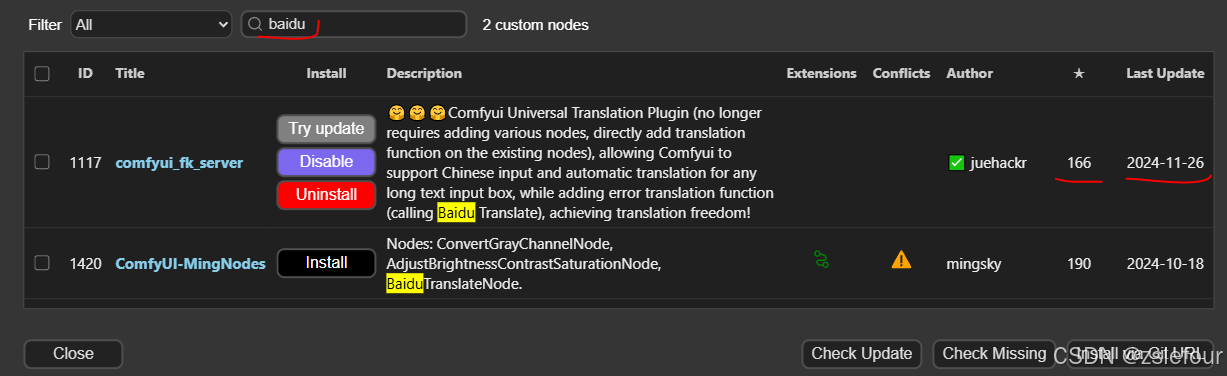
附注:Extensions(扩展) 信息要启动后过一段时间才会显示,里面包含该插件所有的节点名称信息。
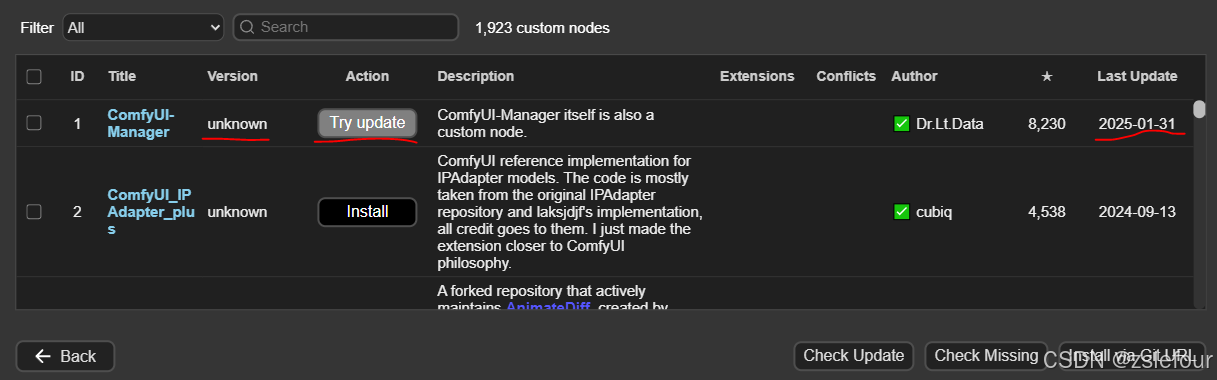
12、更新到 ComfyUI (0.3.12)、ComfyUI-Manager(3.9.2)后
不知道是否因为后台数据没有更新,导致安装的插件显示为未安装状态。
[ComfyUI-Manager] default cache updated: https://api.comfy.org/nodes
nightly_channel: https://raw.githubusercontent.com/ltdrdata/ComfyUI-Manager/main/remote
FETCH DATA from: https://raw.githubusercontent.com/ltdrdata/ComfyUI-Manager/main/custom-node-list.json [DONE]
刚装完,在没架梯子,不能连接网络更新数据时,ComfyUI-Manager显示版本为unknown,try update,连上网络后,就显示下面状态了。
点安装:
Starting server

To see the GUI go to: http://127.0.0.1:8188
[ComfyUI-Manager] default cache updated: https://raw.githubusercontent.com/ltdrdata/ComfyUI-Manager/main/model-list.json
[ComfyUI-Manager] default cache updated: https://raw.githubusercontent.com/ltdrdata/ComfyUI-Manager/main/custom-node-list.json
[ComfyUI-Manager] default cache updated: https://raw.githubusercontent.com/ltdrdata/ComfyUI-Manager/main/extension-node-map.json
[ComfyUI-Manager] default cache updated: https://raw.githubusercontent.com/ltdrdata/ComfyUI-Manager/main/alter-list.json
[ComfyUI-Manager] default cache updated: https://raw.githubusercontent.com/ltdrdata/ComfyUI-Manager/main/github-stats.json
FETCH DATA from: H:\ComfyUI_cp3.11.9\ComfyUI\custom_nodes\ComfyUI-Manager\extension-node-map.json [DONE]
FETCH ComfyRegistry Data: 5/31
FETCH ComfyRegistry Data: 10/31
FETCH ComfyRegistry Data: 15/31
FETCH ComfyRegistry Data: 20/31
FETCH ComfyRegistry Data: 25/31
FETCH ComfyRegistry Data: 30/31
FETCH ComfyRegistry Data [DONE]
[ComfyUI-Manager] default cache updated: https://api.comfy.org/nodes
nightly_channel: https://raw.githubusercontent.com/ltdrdata/ComfyUI-Manager/main/remote
FETCH DATA from: https://raw.githubusercontent.com/ltdrdata/ComfyUI-Manager/main/custom-node-list.json [DONE]
[ComfyUI-Manager] All startup tasks have been completed.
FETCH DATA from: H:\ComfyUI_cp3.11.9\ComfyUI\user\default\ComfyUI-Manager\cache\1742899825_extension-node-map.json [DONE]
[ComfyUI-Manager] The ComfyRegistry cache update is still in progress, so an outdated cache is being used.
nightly_channel: https://raw.githubusercontent.com/ltdrdata/ComfyUI-Manager/main/cache
FETCH DATA from: H:\ComfyUI_cp3.11.9\ComfyUI\user\default\ComfyUI-Manager\cache\1514988643_custom-node-list.json [DONE]
FETCH DATA from: H:\ComfyUI_cp3.11.9\ComfyUI\user\default\ComfyUI-Manager\cache\746607195_github-stats.json [DONE]
FETCH DATA from: https://raw.githubusercontent.com/ltdrdata/ComfyUI-Manager/main/extras.json [DONE]
FETCH DATA from: H:\ComfyUI_cp3.11.9\ComfyUI\user\default\ComfyUI-Manager\cache\1742899825_extension-node-map.json [DONE]
[ComfyUI-Manager] The ComfyRegistry cache update is still in progress, so an outdated cache is being used.
nightly_channel: https://raw.githubusercontent.com/ltdrdata/ComfyUI-Manager/main/cache
FETCH DATA from: H:\ComfyUI_cp3.11.9\ComfyUI\user\default\ComfyUI-Manager\cache\1514988643_custom-node-list.json [DONE]
FETCH DATA from: H:\ComfyUI_cp3.11.9\ComfyUI\user\default\ComfyUI-Manager\cache\746607195_github-stats.json [DONE]
FETCH DATA from: H:\ComfyUI_cp3.11.9\ComfyUI\user\default\ComfyUI-Manager\cache\832903789_extras.json [DONE]
在没架梯子,不能连接网络更新数据时,使用的是本地缓存数据:
连接网络更新数据后,节点数据更新了:
13、及时更新 Git 版本
最近使用 git clone 老是失败,在不用架梯子能流畅浏览GitHub的时段都一样失败,于是尝试升级 Git 软件版本,升级后 git clone 就十分流畅了。
在cmd窗口中使用下面命令可以升级,或者 Git 公司下载最新安装包也可以。
winget install --id Git.Git -e --source winget
14、更改 https://huggingface.co/ 为指向镜像地址 https://hf-mirror.com/
更改 main.py ,添加下面语句 os.environ["HF_ENDPOINT"] = "https://hf-mirror.com"
if __name__ == "__main__":
#NOTE: These do not do anything on core ComfyUI which should already have no communication with the internet, they are for custom nodes.
os.environ['HF_HUB_DISABLE_TELEMETRY'] = '1'
os.environ['DO_NOT_TRACK'] = '1'
os.environ['TF_ENABLE_ONEDNN_OPTS'] = '0'
os.environ["HF_ENDPOINT"] = "https://hf-mirror.com"
----------------------------------
会不定时补充我自己安装过的节点资料。


 7286
7286

 被折叠的 条评论
为什么被折叠?
被折叠的 条评论
为什么被折叠?
 到【灌水乐园】发言


