


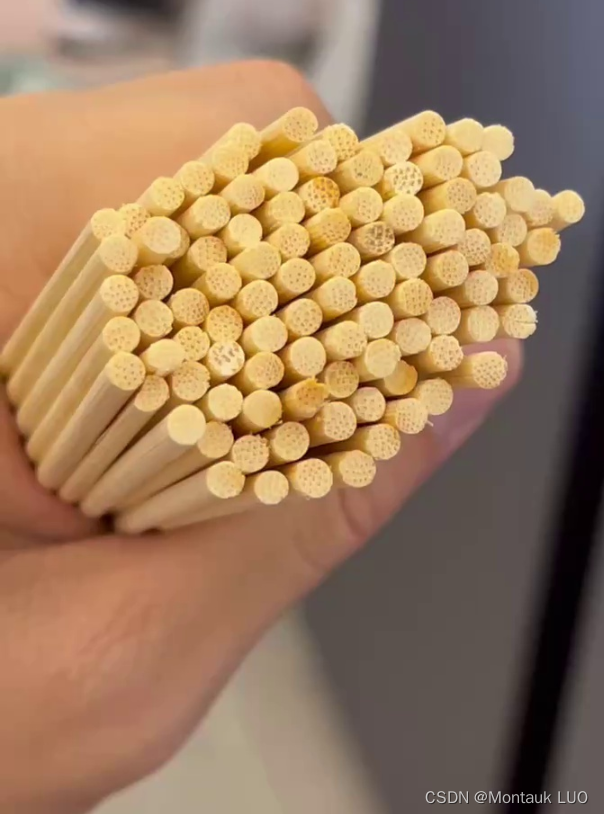
最近参加一个训练营, 项目是利用ai/cv来数串串香的竹签, 对视频中的竹签进行数数. 一句话就能说明白, 应用范围可以推广到数钢筋, 数芝麻, 数果子, 啥都行, 只要训练就行(ai方式)
首先这类应用有个专门APP干这个, 估计还不止一个, 效果那是罡罡的:
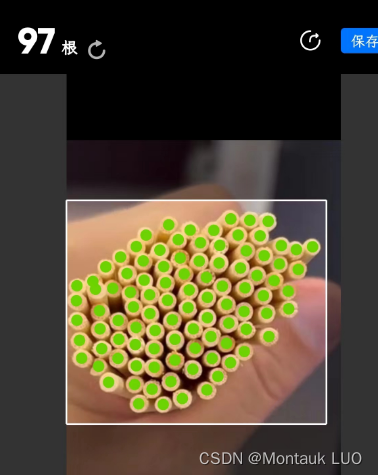
相当准确了.
但是要学习嘛, 拿来练练手, 挺好的.
首先思路有两个, 一个是经过群里做CV的这位同学指教的:

我粗糙的测试了一下
发现还是有希望的, 然后咣咣一通编码:
from copy import copy
import numpy as np
import cv2 as cv

# image_name ='1678589666478.png'
image_name = 'v2_384.jpg'

# 归并圆
def merge_circles(circles):
    # result = circles
    result = copy(circles)
    print("合并前圆的数量: " + str(len(circles)))
    result_index = []

    if len(circles) > 1:
        for result_idx in range(len(result)):

            # 拿出一个圆
            result_circle = result[result_idx]

            # 比较这个圆和result中的每个圆
            for origin_idx in range(result_idx + 1, len(result)):

                # 拿出另一个圆
                origin_circle = circles[origin_idx]

                # 计算两个圆的中心点距离
                distance = np.sqrt(np.square(result_circle[0] - origin_circle[0]) + np.square(result_circle[1] - origin_circle[1]))
                # 找到两个圆中半径更小的
                min_radius = min(result_circle[2], origin_circle[2])

                # 计算两个圆的半径差
                # radius_diff = np.abs(circle[2] - circle2[2])

                # 如果两个圆的中心点距离小于两个圆的半径差
                if distance < min_radius:
                    # 记录下来这个圆的索引
                    result_index.append(result_idx)
                    break

    # 打印result_index长度
    print("result_index长度: " + str(len(result_index)))

    # 去重
    result_index = list(set(result_index))

    # 去除重合的圆
    for i in range(len(result_index)):
        result = np.delete(result, result_index[i] - i, axis=0)

    # 打印合并前后的圆的数量
    print("合并后圆的数量: " + str(len(result)))

    return result

def display(unused):
    # img = cv.imread(image_name, cv.IMREAD_COLOR)
    # assert img is not None, "file could not be read, check with os.path.exists()"
    # # cv.imshow("original image", img)
    # cimg = cv.cvtColor(img, cv.COLOR_GRAY2BGR)

    cimg = cv.imread(image_name, cv.IMREAD_COLOR)
    assert cimg is not None, "file could not be read, check with os.path.exists()"
    dst = cv.pyrMeanShiftFiltering(cimg, 10, 100)
    # 边缘保留滤波EPF
    # cv.imshow('edge', dst)
    img = cv.cvtColor(dst, cv.COLOR_BGR2GRAY)

    img = cv.medianBlur(img, 3)
    pr2 = cv.getTrackbarPos('pr2', 'adjust')
    print("pr2: " + str(pr2))
    if pr2 == 0:
        pr2 = 27

    pr1 = cv.getTrackbarPos('pr1', 'adjust')
    print("pr1: " + str(pr1))
    if pr1 == 0:
        pr1 = 46

    repeat = cv.getTrackbarPos('repeat', 'adjust')

    circles = cv.HoughCircles(img, cv.HOUGH_GRADIENT, dp=1, minDist=20, param1=pr1, param2=pr2, minRadius=10, maxRadius=30)

    if circles is None:
        print("no circles")
    else:
        circles = np.uint16(np.around(circles))

        # circles = merge_circles(circles)
        circles = circles[0, :]

        # 打印圆的数量
        if repeat == 0:
            result_circles = circles
        else:
            result_circles = merge_circles(circles)
        # result_circles = circles

        cimg = cv.imread(image_name, cv.IMREAD_COLOR)
        for i in result_circles:
            # draw the outer circle
            cv.circle(cimg, (i[0], i[1]), i[2], (0, 255, 0), 2)
            # draw the center of the circle
            cv.circle(cimg, (i[0], i[1]), 2, (0, 0, 255), 3)

        # 显示圆的数量
        cv.putText(cimg, str(len(result_circles)), (10, 30), cv.FONT_HERSHEY_SIMPLEX, 1, (0, 255, 255), 2)
        cv.imshow('detected circles', cimg)


cv.namedWindow('adjust')
cv.createTrackbar('pr2', 'adjust', 0, 60, display)
cv.createTrackbar('pr1', 'adjust', 0, 120, display)
cv.createTrackbar('repeat', 'adjust', 0, 1, display)

display(0)

if cv.waitKey(0) == 27:
    cv.destroyAllWindows()
cv.destroyAllWindows()
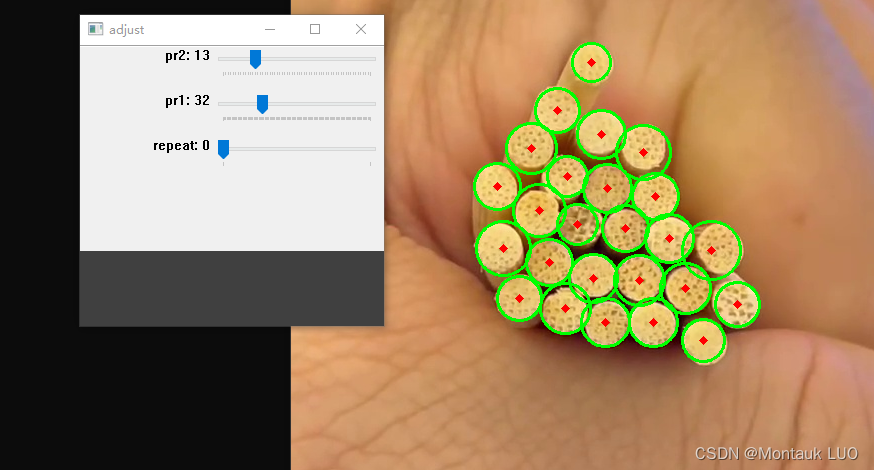
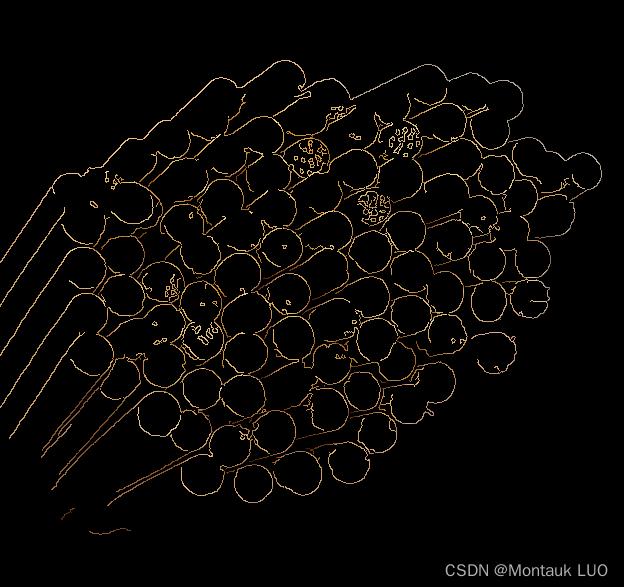
通过调整霍夫圆检测函数的pr2, p1, 看起来有戏. 最后归并的过程花了最多时间, 因为对python完全不熟, 不是不熟, 是完全小白, 在copilot的引导之下, 掉入坑里好几次.
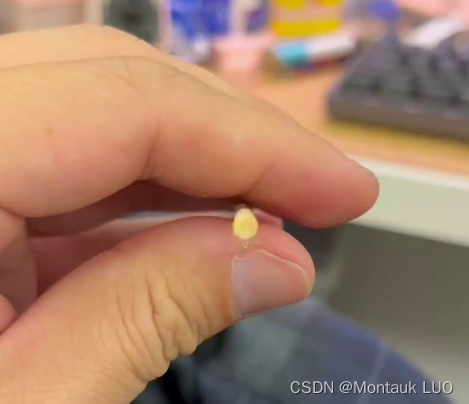
有了上面的图, 我对cv的方案有了一点信心, 最关键, 我看到到标注的难度…
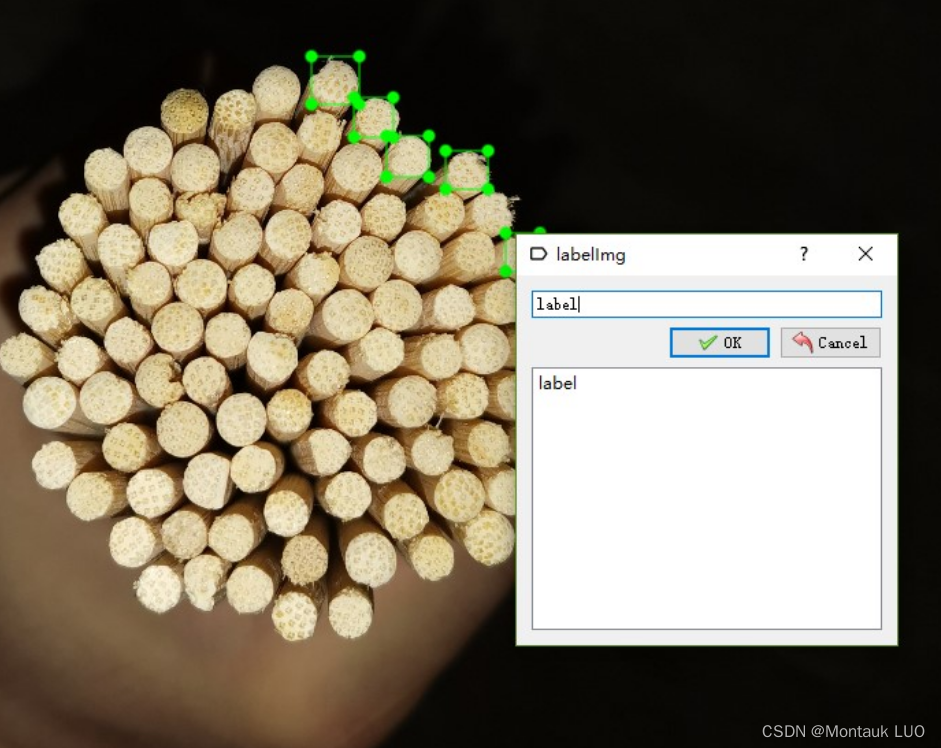
这一张图有100个棍子, 几百张图, 我标到啥时候?
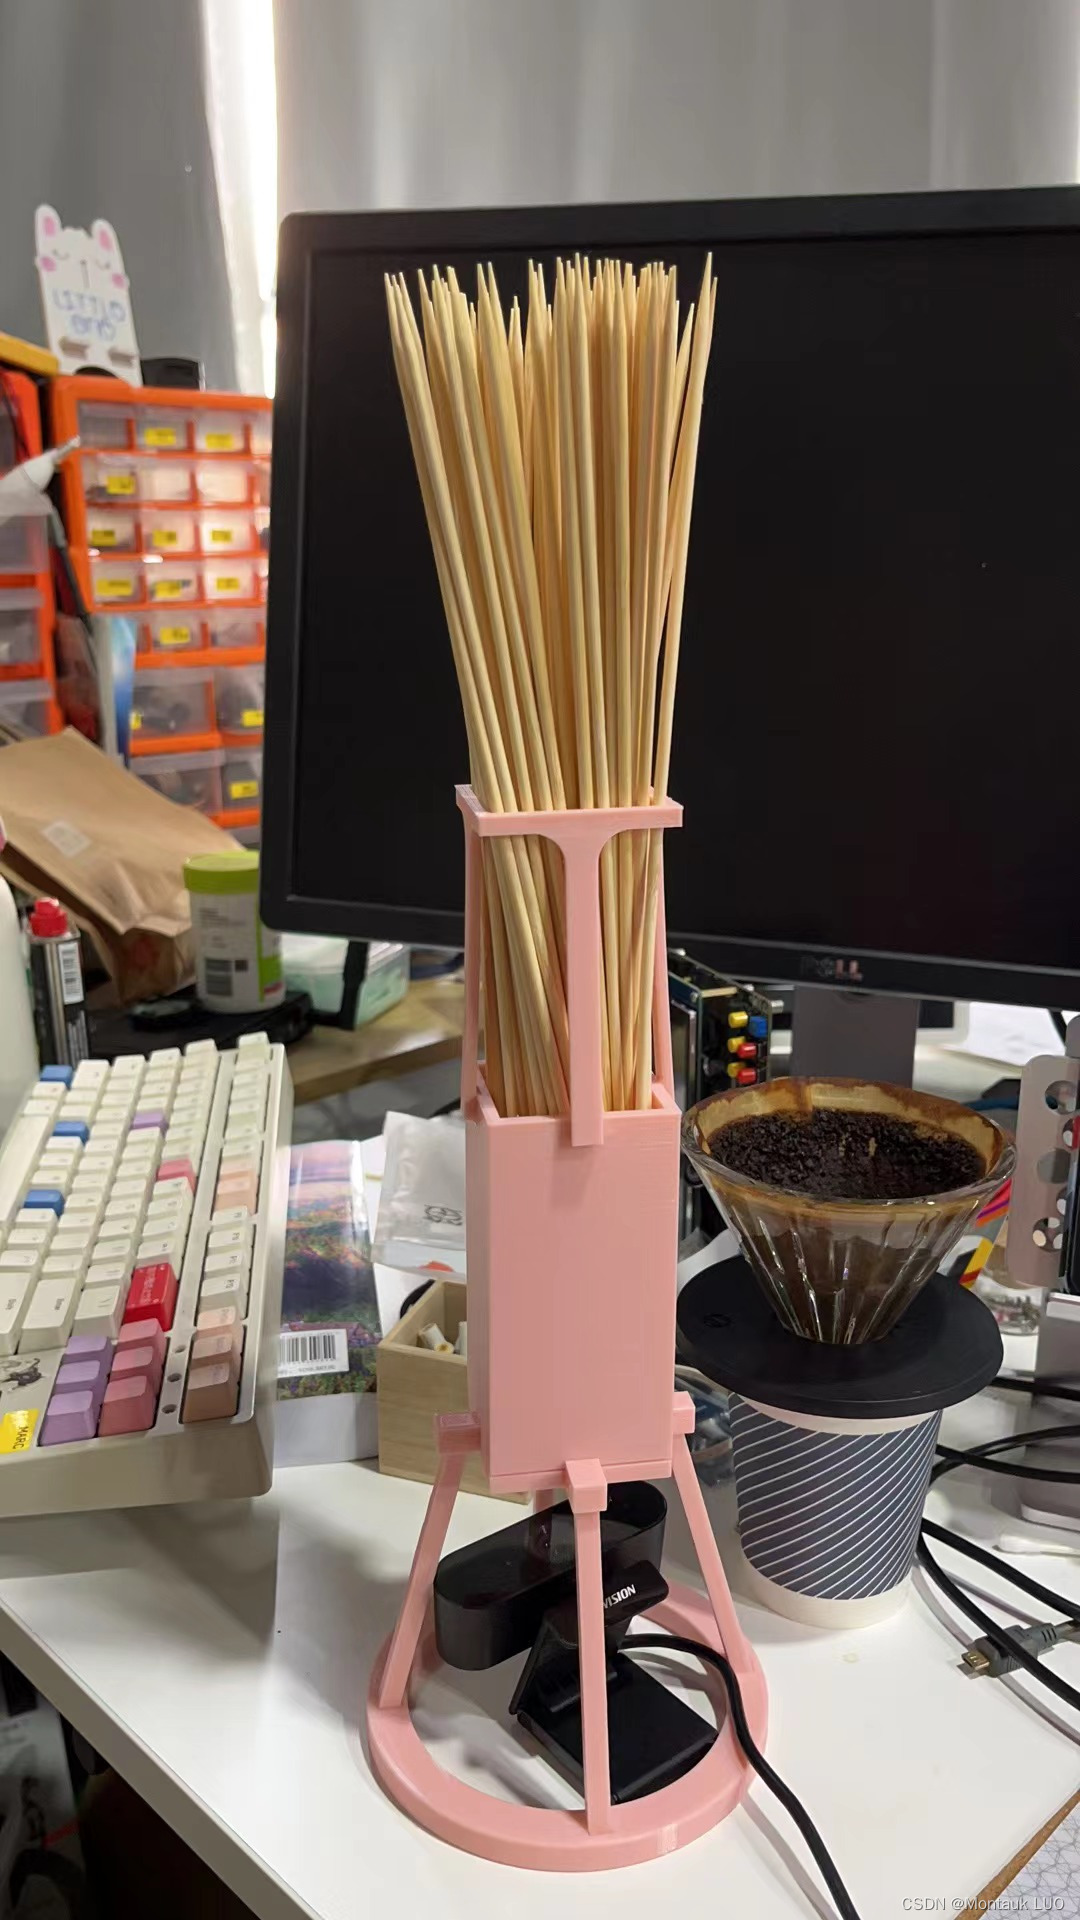
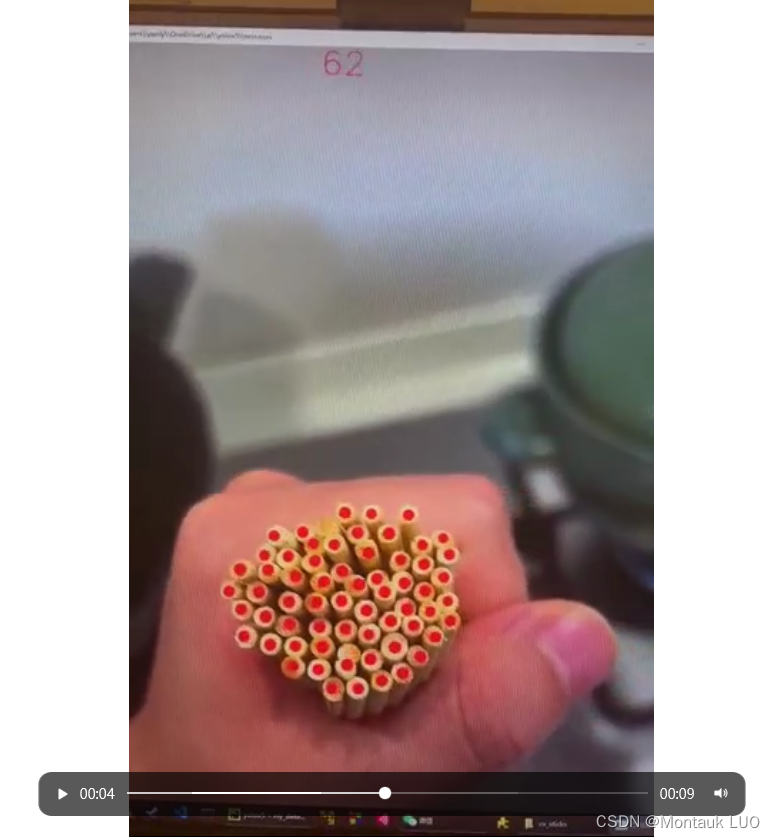
先试试cv的方案, 为此我专门还设计了一个放棍棍的盒子, 打算把摄像头放在下面, 往上拍照, 3D打印了出来:
结果出来的图片是这样的:
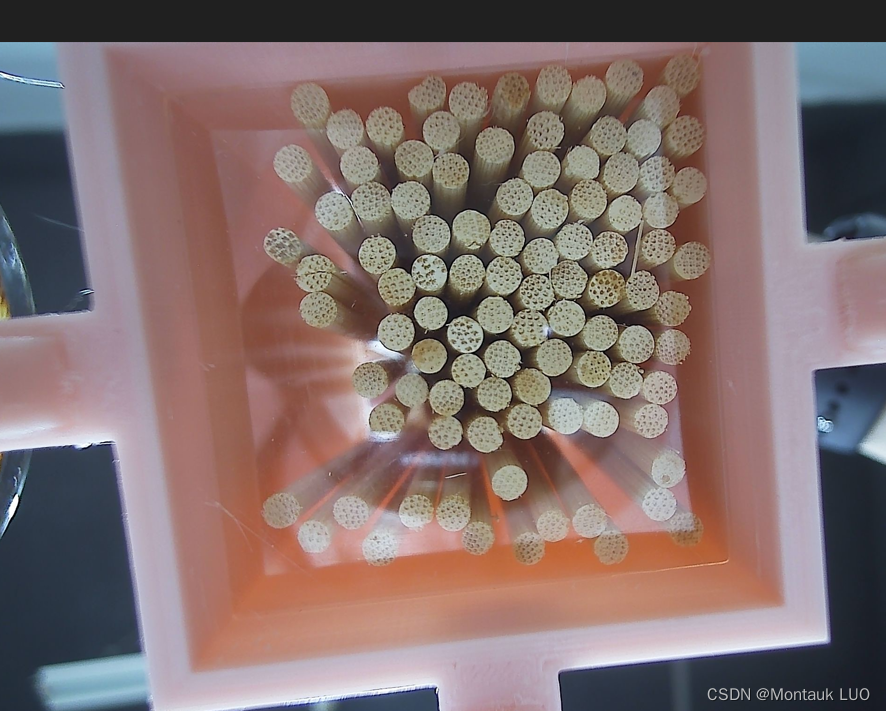
用cv七调八调, 都不对路.
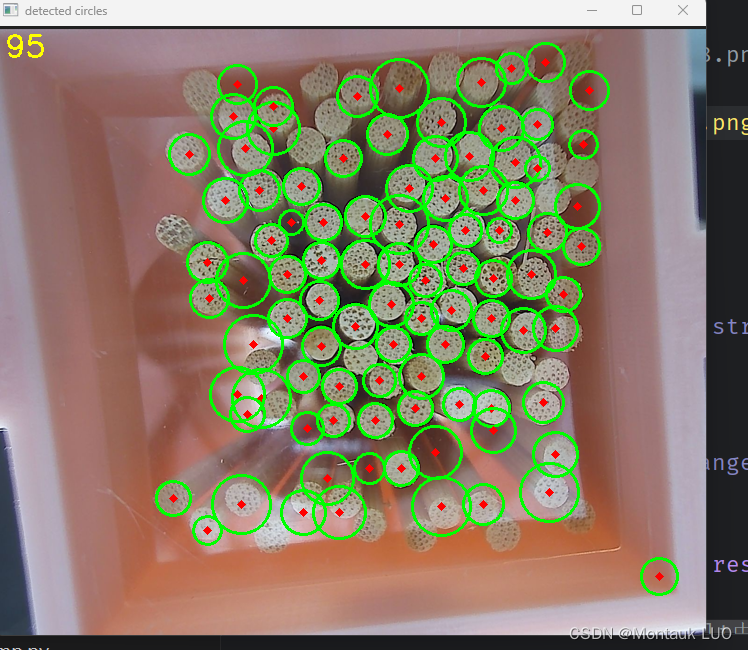
四周有些样本总是识别不了.
果断换方案, 其实yolo是我第一个尝试的方法, 把录像转成图片, 但是由于训练集图片选择的都是单一的竹签, 而且都失焦了, 所以yolo的效果太差, 一开始被放弃了.
这里是video到jpeg的python:
import cv2
# C:\Users\zunly\OneDrive\ai\datasets
# C:\Users\zunly\OneDrive\ai\cv_sticks
video_cap = cv2.VideoCapture('C:\\Users\\zunly\\OneDrive\\ai\\cv_sticks\\test_video.mov')
interval = 8

frame_count = 0

print("reading start")
while (True):
    ret, frame = video_cap.read()
    if ret is False:
        print("video end")
        break
    frame_count = frame_count + 1

    # 缩放frame
    frame = cv2.resize(frame, (1080, 1920))

    if frame_count % interval == 0:
        cv2.imwrite("C:\\Users\\zunly\\OneDrive\\ai\\cv_sticks\\test_image\\test_video_" + str(frame_count) + ".jpg", frame)
        print("save " + str(frame_count) + ".jpg")

print(frame_count)
后来我心想, 实在不行, 手搓一个简易标注的工具吧, 快速标记大量差不多大小的标签, 但是python怎么写图形化界面?? 原来labelImg就是用的qtpy, 是叫pyqt还是qtpy? what ever, 又是一通咣咣编码(搬砖)
#!/usr/bin/python3
# -*- coding: utf-8 -*-

"""
ZetCode PyQt5 tutorial

In this example, we dispay an image
on the window.

Author: Jan Bodnar
Website: zetcode.com
Last edited: August 2017
"""
from PyQt5.QtGui import QIntValidator, QPen, QPainter
from PyQt5.QtWidgets import (QWidget, QLineEdit, QHBoxLayout,
                             QPushButton, QVBoxLayout, QLabel,
                             QApplication)
from PyQt5.QtGui import QPixmap
from PyQt5.QtCore import *
from PyQt5.QtWidgets import *
import sys

top_padding = 10
left_padding = 10

pic_file_name = "test_video_568."
label_file_name = pic_file_name + "txt"


def check_if_already_marked(x, y):
    print(x, y)


class EasyLabelResult():
    def __init__(self, point_x=0.0, point_y=0.0, label_box_size=0.0,
                 image_width=0.0, image_height=0.0,
                 box_x=0, box_y=0, box_size=0
                 ):
        self.x = 0.0
        self.y = 0.0
        self.width = 0.0
        self.height = 0.0

        self.x = round(float(point_x / image_width), 6)
        self.y = round(float(point_y / image_height), 6)
        self.width = round(label_box_size / image_width, 6)
        self.height = round(label_box_size / image_height, 6)

        self.box_x = box_x
        self.box_y = box_y
        self.box_size = box_size

        str_result = "0 " + str(self.x) + " " + str(self.y) + " " + str(self.width) + " " + str(self.height)
        print(str_result)
        # print("x:" + str(self.x) + " y:" + str(self.y) + " width:" + str(self.width) + " height:" + str(self.height))


class Example(QWidget):
    # 记录标注框的大小
    label_box_size = 60
    label_boxes = []

    def __init__(self):
        super().__init__()

        self.label_box_size_text = None
        self.initUI()

    def initUI(self):
        # 创建水平布局
        hbox = QHBoxLayout()

        # 创建一个QLabel,用来显示图片。
        self.pixmap = QPixmap(pic_file_name + "jpg")
        self.image_width = self.pixmap.width()
        self.image_height = self.pixmap.height()
        print("picture height:" + str(self.pixmap.height()) + " width:" + str(self.pixmap.width()))

        self.pen = QPen(Qt.black, 2, Qt.SolidLine)
        self.painton = True

        # 创建两个按钮。
        initButton = QPushButton("重头来")
        undoButton = QPushButton("回退")
        saveButton = QPushButton("Save")

        # 连接信号和槽。
        initButton.clicked.connect(self.initBtnClicked)
        undoButton.clicked.connect(self.undoBtnClicked)
        saveButton.clicked.connect(self.saveBtnClicked)

        # 输入框
        qle = QLineEdit(str(self.label_box_size))
        qle.textChanged[str].connect(self.onLineEditChanged)
        # 限制为数字
        qle.setValidator(QIntValidator())

        self.image_lbl = QLabel()
        self.image_lbl.setPixmap(self.pixmap)
        self.pen = QPen(Qt.green, 3, Qt.SolidLine)

        # 用xy坐标初始化label。
        self.text = "标注尺寸为" + str(self.label_box_size)
        self.label = QLabel(self.text, self)

        self.label_box_size_text = "已经标注了" + str(len(self.label_boxes)) + "个"
        self.label_box_size_label = QLabel(self.label_box_size_text, self)

        vbox = QVBoxLayout()
        # vbox.addWidget(lbl)
        vbox.addWidget(self.label)
        vbox.addWidget(self.label_box_size_label)
        vbox.addWidget(qle)
        vbox.addWidget(initButton)
        vbox.addWidget(undoButton)
        vbox.addWidget(saveButton)
        vbox.addStretch(1)

        # 添加图片label
        hbox.addWidget(self.image_lbl)

        # 添加垂直布局
        hbox.addLayout(vbox)

        self.setLayout(hbox)

        self.move(200, 50)
        self.setWindowTitle('快速标签工具')
        self.show()

    def undoBtnClicked(self):
        if len(self.label_boxes) > 0:
            print('undoBtnClicked')
            self.label_boxes.pop()
            self.draw_all_label_box()

    def initBtnClicked(self):
        print('initBtnClicked')
        self.label_boxes.clear()

    def saveBtnClicked(self):
        print('saving to file: ' + label_file_name)
        fo = open(label_file_name, "w")
        for label_box in self.label_boxes:
            fo.write("0 " + str(label_box.x) + " " + str(label_box.y) + " " + str(label_box.width) + " " + str(
                label_box.height) + "\n")
        fo.close()

    def mouseReleaseEvent(self, event):
        # print(event.pos().x(), event.pos().y())
        point_x = event.pos().x() - top_padding
        point_y = event.pos().y() - left_padding
        if top_padding < point_x and left_padding < point_y:
            easy_label_result = EasyLabelResult(point_x, point_y, self.label_box_size,
                                                self.image_width, self.image_height,
                                                int(point_x - self.label_box_size / 2),
                                                int(point_y - self.label_box_size / 2),
                                                self.label_box_size
                                                )

            self.label_boxes.append(easy_label_result)

            self.label_box_size_label.setText("已经标注了" + str(len(self.label_boxes)) + "个")

            # 绘制标注框
            self.draw_all_label_box()

    # 根据列表内容绘制所有的标注框
    def draw_all_label_box(self):
        self.pixmap = QPixmap(pic_file_name + "jpg")
        painter = QPainter(self.pixmap)
        painter.setPen(self.pen)
        for label_box in self.label_boxes:
            painter.drawRect(QRect(label_box.box_x, label_box.box_y,
                                   label_box.box_size, label_box.box_size))
        self.image_lbl.setPixmap(self.pixmap)

    def onLineEditChanged(self, text):
        self.label.setText("标注尺寸为: " + text + " x " + text)
        self.label.adjustSize()
        self.label_box_size = int(text)


if __name__ == '__main__':
    app = QApplication(sys.argv)
    ex = Example()
    sys.exit(app.exec_())

# x1 = float(point_x - self.label_box_size / 2)
# y1 = float(point_y - self.label_box_size / 2)
# print(round(x1 / float(self.image_width), 6))
# print(round(y1 / float(self.image_height), 6))
#
# x2 = float(point_x + self.label_box_size / 2)
# y2 = float(point_y + self.label_box_size / 2)
# print(round(x2 / self.image_width, 6))
# print(round(y2 / self.image_height, 6))

# check_if_already_marked(point_x, point_y)

# 打印label_box_size的类型
# print(type(self.label_box_size))
# print("box x:" + str(point_x - self.label_box_size))

# print(self.label_box_size.type)
# print("box x:" + (point_x - self.label_box_size))
# print("box y:" + (point_y - self.label_box_size))
界面是这样的:
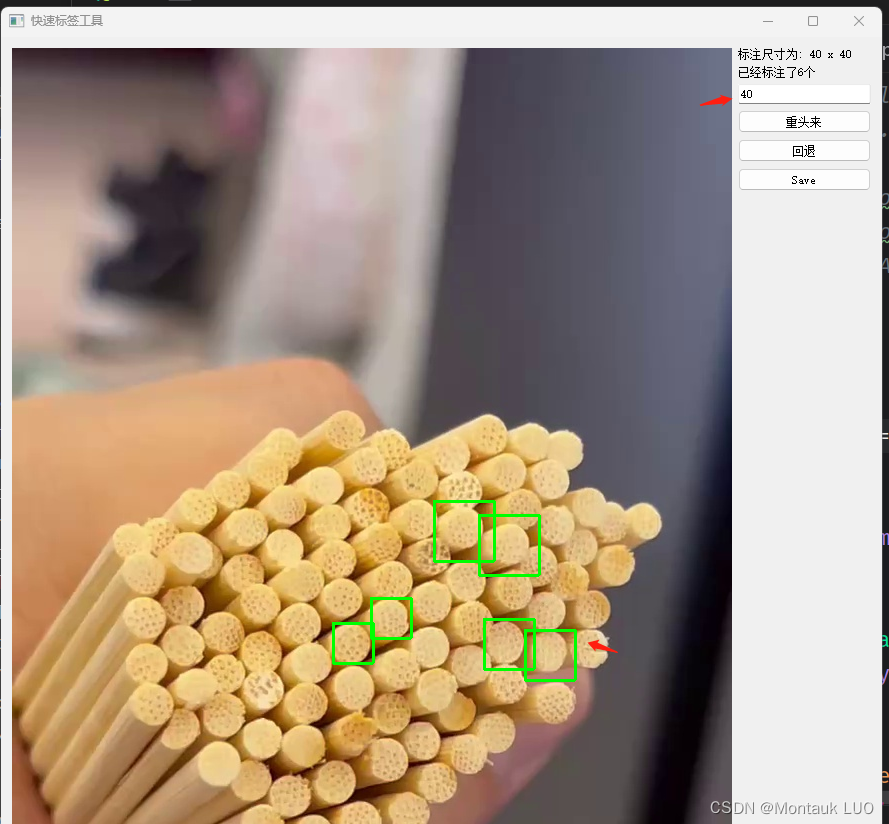
可以输入标注框的大小, 然后只需要在样本中间狂点就好了. 点save就生成一个yolo可以使用的txt文件.
0 0.169444 0.496875 0.055556 0.055556
即
标签:0 x:0.169444 y:0.496875 width:0.055556 height:0.055556
然后导回labelImage查看了一下, 没错:
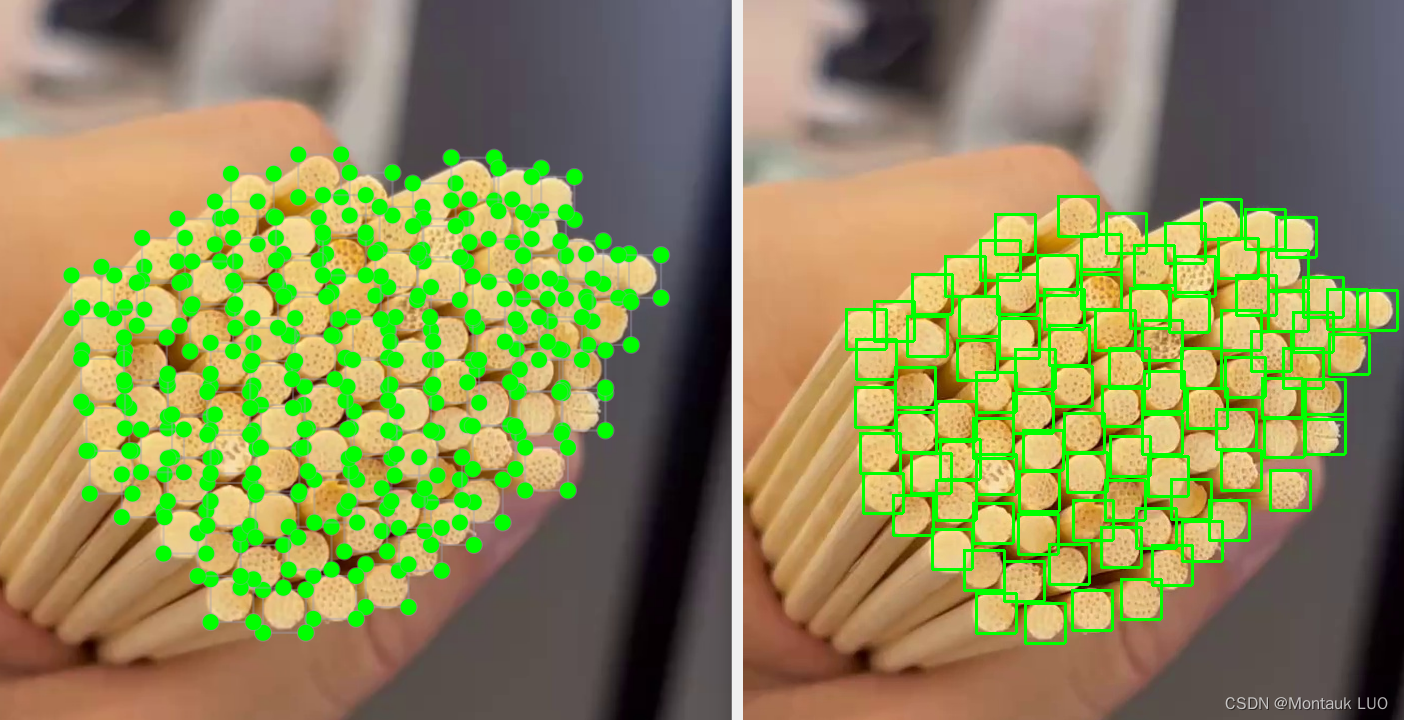
右边是我标注的, 左边是导入到labelImage的结果, 既然labelImage能识别, yolo应该就可以用了.
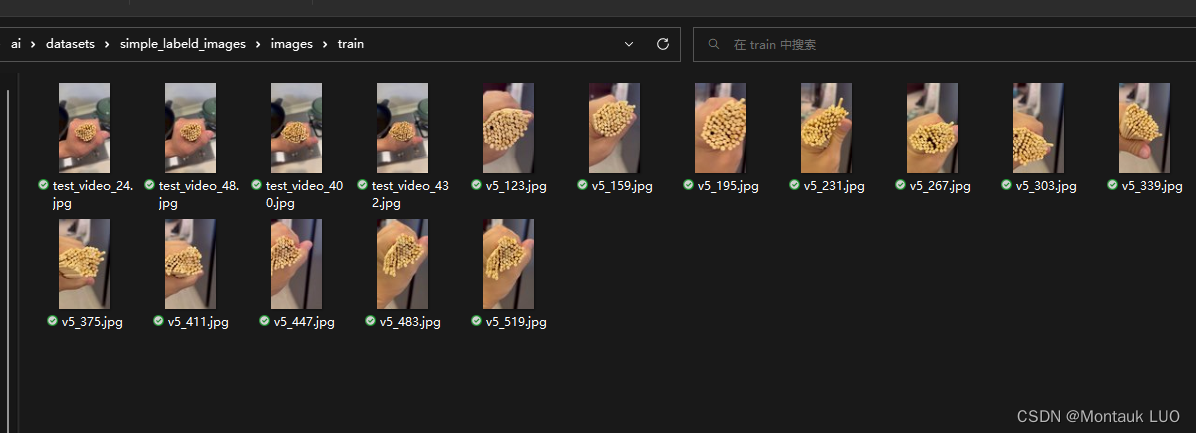
利用午休的1个小时, 标注了大概20多张图片, 每个图片100个标签, 大概2000多个标签, 应该够了.
另外我还作弊了, 利用了测试video导出的图片…
放到autodl上训练, 仅仅20多分钟, 好像300, 400轮就结束了, 能用么?

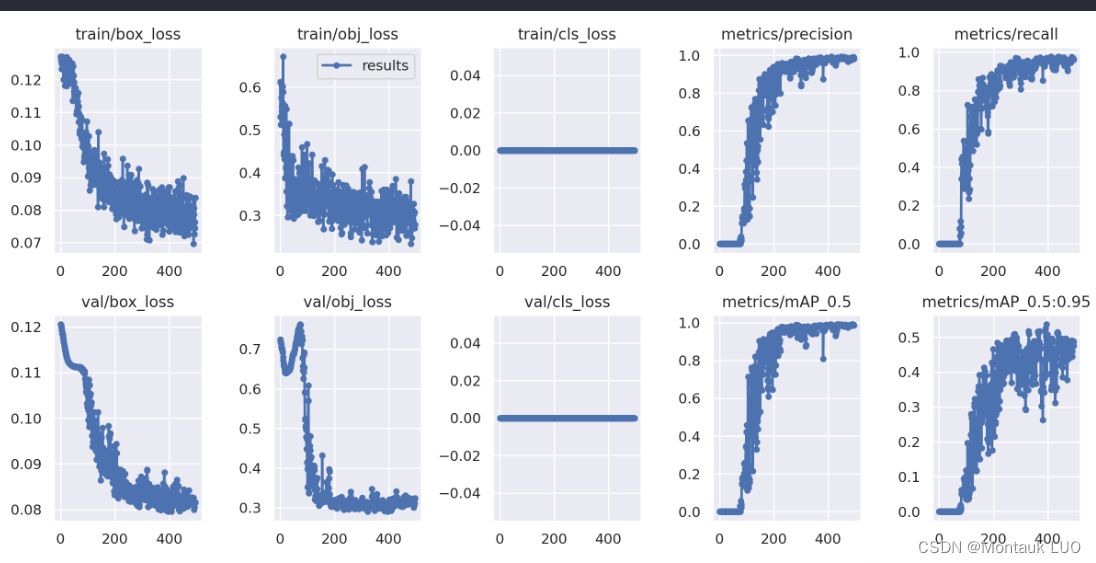
简单测试了一张图, 看来是ok的.
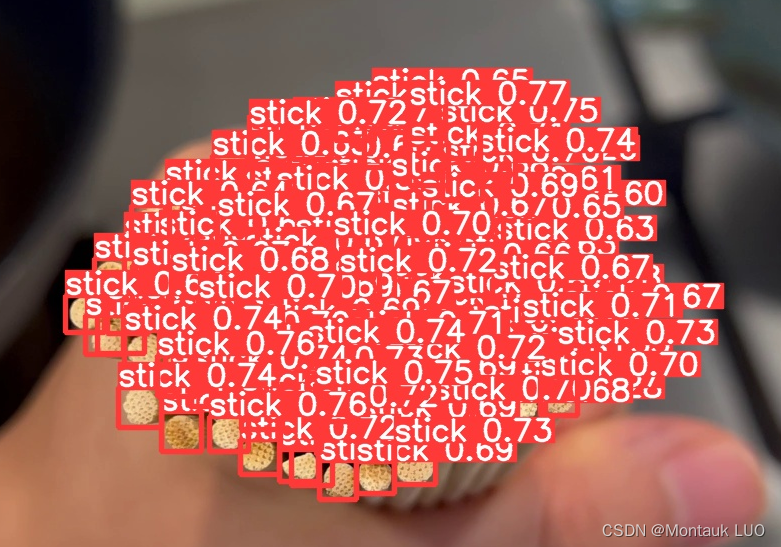
这个是对最终的视频进行连续检测的结果:
代码放下面了:
import argparse
import os
import platform
import sys
from pathlib import Path

import torch

FILE = Path(__file__).resolve()
ROOT = FILE.parents[0]  # YOLOv5 root directory
if str(ROOT) not in sys.path:
    sys.path.append(str(ROOT))  # add ROOT to PATH
ROOT = Path(os.path.relpath(ROOT, Path.cwd()))  # relative

from models.common import DetectMultiBackend
from utils.dataloaders import IMG_FORMATS, VID_FORMATS, LoadImages, LoadScreenshots, LoadStreams
from utils.general import (LOGGER, Profile, check_file, check_img_size, check_imshow, check_requirements, colorstr, cv2,
                           increment_path, non_max_suppression, print_args, scale_boxes, strip_optimizer, xyxy2xywh)
from utils.plots import Annotator, colors, save_one_box
from utils.torch_utils import select_device, smart_inference_mode

# 推理开始
# source = "test_video_504.jpg"
# source = "test.mov"
source = "t1.jpg"
# save_img = not nosave and not source.endswith('.txt')  # save inference images
is_file = Path(source).suffix[1:] in (IMG_FORMATS + VID_FORMATS)
# is_url = source.lower().startswith(('rtsp://', 'rtmp://', 'http://', 'https://'))
# webcam = source.isnumeric() or source.endswith('.streams') or (is_url and not is_file)
screenshot = source.lower().startswith('screen')
# if is_url and is_file:
# source = check_file(source)  # download

# Directories
save_dir = increment_path(Path(ROOT / 'runs/detect') / 'exp', exist_ok=False)  # increment run
(save_dir / 'labels' if False else save_dir).mkdir(parents=True, exist_ok=True)  # make dir

# Load model
# 自行选择GPU/CPU
device = select_device()
weights = "best.pt"
model = DetectMultiBackend(weights, device=device, dnn=False, data=ROOT / 'data/coco128.yaml', fp16=False)
stride, names, pt = model.stride, model.names, model.pt
imgsz = check_img_size((640, 640), s=stride)  # check image size
webcam = False
screenshot = False
visualize = False
# Dataloader
bs = 1  # batch_size
if webcam:
    view_img = check_imshow(warn=True)
    dataset = LoadStreams(source, img_size=imgsz, stride=stride, auto=pt, vid_stride=1)
    bs = len(dataset)
elif screenshot:
    dataset = LoadScreenshots(source, img_size=imgsz, stride=stride, auto=pt)
else:
    # 视频帧间隔为1(默认)
    dataset = LoadImages(source, img_size=imgsz, stride=stride, auto=pt, vid_stride=1)

vid_path, vid_writer = [None] * bs, [None] * bs

# Run inference
model.warmup(imgsz=(1 if pt or model.triton else bs, 3, *imgsz))  # warmup
seen, windows, dt = 0, [], (Profile(), Profile(), Profile())

# 置信度阈值暂定为0.4
conf_thres = 0.4
# 越高重复的越多
iou_thres = 0.35

# conf_thres = 0.4
# iou_thres = 0.45

for path, im, im0s, vid_cap, s in dataset:
    with dt[0]:
        im = torch.from_numpy(im).to(model.device)
        im = im.half() if model.fp16 else im.float()  # uint8 to fp16/32
        im /= 255  # 0 - 255 to 0.0 - 1.0
        if len(im.shape) == 3:
            im = im[None]  # expand for batch dim

    # Inference
    with dt[1]:
        visualize = increment_path(save_dir / Path(path).stem, mkdir=True) if visualize else False
        pred = model(im, augment=False, visualize=visualize)

    # NMS
    with dt[2]:
        pred = non_max_suppression(pred, conf_thres, iou_thres, None, False, max_det=200)

    # Second-stage classifier (optional)
    # pred = utils.general.apply_classifier(pred, classifier_model, im, im0s)

    # Process predictions
    for i, det in enumerate(pred):  # per image
        seen += 1
        if webcam:  # batch_size >= 1
            p, im0, frame = path[i], im0s[i].copy(), dataset.count
            s += f'{i}: '
        else:
            p, im0, frame = path, im0s.copy(), getattr(dataset, 'frame', 0)

        p = Path(p)  # to Path
        save_path = str(save_dir / p.name)  # im.jpg
        txt_path = str(save_dir / 'labels' / p.stem) + ('' if dataset.mode == 'image' else f'_{frame}')  # im.txt
        s += '%gx%g ' % im.shape[2:]  # print string
        gn = torch.tensor(im0.shape)[[1, 0, 1, 0]]  # normalization gain whwh
        save_crop = False
        imc = im0.copy() if save_crop else im0  # for save_crop
        line_thickness = 2
        annotator = Annotator(im0, line_width=line_thickness, example=str(names))
        if len(det):
            # Rescale boxes from img_size to im0 size
            det[:, :4] = scale_boxes(im.shape[2:], det[:, :4], im0.shape).round()

            # Print results
            for c in det[:, 5].unique():
                n = (det[:, 5] == c).sum()  # detections per class
                s += f"{n} {names[int(c)]}{'s' * (n > 1)}, "  # add to string

            # Write results
            for *xyxy, conf, cls in reversed(det):
                save_txt = False
                if save_txt:  # Write to file
                    xywh = (xyxy2xywh(torch.tensor(xyxy).view(1, 4)) / gn).view(-1).tolist()  # normalized xywh
                    save_conf = False
                    line = (cls, *xywh, conf) if save_conf else (cls, *xywh)  # label format
                    with open(f'{txt_path}.txt', 'a') as f:
                        f.write(('%g ' * len(line)).rstrip() % line + '\n')
                save_img = False
                view_img = True
                hide_labels = True
                hide_conf = True
                if save_img or save_crop or view_img:  # Add bbox to image
                    c = int(cls)  # integer class
                    label = None if hide_labels else (names[c] if hide_conf else f'{names[c]} {conf:.2f}')
                    annotator.box_label(xyxy, label, color=colors(c, True))
                if save_crop:
                    save_one_box(xyxy, imc, file=save_dir / 'crops' / names[c] / f'{p.stem}.jpg', BGR=True)

        # Stream results
        im0 = annotator.result()
        if view_img:
            if platform.system() == 'Linux' and p not in windows:
                windows.append(p)
                cv2.namedWindow(str(p), cv2.WINDOW_NORMAL | cv2.WINDOW_KEEPRATIO)  # allow window resize (Linux)
                cv2.resizeWindow(str(p), im0.shape[1], im0.shape[0])

            # 打印图片尺寸
            print(im0.shape[1], im0.shape[0])
            # 缩小图片尺寸方便显示
            im0 = cv2.resize(im0, ((int)(im0.shape[1] / 2), (int)(im0.shape[0] / 2)))

            # 显示发现的目标数量
            cv2.putText(im0, str(len(det)), (400, 50), cv2.FONT_HERSHEY_SIMPLEX, 2, (0, 0, 255), 2)

            cv2.imshow(str(p), im0)
            # cv2.waitKey(1)  # 1 millisecond
            cv2.waitKey(0)  # 等待按键

    # Save results (image with detections)
    if save_img:
        if dataset.mode == 'image':
            cv2.imwrite(save_path, im0)
        else:  # 'video' or 'stream'
            if vid_path[i] != save_path:  # new video
                vid_path[i] = save_path
                if isinstance(vid_writer[i], cv2.VideoWriter):
                    vid_writer[i].release()  # release previous video writer
                if vid_cap:  # video
                    fps = vid_cap.get(cv2.CAP_PROP_FPS)
                    w = int(vid_cap.get(cv2.CAP_PROP_FRAME_WIDTH))
                    h = int(vid_cap.get(cv2.CAP_PROP_FRAME_HEIGHT))
                else:  # stream
                    fps, w, h = 30, im0.shape[1], im0.shape[0]
                save_path = str(Path(save_path).with_suffix('.mp4'))  # force *.mp4 suffix on results videos
                vid_writer[i] = cv2.VideoWriter(save_path, cv2.VideoWriter_fourcc(*'mp4v'), fps, (w, h))
            vid_writer[i].write(im0)

# Print time (inference-only)
LOGGER.info(f"{s}{'' if len(det) else '(no detections), '}{dt[1].dt * 1E3:.1f}ms")

# Print results
t = tuple(x.t / seen * 1E3 for x in dt)  # speeds per image
LOGGER.info(f'Speed: %.1fms pre-process, %.1fms inference, %.1fms NMS per image at shape {(1, 3, *imgsz)}' % t)
if save_txt or save_img:
    s = f"\n{len(list(save_dir.glob('labels/*.txt')))} labels saved to {save_dir / 'labels'}" if save_txt else ''
    LOGGER.info(f"Results saved to {colorstr('bold', save_dir)}{s}")

update = False

if update:
    strip_optimizer(weights[0])  # update model (to fix SourceChangeWarning)


 3256
3256

 被折叠的 条评论
为什么被折叠?
被折叠的 条评论
为什么被折叠?
 到【灌水乐园】发言


