


主要参考:
图像样本增广,yoloV5扩展
Albumentation库 bbox使用案例代码
【YOLOV5-5.x 源码解读】general.py
这里写目录标题
albumentation
官方文档:
https://albumentations.ai/docs/#getting-started-with-albumentations
或移步我之前的文章
标注框(真实框、bbox)格式
具体转换可以我之前的文章 基础学习 3_YOLO、VOC的数据格式转换
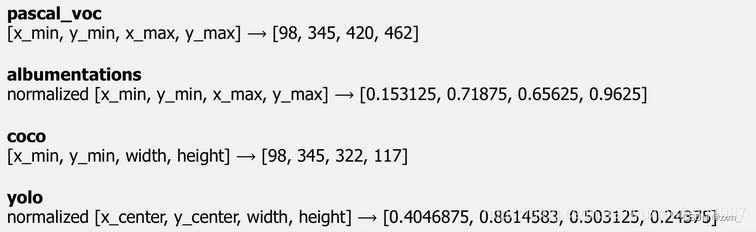
标注框随数据增强进行修改
关键代码:
Compose(aug, # aug为操作组合 本文中 aug=[VerticalFlip(p=1)]
augmented = aug(**annotations)
	bbox_params={
	'format': 'pascal_voc',
	'min_area': min_area,
	'min_visibility': min_visibility,
	'label_fields': ['category_id']}
)
minu area和minu visibility参数控制图片在增强后大小发生变化时应该对增强的边界框执行的操作。如果应用空间增强(例如,裁剪图像的一部分或调整图像大小),边界框的大小可能会更改
minu area是以像素为单位的值。如果增强后标注框的面积小于最小面积,则Albumentations将删除该框(返回的扩展边界框列表将不包含标注框)
minu visibility是介于0和1之间的值。如果增强后的标注框面积与增强前的标注框面积之比小于最小可见性,则Albumentations将删除该框。(如果增强过程剪切了某个标注框的大部分位置,那么该框将不会出现在返回的标注框列表中)
label_fields=[‘class_labels’, ‘class_categories’]
class_labels 一个类别中的细分,例如class_categories 是动物,class_labels 则可以是狗、猫、牛等
完整代码如下:
xywh2xyxy.py(VOC、YOLO格式转换)
这部分是从Yolov5官方开源的代码中 截取一部分出来的
import cv2
import numpy as np
import pandas as pd
import pkg_resources as pkg
import torch
import torchvision
import yaml


def clip_coords(boxes, shape):
    # Clip bounding xyxy bounding boxes to image shape (height, width)
    '''
    将boxes的坐标(x1y1x2y2左上角右下角)限定在图像的尺寸(img_shapehw)内,防止出界。
    这个函数会用在下面的xyxy2xywhn、save_one_boxd等函数中,很重要,必须掌握
    '''
    if isinstance(boxes, torch.Tensor):  # faster individually
        boxes[:, 0].clamp_(0, shape[1])  # x1
        boxes[:, 1].clamp_(0, shape[0])  # y1
        boxes[:, 2].clamp_(0, shape[1])  # x2
        boxes[:, 3].clamp_(0, shape[0])  # y2
    else:  # np.array (faster grouped)
        boxes[:, [0, 2]] = boxes[:, [0, 2]].clip(0, shape[1])  # x1, x2
        boxes[:, [1, 3]] = boxes[:, [1, 3]].clip(0, shape[0])  # y1, y2


def xyxy2xywh(x):
    # Convert nx4 boxes from [x1, y1, x2, y2] to [x, y, w, h] where xy1=top-left, xy2=bottom-right
    y = x.clone() if isinstance(x, torch.Tensor) else np.copy(x)
    y[:, 0] = (x[:, 0] + x[:, 2]) / 2  # x center
    y[:, 1] = (x[:, 1] + x[:, 3]) / 2  # y center
    y[:, 2] = x[:, 2] - x[:, 0]  # width
    y[:, 3] = x[:, 3] - x[:, 1]  # height
    return y


def xywh2xyxy(x):
    # Convert nx4 boxes from [x, y, w, h] to [x1, y1, x2, y2] where xy1=top-left, xy2=bottom-right
    y = x.clone() if isinstance(x, torch.Tensor) else np.copy(x)
    y[:, 0] = x[:, 0] - x[:, 2] / 2  # top left x
    y[:, 1] = x[:, 1] - x[:, 3] / 2  # top left y
    y[:, 2] = x[:, 0] + x[:, 2] / 2  # bottom right x
    y[:, 3] = x[:, 1] + x[:, 3] / 2  # bottom right y
    return y


def xywhn2xyxy(x, w=640, h=640, padw=0, padh=0):
    # Convert nx4 boxes from [x, y, w, h] normalized to [x1, y1, x2, y2] where xy1=top-left, xy2=bottom-right
    y = x.clone() if isinstance(x, torch.Tensor) else np.copy(x)
    y[:, 0] = w * (x[:, 0] - x[:, 2] / 2) + padw  # top left x
    y[:, 1] = h * (x[:, 1] - x[:, 3] / 2) + padh  # top left y
    y[:, 2] = w * (x[:, 0] + x[:, 2] / 2) + padw  # bottom right x
    y[:, 3] = h * (x[:, 1] + x[:, 3] / 2) + padh  # bottom right y
    return y


def xyxy2xywhn(x, w=640, h=640, clip=False, eps=0.0):
    # Convert nx4 boxes from [x1, y1, x2, y2] to [x, y, w, h] normalized where xy1=top-left, xy2=bottom-right
    if clip:
        clip_coords(x, (h - eps, w - eps))  # warning: inplace clip
    y = x.clone() if isinstance(x, torch.Tensor) else np.copy(x)
    y[:, 0] = ((x[:, 0] + x[:, 2]) / 2) / w  # x center
    y[:, 1] = ((x[:, 1] + x[:, 3]) / 2) / h  # y center
    y[:, 2] = (x[:, 2] - x[:, 0]) / w  # width
    y[:, 3] = (x[:, 3] - x[:, 1]) / h  # height
    return y


def xyn2xy(x, w=640, h=640, padw=0, padh=0):
    # Convert normalized segments into pixel segments, shape (n,2)
    y = x.clone() if isinstance(x, torch.Tensor) else np.copy(x)
    y[:, 0] = w * x[:, 0] + padw  # top left x
    y[:, 1] = h * x[:, 1] + padh  # top left y
    return y
bbox.py(标注框同时修改)
这里只展示翻转操作,其他操作可以在Compose中添加
image与label需要替换成自己的路径(注意中文路径的问题)
import os
import numpy as np
import cv2
from matplotlib import pyplot as plt
from urllib.request import urlopen

from albumentations import (
    HorizontalFlip,
    VerticalFlip,
    Resize,
    CenterCrop,
    RandomCrop,
    Crop,
    Compose
)

from xywh2xyxy import xywhn2xyxy,xyxy2xywhn

# 用于图片上的边界框和类别 labels 的可视化函数
BOX_COLOR = (255, 0, 0)
TEXT_COLOR = (255, 255, 255)

def bbox_VOC2YOLO(voc_bbox):
    voc_bbox = np.array([voc_bbox], dtype=float)
    yolo_bbox = xyxy2xywhn(voc_bbox, w=1920, h=1080, clip=False, eps=0.0)
    return yolo_bbox

def bbox_YOLO2VOC(yolo_bbox):
    yolo_bbox = np.array([yolo_bbox], dtype=float)
    voc_bbox = xywhn2xyxy(yolo_bbox, w=1920, h=1080)
    return voc_bbox

# 注意!!以下三个函数都是一次仅绘制一个bbox矩形框
# 绘图 COCO_normalization格式
def visualize_bbox_COCO_normalization(img, bbox, class_id, class_idx_to_name, color=BOX_COLOR, thickness=2):
    x_min, y_min, w, h = bbox
    x_min, x_max, y_min, y_max = int(x_min), int(x_min + w), int(y_min), int(y_min + h)
    cv2.rectangle(img, (x_min, y_min), (x_max, y_max), color=color, thickness=thickness)
    class_name = class_idx_to_name[class_id]
    ((text_width, text_height), _) = cv2.getTextSize(class_name, cv2.FONT_HERSHEY_SIMPLEX, 0.35, 1)
    cv2.rectangle(img, (x_min, y_min - int(1.3 * text_height)), (x_min + text_width, y_min), BOX_COLOR, -1)
    cv2.putText(img, class_name, (x_min, y_min - int(0.3 * text_height)), cv2.FONT_HERSHEY_SIMPLEX, 0.35, TEXT_COLOR,
                lineType=cv2.LINE_AA)
    return img


# 绘图 YOLO格式
def visualize_bbox_YOLO(img, bbox, class_id, class_idx_to_name, color=BOX_COLOR, thickness=2):
    # 转换为xyxy
    bbox = bbox_YOLO2VOC(bbox)
    bbox = list(bbox[0])
    x1, y1, x2, y2 = bbox
    x_min, y_min, x_max, y_max = int(x1), int(y1), int(x2), int(y2)
    cv2.rectangle(img, (x_min, y_min), (x_max, y_max), color=color, thickness=thickness)
    class_name = class_idx_to_name[class_id]
    ((text_width, text_height), _) = cv2.getTextSize(class_name, cv2.FONT_HERSHEY_SIMPLEX, 0.35, 1)
    cv2.rectangle(img, (x_min, y_min - int(1.3 * text_height)), (x_min + text_width, y_min), BOX_COLOR, -1)
    cv2.putText(img, class_name, (x_min, y_min - int(0.3 * text_height)), cv2.FONT_HERSHEY_SIMPLEX, 0.35, TEXT_COLOR,
                lineType=cv2.LINE_AA)
    return img

# 绘图 VOC格式
def visualize_bbox_VOC(img, bbox, class_id, class_idx_to_name, color=BOX_COLOR, thickness=2):
    x1, y1, x2, y2 = bbox
    x_min, y_min, x_max, y_max = int(x1), int(y1), int(x2), int(y2)

    cv2.rectangle(img, (x_min, y_min), (x_max, y_max), color=color, thickness=thickness)
    class_name = class_idx_to_name[class_id]
    ((text_width, text_height), _) = cv2.getTextSize(class_name, cv2.FONT_HERSHEY_SIMPLEX, 0.35, 1)
    cv2.rectangle(img, (x_min, y_min - int(1.3 * text_height)), (x_min + text_width, y_min), BOX_COLOR, -1)
    cv2.putText(img, class_name, (x_min, y_min - int(0.3 * text_height)), cv2.FONT_HERSHEY_SIMPLEX, 0.35, TEXT_COLOR,
                lineType=cv2.LINE_AA)
    return img

def get_aug_voc(aug, min_area=0., min_visibility=0.):
    return Compose(aug, bbox_params={'format': 'pascal_voc', 'min_area': min_area,'min_visibility': min_visibility,'label_fields': ['category_id']})

def get_aug_yolo(aug, min_area=0., min_visibility=0.):
    return Compose(aug, bbox_params={'format': 'yolo', 'min_area': min_area,'min_visibility': min_visibility,'label_fields': ['category_id']})

if __name__ == '__main__':
    '''
    # 读取的路径、文件名只能带有英文数字及一些特定字符,不能带有中文、日文等字符!!!
    # 以下方式无法正常读到图片
    image = cv2.imread('D:/Workspace/Pycharm_Workspace/Pycharm_pytorch_gpu_Workspace/augmentation/Albumentations数据扩充2/images/0001100_II-42.1_15.jpg')
    image = cv2.cvtColor(image, cv2.COLOR_BGR2RGB)
    '''
    image_path = 'I:/yolov7-DFG-运行结果备份/DFG---txt格式数据集/DFG/images/train/0000006.jpg'
    image1 = cv2.imdecode(np.fromfile(image_path, dtype=np.uint8), -1)
    image2 = cv2.imdecode(np.fromfile(image_path, dtype=np.uint8), -1)

    bbox1 = [[1331,321,1408,384]]
    category_id = [5]
    annotations1 = {'image': image1,
                   'bboxes': bbox1,
                   'category_id': category_id}
    category_id_to_name = {5: 'sign', }
    aug1 = get_aug_voc([VerticalFlip(p=1)])
    augmented1 = aug1(**annotations1)
    aug_bbox1, aug_img1, aug_cls_id1 = augmented1['bboxes'], augmented1['image'], augmented1['category_id']

    for index, box in enumerate(bbox1):
        show_img1 = visualize_bbox_VOC(image1, box, category_id[index], category_id_to_name)

    for index, box in enumerate(aug_bbox1):
        show_aug_img1 = visualize_bbox_VOC(aug_img1, box, aug_cls_id1[index], category_id_to_name)


    bbox2=bbox_VOC2YOLO([1331,321,1408,384])
    annotations2 = {'image': image2,
                   'bboxes': bbox2,
                   'category_id': [5]}

    aug2 = get_aug_yolo([HorizontalFlip(p=1)])
    augmented2 = aug2(**annotations2)
    aug_bbox2, aug_img2, aug_cls_id2 = augmented2['bboxes'], augmented2['image'], augmented2['category_id']

    for index, box in enumerate(bbox2):
        show_img2 = visualize_bbox_YOLO(image2, box, category_id[index], category_id_to_name)

    for index, box in enumerate(aug_bbox2):
        show_aug_img2 = visualize_bbox_YOLO(aug_img2, box, aug_cls_id2[index], category_id_to_name)


    cv2.imwrite("show_img1.jpg", show_img1)
    cv2.imwrite("show_aug_img1.jpg", show_aug_img1)
    cv2.imwrite("show_img2.jpg", show_img2)
    cv2.imwrite("show_aug_img2.jpg", show_aug_img2)


    # 显示
    # cv2.namedWindow('test', 0)
    # cv2.resizeWindow('test', 900, 600)   # 自己设定窗口图片的大小
    cv2.imshow('show_img', show_aug_img2)
    cv2.waitKey(0)
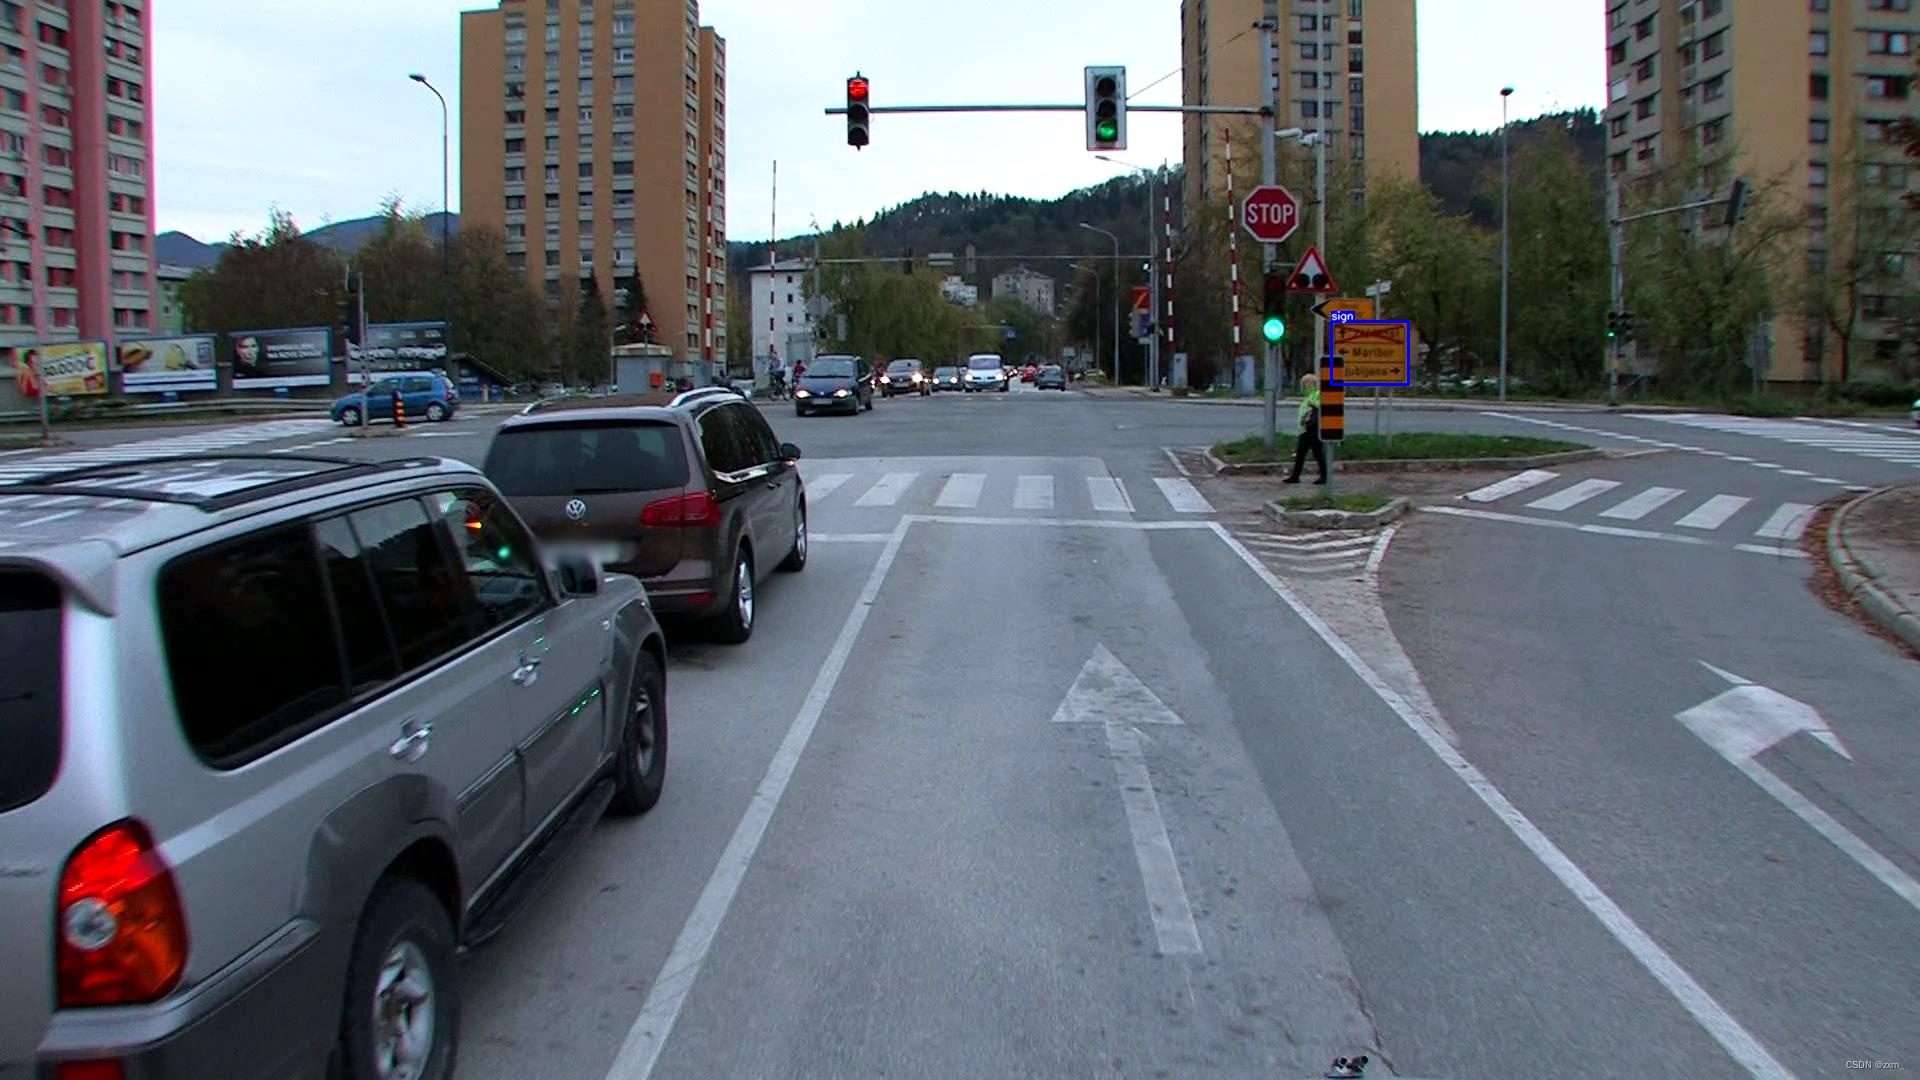
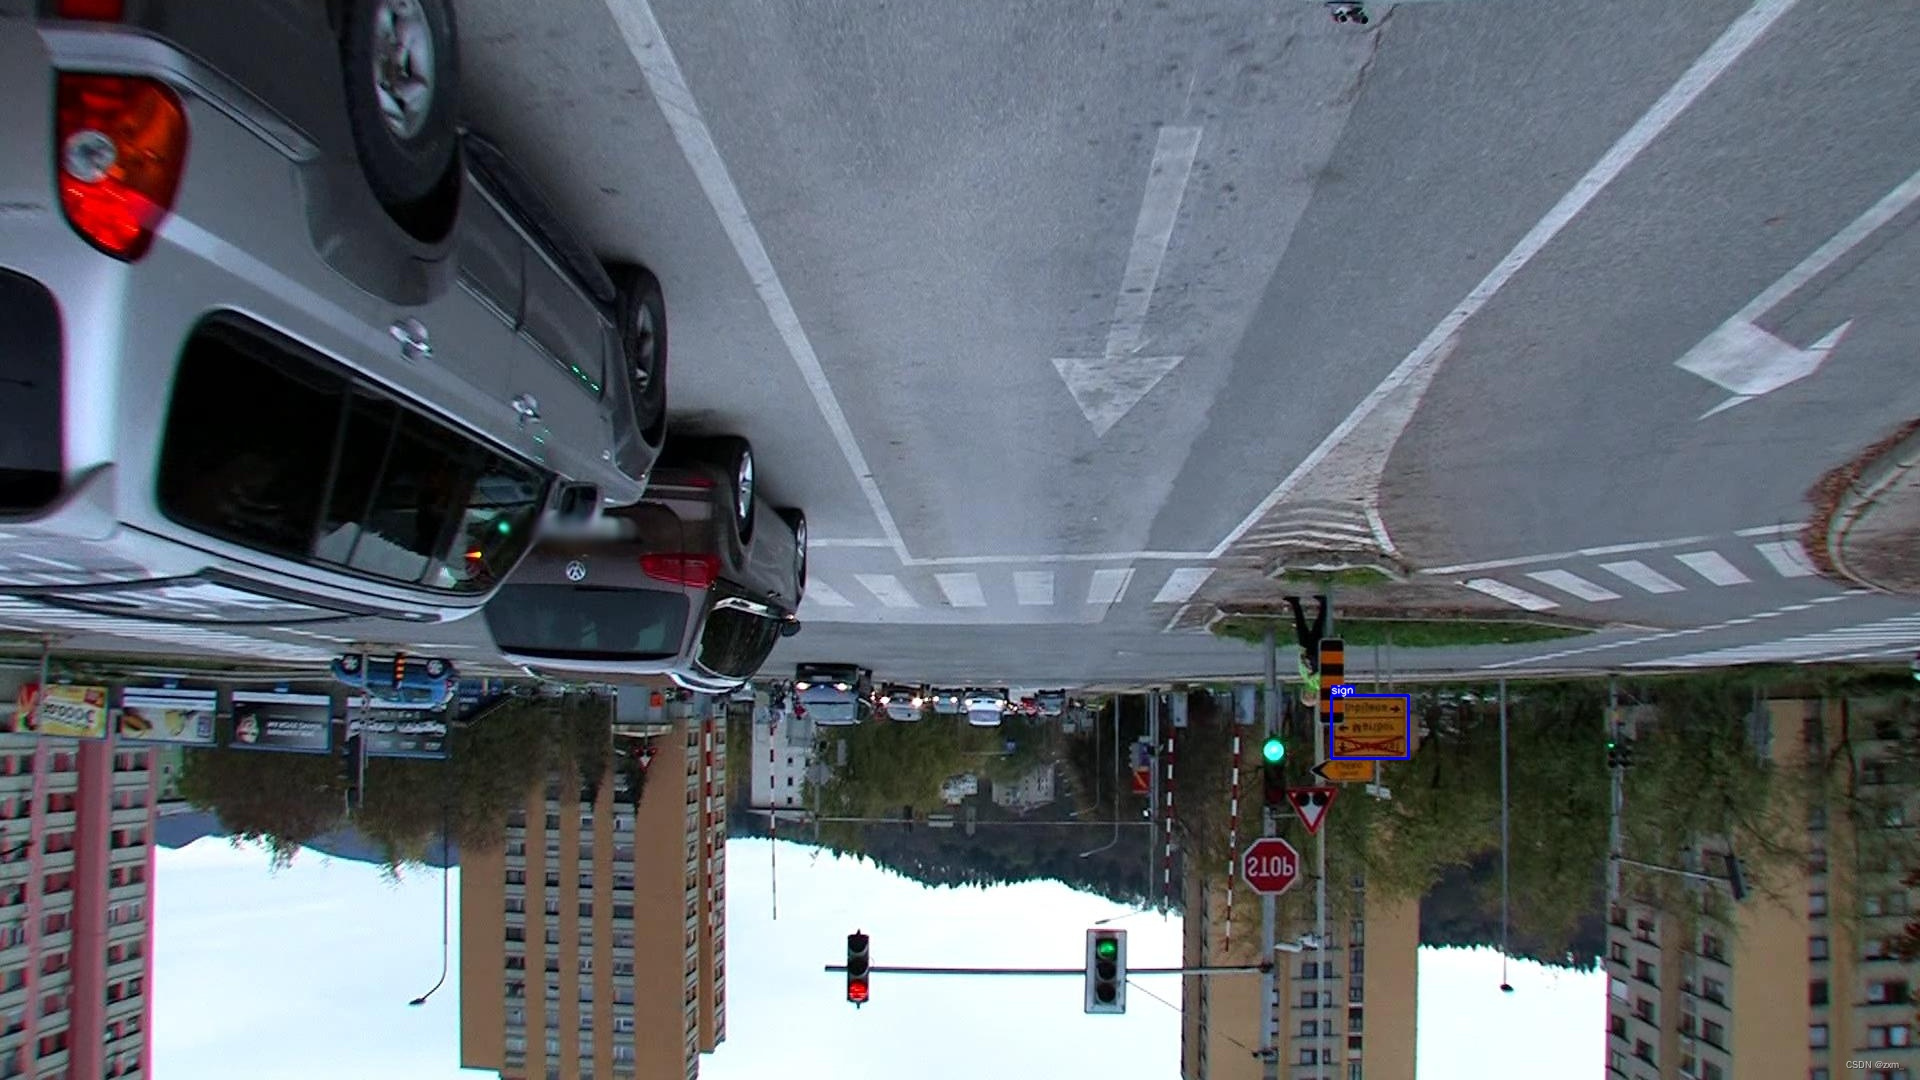
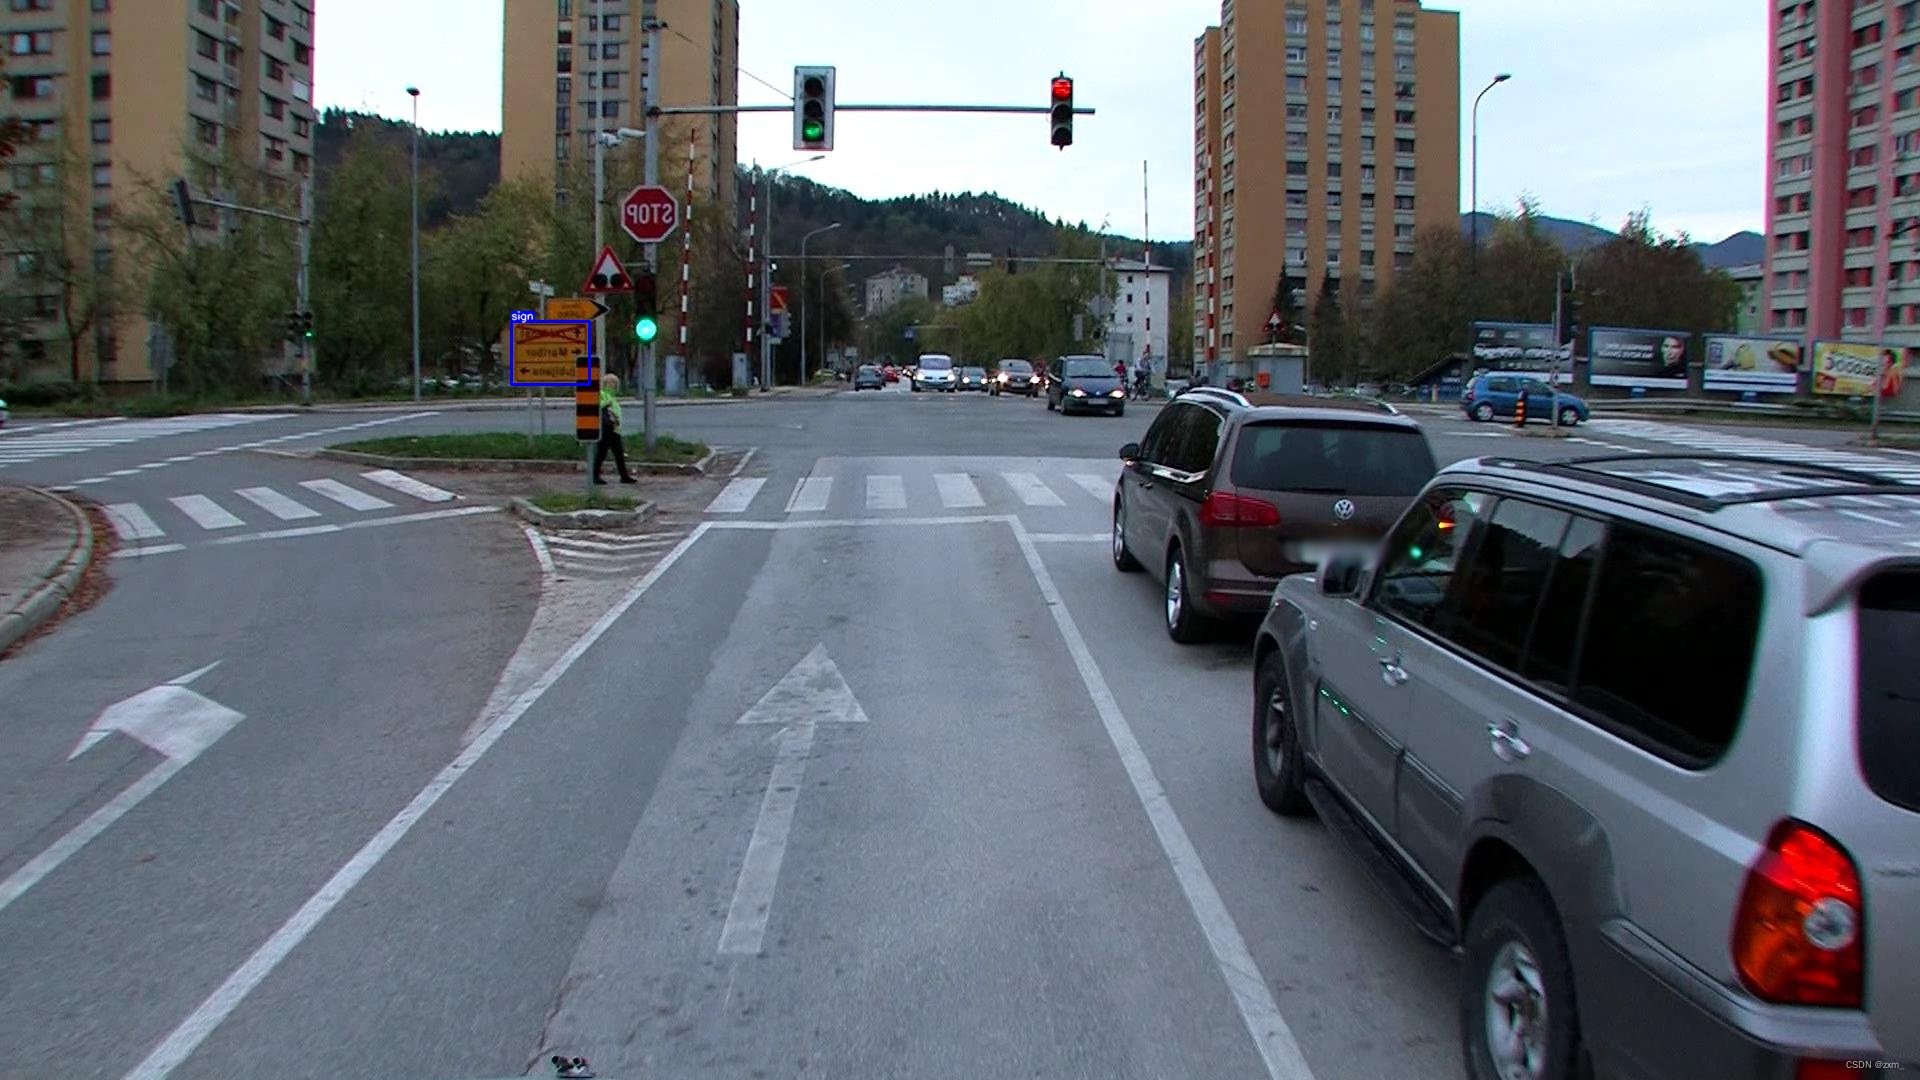
运行结果:
如下所示,标注框有根据图片增强的方式进行修改
垂直翻转:
show_img1.jpg
show_aug_img1.jpg
水平翻转:
show_img2.jpg

show_aug_img2.jpg


 3308
3308


 被折叠的 条评论
为什么被折叠?
被折叠的 条评论
为什么被折叠?
 到【灌水乐园】发言


