


================================================================
预留填坑
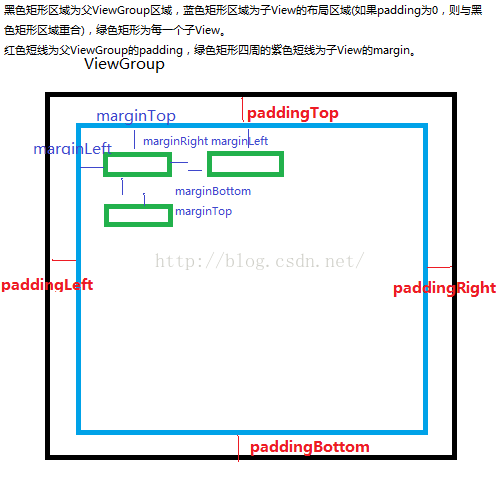
先画一个我理解的margin padding 的图,感觉在写自定义ViewGroup的时候容易混乱:
黑色矩形区域为父ViewGroup区域,蓝色矩形区域为子View的布局区域(如果padding为0,则与黑色矩形区域重合),绿色矩形为每一个子View。
红色短线为父ViewGroup的padding,绿色矩形四周的紫色短线为子View的margin。
================================================================
先直接贴代码,注释真心很详细了:
大体思路,自定义一个ViewGroup,重写onMeasure,onLayout方法,
在onMeasure方法里测量并设置子View和ViewGroup自己的宽高,
在onLayout方法里,为每个子View布局。
这里假设的是每一行的里的每个View的行高是一样的,不同的行行高可以不同。
效果图1: ViewGroup 的padding为5dp
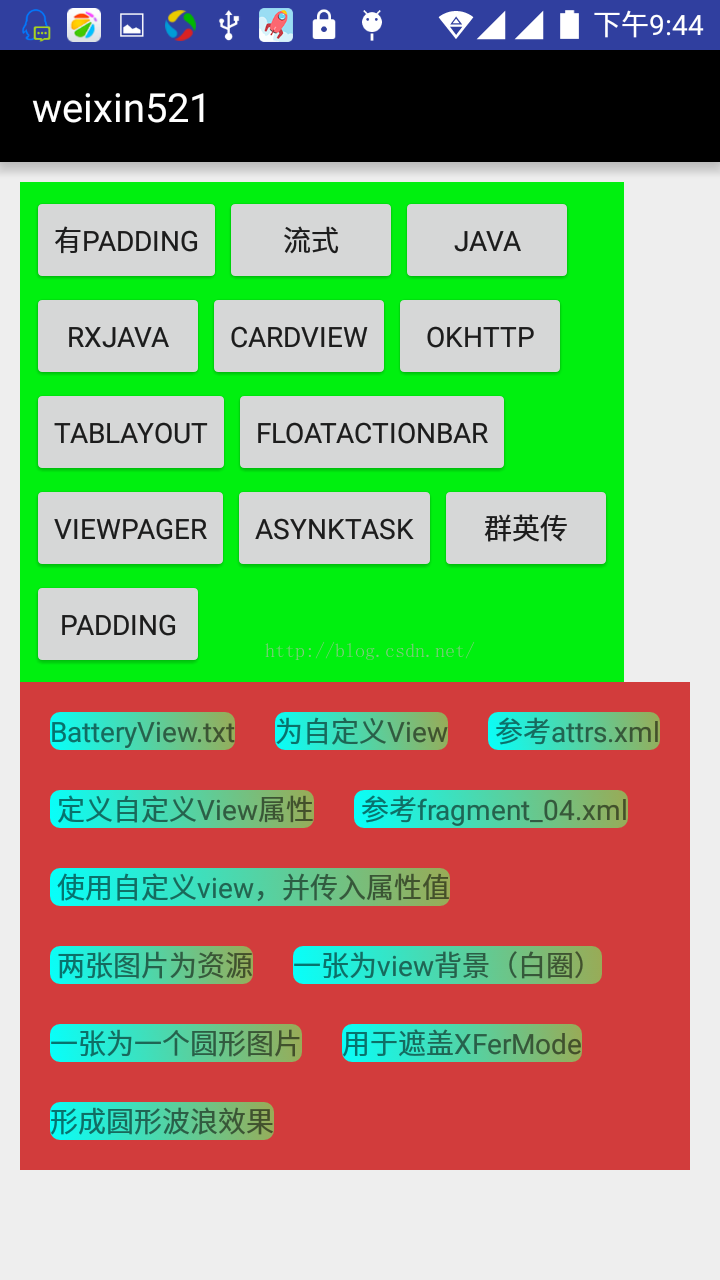
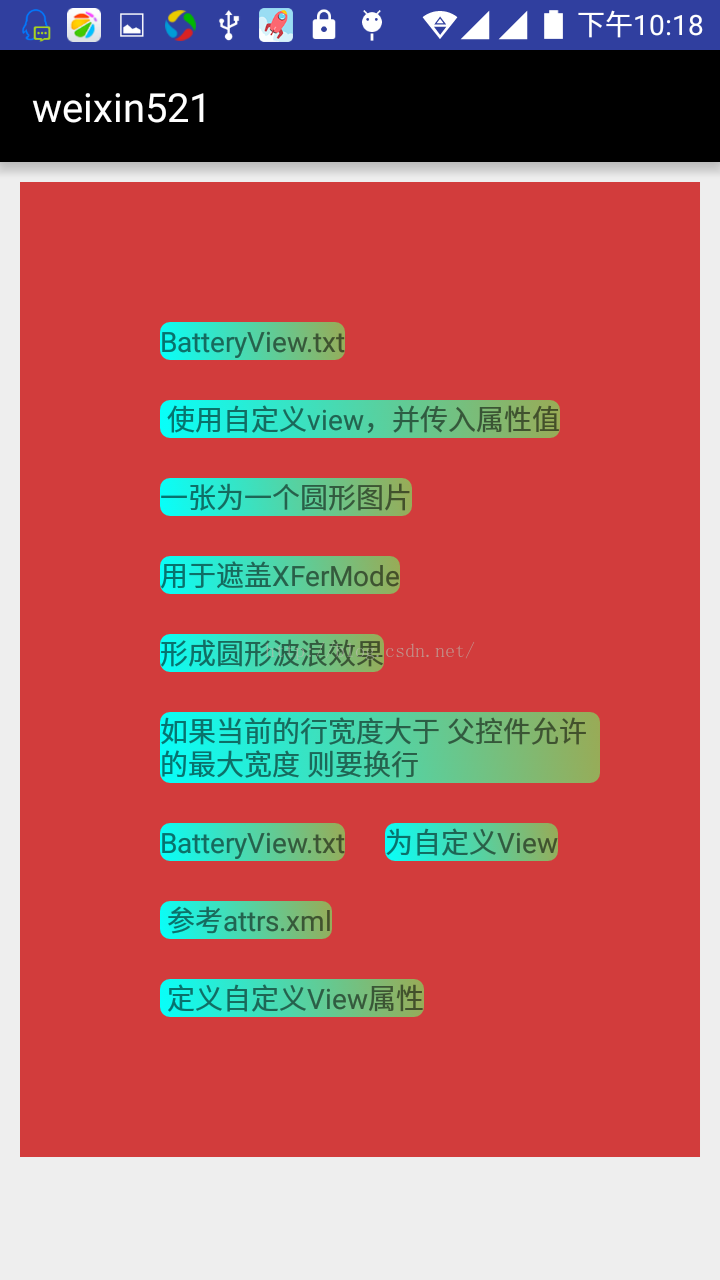
效果图2 是将ViewGroup的padding设为60dp,每个textview margin为10dp:
是根据hyman大神的流式布局的思路,然后自己实现的,其中onLayout方法和hyman大神的不一样。
支持ViewGroup的padding,和子View的margin属性。
自定的ViewGroup代码如下:
package mcxtzhang.weixin521.leftmenu;

import android.content.Context;
import android.util.AttributeSet;
import android.util.Log;
import android.view.View;
import android.view.ViewGroup;

/**
 * 流式布局
 * Created by zhangxutong on 2016/1/17.
 */
public class FlowViewGroup extends ViewGroup {
    private static final String TAG = "zxt/FlowViewGroup";

    public FlowViewGroup(Context context) {
        this(context, null);
    }

    public FlowViewGroup(Context context, AttributeSet attrs) {
        this(context, attrs, 0);
    }

    public FlowViewGroup(Context context, AttributeSet attrs, int defStyleAttr) {
        super(context, attrs, defStyleAttr);
    }

    //在onMeasure里,测量所有子View的宽高,以及确定Viewgroup自己的宽高。
    @Override
    protected void onMeasure(int widthMeasureSpec, int heightMeasureSpec) {
        //获取系统传递过来测量出的宽度 高度,以及相应的测量模式。
        //如果测量模式为 EXACTLY( 确定的dp值,match_parent),则可以调用setMeasuredDimension()设置,
        //如果测量模式为 AT_MOST(wrap_content),则需要经过计算再去调用setMeasuredDimension()设置
        int widthMeasure = MeasureSpec.getSize(widthMeasureSpec);
        int widthMode = MeasureSpec.getMode(widthMeasureSpec);
        int heightMeasure = MeasureSpec.getSize(heightMeasureSpec);
        int heightMode = MeasureSpec.getMode(heightMeasureSpec);

        //计算宽度 高度 //wrap_content测量模式下会使用到:
        //存储最后计算出的宽度,
        int maxLineWidth = 0;
        //存储最后计算出的高度
        int totalHeight = 0;
        //存储当前行的宽度
        int curLineWidth = 0;
        //存储当前行的高度
        int curLineHeight = 0;

        // 得到内部元素的个数
        int count = getChildCount();

        //存储子View
        View child =null;
        //存储子View的LayoutParams
        MarginLayoutParams params =null;
        //子View Layout需要的宽高(包含margin),用于计算是否越界
        int childWidth;
        int childHeight;

        //遍历子View 计算父控件宽高
        for (int i = 0; i < count; i++) {
            child = getChildAt(i);
            //如果gone,不测量了
            if (View.GONE == child.getVisibility()) {
                continue;
            }
            //先测量子View
            measureChild(child, widthMeasureSpec, heightMeasureSpec);

            //获取子View的LayoutParams,(子View的LayoutParams的对象类型,取决于其ViewGroup的generateLayoutParams()方法的返回的对象类型,这里返回的是MarginLayoutParams)
            params = (MarginLayoutParams) child.getLayoutParams();
            //子View需要的宽度 为 子View 本身宽度+marginLeft + marginRight
            childWidth = child.getMeasuredWidth() + params.leftMargin + params.rightMargin;
            childHeight = child.getMeasuredHeight() + params.topMargin + params.bottomMargin;
            Log.i(TAG, "子View Layout需要的宽高(包含margin):childWidth:" + childWidth + "   ,childHeight:" + childHeight);

            //如果当前的行宽度大于 父控件允许的最大宽度 则要换行
            //父控件允许的最大宽度 如果要适配 padding 这里要- getPaddingLeft() - getPaddingRight()
            //即为测量出的宽度减去父控件的左右边距
            if (curLineWidth + childWidth > widthMeasure - getPaddingLeft() - getPaddingRight()) {
                //通过比较 当前行宽 和以前存储的最大行宽,得到最新的最大行宽,用于设置父控件的宽度
                maxLineWidth = Math.max(maxLineWidth, curLineWidth);
                //父控件的高度增加了,为当前高度+当前行的高度
                totalHeight += curLineHeight;
                //换行后 刷新 当前行 宽高数据: 因为新的一行就这一个View,所以为当前这个view占用的宽高(要加上View 的 margin)
                curLineWidth = childWidth;
                curLineHeight = childHeight;
            } else {
                //不换行:叠加当前行宽 和 比较当前行高:
                curLineWidth += childWidth;
                curLineHeight = Math.max(curLineHeight, childHeight);
            }
            //如果已经是最后一个View,要比较当前行的 宽度和最大宽度,叠加一共的高度
            if (i == count - 1) {
                maxLineWidth = Math.max(maxLineWidth, curLineWidth);
                totalHeight += childHeight;
            }
        }

        Log.i(TAG, "系统测量允许的尺寸最大值:widthMeasure:" + widthMeasure + "   ,heightMeasure:" + heightMeasure);
        Log.i(TAG, "经过我们测量实际的尺寸(不包括父控件的padding):maxLineWidth:" + maxLineWidth + "   ,totalHeight:" + totalHeight);

        //适配padding,如果是wrap_content,则除了子控件本身占据的控件,还要在加上父控件的padding
        setMeasuredDimension(
                widthMode != MeasureSpec.EXACTLY? maxLineWidth + getPaddingLeft() + getPaddingRight() : widthMeasure,
                heightMode != MeasureSpecEXACTLY ? totalHeight + getPaddingTop() + getPaddingBottom() : heightMeasure);
    }

    //布局父控件位置以及子控件的位置
    @Override
    protected void onLayout(boolean changed, int l, int t, int r, int b) {
        Log.i(TAG, "changed:" + changed + "   ,l:" + l + "  t:" + t + "  r:" + r + "  b:" + b);
        //子控件的个数
        int count = getChildCount();
        //ViewParent宽度(包含padding)
        int width = getWidth();
        //ViewParent 的右边x的布局限制值
        int rightLimit =  width - getPaddingRight();

        //存储基准的left top (子类.layout(),里的坐标是基于父控件的坐标,所以 x应该是从0+父控件左内边距开始,y从0+父控件上内边距开始)
        int baseLeft = 0 + getPaddingLeft();
        int baseTop = 0 + getPaddingTop();
        //存储现在的left top
        int curLeft = baseLeft;
        int curTop = baseTop;

        //子View
        View child = null;
        //子view用于layout的 l t r b
        int viewL,viewT,viewR,viewB;
        //子View的LayoutParams
        MarginLayoutParams params = null;
        //子View Layout需要的宽高(包含margin),用于计算是否越界
        int childWidth;
        int childHeight;
        //子View 本身的宽高
        int childW,childH;

        //临时增加一个temp 存储上一个View的高度 解决过长的两行View导致显示不正确的bug
        int lastChildHeight =0;
        //
        for (int i = 0; i < count; i++) {
            child = getChildAt(i);
            //如果gone,不布局了
            if (View.GONE == child.getVisibility()) {
                continue;
            }
            //获取子View本身的宽高:
            childW = child.getMeasuredWidth();
            childH = child.getMeasuredHeight();
            //获取子View的LayoutParams,用于获取其margin
            params = (MarginLayoutParams) child.getLayoutParams();
            //子View需要的宽高 为 本身宽高+marginLeft + marginRight
            childWidth =  childW + params.leftMargin + params.rightMargin;
            childHeight = childH + params.topMargin + params.bottomMargin;

            //这里要考虑padding,所以右边界为 ViewParent宽度(包含padding) -ViewParent右内边距
            if (curLeft + childWidth > rightLimit ) {
                //如果当前行已经放不下该子View了 需要换行放置:
                //在新的一行布局子View,左x就是baseLeft,上y是 top +前一行高(这里假设的是每一行行高一样),
                curTop = curTop + lastChildHeight;
                //layout时要考虑margin
                viewL = baseLeft +params.leftMargin;
                viewT = curTop + params.topMargin;
                viewR = viewL + childW;
                viewB = viewT + childH;
                //child.layout(baseLeft + params.leftMargin, curTop + params.topMargin, baseLeft + params.leftMargin + child.getMeasuredWidth(), curTop + params.topMargin + child.getMeasuredHeight());
                //Log.i(TAG,"新的一行:" +"   ,baseLeft:"+baseLeft +"  curTop:"+curTop+"  baseLeft+childWidth:"+(baseLeft+childWidth)+"  curTop+childHeight:"+ ( curTop+childHeight));
                curLeft = baseLeft + childWidth;

            } else {
                //当前行可以放下子View:
                viewL = curLeft +params.leftMargin;
                viewT = curTop + params.topMargin;
                viewR = viewL + childW;
                viewB = viewT + childH;

                //child.layout(curLeft + params.leftMargin, curTop + params.topMargin, curLeft + params.leftMargin + child.getMeasuredWidth(), curTop + params.topMargin + child.getMeasuredHeight());
                //Log.i(TAG,"当前行:"+changed +"   ,curLeft:"+curLeft +"  curTop:"+curTop+"  curLeft+childWidth:"+(curLeft+childWidth)+"  curTop+childHeight:"+(curTop+childHeight));
                curLeft = curLeft + childWidth;
            }
            lastChildHeight = childHeight;
            //布局子View
            child.layout(viewL,viewT,viewR,viewB);
        }
    }
    /**
     * @return 当前ViewGroup返回的Params的类型
     */
    @Override
    public ViewGroup.LayoutParams generateLayoutParams(AttributeSet attrs) {
        return new MarginLayoutParams(getContext(), attrs);
    }
}
使用方法:
一、动态使用:
private FlowViewGroup mFlowViewGroup;
private String[] mTexts = new String[]{"BatteryView.txt", "为自定义View",
        " 参考attrs.xml", " 定义自定义View属性", " 参考fragment_04.xml",
        " 使用自定义view,并传入属性值", " 两张图片为资源", "一张为view背景(白圈)",
        "一张为一个圆形图片", "用于遮盖XFerMode","形成圆形波浪效果"};
private void initView() {
    mFlowViewGroup = (FlowViewGroup) findViewById(R.id.flowlayout);
}

private void initDatas() {
    TextView tv;
    for (int i=0;i<mTexts.length;i++){
        tv= (TextView) LayoutInflater.from(this).inflate(R.layout.item_flow,mFlowViewGroup,false);
        tv.setText(mTexts[i]);
        tv.setOnClickListener(new View.OnClickListener() {
            @Override
            public void onClick(View v) {
                Toast.makeText(LeftMenu2Activity.this,""+((TextView)v).getText(),Toast.LENGTH_SHORT).show();
            }
        });
        mFlowViewGroup.addView(tv);
    }
}
其中布局文件为:
ViewGroup布局文件如下:
<mcxtzhang.weixin521.leftmenu.FlowViewGroup
    android:background="#d23c3c"
    android:padding="5dp"
    android:id="@+id/flowlayout"
    android:layout_width="wrap_content"
    android:layout_height="wrap_content">

</mcxtzhang.weixin521.leftmenu.FlowViewGroup>
每个TextView布局文件如下:item_flow.xml:
<?xml version="1.0" encoding="utf-8"?>
<TextView xmlns:android="http://schemas.android.com/apk/res/android"
    android:layout_width="wrap_content"
    android:layout_height="wrap_content"
    android:text="Demo Test"
    android:background="@drawable/textview_bg"
    android:layout_margin="10dp"
    />
background为一个自写的shape:textview_bg.xml 放在drawable文件夹下
<?xml version="1.0" encoding="utf-8"?>
<shape xmlns:android="http://schemas.android.com/apk/res/android" android:shape="rectangle">
    <corners android:radius="5dp"/>
    <gradient android:angle="45" android:startColor="#06fffa" android:endColor="#99aa55"/>
</shape>
二,静态使用:
直接在布局文件里:
<mcxtzhang.weixin521.leftmenu.FlowViewGroup
    android:padding="5dp"
    android:background="#00f00f"
    android:layout_width="wrap_content"
    android:layout_height="wrap_content">

    <Button
        android:layout_width="wrap_content"
        android:layout_height="wrap_content"
        android:text="有padding" />

    <Button
        android:layout_width="wrap_content"
        android:layout_height="wrap_content"
        android:text="流式" />

    <Button
        android:layout_width="wrap_content"
        android:layout_height="wrap_content"
        android:text="Java" />

    <Button
        android:layout_width="wrap_content"
        android:layout_height="wrap_content"
        android:text="RxJava" />

    <Button
        android:layout_width="wrap_content"
        android:layout_height="wrap_content"
        android:text="CardView" />

    <Button
        android:layout_width="wrap_content"
        android:layout_height="wrap_content"
        android:text="OKHttp" />

    <Button
        android:layout_width="wrap_content"
        android:layout_height="wrap_content"
        android:text="TabLayout" />

    <Button
        android:layout_width="wrap_content"
        android:layout_height="wrap_content"
        android:text="FloatActionBar" />

    <Button
        android:layout_width="wrap_content"
        android:layout_height="wrap_content"
        android:text="ViewPager" />

    <Button
        android:layout_width="wrap_content"
        android:layout_height="wrap_content"
        android:text="AsynkTask" />

    <Button
        android:layout_width="wrap_content"
        android:layout_height="wrap_content"
        android:text="群英传" />

    <Button
        android:layout_width="wrap_content"
        android:layout_height="wrap_content"
        android:text="padding" />


</mcxtzhang.weixin521.leftmenu.FlowViewGroup>
资源下载地址:
http://download.csdn.net/detail/zxt0601/9618061


 860
860

 被折叠的 条评论
为什么被折叠?
被折叠的 条评论
为什么被折叠?
 到【灌水乐园】发言


