


Hi3559A芯片仅支持caffe1.0库量化,所以整体移植过程分为pt->onnx->caffe->wk。
1. pt转onnx
step1:下载官方yolov5-6.0及预训练好的权重(比如yolov5s.pt);
step2:按照requirements.txt文件配置相关yolov5运行环境,pytorch版本要求1.10以下,不然后续转换会出问题;
step3:进入yolov5-6.0目录下,新建weights文件夹,将下载的yolov5s.pt文件放进去;
step4:修改models/yolo.py文件;
    def forward(self, x):
        z = []  # inference output
        for i in range(self.nl):
            x[i] = self.m[i](x[i]).sigmoid()  # conv
        #     bs, _, ny, nx = x[i].shape  # x(bs,255,20,20) to x(bs,3,20,20,85)
        #     x[i] = x[i].view(bs, self.na, self.no, ny, nx).permute(0, 1, 3, 4, 2).contiguous()

        #     if not self.training:  # inference
        #         if self.grid[i].shape[2:4] != x[i].shape[2:4] or self.onnx_dynamic:
        #             self.grid[i], self.anchor_grid[i] = self._make_grid(nx, ny, i)

        #         y = x[i].sigmoid()
        #         if self.inplace:
        #             y[..., 0:2] = (y[..., 0:2] * 2. - 0.5 + self.grid[i]) * self.stride[i]  # xy
        #             y[..., 2:4] = (y[..., 2:4] * 2) ** 2 * self.anchor_grid[i]  # wh
        #         else:  # for YOLOv5 on AWS Inferentia https://github.com/ultralytics/yolov5/pull/2953
        #             xy = (y[..., 0:2] * 2. - 0.5 + self.grid[i]) * self.stride[i]  # xy
        #             wh = (y[..., 2:4] * 2) ** 2 * self.anchor_grid[i]  # wh
        #             y = torch.cat((xy, wh, y[..., 4:]), -1)
        #         z.append(y.view(bs, -1, self.no))

        # return x if self.training else (torch.cat(z, 1), x)
        return x[0], x[1], x[2]
step5: 修改models/yolov5s.yaml文件,将head下的nn.Upsample层替换为nn.ConvTranspose2d,因为caffe1.0不支持该算子。
# YOLOv5 🚀 by Ultralytics, GPL-3.0 license

# Parameters
nc: 80  # number of classes
depth_multiple: 0.33  # model depth multiple
width_multiple: 0.50  # layer channel multiple
anchors:
  - [10,13, 16,30, 33,23]  # P3/8
  - [30,61, 62,45, 59,119]  # P4/16
  - [116,90, 156,198, 373,326]  # P5/32

# YOLOv5 v6.0 backbone
backbone:
  # [from, number, module, args]
  [[-1, 1, Conv, [64, 6, 2, 2]],  # 0-P1/2
   [-1, 1, Conv, [128, 3, 2]],  # 1-P2/4
   [-1, 3, C3, [128]],
   [-1, 1, Conv, [256, 3, 2]],  # 3-P3/8
   [-1, 6, C3, [256]],
   [-1, 1, Conv, [512, 3, 2]],  # 5-P4/16
   [-1, 9, C3, [512]],
   [-1, 1, Conv, [1024, 3, 2]],  # 7-P5/32
   [-1, 3, C3, [1024]],
   [-1, 1, SPPF, [1024, 5]],  # 9
  ]

# YOLOv5 v6.0 head
head:
  [[-1, 1, Conv, [512, 1, 1]],
   #[-1, 1, nn.Upsample, [None, 2, 'nearest']],
   [-1, 1, nn.ConvTranspose2d,[256, 256, 2, 2]],
   [[-1, 6], 1, Concat, [1]],  # cat backbone P4
   [-1, 3, C3, [512, False]],  # 13

   [-1, 1, Conv, [256, 1, 1]],
   #[-1, 1, nn.Upsample, [None, 2, 'nearest']],
   [-1, 1, nn.ConvTranspose2d,[128, 128, 2, 2]],
   [[-1, 4], 1, Concat, [1]],  # cat backbone P3
   [-1, 3, C3, [256, False]],  # 17 (P3/8-small)

   [-1, 1, Conv, [256, 3, 2]],
   [[-1, 14], 1, Concat, [1]],  # cat head P4
   [-1, 3, C3, [512, False]],  # 20 (P4/16-medium)

   [-1, 1, Conv, [512, 3, 2]],
   [[-1, 10], 1, Concat, [1]],  # cat head P5
   [-1, 3, C3, [1024, False]],  # 23 (P5/32-large)

   [[17, 20, 23], 1, Detect, [nc, anchors]],  # Detect(P3, P4, P5)
  ]
step6:新建export_nine.py文件,注意opset_version设置为9或者10;
import os
import torch
import onnx
from onnxsim import simplify
import onnxoptimizer
import argparse
from models.yolo import Detect, Model

if __name__ == '__main__':
    parser = argparse.ArgumentParser()
    parser.add_argument('--weights', type=str, default='./weights/yolov5s.pt', help='initial weights path')

    #================================================================
    opt = parser.parse_args()
    print(opt)

    #Save Only weights
    ckpt = torch.load(opt.weights, map_location=torch.device('cpu'))
    torch.save(ckpt['model'].state_dict(), opt.weights.replace(".pt", "-model.pt"))

    #Load model without postprocessing
    new_model = Model("./models/{}.yaml".format(os.path.basename(opt.weights).strip(".pt")))
    new_model.load_state_dict(torch.load(opt.weights.replace(".pt", "-model.pt"), map_location=torch.device('cpu')), False)
    new_model.eval()

    #save to JIT script
    example = torch.rand(1, 3, 640, 640)
    traced_script_module = torch.jit.trace(new_model, example)
    traced_script_module.save(opt.weights.replace(".pt", "-jit.pt"))

    #save to onnx
    f = opt.weights.replace(".pt", ".onnx")
    torch.onnx.export(new_model, example, f, verbose=False, opset_version=9,
                            training=torch.onnx.TrainingMode.EVAL,
                            do_constant_folding=True,
                            input_names=['data'],
                            output_names=['out0','out1','out2'])

    #onnxsim
    model_simp, check = simplify(f)
    assert check, "Simplified ONNX model could not be validated"
    onnx.save(model_simp, opt.weights.replace(".pt", "-sim.onnx"))

    #optimize onnx
    passes = ["extract_constant_to_initializer", "eliminate_unused_initializer"]
    optimized_model = onnxoptimizer.optimize(model_simp, passes)
    onnx.checker.check_model(optimized_model)
    onnx.save(optimized_model, opt.weights.replace(".pt", "-op.onnx"))
    print('finished exporting onnx')
step7:运行python export_nine.py命令,导出相关onnx。
2. onnx转为caffemodel
step1:下载yolov5_onnx2caffe;
step2:配置caffe环境,可以简单地使用conda install caffe进行配置,不用选择源码编译,但是conda直接安装的只有caffe1.0的版本,如需要caffe2.0需要自行安装;
step3:修改yolov5_onnx2caffe/convertCaff.py文件,修改路径;
if __name__ == "__main__":

    onnx_path = "./models/yolov5s.onnx"
    prototxt_path = "./models/yolov5s.prototxt"
    caffemodel_path = "./models/yolov5s.caffemodel"

    graph = getGraph(onnx_path)

    #convertToCaffe(graph, prototxt_path, caffemodel_path, exis_focus=True, focus_concat_name="Concat_40", focus_conv_name="Conv_41")
    #convertToCaffe(graph, prototxt_path, caffemodel_path, exis_focus=True, focus_concat_name="Concat_40")
    #convertToCaffe(graph, prototxt_path, caffemodel_path, focus_conv_name="Conv_41")
    convertToCaffe(graph, prototxt_path, caffemodel_path)
step4:运行python convertCaff.py,得到caffmodel和prototxt文件。
3. caffemodel转wk文件
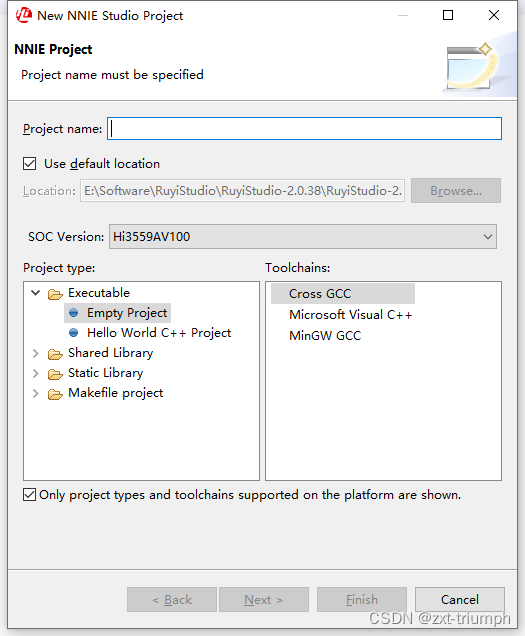
step1:安装Ruyistudio软件,按照海思sdk安装,建议安装windows版本,较为简单;
step2:打开Ruyistudio软件,新建nnie工程
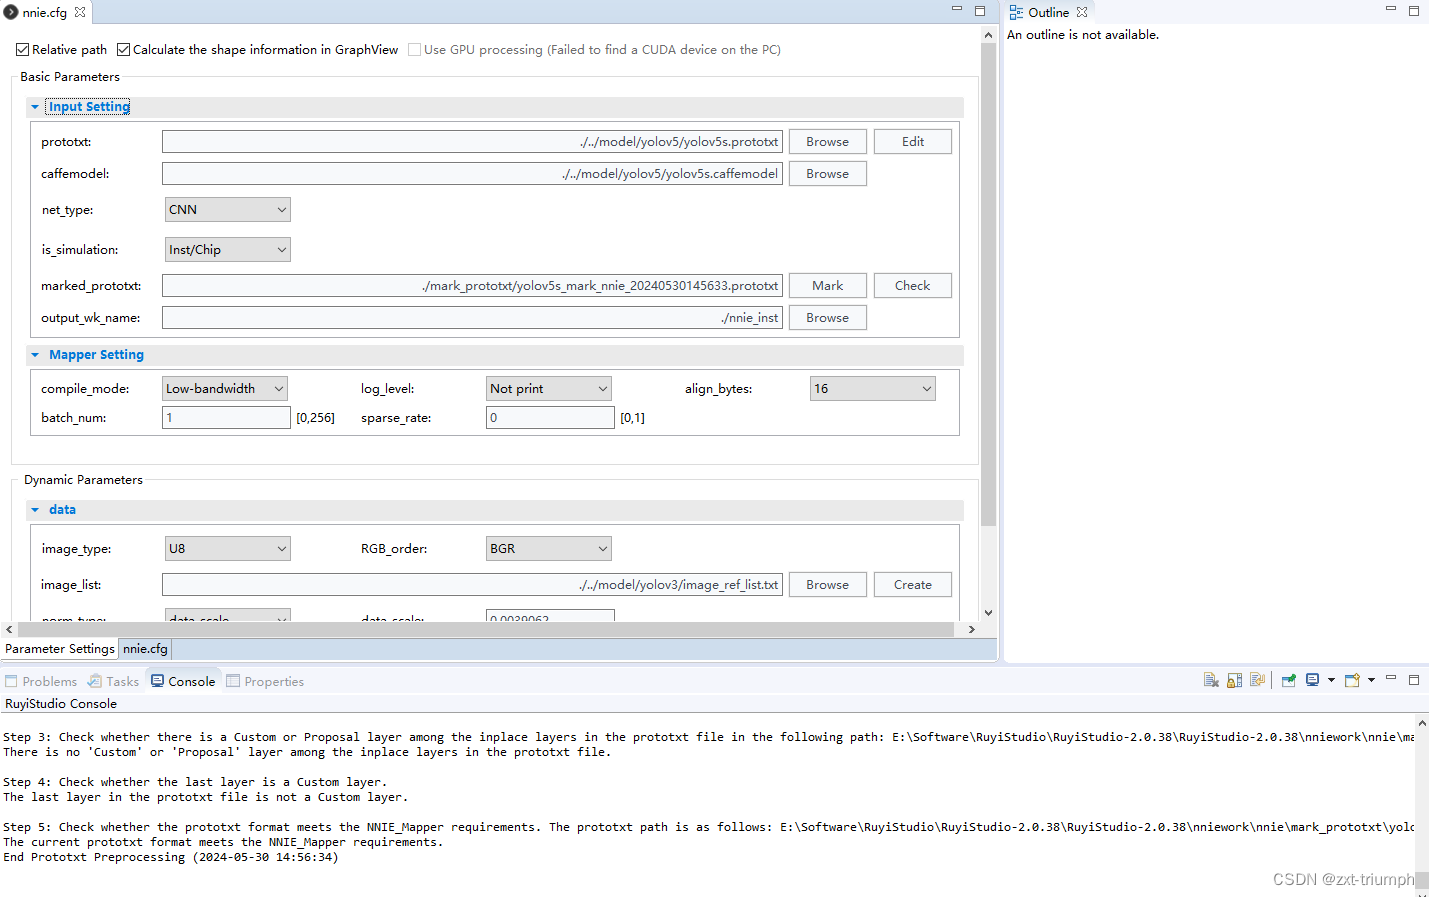
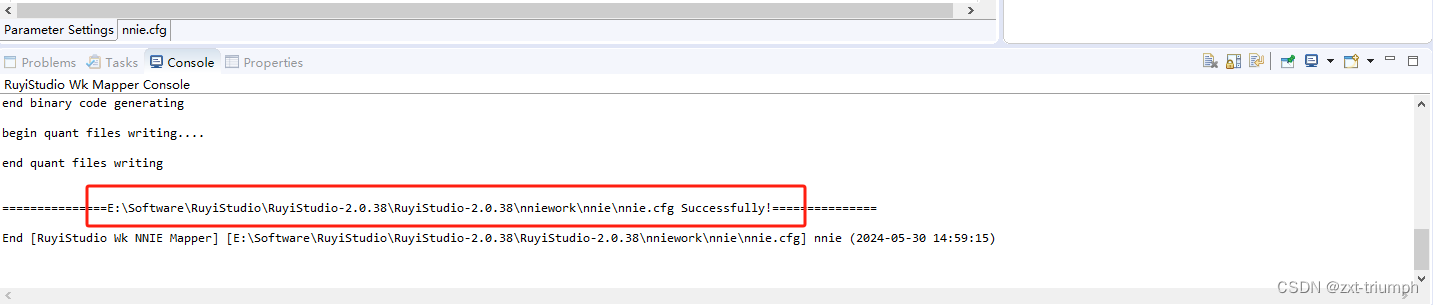
step3: 打开nine.cfg文件,配置必要参数, 然后点击运行按钮;
step4:得到wk文件,完成模型的移植。


 4498
4498

 被折叠的 条评论
为什么被折叠?
被折叠的 条评论
为什么被折叠?
 到【灌水乐园】发言


