


本文测试环境:
win10 64位
vistual studio 2019
Emgu CV 4.6.0
环境配置准备:
1 新增控制台项目,.net framework为4.7.2
2 把win-x64目录的native目录下的文件全部拷贝到项目的运行目录Debug目录下
3 项目选择x64
4 添加项目引用Emgu.CV.dll、Emgu.CV.Platform.NetFramework.dll、System.Drawing.dll和System.Runtime.InteropServices.RuntimeInformation.dll
具体配置参考:
Emgu CV4图像处理之环境搭建1(C#)_zxy2847225301的博客-CSDN博客
下面的内容参考自:21-22轮廓绘制(EmguCV学习)_牛客博客
查找轮廓API函数原型:

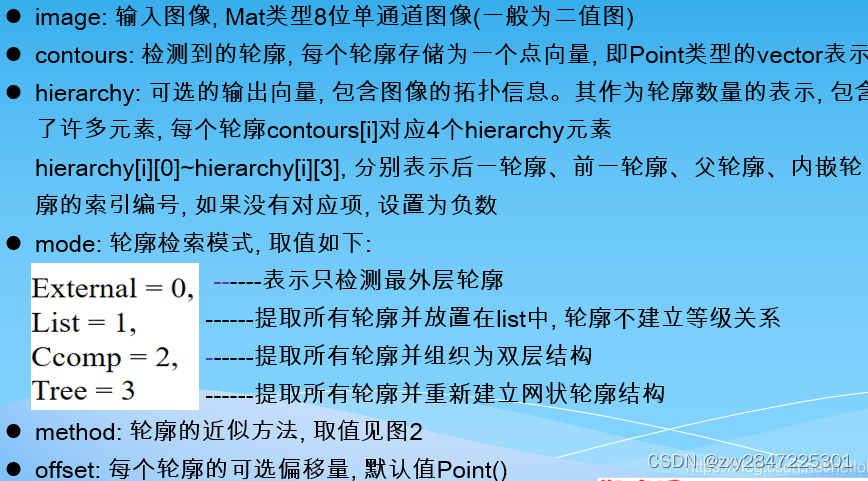
其中轮廓contours可以使用VectorOfVectorOfPoint contours = new VectorOfVectorOfPoint()进行存储;hierarchy可以使用VectorOfRect hierarchy = new VectorOfRect()进行存储
参考例子:
stopSign.png原图如下:

代码如下:
using Emgu.CV;
using Emgu.CV.Structure;
using Emgu.CV.Util;
using System;
using System.Collections.Generic;
using System.Drawing;
using System.IO;
using System.Linq;
using System.Text;
using System.Threading.Tasks;

namespace EmguCVDemo2
{
    class Program
    {
        static void Main(string[] args)
        {

            Image<Bgr,Byte> srcPic = new Image<Bgr, Byte>("stopSign.png");
            ImgFindContoursAndDraw1(srcPic);
            CvInvoke.WaitKey(0);
            Console.ReadLine();
        }

        /// <summary>
        /// 查找轮廓并绘制轮廓(方式1)
        /// </summary>
        /// <param name="srcPic"></param>
        private static void ImgFindContoursAndDraw1(Image<Bgr, Byte> srcPic)
        {
            CvInvoke.Imshow("srcPic_before", srcPic);
            Mat gray_srvPic = new Mat();
            //转灰度图
            CvInvoke.CvtColor(srcPic, gray_srvPic, Emgu.CV.CvEnum.ColorConversion.Bgr2Gray);
            VectorOfVectorOfPoint contours = new VectorOfVectorOfPoint();
            VectorOfRect hierarchy = new VectorOfRect();
            //二值化
            CvInvoke.Threshold(gray_srvPic, gray_srvPic, 100, 255, Emgu.CV.CvEnum.ThresholdType.Binary);

            //查找轮廓
            CvInvoke.FindContours(gray_srvPic, contours, hierarchy, Emgu.CV.CvEnum.RetrType.Tree, Emgu.CV.CvEnum.ChainApproxMethod.ChainApproxSimple);


            //绘制轮廓
            Mat countours_Pic = new Mat(srcPic.Size, Emgu.CV.CvEnum.DepthType.Cv8U, 3);
            for (int i = 0; i < contours.Size; i++)
            {
                VectorOfPoint vectorOfPoint = contours[i];  //轮廓是由点组成的,这是一个轮廓向量点的集合
                for (int j = 0; j< vectorOfPoint.Size-1; j++)  //这里绘制的轮廓就差最后一条线还没有闭合
                {
                    CvInvoke.Line(countours_Pic, vectorOfPoint[j], vectorOfPoint[j + 1], new MCvScalar(0, 255, 0), 3);
                    CvInvoke.Line(srcPic, vectorOfPoint[j], vectorOfPoint[j+1], new MCvScalar(0, 255, 0),3);
                }
                //最后一个点要起点相连,才能算全部闭合
                CvInvoke.Line(countours_Pic, vectorOfPoint[vectorOfPoint.Size - 1], vectorOfPoint[0], new MCvScalar(0, 255, 0), 3);
                CvInvoke.Line(srcPic, vectorOfPoint[vectorOfPoint.Size-1], vectorOfPoint[0], new MCvScalar(0, 255, 0), 3);
            }
            CvInvoke.Imshow("countours_Pic", countours_Pic);
            CvInvoke.Imshow("srcPic_after", srcPic);
            CvInvoke.WaitKey(0);
        }


    }
}
运行结果如下:
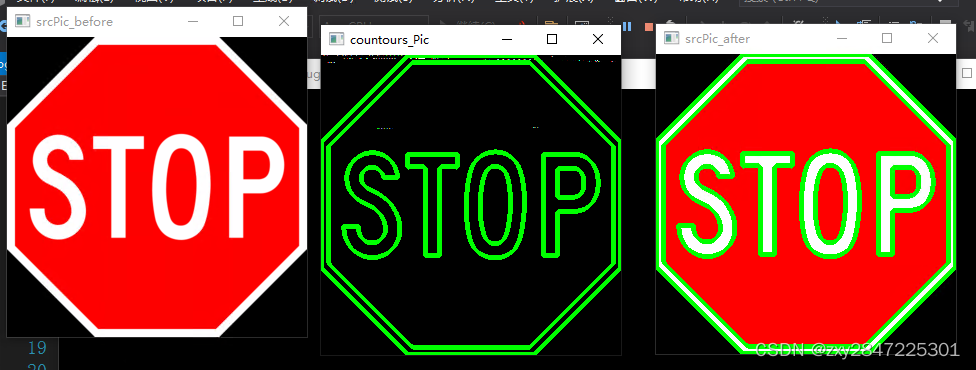
其中srcPic_before是原图,countours_Pic是轮廓,srcPic_after是在原图中绘制轮廓
上面的例子是找到轮廓后,遍历轮廓的点,然后把点与点直接通过直线连接起来组成轮廓,其实不用那么麻烦,EmguCV已经提供绘制轮廓的Api了,函数原型如下:
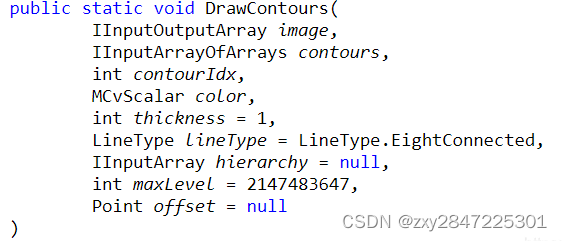
image:要绘制轮廓的图像
contours:通过查找轮廓函数查找到的轮廓信息
contourIds:要绘制contours中的那一条,一般遍历contours获取到,如contours[0]
color:线条的颜色,如new McvScalar(0,255,0)
thickness[可选]:线条的粗细
例子代码如下:
using Emgu.CV;
using Emgu.CV.Structure;
using Emgu.CV.Util;
using System;
using System.Collections.Generic;
using System.Drawing;
using System.IO;
using System.Linq;
using System.Text;
using System.Threading.Tasks;

namespace EmguCVDemo2
{
    class Program
    {
        static void Main(string[] args)
        {

            Image<Bgr,Byte> srcPic = new Image<Bgr, Byte>("stopSign.png");
            ImgFindContoursAndDraw2(srcPic);
            CvInvoke.WaitKey(0);
            Console.ReadLine();
        }


        /// <summary>
        /// 查找轮廓并绘制轮廓(方式2)
        /// </summary>
        /// <param name="srcPic"></param>
        private static void ImgFindContoursAndDraw2(Image<Bgr, Byte> srcPic)
        {
            CvInvoke.Imshow("srcPic_before", srcPic);
            Mat gray_srvPic = new Mat();
            //转灰度图
            CvInvoke.CvtColor(srcPic, gray_srvPic, Emgu.CV.CvEnum.ColorConversion.Bgr2Gray);
            VectorOfVectorOfPoint contours = new VectorOfVectorOfPoint();
            VectorOfRect hierarchy = new VectorOfRect();
            //二值化
            CvInvoke.Threshold(gray_srvPic, gray_srvPic, 100, 255, Emgu.CV.CvEnum.ThresholdType.Binary);

            //查找轮廓
            CvInvoke.FindContours(gray_srvPic, contours, hierarchy, Emgu.CV.CvEnum.RetrType.Tree, Emgu.CV.CvEnum.ChainApproxMethod.ChainApproxSimple);


            //绘制轮廓
            Mat countours_Pic = new Mat(srcPic.Size, Emgu.CV.CvEnum.DepthType.Cv8U, 3);
            for (int i = 0; i < contours.Size; i++) //遍历轮廓
            {
                CvInvoke.DrawContours(countours_Pic, contours, i, new MCvScalar(0, 255, 0), 3);
                CvInvoke.DrawContours(srcPic, contours, i, new MCvScalar(0, 255, 0), 3);
            }
            CvInvoke.Imshow("countours_Pic", countours_Pic);
            CvInvoke.Imshow("srcPic_after", srcPic);
            CvInvoke.WaitKey(0);
        }


    }
}
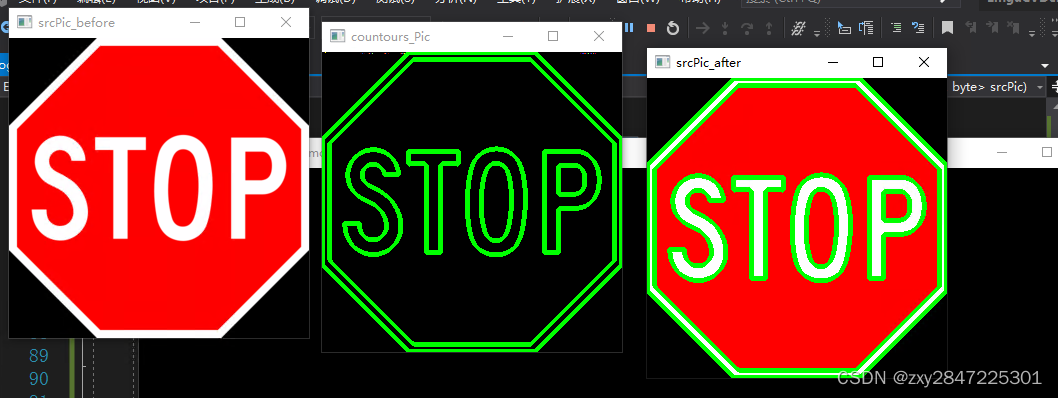
运行结果如下:


 7700
7700


 被折叠的 条评论
为什么被折叠?
被折叠的 条评论
为什么被折叠?
 到【灌水乐园】发言


