


文章仅仅用于个人的学习记录,基本上内容都是网上各个大神的杰作,此处摘录过来以自己的理解学习方式记录一下。
参考链接:
service组件是Android设计的四大组件之一,和线程什么的没有什么关系。为什么能执行耗时操作?在启动service
时,如果当前service要运行的进程没有启动,那么它就是开了一个
进
程这个进程的优先级较高。在一个进程里面那当
然可以做耗时的操作了.service就可以理解为一个上下文,每个应用都由很多个上下文组成(Activity、Service等),下
面一次来记录学习startService()和bindService()的流程,加深一下对service组件的理解.
2、startService流程.
此处我们假如在manifest中为service组件配置了android:process=".Server".睡醒来让它运行在单独的进程当中.
2.1、从应用所在进程开始发起
startService.(应用所在进程不一定是service所在进程)
调用startService(new Intent("com.zy.server")),我们分析Context的时候知道,由于继承关系此处会调用到
ContextImp中的
对应的方法.
@Overridepublic ComponentName startService(Intent service) {warnIfCallingFromSystemProcess();return startServiceCommon(service, mUser);}private ComponentName startServiceCommon(Intent service, UserHandle user) {try {validateServiceIntent(service);service.prepareToLeaveProcess();//跨境进程的时候,调用到ActivityManagerProxy中的startService.ComponentName cn = ActivityManagerNative.getDefault().startService(mMainThread.getApplicationThread(), service,service.resolveTypeIfNeeded(getContentResolver()), user.getIdentifier());if (cn != null) {if (cn.getPackageName().equals("!")) {throw new SecurityException("Not allowed to start service " + service+ " without permission " + cn.getClassName());} else if (cn.getPackageName().equals("!!")) {throw new SecurityException("Unable to start service " + service+ ": " + cn.getClassName());}}return cn;} catch (RemoteException e) {return null;}}
此时是处于当先的主进程当中,(要去启动service组件的那个进程)此时的
mMainThread当前进程的.
可以看到调用到了startServiceCommon当中,并且先通过ActivityManagerNative.getDefault()来直接返回AMS的
远程代理对象ActivityManagerProxy.AMS这个server在系统启动的时候阻碍systemServer中已经注册到serviceMan
ag
er当中然后调用它的startService方法
.注意传入的参数mMainThread.getApplicationThread().
mMainThread就是当
前的要去启动service的进程的主线程的代表类
ActivityThread.
getApplicationThread()就是获取
ActivityThread
中的ApplicationThread类型的成员变量mAppThread.它是一个Binder对象用于AMS和当前应用进程通信,很关键.
注意resolvedType发现很多时候都为null需要看service.resolveTypeIfNeeded(getContentResolver()).service
是Intent对象.
public ComponentName startService(IApplicationThread caller, Intent service,String resolvedType, int userId) throws RemoteException{Parcel data = Parcel.obtain();Parcel reply = Parcel.obtain();data.writeInterfaceToken(IActivityManager.descriptor);data.writeStrongBinder(caller != null ? caller.asBinder() : null);service.writeToParcel(data, 0);data.writeString(resolvedType);data.writeInt(userId);//此处最终会调用管道AMS的startService当中.mRemote.transact(START_SERVICE_TRANSACTION, data, reply, 0);reply.readException();ComponentName res = ComponentName.readFromParcel(reply);data.recycle();reply.recycle();return res;}
注意此处这个caller是Binder实体对象对象不是代理,它此时是
ApplicationThread的类型.首先此时还是处于主进
程当中,由ContextImp获取AMS的远程代理,然后调用这个方法,参数是有ContextImpl中传入.由上面的分析我们知道此
时传入的是
ApplicationThread对象.
2.2、进入到AMS所在的进程进行启动服务,创建相关进程的操作.
通过上面的调用,经由
mRemote进入到Binder驱动中,
此处的mRemote是一个BinderProxy对象对应于BpBinder(0),
B
inde
r机制做出相应处理后,调用到
class ActivityManage
r
Nat
ive
extends Binder 当中的
onTransact方法里。然后走
到对应的case START_SERVICE_TRANSACTION:(
此时进程切换到了AMS所在的进程当中.
)
case START_SERVICE_TRANSACTION: {data.enforceInterface(IActivityManager.descriptor);IBinder b = data.readStrongBinder();//此时是在AMS所在的进程了!!!!!!!它作为客户端,拿到了ApplicationThread Binder的代理对象.//此时已经由Binder驱动的传递,b = android.os.BinderProxy@1f1ce01d.获取了一个ApplicationThread的Binder代理对象.android.util.Log.d("zy_ser","START_SERVICE_TRANSACTION b = "+b);//IApplicationThread app = ApplicationThreadNative.asInterface(b);if(app!=null){//那么拿到这个app必然就是ApplicationThreadProxy.android.util.Log.d("zy_ser","START_SERVICE_TRANSACTION app = "+app.asBinder());}Intent service = Intent.CREATOR.createFromParcel(data);String resolvedType = data.readString();int userId = data.readInt();ComponentName cn = startService(app, service, resolvedType, userId);reply.writeNoException();ComponentName.writeToParcel(cn, reply);return true;}
此时对理解IApplicationThread的对象到底是实体
ApplicationThread
(),还是代理(ApplicationThreadProxy)很关
键了,前面一直有点晕,感觉都是传入的实体对象,还是由于对Binder机制不熟悉导致的。其实虽然在主进程中传入的时
候传入的是Binder实体对象,(此时感觉应该是交由Binder驱动去管理这个实体了,当谁获取的时候就把这个实体对应的
代
理对象发给获取者.
)那么此处这个Ibinder b就是Binderproxy对象,经过asInterface(b)调用以后,返回new Applicati
on
ThreadProxy(obj),接着调用startservice也就调用到了
AMS中的startService().传入app(ApplicationThreadProxy对象
)
@Overridepublic ComponentName startService(IApplicationThread caller, Intent service,String resolvedType, int userId) {//到AMS进程中了.......synchronized(this) {final int callingPid = Binder.getCallingPid();final int callingUid = Binder.getCallingUid();final long origId = Binder.clearCallingIdentity();ComponentName res = mServices.startServiceLocked(caller, service,resolvedType, callingPid, callingUid, userId);Binder.restoreCallingIdentity(origId);return res;}}
此处的mServices是一个ActiveServices对象,从名字上也能看出该类主要是封装了一些处于活动状态的service
组件的方法的调用.调用它的startServiceLocked().传入了Binder对象caller和callingUid、callingPid用于权限检
测.注意此时caller是ApplicationThreadProxy对象.
ComponentName startServiceLocked(IApplicationThread caller,Intent service, String resolvedType,int callingPid, int callingUid, int userId) {......final boolean callerFg;//当时前台进程启动的时候,最终应该是为true.if (caller != null) {//mAm 是ActivityManagerService.final ProcessRecord callerApp = mAm.getRecordForAppLocked(caller);if (callerApp == null) {throw new SecurityException("Unable to find app for caller " + caller+ " (pid=" + Binder.getCallingPid()+ ") when starting service " + service);}callerFg = callerApp.setSchedGroup != Process.THREAD_GROUP_BG_NONINTERACTIVE;} else {callerFg = true;}// 必须先通过retrieveServiceLocked()找到(或创建)一个ServiceRecord节点//毕竟是用这个ServiceRecord节点来管理service的.//这样它里面就有ServiceRecord了,而ServiceRecord又通过ServiceInfo实例化了很多东西ServiceLookupResult res =retrieveServiceLocked ( service , resolvedType ,callingPid, callingUid, userId, true, callerFg);if (res == null) {return null;}if (res.record == null) {//权限拒绝.return new ComponentName("!", res.permission != null? res.permission : "private to package");}ServiceRecord r = res.record;.......r.lastActivity = SystemClock.uptimeMillis();r.startRequested = true;r.delayedStop = false;r.pendingStarts.add(new ServiceRecord.StartItem(r, false, r.makeNextStartId(),service, neededGrants));final ServiceMap smap = getServiceMap(r.userId);boolean addToStarting = false;......//根据各种条件为addToStarting赋相应的值.return startServiceInnerLocked(smap, service, r, callerFg, addToStarting);}
可以看出来主要的就是把参数进行正确的赋值,然后调用startServiceInnerLocked()传入相应的参数.非常关
键的一个点就是ServiceRecord的赋值,后期很多的变量的值都是通过这个获取的。那么我们就去看一下retrieveServi
ce
Locked方法,通过该方法获取或者创建一个
ServiceRecord.(利用安装时实例化的ServiceInfo)
private ServiceLookupResult retrieveServiceLocked(Intent service,String resolvedType, int callingPid, int callingUid, int userId,boolean createIfNeeded, boolean callingFromFg) {//注意createIfNeeded为true,ServiceRecord r = null;......ServiceMap smap = getServiceMap(userId);final ComponentName comp = service.getComponent();//任何一个只要存在就算是以前创建过.(下面这么多集合)if (comp != null) {r = smap.mServicesByName.get(comp);}if (r == null) {Intent.FilterComparison filter = new Intent.FilterComparison(service);r = smap.mServicesByIntent.get(filter);}//总之希望在AMS内部的相关表格里找到对应的ServiceRecord节点,如果找不到,就创建一个新节点,并插入到相应的表格中.if (r == null) {//实在找不到的时候.try {// 从PKMS处查到ServiceInfo.(解析这个应用的时候实例化的)。//看来是需要利用安装解析时的资源,交互起作用啊.ResolveInfo rInfo =AppGlobals.getPackageManager().resolveService(service, resolvedType,ActivityManagerService.STOCK_PM_FLAGS, userId);+ServiceInfo sInfo =rInfo != null ? rInfo.serviceInfo : null;if (sInfo == null) {//没有在manifest中注册的时候此处救护为null.Slog.w(TAG, "Unable to start service " + service + " U=" + userId +": not found");return null;}ComponentName name = new ComponentName(sInfo.applicationInfo.packageName, sInfo.name);if (userId > 0) {if (mAm.isSingleton(sInfo.processName, sInfo.applicationInfo,sInfo.name, sInfo.flags)&& mAm.isValidSingletonCall(callingUid, sInfo.applicationInfo.uid)) {userId = 0;smap = getServiceMap(0);}sInfo = new ServiceInfo(sInfo);sInfo.applicationInfo = mAm.getAppInfoForUser(sInfo.applicationInfo, userId);}r = smap.mServicesByName.get(name);if (r == null && createIfNeeded) {//需要创建并且这个集合中没有的时候.Intent.FilterComparison filter= new Intent.FilterComparison(service.cloneFilter());ServiceRestarter res = new ServiceRestarter();BatteryStatsImpl.Uid.Pkg.Serv ss = null;BatteryStatsImpl stats = mAm.mBatteryStatsService.getActiveStatistics();synchronized (stats) {ss = stats.getServiceStatsLocked(sInfo.applicationInfo.uid, sInfo.packageName,sInfo.name);}//此处新建的ServiceRecord.!!!!r = new ServiceRecord(mAm, ss, name, filter, sInfo, callingFromFg, res);res.setService(r);//分别放入到两个集合当中smap.mServicesByName.put(name, r);smap.mServicesByIntent.put(filter, r);// Make sure this component isn't in the pending list.......}} catch (RemoteException ex) {}}if (r != null) {//当成功的新建或者查询到一个ServiceRecord的时候.(第二次进入的时候会直接走到这里!)if (mAm.checkComponentPermission(r.permission,callingPid, callingUid, r.appInfo.uid, r.exported)!= PackageManager.PERMISSION_GRANTED) {if (!r.exported) {//不允许外部进程调用!此处进行限制.return new ServiceLookupResult(null, "not exported from uid "+ r.appInfo.uid);}......//权限拒绝return new ServiceLookupResult(null, r.permission);}......return new ServiceLookupResult(r, null);//正常的时候返回这个.}return null;}
先来看一下返回值的类型ServiceLookupResult,这个类的定义如下:
//就封装了ServiceRecord和所需权限permission.private final class ServiceLookupResult {final ServiceRecord record;final String permission;ServiceLookupResult(ServiceRecord _record, String _permission) {record = _record;permission = _permission;}}
可以看到非常的简单,就是一个私有的内部类.做了一些简单的封装.
在介绍一下ServiceMap这个也很关键,由于Android需要支持多用户概念,所以弄了个这个。不然直接把
Servic
e
M
ap中的成员直接方法AMS当中即可,现在是每个AMS中有个成员变量ActiveServices mServices.
在ActiveSer
vic
es中
final SparseArray<ServiceMap> mServiceMap = new SparseArray<ServiceMap>():它里面以key = userId,
value =
ServiceMap对象来存放数据。每个用户对应一个
ServiceMap.
ServiceMap:描述当前用户的services
的消息.
在
ServiceMap当中:(class ServiceMap extends Handler
)
1)、final ArrayMap<ComponentName, ServiceRecord> mServicesByName
= new ArrayMap<ComponentName, ServiceRecord>();
mServicesByName中
以key =
ComponentName,value =
ServiceRecord.来存储ServiceRecords.
2)、final ArrayMap<Intent.FilterComparison, ServiceRecord> mServicesByIntent
= new ArrayMap<Intent.FilterComparison, ServiceRecord>();
mServicesByIntent
以key =
FilterComparison,
value =
ServiceRecord.来存储ServiceRecords.
3)、final ArrayList<ServiceRecord> mDelayedStartList
= new ArrayList<ServiceRecord>();
mDelayedStartList是一个
ArrayList集合直接存放了需要延迟启动的
ServiceRecords.
不管ServiceRecord表格被放到哪里,其本质都是一致的。而AMS必须保证在实际启动一个Service之前查
到或
创建对应的ServiceRecord节点。
此时再回头看retrieveServiceLocked就比较容易理解了,先是调用getServiceMap(userId)来取出来当前用户对
应的ServiceMap smap.然后再尝试从
smap中的成员变量mServicesByName、mServicesByIntent中取出
ServiceRecord
如果仍然没有找到,那就需要创建一个了.此时就需要从PKMS中获取对应ServiceInfo变量,来实例化
ServiceRecord
这就体现到了,两个系统的Service之间的资源共享和利用了.通过
ResolveInfo rInfo =AppGlobals . getPackageManager (). resolveService ( service , resolvedType ,ActivityManagerService.STOCK_PM_FLAGS, userId);ServiceInfo sInfo =rInfo != null ? rInfo . serviceInfo : null ;if (sInfo == null) {Slog.w(TAG, "Unable to start service " + service + " U=" + userId +": not found" );return null;}
接下来如果符合条件(r == null && createIfNeeded)那么就证明需要创建一个ServiceRecord.
r = new ServiceRecord(mAm, ss, name, filter, sInfo, callingFromFg, res);我们关注一下传入的
sInfo.在
ServiceRecord的构造中,会利用它来实例化很多变量.特别要注意的是ServiceRecord extends Binder.它是一个
Binder对象,俺么它为什么要是一个Binder对象那?当前你是在AMS的进程中,你要不是Binder,怎么跨进程传递?
如何利用各个变量实现最终在service所要运行的进程中创建service.先提一下
ServiceRecord
待"传到"service运行
的进程时,这个
ServiceRecord的
Binder实体对应的Binder代理被称作token,记在了ActivityThread的CreateServ
ice
Data对象
的token
域中,并且最终通过调用Service的attach()方法存入到Service类的IBinder mToken变量当中.
此处新建完ServiceRecord后,把
ServiceRecord分别添加到smap.mServicesByName、smap.mServicesByIntent两
个集合当中,最后返回new ServiceLookupResult(r, null)到startServiceLocked当中.此时res里面的record对象就
是记录的
ServiceRecord了。最后调用startServiceInnerLocked()去做进一步的处理.
注意:
此时刚新建完
ServiceRecord,它的的成员变量app还未赋值!也就是该service组件还没有关联ProcessRecord
ComponentName startServiceInnerLocked(ServiceMap smap, Intent service,ServiceRecord r, boolean callerFg, boolean addToStarting) {......//真正开启service的地方。String error = bringUpServiceLocked(r, service.getFlags(), callerFg, false);//注意此处反回值是null的时候,证明没有异常.if (error != null) {return new ComponentName("!!", error);}......return r.name;}
可以看到就是调用了bringUpServiceLocked()的方法来进一步的操作.
private final String bringUpServiceLocked(ServiceRecord r,int intentFlags, boolean execInFg, boolean whileRestarting) {......//第一次启动的逻辑到这里的时候r.app此时还为null!!!!//当你再次执行startService的时候,此时下面条件会符合,因为当前进程已经存在了.if (r.app != null && r.app.thread != null) {//证明以前已经启动过了,不走create了,直接取走onStartCommandsendServiceArgsLocked(r, execInFg, false);return null;}......// Service is now being launched, its package can't be stopped.try {AppGlobals.getPackageManager().setPackageStoppedState(r.packageName, false, r.userId);} catch (RemoteException e) {} catch (IllegalArgumentException e) {}final boolean isolated = (r.serviceInfo.flags&ServiceInfo.FLAG_ISOLATED_PROCESS) != 0;final String procName = r.processName;ProcessRecord app;if (!isolated) {//默认的时候这个进程名字和包名字一样,这样的话.就不需要新建(一般,因为这个进程一般都早已启动),//不一样的话自己配置过process,那么就需要新建了.app = mAm.getProcessRecordLocked(procName, r.appInfo.uid, false);//此处是假如要运行service组件的进程已经启动的话.(注意不一定关联),直接调用realStartServiceLocked.//默认没有在manifest中配置process的时候就会启动因为已经在当前进程中起来了.if (app != null && app.thread != null) {try {app.addPackage(r.appInfo.packageName, r.appInfo.versionCode, mAm.mProcessStats);//不需要再去开启进程,直接去启动服务.realStartServiceLocked(r, app, execInFg);return null;} catch (RemoteException e) {}}} else {app = r.isolatedProc;}//到这的时候还这个service组件想要运行的进程还没启动,那么我们要启动这个进程.//但是有一个问题,我们这个组件需要放到某个地方,当进程启动个完毕的时候回去执行它,加载它对应的生命周期.if (app == null) {if ((app=mAm.startProcessLocked(procName, r.appInfo, true, intentFlags,"service", r.name, false, isolated, false)) == null) {......return msg;}if (isolated) {r.isolatedProc = app;}}if (!mPendingServices.contains(r)) {mPendingServices.add(r);}......return null;}
AMS.
getProcessRecordLocked就是从
mProcessNames这个数据集合中查询而已.
也可以看出来一个问题,当进程不
存在的时候会调用AMS的startProcessLocked去启动一个进程.
我们此处分析的是在新进程中开启service组件的流程,所以此时会走到AMS的startProcessLocked当中.此处有个
问题就是系统如何判断你这个进程有没有启动的?第一步先是假如ServicRecord.app已经有值,证明已经关联.那么进
程肯定是已经启动的,第二步调用:
AMS.getProcessRecordLocked.传入要启动的进程的名字和uid,如果这个
ProcessRecord已存在,那么证明继承也是已经启动的(进程启动的时候会按照规则创建ProcessRecord)
而此流程
我们
以在别的地方分析过,我们看和启动服务有关的.此处的大概流程是:AMS.
startProcessLocked->Process.
start
->ActivityThread.main->AMS.attachApplication->ActiveService.attachApplicationLocked.
注意此时进程已经切换到了新建的这个进程当中(service组件要运行的这个进程)此时的ActivityThread已经又变
了,mAppThread也跟着改变.
直到ActivityThread的attach方法此时还是在新建的进程当中.
private void attach(boolean system) {......if (!system) {......final IActivityManager mgr = ActivityManagerNative.getDefault();try {mgr.attachApplication(mAppThread);} catch (RemoteException ex) {}} else {......}......}
同样的道理,又去获取AMS的远程代理接口,调用它attachApplication(mAppThread)传入的是
ApplicationThread.
此时进入到远程代理接口ActivityManagerProxy当中查看.
public void attachApplication(IApplicationThread app) throws RemoteException{Parcel data = Parcel.obtain();Parcel reply = Parcel.obtain();data.writeInterfaceToken(IActivityManager.descriptor);data.writeStrongBinder(app.asBinder());//app显然是 ApplicationThreadNative对象,不是远程代理.mRemote.transact(ATTACH_APPLICATION_TRANSACTION, data, reply, 0);reply.readException();data.recycle();reply.recycle();}
然后又通过mRemote,发往Binder驱动.驱动注册这个(匿名Binder对象?感觉应该是).其它对象获取的时候,会获取
到驱动分配给它的远程代理.然后又走到了ActivityManagerNative的onTransact()中对应的case.一定要注意此时又进入
到了AMS的进程当中.获取到IApplicationThread对象的远程代理,也就是ApplicationThreadProxy.
case ATTACH_APPLICATION_TRANSACTION: {data.enforceInterface(IActivityManager.descriptor);//此时又从新建的进程中走到了AMS的进程中了的!!!IApplicationThread app = ApplicationThreadNative.asInterface(data.readStrongBinder());//所以出来的时候已经是代理了IApplicationThreadif (app != null) {attachApplication(app);}reply.writeNoException();return true;}
可以看到在app不为null时候调用attachApplication.也就是调用AMS的attachApplication().注意传入的参数是一
个IApplicationThread它具体是一个BinderProxy对象也就是ApplicationThreadProxy.接下来贴一段AMS中的
attachA
p
p
li
cationLocked方法.
private final boolean attachApplicationLocked(IApplicationThread thread,int pid) {......if (pid != MY_PID && pid >= 0) {synchronized (mPidsSelfLocked) {app = mPidsSelfLocked.get(pid);}} else {app = null;}......app.makeActive(thread, mProcessStats);......boolean badApp = false;boolean didSomething = false;// See if the top visible activity is waiting to run in this process...if (normalMode) {try {if (mStackSupervisor.attachApplicationLocked(app)) {didSomething = true;}} catch (Exception e) {Slog.wtf(TAG, "Exception thrown launching activities in " + app, e);badApp = true;}}// Find any services that should be running in this process...if (!badApp) {try {didSomething |= mServices.attachApplicationLocked(app, processName);//zy} catch (Exception e) {}}......return true;}
这个mPidsSelfLocked是在什么时候初始化的那?在AMS的startProcessLocked当中哎调用Procee.start()后,下面
有一段代码如下。注意这个锁,用来保证这边先执行到,才回去get.
synchronized (mPidsSelfLocked) {this.mPidsSelfLocked.put(startResult.pid, app);if (isActivityProcess) {Message msg = mHandler.obtainMessage(PROC_START_TIMEOUT_MSG);msg.obj = app;mHandler.sendMessageDelayed(msg, startResult.usingWrapper? PROC_START_TIMEOUT_WITH_WRAPPER : PROC_START_TIMEOUT);}}
取到app后,app.makeActive(thread, mProcessStats)来为当前进程设置
IApplicationThread对象.
然后是调用到ActiveServices中的
boolean attachApplicationLocked(ProcessRecord proc, String processName)throws RemoteException {boolean didSomething = false;// Collect any services that are waiting for this process to come up.if (mPendingServices.size() > 0) {//如果有服务需要(第一次启动)ServiceRecord sr = null;try {for (int i=0; i<mPendingServices.size(); i++) {sr = mPendingServices.get(i);if (proc != sr.isolatedProc && (proc.uid != sr.appInfo.uid|| !processName.equals(sr.processName))) {continue;}mPendingServices.remove(i);i--;//在当前进程中添加当前的组件.proc.addPackage(sr.appInfo.packageName, sr.appInfo.versionCode,mAm.mProcessStats);//从调用下面方法Oncreate开始.realStartServiceLocked(sr, proc, sr.createdFromFg);didSomething = true;}} catch (RemoteException e) {}}if (mRestartingServices.size() > 0) {//mRestartingServices需要重启的服务.ServiceRecord sr = null;for (int i=0; i<mRestartingServices.size(); i++) {......}}return didSomething;}
可以看到最终还是通过realStartServiceLocked来启动的.传入对应的ServiceRecord.此处就是从前面我们存入的地
方获取的.
private final void realStartServiceLocked(ServiceRecord r,ProcessRecord app, boolean execInFg) throws RemoteException {......r.app = app;//在此处对进程和ServiceRecord进行关联.!!!!r.restartTime = r.lastActivity = SystemClock.uptimeMillis();//放入到ProcessRecord内的成员变量services.//final ArraySet<ServiceRecord> services = new ArraySet<ServiceRecord>();存放着目前看是所通过startService启动//的service组件.app.services.add(r);......boolean created = false;try {......//通过进程的ProcessRecord的thread.(和AMS交互的Binder)app.thread.scheduleCreateService(r, r.serviceInfo,mAm.compatibilityInfoForPackageLocked(r.serviceInfo.applicationInfo),app.repProcState);r.postNotification();created = true;} catch (DeadObjectException e) {} finally {......}......//开始执行onsttartcommand.sendServiceArgsLocked(r, execInFg, true);......}
此处三个关键点
1、r.app = app 实现进程关联相关的ServiceRecord。
2、调用app.thread.scheduleCreateService(). 来实现从AMS进程往新建的进程(Service组件要运行的进程)
3、调用sendServiceArgsLocked().执行接下来的onStartCommand等生命周期.
我们关注一下scheduleCreateService().方法和参数.它是通过Binder最终调用到了ActivityThread中的Applicati
on
Thread成员变量中.来实现从AMS到Service要运行的进程的切换,然后就要在新切换到的进程中实例化Service组件了
处以传递的参数ServiceRecord作为第一个参数传入进去了,这时候就体现出它是一个Binder对象的必要了,在另一个
进程就可以得到合理的
ServiceRecord,然后使用它所携带的成员变量的数据.
下面分析ActivityThread中的scheduleCreateService
public final void scheduleCreateService(IBinder token,ServiceInfo info, CompatibilityInfo compatInfo, int processState) {//跑到了当前Service组件要运行的进程中updateProcessState(processState, false);//就是简单的通过CreateServiceData封装了一下.CreateServiceData s = new CreateServiceData();s.token = token;s.info = info;s.compatInfo = compatInfo;sendMessage(H.CREATE_SERVICE, s);}
进入如下case.
case CREATE_SERVICE:Trace.traceBegin(Trace.TRACE_TAG_ACTIVITY_MANAGER, "serviceCreate");handleCreateService((CreateServiceData)msg.obj);Trace.traceEnd(Trace.TRACE_TAG_ACTIVITY_MANAGER);break;
调用handleCreateService().
private void handleCreateService(CreateServiceData data) {// If we are getting ready to gc after going to the background, well// we are back active so skip it.unscheduleGcIdler();LoadedApk packageInfo = getPackageInfoNoCheck(data.info.applicationInfo, data.compatInfo);Service service = null;try {java.lang.ClassLoader cl = packageInfo.getClassLoader();//实例化service,可以看出来当不是service组件实例会报错.service = (Service) cl.loadClass(data.info.name).newInstance();} catch (Exception e) {}try {ContextImpl context = ContextImpl.createAppContext(this, packageInfo);//每实例化一个service就是实例化一个context然后把这个service设置为它的OuterContextcontext.setOuterContext(service);Application app = packageInfo.makeApplication(false, mInstrumentation);//就是初始化Service的一些变量.service.attach(context, this, data.info.name, data.token, app,ActivityManagerNative.getDefault());service.onCreate();mServices.put(data.token, service);......} catch (Exception e) {......}}
这样最终通过反射在新建的进程中就调用了当前的service组件的OnCreate方法.
至此完成了startService的启动.接下来回到ActiveServices的realStartServiceLocked当中,app.thread.schedu
le
Cre
ateService()继续往下执行,会调用sendServiceArgsLocked(r, execInFg, true).经过类似执行OnCreate的方法
的调用会走到onStartCommand()当中.
一路下来的进程切换:
1、先是在主进程当中,调用startservie(..).然后获取AMS的远程代理
2、进入到AMS所在的进程中调用
startservie().进一步做处理.
3、此时假如要运行的服无不在当前进程而是在新建的进程,那么进入到新建的进程中.调用它的ActivityThread的
main函数来做进一步的处理.
4、又由新建的进程进入到AMS所在的进程,封装一个Binder对象ServiceRecord.
5、从AMS中再次回到新建的进程中根据传入的
ServiceRecord来完成service组件的创建的启动.
3、bindeService的流程.
传入对应参数有如下三个:
Intent service :启动对应的Service用的.
ServiceConnection conn :ServiceConnection接口的对象。定义如下:
public interface ServiceConnection {public void onServiceConnected(ComponentName name, IBinder service);public void onServiceDisconnected(ComponentName name);}
每当用户调用bindService(),就意味着要建立一个新的"逻辑连接".当这个连接建立完毕后,系统内不会回调ServiceCon
ne
ction的onServiceConnected()
接口.但是onServiceDisconnected并不是在unBindeService时回调的,而是
当目标service
所在的进程意外挂掉或者被杀掉时,系统才会回调onServiceDisconnected().
int flags:标志位,当为Context.BIND_AUTO_CREATE.才会在绑定后就启动service.
接下来我们就分析一下bindservice的具体流程.从Activity.
bindservice()---->ContextImpl.
bindservice.中间的调用
流程此处不记录。!!!!一定注意此时还是在主进程(要进行bindeService的那个进程当中)
@Overridepublic boolean bindService(Intent service, ServiceConnection conn,int flags) {warnIfCallingFromSystemProcess();return bindServiceCommon(service, conn, flags, Process.myUserHandle());}private boolean bindServiceCommon(Intent service, ServiceConnection conn, int flags,UserHandle user) {IServiceConnection sd;......if (mPackageInfo != null) {//在Android平台上,要和其他进程建立逻辑连接往往都需要利用binder机制。//注意这个获取的位置,很早!还没进入AMS之前就搞定了.startService就没有,//就是获取在ServiceDispatcher构造中实例化的内部类InnerConnection//getOuterContext:这个outer是当前进程所在的界面的service或者activity的context.sd = mPackageInfo.getServiceDispatcher(conn, getOuterContext(),mMainThread.getHandler(), flags);//最终在publishServiceLocked方法中有用到sd,为什么要是一个binder那?此时的它是一个类的对象把,想调用它的方法,//在本进程中的时候胡奥说,直接导包用,但是要是跨进程那?没法用了,而这个的用处就是最后是在AMS当中.所以要跨进程//传输啊,放到AMS中的某个类的封装李,到后面直接用.} else {throw new RuntimeException("Not supported in system context");}validateServiceIntent(service);try {IBinder token = getActivityToken();if (token == null && (flags&BIND_AUTO_CREATE) == 0 && mPackageInfo != null&& mPackageInfo.getApplicationInfo().targetSdkVersion< android.os.Build.VERSION_CODES.ICE_CREAM_SANDWICH) {flags |= BIND_WAIVE_PRIORITY;}service.prepareToLeaveProcess();int res = ActivityManagerNative.getDefault().bindService(mMainThread.getApplicationThread(), getActivityToken(),service, service.resolveTypeIfNeeded(getContentResolver()),sd, flags, user.getIdentifier());//zy 注意这个sd.writeStrongBinder写入......return res != 0;} catch (RemoteException e) {return false;}}
可以看到调用到了函数bindServiceCommon.其中mPackageInfo是LoadedApk对象,个人感觉应该是在安装应用程序的时候
解析和实例化的,此处一般都不为null.接下来就是很关键的IServiceConnection对象了.我们去看一下它相关的具体实现,
在LoadedApk.java中有一个静态的final的内部类ServiceDispatcher.(观类名而知其意啊,service dispatcher 服务
分
发管理器,缩写sd)只保留我们分析用的函数和变量.
static final class ServiceDispatcher {private final ServiceDispatcher.InnerConnection mIServiceConnection;private final ServiceConnection mConnection;private final Context mContext;private final Handler mActivityThread;private final ServiceConnectionLeaked mLocation;private final int mFlags;private RuntimeException mUnbindLocation;private boolean mDied;private boolean mForgotten;private static class ConnectionInfo {IBinder binder;IBinder.DeathRecipient deathMonitor;}//ActivityManagerServic后续就是要通过这个Binder对象和ServiceConnection通信的。private static class InnerConnection extends IServiceConnection.Stub {final WeakReference<LoadedApk.ServiceDispatcher> mDispatcher;InnerConnection(LoadedApk.ServiceDispatcher sd) {//!!注意它的构造传入的参数.mDispatcher = new WeakReference<LoadedApk.ServiceDispatcher>(sd);}public void connected(ComponentName name, IBinder service) throws RemoteException {LoadedApk.ServiceDispatcher sd = mDispatcher.get();//这个get是什么意思?难道是弱引用的一种使用?if (sd != null) {sd.connected(name, service);}}}private final ArrayMap<ComponentName, ServiceDispatcher.ConnectionInfo> mActiveConnections= new ArrayMap<ComponentName, ServiceDispatcher.ConnectionInfo>();ServiceDispatcher(ServiceConnection conn,Context context, Handler activityThread, int flags) {//并且每一个ServiceDispatcher内部都有一个private mIServiceConnection.1对1.mIServiceConnection = new InnerConnection(this);mConnection = conn;mContext = context;mActivityThread = activityThread;mLocation = new ServiceConnectionLeaked(null);mLocation.fillInStackTrace();mFlags = flags;}......ServiceConnection getServiceConnection() {return mConnection;}IServiceConnection getIServiceConnection() {return mIServiceConnection;}int getFlags() {return mFlags;}public void connected(ComponentName name, IBinder service) {if (mActivityThread != null) {mActivityThread.post(new RunConnection(name, service, 0));} else {doConnected(name, service);}}public void doConnected(ComponentName name, IBinder service) {ServiceDispatcher.ConnectionInfo old;ServiceDispatcher.ConnectionInfo info;synchronized (this) {if (mForgotten) {// We unbound before receiving the connection; ignore// any connection received.return;}old = mActiveConnections.get(name);if (old != null && old.binder == service) {// Huh, already have this one. Oh well!return;}if (service != null) {// A new service is being connected... set it all up.mDied = false;info = new ConnectionInfo();info.binder = service;info.deathMonitor = new DeathMonitor(name, service);try {service.linkToDeath(info.deathMonitor, 0);mActiveConnections.put(name, info);} catch (RemoteException e) {// This service was dead before we got it... just// don't do anything with it.mActiveConnections.remove(name);return;}} else {// The named service is being disconnected... clean up.mActiveConnections.remove(name);}if (old != null) {old.binder.unlinkToDeath(old.deathMonitor, 0);}}// If there was an old service, it is not disconnected.if (old != null) {mConnection.onServiceDisconnected(name);}// If there is a new service, it is now connected.if (service != null) {//这里的mConnection变量的类型的ServiceConnection,它是在前面的Step 4中设置好的.mConnection.onServiceConnected(name, service);//zy 最终回调到这里.}}......private final class RunConnection implements Runnable {RunConnection(ComponentName name, IBinder service, int command) {mName = name;mService = service;mCommand = command;}public void run() {if (mCommand == 0) {doConnected(mName, mService);} else if (mCommand == 1) {doDeath(mName, mService);}}final ComponentName mName;final IBinder mService;final int mCommand;}private final class DeathMonitor implements IBinder.DeathRecipient{//检测service是否挂掉了,挂掉的话,最终调用到传入的mConnection.onServiceDisconnected(name);}}
由上可以看到
IServiceConnection.最终是由ServiceDispatcher.InnerConnection内部来来实现,但是
InnerConnection
是一个私有的内部类,那么肯定是通过某个暴漏的接口来获取它.这个接口就是getIServiceConnection().我们需要先看一
下ServiceDispatcher的构造。
在构造中:
1、先是调用mIServiceConnection = new InnerConnection(this);来实例化一个
InnerConnection也就是
IServi
ceConne
ction对象.由此也可以看出,每一个
ServiceDispatcher内部都有一个
IServiceConnection
.
//ActivityManagerServic后续就是要通过这个Binder对象和ServiceConnection通信的。private static class InnerConnection extends IServiceConnection.Stub {final WeakReference<LoadedApk.ServiceDispatcher> mDispatcher;InnerConnection(LoadedApk.ServiceDispatcher sd) {//!!注意它的构造传入的参数.mDispatcher = new WeakReference<LoadedApk.ServiceDispatcher>(sd);}public void connected(ComponentName name, IBinder service) throws RemoteException {LoadedApk.ServiceDispatcher sd = mDispatcher.get();//这个get是什么意思?那那倒是弱引用的一种使用?if (sd != null) {sd.connected(name, service);}}}
这个IServiceConnection实现类InnerConnection,首先它是一个binder对象,可以跨进程传输.内部主要的就是一个
connected方法.该方法两个参数:
ComponentName name :启动的那个intent
IBinder service : 这个Binder对象就是我们要绑定的service中是的onBinde()方法返回的那个Binder对象.
最终就是调用了,当前
InnerConnection所属的
ServiceDispatcher的connected方法.再往下的具体内容后面分析.
2、接着为ServiceConnection mConnection进行赋值,把传入的connect赋值给它.
3、mContext = context;把传入的context上下文进行赋值.
4、mActivityThread = activityThread;
mActivityThread是一个
Handler对象.此处前面的传入是mMainThread.get
Ha
n
dler().是当前主线程的Handler.拿到此Handler,就可以往主线程发送消息和处理事件了.最终的onService
Conne
cted和onServiceDisconnected都是在当前进程的主线程中执行的.
5、mLocation、mFlags暂不分析.
mFlags就是我们Binderservice传入的最后一个参数.
分析完ServiceDispatcher我们接着回到ContextImpl的bindServiceCommon当中.
sd = mPackageInfo.getService
Dispatcher
(conn, getOuterContext(),
mMainThread.getHandler(), flags);
getOuterContext():这个Context是在最终启动一个Service或者Activity时实例化的,也就是说此处代表的是当前要进
行绑定service的这个界面(Activity、service的Outer(context对象))
其它的参数都十分简单,最终去调用LoadedApk的getServiceDispatcher去获得一个IServiceConnection对象.其实此处
的
函数名字并不好此处最终不是获得一个ServiceDispatcher对象,它最后返回的是IServiceConnection它是
ServiceDisp
at
cher的内部类
InnerConnec
tion对象.
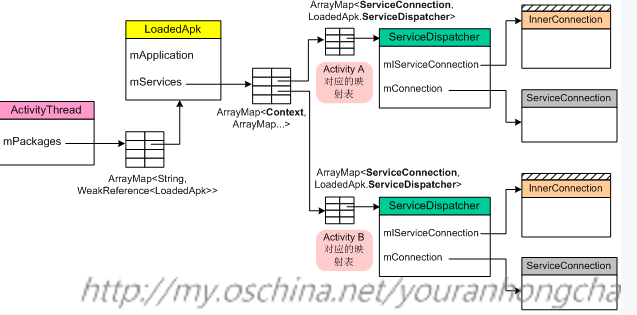
public final IServiceConnection getServiceDispatcher(ServiceConnection c,Context context, Handler handler, int flags) {synchronized (mServices) {LoadedApk.ServiceDispatcher sd = null;//context 以context为一个实例.android.util.Log.d("zy_bind","LoadPak getServiceDispatcher context= " + context);//所以一个services 对应一个map.第二次bindservice的时候此处就不为null了ArrayMap<ServiceConnection, LoadedApk.ServiceDispatcher> map = mServices.get(context);// 第一次应该是nullif (map != null) {sd = map.get(c);}if (sd == null) {//实例化ServiceDispatchersd = new ServiceDispatcher(c, context, handler, flags);if (map == null) {map = new ArrayMap<ServiceConnection, LoadedApk.ServiceDispatcher>();mServices.put(context, map);//BinderService在此处放入相应的集合.}map.put(c, sd);//放入对应的集合.} else {sd.validate(context, handler);}return sd.getIServiceConnection();}}
mServices声明如下:存放的是所有binderService对应的service.
private final ArrayMap<Context, ArrayMap<ServiceConnection, LoadedApk.ServiceDispatcher>> mServices
= new ArrayMap<Context, ArrayMap<ServiceConnection, LoadedApk.ServiceDispatcher>>();
可以看到,以Context为key.
ArrayMap为value. value中又以
ServiceConnection为key,
ServiceDispatcher为value.
所以:mServices.get(context),同一个上下文(当前所处的service或者Activity界面的outerContext,不是调用binde
Service时候使用的那个上下文Context) 有一个arrayMap,用来存储它的所有的
ServiceConnection.然后在这个map中,
又存入了
ServiceConnection和它对应的ServiceDispatcher.
通过上面代码也可以看出来一个ServiceConnection对应一个ServiceDispatcher.因为在map有的时候,以key = Servi
ce
Co
nnection去获取
ServiceDispatcher.而当已经存放过后,就会获取到上次关联的那一个.最终调用到了,刚实例化的
ServiceDispatcher的getIServiceConnection().去获取在构造中实例的
InnerConnec
tion对象返回回去.
下面贴上依然红茶写的图:
再回到ContextImpl的bindServiceCommon().获取到IServiceConnection sd以后,最终调用AMS的proxy去进行跨进程
通信,此时把sd作为参数通过bindService传入到了AMS所在的进程当中.在ActivityManagerProxy中的bindService会
data.writeStrongBinder(connection.asBinder());把它写入到Binder驱动当中,(此时应该就是匿名binder吧?),接下来
就通过binder驱动进入到了AMS所在的进程当中了.AMS.bindService().
public int bindService(IApplicationThread caller, IBinder token,Intent service, String resolvedType,IServiceConnection connection, int flags, int userId) {......synchronized(this) {//和startService一样经过驱动到这里以后,IApplicationThread caller就为BinderProxy了。return mServices.bindServiceLocked(caller, token, service, resolvedType,connection, flags, userId);}}
同样直接调用到了ActiveService中相关的方法.此时传入的前面进程中获取的connection,到着个AMS中就是BinderPr
oxy代理对象了.参数token,是在主进程中通过getActivityToken()来获取的.它当前的Activity界面在AMS里面的一个"标
记",下面通过这个标记就可以将这
个代表Activity的ActivityRecord取回来了.
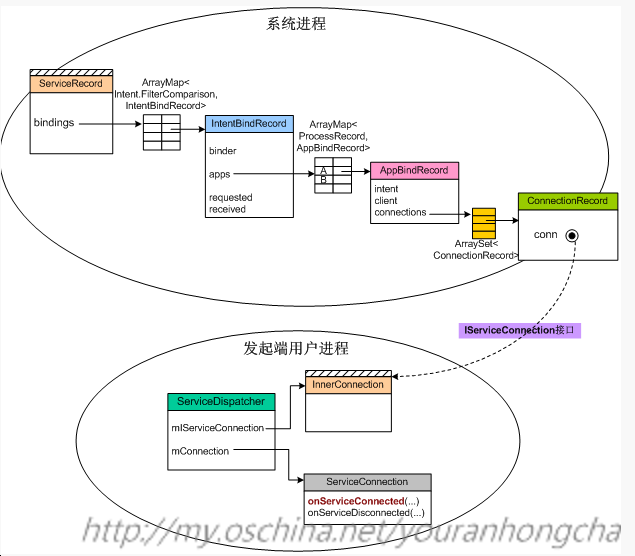
int bindServiceLocked(IApplicationThread caller, IBinder token,Intent service, String resolvedType,IServiceConnection connection, int flags, int userId) {......final ProcessRecord callerApp = mAm.getRecordForAppLocked(caller);......ActivityRecord activity = null;//发起绑定动作是activity的时候,此处不为nullif (token != null) {activity = ActivityRecord.isInStackLocked(token);if (activity == null) {Slog.w(TAG, "Binding with unknown activity: " + token);return 0;}}//那要是在service当中启动的service是不是就null?int clientLabel = 0;PendingIntent clientIntent = null;......ServiceLookupResult res =retrieveServiceLocked(service, resolvedType,Binder.getCallingPid(), Binder.getCallingUid(), userId, true, callerFg);......ServiceRecord s = res.record;//这个来源和startService的一样.final long origId = Binder.clearCallingIdentity();try {......//相对于一个Service而言,有多少应用和它建立了绑定关系,就会有多少个AppBindRecord节点.//当然,一个应用里可以有多个地方发起绑定动作,//所以AppBindRecord里需要用一个ArraySet<ConnectionRecord>记录下每个绑定动作对应的逻辑连接节点。AppBindRecord b = s.retrieveAppBindingLocked(service, callerApp);//每当用户调用bindService()时,最终的表现是向ServiceRecord内部的某张映射表里添加一个新的ConnectionRecord节点.//在实际运作时,这个节点还会记录进其他几个映射表里(比如系统总映射表),可能是方便以后的查询等动作吧//实例化ConnectionRecord把IServiceConnection代理端记录到ConnectionRecord节点里.//这里的参数connection是一个Binder对象,它的类型是LoadedApk.ServiceDispatcher.InnerConnectionConnectionRecord c = new ConnectionRecord(b, activity,connection, flags, clientLabel, clientIntent);IBinder binder = connection.asBinder();ArrayList<ConnectionRecord> clist = s.connections.get(binder);if (clist == null) {clist = new ArrayList<ConnectionRecord>();s.connections.put(binder, clist);}clist.add(c);b.connections.add(c);if (activity != null) {if (activity.connections == null) {activity.connections = new HashSet<ConnectionRecord>();}activity.connections.add(c);}b.client.connections.add(c);clist = mServiceConnections.get(binder);//这个表应该是比较重要的.if (clist == null) {clist = new ArrayList<ConnectionRecord>();mServiceConnections.put(binder, clist);}clist.add(c);//可见设置这个BIND_AUTO_CREATE flag的时候才会去调用bringUpServiceLockedif ((flags&Context.BIND_AUTO_CREATE) != 0) {s.lastActivity = SystemClock.uptimeMillis();if (bringUpServiceLocked(s, service.getFlags(), callerFg, false) != null) {return 0;}}......//如果进程已启动s.app !=null.//并且已收到广播received!这个是在Activeservices. publishServiceLocked的时候对相应的if (s.app != null && b.intent.received) {// Service is already running, so we can immediately// publish the connection.try {//直接调用connected.c.conn.connected(s.name, b.intent.binder);} catch (Exception e) {Slog.w(TAG, "Failure sending service " + s.shortName+ " to connection " + c.conn.asBinder()+ " (in " + c.binding.client.processName + ")", e);}// If this is the first app connected back to this binding,// and the service had previously asked to be told when// rebound, then do so.if (b.intent.apps.size() == 1 && b.intent.doRebind) {//该函数主要是向目标service发起绑定的请求,requestServiceBindingLocked(s, b.intent, callerFg, true);}} else if (!b.intent.requested) {requestServiceBindingLocked(s, b.intent, callerFg, false);}......} finally {Binder.restoreCallingIdentity(origId);}return 1;}
该方法一直到retrieveServiceLocked来获取或创建这个service对应的ServiceRecord,都是和startService差不多的,
我们重点分析一下后面的操作,先是调用
ServiceRecord的
retrieveAppBindingLocked方法去获取一个AppBinderRecord对象
,传入的参数是Intent:启动这个service时的,ProcessRecord :callerApp 这个时当前进程的,就是要去执行binde操作
的这个进程。(是以应用程序为单位的,因为
ProcessRecord
是通过当前应用的主进程caller来获取的
)
public AppBindRecord retrieveAppBindingLocked(Intent intent,ProcessRecord app ) {Intent.FilterComparison filter = new Intent.FilterComparison(intent);IntentBindRecord i = bindings.get(filter);if (i == null) {i = new IntentBindRecord(this, filter);bindings.put(filter, i);}AppBindRecord a = i.apps.get(app);if (a != null) {return a;}a = new AppBindRecord(this, i, app);i.apps.put(app, a);return a;}
此函数功能就是去获取(retrieve)一个AppBinding对象.
final ArrayMap<Intent.FilterComparison, IntentBindRecord> bindings
= new ArrayMap<Intent.FilterComparison, IntentBindRecord>();
可以看到ServiceRecord的成员变量bindings,是以key =
Intent.FilterComparison,value =
IntentBindRecord对象
进
行存储的
ArrayMap
集合。所以先以传入的intent实例化一个
Intent.FilterComparison对象,然后去看
bindings有没有该
key对应的value,如果没有再实例化value也就是
IntentBindRecord对象,然后存入到bindings当中。而AppBindRecord那?
我们先来看一下
IntentBindRecord对象,它用来描述指定的Intent,该Intent已经被绑定到某个service了。看这个类的名
字Intent bind绑定 Record记录。它的构造很简单
final class IntentBindRecord {/** The running service. */final ServiceRecord service;/** The intent that is bound.*/final Intent.FilterComparison intent; ///** All apps that have bound to this Intent. */final ArrayMap<ProcessRecord, AppBindRecord> apps= new ArrayMap<ProcessRecord, AppBindRecord>();/** Binder published from service. */IBinder binder;//并没有实例化它.最终是吧自己实现的Service放到了这里.......IntentBindRecord(ServiceRecord _service, Intent.FilterComparison _intent) {service = _service;intent = _intent;}}
它里面除了构造传入的参数需要我们注意外,还应该特别注意apps和binder.apps:存放着所有绑定到这个intent上的应用
它是以key = ProcessRecord 要进行绑定的应用的进程,value = AppBindRecord对象来描述绑定的这个app.还有一个binder
这个成员变量,最后的时候会把我们写的本地service中的onBind()返回的IBinder对象到这里.(在publishServiceLocked)
回到ServiceRecord的retrieveAppBindingLocked当中.找到一个IntentBinderRecord对象以后,再去它的apps成员函数
中,以ProcessRecord为key去获取这个进程对应的AppBinderRecord对象,没有的话就创建一个,传入ServiceRecord、AppBi
nd
Record、ProcessRecord.最后把
AppBinderRecord返回。我们再来看一下
AppBinderRecord对象.该对象是用来描述:当前的
service和绑定到它的app之间的联系
final class AppBindRecord {final ServiceRecord service; // The running service.final IntentBindRecord intent; // The intent we are bound to.final ProcessRecord client; // Who has started/bound the service.final ArraySet<ConnectionRecord> connections = new ArraySet<>();// All ConnectionRecord for this client.......AppBindRecord(ServiceRecord _service, IntentBindRecord _intent,ProcessRecord _client) {service = _service;intent = _intent;client = _client;}}
注意它里面的connections并没有初始化,而是在ActiveServices的方法中初始化的.connects就是一个简单的集合存放的
是ConnectionRecord对象。因为一个app里面可以有多个地方发起绑定service的操作,而这个就是用来描述每一次的绑定操
作的(重复bind操作会走到这里,
ConnectionRecord会在new一个,不过b、
connection都还是同一个对象.
).
介绍完这些,我们继续回到ActiveServices的bindServiceLocked当中.在取得AppBindRecord b 对象以后执行如下语句
C
onnectionRecord c = new ConnectionRecord(b, activity,
connection, flags, clientLabel, clientIntent);来实例
化一个
C
onnectionRecord.它就是用来描述对这个service的一次绑定操作.可以想成是封装IServiceConnection.
final class ConnectionRecord {final AppBindRecord binding; // The application/service binding.final ActivityRecord activity; // If non-null, the owning activity.final IServiceConnection conn; // The client connection.final int flags; // Binding options.final int clientLabel; // String resource labeling this client.final PendingIntent clientIntent; // How to launch the client.String stringName; // Caching of toString.boolean serviceDead; // Well is it?......ConnectionRecord(AppBindRecord _binding, ActivityRecord _activity,IServiceConnection _conn, int _flags,int _clientLabel, PendingIntent _clientIntent) {binding = _binding;activity = _activity;conn = _conn;flags = _flags;clientLabel = _clientLabel;clientIntent = _clientIntent;}......}
基本都是在构造中就实现了简单的赋值。注意此处的
connection参数就是我们在ContextImpl中通过调用LoadedApk的get
Se
rv
ice
Dispatcher获取到的
Se
rv
ice
Dispatcher.InnerConnection对象.实例化完这么多的对象,接下来就该往相应的表结构
里面添加数据了.
1)、往ServiceRecord的connections成员变量中添加.
final ArrayMap<IBinder, ArrayList<ConnectionRecord>> connections
= new ArrayMap<IBinder, ArrayList<ConnectionRecord>>();
此时的key = IBinder对象,就是
InnerConnection. value =
ArrayList集合
(
由于每个界面可以绑定好几个)
ArrayList<ConnectionRecord> clist = s.connections.get(binder);if (clist == null) {clist = new ArrayList<ConnectionRecord>();s.connections.put(binder, clist);}clist.add(c);b.connections.add(c)
注意最后AppBindRecord.connections.add(c)把ConnectionRecord加入到自己的connections.
2)、往ActiveService的mServiceConnections成员变量中添加.
final ArrayMap<IBinder, ArrayList<ConnectionRecord>> mServiceConnections
= new ArrayMap<IBinder, ArrayList<ConnectionRecord>>();
clist = mServiceConnections.get(binder);if (clist == null) {clist = new ArrayList<ConnectionRecord>();mServiceConnections.put(binder, clist);}clist.add(c);
在一次回到ActiveServices中,接下来判断传入的flag,是执行bringUpServiceLocked去真正的实现服务的启动,前面这
些可以说完成了bind服务的注册.
最后贴上:依然红茶 大神画的图
然后我们继续看bringUpServiceLocked.此处开始就和StartService部分代码走的一样的,就是传入的参数和具体走的分
支有区别.我们按照进程未启动进行分析。那么又会走到mAm.startProcessLocked()启动目标service寄身的进程,往后的流
程和startServie的时候一样,最终会走到ActiveServies的realStartServiceLocked.然后会走到目标service走到大家熟悉
的onCreate(),这些都在前面的StartService中以有分析。执行完onCreate后,返回到
realStartServiceLocked.接着去执行
requestServiceBindingsLocked(...)此方法会执行到service的onBind().方法我们接着分析.
private final void requestServiceBindingsLocked(ServiceRecord r, boolean execInFg) {for (int i=r.bindings.size()-1; i>=0; i--) {//当是单纯的startService的时候,此处不符合条件就不会再进一步的执行.IntentBindRecord ibr = r.bindings.valueAt(i);//zy bindings什么时候实例化的啊?if (!requestServiceBindingLocked(r, ibr, execInFg, false)) {break;}}}
然后调用requestServiceBindingLocked
private final boolean requestServiceBindingLocked(ServiceRecord r,IntentBindRecord i, boolean execInFg, boolean rebind) {......if ((!i.requested || rebind) && i.apps.size() > 0) {try {......r.app.thread.scheduleBindService(r, i.intent.getIntent(), rebind,r.app.repProcState);if (!rebind) {i.requested = true;}i.hasBound = true;i.doRebind = false;} catch (RemoteException e) {}}return true;}
就要去执行到了当前Service所寄宿的进程的主线程中去执行scheduleBindService相关的操作.直接去ActivityThread中
看对应的方法
public final void scheduleBindService(IBinder token, Intent intent,boolean rebind, int processState) {updateProcessState(processState, false);BindServiceData s = new BindServiceData();//用来封装service信息s.token = token;//还是ServiceRecords.intent = intent;s.rebind = rebind;......sendMessage(H.BIND_SERVICE, s);}
执行到了H Handler对应的case当中
case BIND_SERVICE:Trace.traceBegin(Trace.TRACE_TAG_ACTIVITY_MANAGER, "serviceBind");handleBindService((BindServiceData)msg.obj);Trace.traceEnd(Trace.TRACE_TAG_ACTIVITY_MANAGER);break;
一定注意mServices中此时已经包含当前的Service组件了,是在执行onCreate的时候最后加入的.
private void handleBindService(BindServiceData data) {Service s = mServices.get(data.token);//在create的时候添加进去的!if (s != null) {try {......try {if (!data.rebind) {//不是重新绑定的时候走这里IBinder binder = s.onBind(data.intent);//返回这个我们在onBind中得到的binder对象.ActivityManagerNative.getDefault().publishService(data.token, data.intent, binder);//传入onBinder返回的Binder.} else {s.onRebind(data.intent);ActivityManagerNative.getDefault().serviceDoneExecuting(data.token, SERVICE_DONE_EXECUTING_ANON, 0, 0);}ensureJitEnabled();} catch (RemoteException ex) {......}} catch (Exception e) {......}}}
进入对应的分支,调用对应的service组件的onBind方法,返回我们实现的IBinder对象.然后又要通过Binder去AMS的进程
中了,最终调用到AMS的(data.token, data.intent, binder).注意最后一个参数binder.
public void publishService(IBinder token, Intent intent, IBinder service) {......synchronized(this) {......//service是我们自己的Service组件的onBinder方法返回的.//也正是因为返回的是一个Binder对象才能来回传递,此时拿的应该是一个BinderProxy.mServices.publishServiceLocked((ServiceRecord)token, intent, service);}}
publishService这个方法其实就是起到了一个连接的作用,最终还是调用ActiveServices的publishServiceLocked.
void publishServiceLocked(ServiceRecord r, Intent intent, IBinder service) {//zyfinal long origId = Binder.clearCallingIdentity();try {if (r != null) {Intent.FilterComparison filter= new Intent . FilterComparison ( intent );IntentBindRecord b = r.bindings.get(filter);if (b != null && !b.received) {b.binder = service;//实例化IntentBindRecord.binder成员变量.b.requested = true;b.received = true;//直到此处置为true.for (int conni=r.connections.size()-1; conni>=0; conni--) {//先从对应的表中取出来.valueAt(.)从最后一个索引开始拿ArrayList<ConnectionRecord> clist = r.connections.valueAt(conni);for (int i=0; i<clist.size(); i++) {ConnectionRecord c = clist.get(i);......try {//c.conn就是LoadedApk.ServiceDispatcher.InnerConnection对象//此处就用到了把,假如不是一个Binder对象它也没办法来回传输啊.(因为是在启动的那个进程中实例化的//而此时是在AMS所在的进程)c.conn.connected(r.name, service);//调用到InnerConnection 的connected方法.} catch (Exception e) {......}}}}serviceDoneExecutingLocked(r, mDestroyingServices.contains(r), false);}} finally {Binder.restoreCallingIdentity(origId);}}
接下来我们就去看看InnerConnection的connected方法传入的第二个参数就是我们service返回的IBinder,此处再贴一下该
方法的实现.
public void connected(ComponentName name, IBinder service) throws RemoteException {LoadedApk.ServiceDispatcher sd = mDispatcher.get();//感觉是弱引用的一种使用.if (sd != null) {sd.connected(name, service);}}
直接调用到了ServiceDispatcher的
connected.
public void connected(ComponentName name, IBinder service) {if (mActivityThread != null) {mActivityThread.post(new RunConnection(name, service, 0));} else {doConnected(name, service);}}
当执行绑定service的进程的主进程的Handler依然存在的话,直接去放到它的主进程去进一步执行,否则就在当前进程执
行了,当前进程是AMS所在的进程.此处我们跟踪主进程执行的流程.需要注意new RunConnection(..)传入的最后一个参数,当
是绑定的时候传入的是0,而当是这个服务被意外杀死而回调到这里的时候。传入的是1.看它的run方法
public void run() {if (mCommand == 0) {doConnected(mName, mService);} else if (mCommand == 1) {//检测到死亡的时候发送这个.doDeath(mName, mService);}}
执行doConnected().
public void doConnected(ComponentName name, IBinder service) {......synchronized (this) {......if (service != null) {// A new service is being connected... set it all up.mDied = false;info = new ConnectionInfo();info.binder = service;info.deathMonitor = new DeathMonitor(name, service);try {service.linkToDeath(info.deathMonitor, 0);mActiveConnections.put(name, info);} catch (RemoteException e) {}} else {// The named service is being disconnected... clean up.mActiveConnections.remove(name);}......}......// If there is a new service, it is now connected.if (service != null) {//这里的mConnection变量的类型的ServiceConnection,它是在前面的Step 4中设置好的.mConnection.onServiceConnected(name, service);//zy 最终回调到这里.}}
最终执行到了我们先前传入的ServiceConnection的回调onServiceConnected(..,service)并最终传入的是onBind返回
的IBinder对象.这样就完成了onBinder回调.然后回到ActiveService中的realStartServiceLocked.在调用sendServiceAr
gsLocked去执行onStartCommand的声明周期,最终完成bindeService的启动流程.
关于bindService的杂记:
1)、IServiceConnection.Stub 它的aidl的实现,以及作用(也就是InnerConnection作用)。
oneway interface IServiceConnection {void connected(in ComponentName name, IBinder service);}
可以看到就是声明了一个接口connected.(单向调用的).
作用:作为Binder对象可以跨进程传输,而启动服务又是在进程之间来回切换的.此对象获取的时候是在主进程(启
动绑定Service的进程)当中的,而最终在启动完毕Service寄宿的进程(这个之间就有可能进行一次Binder传
递)后,在主线程中调用handleBindService去执行onBind方法的回调.然后又会进入到AMS所在的进程调用它
的publishServiceLocked(ActiveServices的)方法最终才一步步调用到这个
IServiceConnection对象的conn
e
cted方法,然后再调用到ServiceDispatcher,在调用到
ServiceDispatcher的成员变量ServiceConnection也
就是,我们绑定Service的时候传入的接口.
2)、Intent的
resolveTypeIfNeeded(getContentResolver())
public String resolveTypeIfNeeded(ContentResolver resolver) {if (mComponent != null) {return mType;}return resolveType(resolver);}
就是在需要的时候返回该Intent的MIME的类型.怎么算是需要的时候?暂无跟踪源码.
在启动服务的流程中,ContextImpl是获取的为null,后面传入的也都是null了。
3)、onBind()返回的Binder
此时的这个Binder就是匿名的Binder,Binder驱动会处理好对应的关系。也就是说并不是所有Binder都需要注
册到ServiceManager,此处的Client和server端通过连接直接获取的. (通过了AMS这个Binder)
看网上说匿名binder需要借助实名的binder来进行传输.
bindService的IPC手段没有经过ServiceManager,直接通过ActivityManagerService这个大家都可以与之交互的
对象获取了。(匿名binder)
4)、关于Context
此处的上下文的理解是"依然红茶"大神对我的解答,整理笔记的时候发现的
你好,我已经很久没有回答binder方面的问题了,今天只能粗略地说说。其实“上下文”这个概念,在软件
世界里已经被
用烂了。具体到Android平台上来说,Activity、Service、Application等事物从本质上说都是可以
称为“运行期微型上
下文”,而一个Android应用程序就是由这些“微型上下文”组成的。对于Service Manager
Service而言,它要管理所有
系统服务,所以它管理的所谓上下文大体上可以被理解为那些系统服务了。binder
_become_context_manager()最终执行
的行为在binder_ioctl()里,该函数运行在驱动层,已经不是在普通的应
用程序空间了。此时专门生成了一个
binder_node节点,并记在静态变量binder_context_mgr_node里,意味着整个
手机系统里所有进程最终用到的“指代系统
service管理器”的binder_node节点是同一个节点。日后,每当用户进
程希望拿到一个合法的系统service代理,原则上
都必须先拿到指代binder_context_mgr_node节点的代理,而后才
能让系统帮你找到合法的系统service节点。从这个意义
上来说,说它是个context manager也不为过。至于你说的
设置什么属性就算是上下文了,其实是没有这种属性的。每当
你写一个service时,就是在写一个上下文了.
5)、onstartCommand()
onstartCommand生命周期只有在startService的时候才会回调.具体的源码实现还未分析.
6)、启动的时候的进程问题
和startService一样的默认service组件没有配置相关的属性的话,会启动在当前应用所在的进程,具体表现
在bringUpServiceLocked中app = mAm.getProcessRecordLocked(procName, r.appInfo.uid, false)当app不等于
null的时候直接调用realStartServiceLocked(r, app, execInFg).当app == null的时候调用
7)、onServiceConnected一个小细节
当我们自己编写的service的onBind返回的是一个null的时候,最后执行完毕是不会回调onServiceConnected()
在源码中,LoadApk.ServiceDispatcher的方法doConnected()当中(前面已说过回回调到这里)有个判断
if (service != null) {mConnection.onServiceConnected(name, service);}
这个service就是我们onBind方法的返回值.
8)、bindService()方法的调用.
调用bindService需要上下文对象Context,所以在Activity中和Service中都可以正常调用。但是在广播中是
不
可以的。报出异常:
android.content.ReceiverCallNotAllowedException:
BroadcastReceiver components are not allowed to
bind to services.
从源码看,由于BroadcastReceiver的onReceive中的Context是经过包装的,它是ReceiverRestrictedContext
对象(当时看广播机制还纳闷为什么封装那,这就体现了一点吧,限制在广播的onRecive里面的一些操作,)重写了
@Overridepublic boolean bindService(Intent service, ServiceConnection conn, int flags) {throw new ReceiverCallNotAllowedException("BroadcastReceiver components are not allowed to bind to services");}
直接抛出异常.
9)、Intent.FilterComparison
个人的初步理解,就是封装了一下Intent,便于更加准确的用来比较每个Intent是否相同
public static final class FilterComparison {private final Intent mIntent;private final int mHashCode;public FilterComparison(Intent intent) {mIntent = intent;mHashCode = intent.filterHashCode();}public Intent getIntent() {return mIntent;}@Overridepublic boolean equals(Object obj) {if (obj instanceof FilterComparison) {Intent other = ((FilterComparison)obj).mIntent;return mIntent.filterEquals(other);}return false;}@Overridepublic int hashCode() {return mHashCode;}}
可以看到就是简单的封装,加上了一个比较各个属性的hashCode.
10)、依然红茶 大神的摘录
简单说起来,service和线程、进程是没什么关系的。我们知道,在Android平台上已经大幅度地弱化了进程的
概念,取而
代之的是一个个有意义的逻辑实体,比如activity、service等。Service实体必然要寄身到某个进程里
才行,它也可以再
启动几个线程来帮它干活儿。但是,说到底service只是一个逻辑实体、一个运行期上下文而
已。
相比activity这种“操控UI界面的运行期上下文”,service这种上下文一般是没有界面部分的。当然这里说
的只是一般
情况,有些特殊的service还是可以创建自己的界面的,比如当一个service需要显现某种浮动面板时,
就必须自己创建、
销毁界面了。
在Android系统内部的AMS里,是利用各种类型的Record节点来管理不同的运行期上下文的。比如以ActivityRe
co
rd来管理
activity,以ServiceRecord来管理service。
可是,线程这种东东可没有对应的Record节点喔。一些初学者常常会在activity里启动一个线程,从事某种耗
时费力的工
作,可是一旦activity被遮挡住,天知道它会在什么时候被系统砍掉,进而导致连应用进程也退出。
从AMS的角度来看,
它压根就不知道用户进程里还搞了个工作线程在干活儿,所以当它要干掉用户进程时,是不会
考虑用户进程里还有没有工
作没干完。而Service组件就有记录了,轻易不去删除.
但如果是在service里启动了工
作线程,那么AMS一般是不会随便砍掉service所在的进程的,所以耗时的工作也就可以顺
利进行了。
Service的那些onCreate()、onBind()函数都是在主线程里执行的,当然,在这些函数里也不
要进行耗时的操
作,否则会出现ANR。service里进行耗时操作时,基本上都是需要创建子线程的
11)、关联service和它所处进程的地方
realStartServiceLocked(...)方法.参数:
ProcessRecord app、
ServiceRecord r.方法内
r.app = app.
12)、getOuterContext
前面在ContextImpl中bindServiceCommon的方法去获取ServiceDispatcher.InnerConnection的时候,传入的
就是它.这个context是怎么算的那?一个应用一个?一个activity一个?一个service一个?这对更好的理解
service组件在各个表中的存放是有很大意义的。下面分析一下.
class ContextImpl extends Context {private ContextImpl(......) {......}private Context mOuterContext;final void setOuterContext(Context context) {mOuterContext = context;}......final Context getOuterContext() {return mOuterContext;}......}
首先注意ContextImpl是私有的构造.它的mOuterContext可以通过方法设定.
1、在我们启动service组件最终调用到onCreate的时候
private void handleCreateService(CreateServiceData data) {......ContextImpl context = ContextImpl.createAppContext(this, packageInfo);context.setOuterContext(service);//在应用进程启动的时候,handleBindApplication mInstrumentation.Application app = packageInfo.makeApplication(false, mInstrumentation);service.attach(context, this, data.info.name, data.token, app,ActivityManagerNative.getDefault());service.onCreate();mServices.put(data.token, service);//在create的时候添加进去的,onBind时候会用.}
先是通过createAppContext接口去实例化ContextImpl.然后调用setOuterContext来设置当前的
mOuterContext,
并且跟踪attach的源码.
public final void attach(Context context , ActivityThread thread , String className , IBinder token ,Application application, Object activityManager) {attachBaseContext(context);//mBase = base;......}
调用到ContextWrapper的attachBaseContext.并且传入我们前面实例化的ContextImpl.至此现在的mBase就是对象
ContextImpl了。
protected void attachBaseContext(Context base) {if (mBase != null) {throw new IllegalStateException("Base context already set");}mBase = base;}
2、在我们启动activity组件调用到onCreate的时候.
调用到ActivityThread.performLaunchActivity()--->createBaseContextForActivity()
private Context createBaseContextForActivity(ActivityClientRecord r,final Activity activity) {ContextImpl appContext = ContextImpl.createActivityContext(this, r.packageInfo, r.token);appContext.setOuterContext(activity);Context baseContext = appContext;......return baseContext;}
道理和service的组件类似,最终也会为这个context上下文的ContextImpl设置
mOuterContext.
综上来看,每个context对象:service、activity都有自己的
mOuterContext,
getOuterContext()返回的都不一
样.LoadedApk中的mServices集合的context,就是这么对应的。每个context上下文为key.value是一个集合。因为这
个界面可能会绑定好几个嘛。
13)、bindService为什么会随着actvity的销毁而解除绑定?生命周期内回调?
没有研究源码。


 2万+
2万+

 被折叠的 条评论
为什么被折叠?
被折叠的 条评论
为什么被折叠?
 到【灌水乐园】发言


