自定义 QTreeView


自定义 QTreeView

交替行的背景色可以使用下面样式代码来定义:

QTreeView {
    alternate-background-color: yellow;
}
 
 
  • 1
  • 2
  • 3
  • 1
  • 2
  • 3

当鼠标划过 item 时,如果要提供一个特殊的背景色,可以使用 ::item 辅助控制,例如:

QTreeView {
    show-decoration-selected: 1;
}

QTreeView::item {
    border: 1px solid #d9d9d9;
    border-top-color: transparent;
    border-bottom-color: transparent;
}

QTreeView::item:hover {
    background: qlineargradient(x1: 0, y1: 0, x2: 0, y2: 1, stop: 0 #e7effd, stop: 1 #cbdaf1);
    border: 1px solid #bfcde4;
}

QTreeView::item:selected {
    border: 1px solid #567dbc;
}

QTreeView::item:selected:active{
    background: qlineargradient(x1: 0, y1: 0, x2: 0, y2: 1, stop: 0 #6ea1f1, stop: 1 #567dbc);
}

QTreeView::item:selected:!active {
    background: qlineargradient(x1: 0, y1: 0, x2: 0, y2: 1, stop: 0 #6b9be8, stop: 1 #577fbf);
}
 
 
  • 1
  • 2
  • 3
  • 4
  • 5
  • 6
  • 7
  • 8
  • 9
  • 10
  • 11
  • 12
  • 13
  • 14
  • 15
  • 16
  • 17
  • 18
  • 19
  • 20
  • 21
  • 22
  • 23
  • 24
  • 25
  • 26
  • 1
  • 2
  • 3
  • 4
  • 5
  • 6
  • 7
  • 8
  • 9
  • 10
  • 11
  • 12
  • 13
  • 14
  • 15
  • 16
  • 17
  • 18
  • 19
  • 20
  • 21
  • 22
  • 23
  • 24
  • 25
  • 26

QTreeView 的分支可以使用 ::branch 辅助控制。当绘制一个 branch 时,下述的样式颜色实现了一系列状态。

QTreeView::branch {
    background: palette(base);
}

QTreeView::branch:has-siblings:!adjoins-item {
    background: cyan;
}

QTreeView::branch:has-siblings:adjoins-item {
    background: red;
}

QTreeView::branch:!has-children:!has-siblings:adjoins-item {
    background: blue;
}

QTreeView::branch:closed:has-children:has-siblings {
    background: pink;
}

QTreeView::branch:has-children:!has-siblings:closed {
    background: gray;
}

QTreeView::branch:open:has-children:has-siblings {
    background: magenta;
}

QTreeView::branch:open:has-children:!has-siblings {
    background: green;
}
 
 
  • 1
  • 2
  • 3
  • 4
  • 5
  • 6
  • 7
  • 8
  • 9
  • 10
  • 11
  • 12
  • 13
  • 14
  • 15
  • 16
  • 17
  • 18
  • 19
  • 20
  • 21
  • 22
  • 23
  • 24
  • 25
  • 26
  • 27
  • 28
  • 29
  • 30
  • 31
  • 1
  • 2
  • 3
  • 4
  • 5
  • 6
  • 7
  • 8
  • 9
  • 10
  • 11
  • 12
  • 13
  • 14
  • 15
  • 16
  • 17
  • 18
  • 19
  • 20
  • 21
  • 22
  • 23
  • 24
  • 25
  • 26
  • 27
  • 28
  • 29
  • 30
  • 31

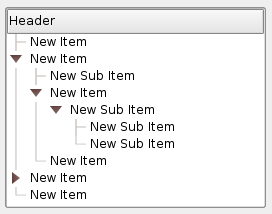
尽管它比较丰富多彩,但可以用下面的图片实现一个更有用的效果:

图片 路径
这里写图片描述 vline.png
这里写图片描述 branch-more.png
这里写图片描述 branch-end.png
这里写图片描述 branch-closed.png
这里写图片描述 branch-open.png


QTreeView::branch:has-siblings:!adjoins-item {
    border-image: url(vline.png) 0;
}

QTreeView::branch:has-siblings:adjoins-item {
    border-image: url(branch-more.png) 0;
}

QTreeView::branch:!has-children:!has-siblings:adjoins-item {
    border-image: url(branch-end.png) 0;
}

QTreeView::branch:has-children:!has-siblings:closed,
QTreeView::branch:closed:has-children:has-siblings {
    border-image: none;
    image: url(branch-closed.png);
}

QTreeView::branch:open:has-children:!has-siblings,
QTreeView::branch:open:has-children:has-siblings  {
    border-image: none;
    image: url(branch-open.png);
}
 
 
  • 1
  • 2
  • 3
  • 4
  • 5
  • 6
  • 7
  • 8
  • 9
  • 10
  • 11
  • 12
  • 13
  • 14
  • 15
  • 16
  • 17
  • 18
  • 19
  • 20
  • 21
  • 22
  • 23
  • 1
  • 2
  • 3
  • 4
  • 5
  • 6
  • 7
  • 8
  • 9
  • 10
  • 11
  • 12
  • 13
  • 14
  • 15
  • 16
  • 17
  • 18
  • 19
  • 20
  • 21
  • 22
  • 23

由此产生的 Tree 视图看起来像这样:

这里写图片描述

指示器

这里写图片描述

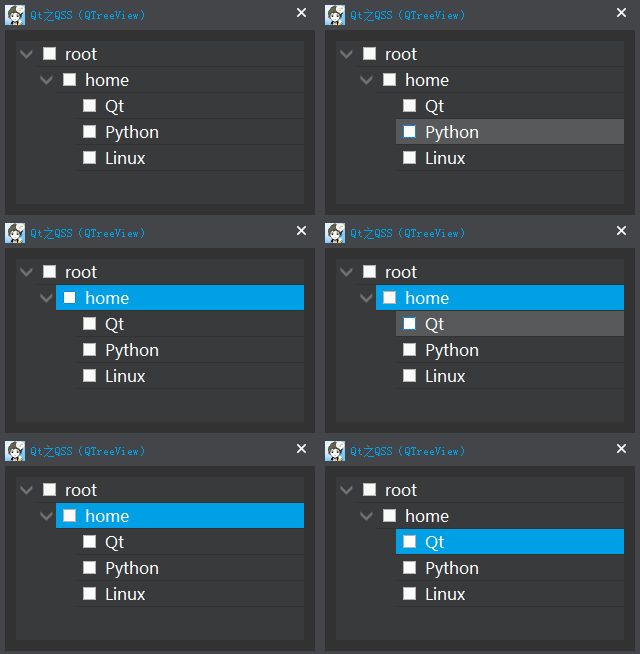
如果我们对 Tree 需要添加指示器,需要用过 ::indicator 辅助控制:

QTreeView {
        border: 1px solid rgb(50, 50, 50);
        background-color: rgb(57, 58, 60);
        font-size: 16px;
}
QTreeView::item {  /** item **/
        height: 25px;
        color: white;
        border: none;
        border-bottom: 1px solid rgb(50, 50, 50);
        background-color: transparent;
}
QTreeView::item:hover { /** 鼠标滑过 item **/
        background-color: rgba(255, 255, 255, 40);
}
QTreeView::item:selected { /** 鼠标选中 item **/
        background-color: rgb(0, 160, 230);
}
QTreeView::branch:open:has-children {  /** 分支 - 展开 item(有孩子) **/
        image: url(:/Images/arrowBottom);
}
QTreeView::branch:closed:has-children { /** 分支 - 折叠 item(无孩子) **/
        image: url(:/Images/arrowRight);
}
QTreeView::indicator {  /** 指示器 **/
        width: 20px;
        height: 20px;
}
QTreeView::indicator:enabled:unchecked {  /** 指示器 - 未选中 **/
        image: url(:/Images/checkBox);
}
QTreeView::indicator:enabled:unchecked:hover {
        image: url(:/Images/checkBoxHover);
}
QTreeView::indicator:enabled:unchecked:pressed {
        image: url(:/Images/checkBoxPressed);
}
QTreeView::indicator:enabled:checked {  /** 指示器 - 选中 **/
        image: url(:/Images/checkBoxChecked);
}
QTreeView::indicator:enabled:checked:hover {
        image: url(:/Images/checkBoxCheckedHover);
}
QTreeView::indicator:enabled:checked:pressed {
        image: url(:/Images/checkBoxCheckedPressed);
}
QTableView::indicator:enabled:indeterminate {  /** 指示器 - 半选 **/
        image: url(:/Images/checkBoxIndeterminate);
}
QTreeView::indicator:enabled:indeterminate:hover {
        image: url(:/Images/checkBoxIndeterminateHover);
}
QTreeView::indicator:enabled:indeterminate:pressed {
        image: url(:/Images/checkBoxIndeterminatePressed);
}
 
 
  • 1
  • 2
  • 3
  • 4
  • 5
  • 6
  • 7
  • 8
  • 9
  • 10
  • 11
  • 12
  • 13
  • 14
  • 15
  • 16
  • 17
  • 18
  • 19
  • 20
  • 21
  • 22
  • 23
  • 24
  • 25
  • 26
  • 27
  • 28
  • 29
  • 30
  • 31
  • 32
  • 33
  • 34
  • 35
  • 36
  • 37
  • 38
  • 39
  • 40
  • 41
  • 42
  • 43
  • 44
  • 45
  • 46
  • 47
  • 48
  • 49
  • 50
  • 51
  • 52
  • 53
  • 54
  • 55

整行拓展

由上面分析,如果要整行拓展,可以将 item 和 branch 相同状态(正常、划过、选中)下的背景设置相同。

QTreeView {
        border: 1px solid rgb(50, 50, 50);
        background-color: rgb(57, 58, 60);
}
QTreeView::item {
        height: 25px;
        color: white;
        border: none;
        background-color: transparent;
}
QTreeView::item:hover, QTreeView::branch:hover { /** 鼠标滑过 **/
        background-color: rgba(255, 255, 255, 40);
}
QTreeView::item:selected, QTreeView::branch:selected { /** 鼠标选中 **/
        background-color: rgb(0, 160, 230);
}
QTreeView::branch {
        background-color: transparent;
}
QTreeView::branch:open:has-children {
        image: url(:/Images/arrowBottom);
}
QTreeView::branch:closed:has-children {
        image: url(:/Images/arrowRight);
}
 
 
  • 1
  • 2
  • 3
  • 4
  • 5
  • 6
  • 7
  • 8
  • 9
  • 10
  • 11
  • 12
  • 13
  • 14
  • 15
  • 16
  • 17
  • 18
  • 19
  • 20
  • 21
  • 22
  • 23
  • 24
  • 25
  • 1
  • 2
  • 3
  • 4
  • 5
  • 6
  • 7
  • 8
  • 9
  • 10
  • 11
  • 12
  • 13
  • 14
  • 15
  • 16
  • 17
  • 18
  • 19
  • 20
  • 21
  • 22
  • 23
  • 24
  • 25

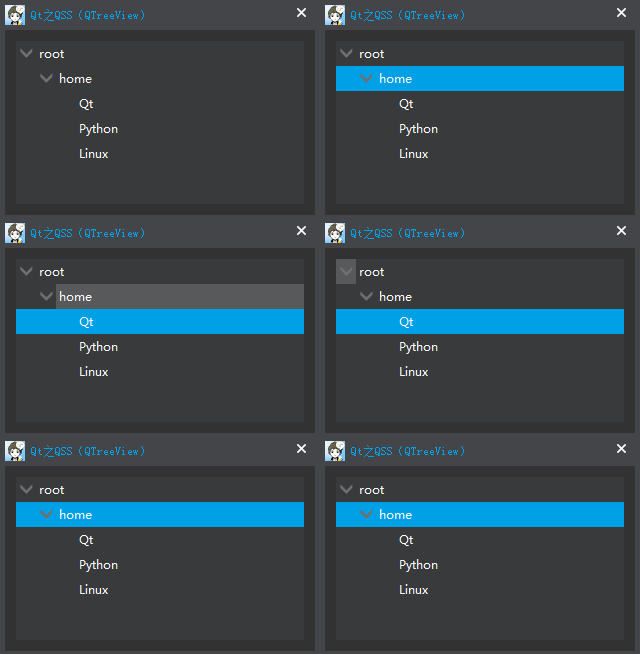
O__O”…,看似大功告成,可万万没想到:

这里写图片描述

当鼠标选中的时候可以整行拓展,可是当鼠标滑过。。。无语中!

没关系,其实 Qt 关于盒模型的介绍说的很清楚,不妨添加如下代码试试:

QTreeView {
    show-decoration-selected: 1;
}
 
 
  • 1
  • 2
  • 3
  • 1
  • 2
  • 3

注意:在之前代码的基础上,只需再添加这一行即可。

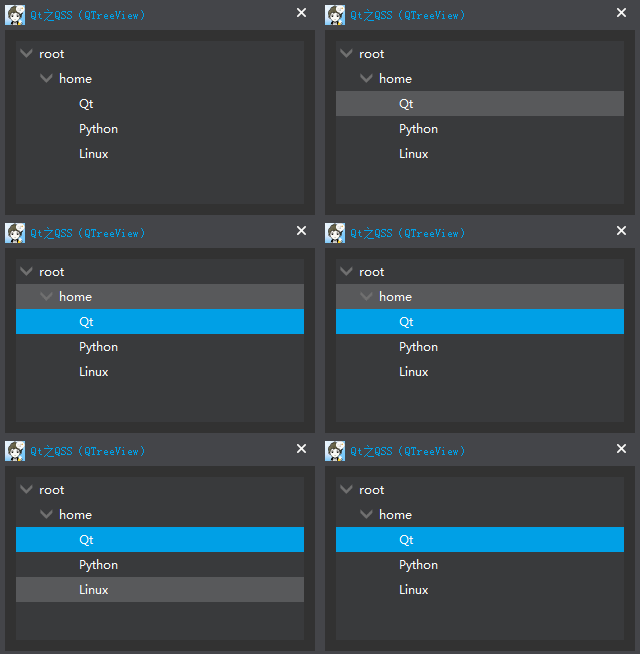
再来看一下效果:

这里写图片描述

show-decoration-selected 属性控制选中时是选中整项还是仅仅只是项的文本,而辅助控制(子组件) ::branch 和 ::item 用于精细化控制。

  • 1
    点赞
  • 10
    收藏
    觉得还不错? 一键收藏
  • 2
    评论
以下是使用C++实现自定义QTreeview和QFileSystemModel的完整代码及注释: ``` #include <QTreeView> #include <QFileSystemModel> #include <QTimer> #include <QThread> #include <QDebug> #include <QVBoxLayout> #include <QApplication> // 定义扫描文件的数量 const int MAX_FILES = 100; // 定义扫描的时间间隔 const int SCAN_INTERVAL = 500; // 毫秒 // 定义文件类型过滤器 const QStringList FILTERS = {"*.txt"}; // 自定义QFileSystemModel类,继承自QFileSystemModel class CustomFileSystemModel : public QFileSystemModel { public: CustomFileSystemModel(QObject *parent = nullptr) : QFileSystemModel(parent) { } // 重写canFetchMore函数,用于判断是否还有更多的数据需要获取 bool canFetchMore(const QModelIndex &parent) const override { // 如果当前的文件数小于总文件数,则还有更多数据需要获取 return rowCount(parent) < m_totalFiles; } // 设置总文件数 void setTotalFiles(int totalFiles) { m_totalFiles = totalFiles; } private: // 总文件数 int m_totalFiles = 0; }; // 自定义QTreeView类,继承自QTreeView class CustomTreeView : public QTreeView { public: CustomTreeView(QWidget *parent = nullptr) : QTreeView(parent) { // 创建QFileSystemModel对象 m_fileSystemModel = new CustomFileSystemModel(this); // 设置过滤器 m_fileSystemModel->setNameFilters(FILTERS); // 设置排序方式 m_fileSystemModel->setSort(QDir::Name | QDir::IgnoreCase); // 设置根目录 setModel(m_fileSystemModel); setRootIndex(m_fileSystemModel->index(QDir::rootPath())); // 开始定时器 m_timer.start(SCAN_INTERVAL); // 连接定时器的timeout信号到scanFiles槽函数 connect(&m_timer, &QTimer::timeout, this, &CustomTreeView::scanFiles); } ~CustomTreeView() { // 停止定时器 m_timer.stop(); // 删除QFileSystemModel对象 delete m_fileSystemModel; } private: // 扫描文件 void scanFiles() { // 如果当前正在扫描,则退出函数 if (m_isScanning) return; // 标记为正在扫描 m_isScanning = true; // 获取当前目录 QString currentPath = m_fileSystemModel->rootPath(); // 获取当前目录下的所有文件 QStringList files = QDir(currentPath).entryList(FILTERS, QDir::Files | QDir::NoSymLinks); // 获取当前目录下的所有子目录 QStringList dirs = QDir(currentPath).entryList(QDir::Dirs | QDir::NoDotAndDotDot); // 计算总文件数 int totalFiles = files.count(); // 遍历子目录,计算总文件数 for (const QString &dir : qAsConst(dirs)) { QString subdir = QString("%1/%2").arg(currentPath).arg(dir); totalFiles += QDir(subdir).count(FILTERS); } // 设置总文件数 m_fileSystemModel->setTotalFiles(totalFiles); // 获取当前的QModelIndex QModelIndex currentIndex = currentIndex(); // 如果当前的QModelIndex没有对应的QFileInfo,则退出函数 if (!currentIndex.isValid() || !m_fileSystemModel->hasChildren(currentIndex)) { m_isScanning = false; return; } // 获取当前的QFileInfo QFileInfo currentFileInfo = m_fileSystemModel->fileInfo(currentIndex); // 如果当前的QFileInfo不是目录,则退出函数 if (!currentFileInfo.isDir()) { m_isScanning = false; return; } // 获取当前目录 QString path = currentFileInfo.absoluteFilePath(); // 获取当前目录下的所有文件和子目录 QStringList allFilesAndDirs = QDir(path).entryList(QDir::AllEntries | QDir::NoDotAndDotDot); // 遍历所有文件和子目录 int count = 0; for (const QString &fileOrDir : qAsConst(allFilesAndDirs)) { // 获取文件或子目录的绝对路径 QString filePath = QString("%1/%2").arg(path).arg(fileOrDir); // 如果是文件,则添加到模型 if (QFileInfo(filePath).isFile()) { // 添加文件到模型 m_fileSystemModel->addFile(filePath, currentIndex); // 计数器加1 count++; // 如果计数器大于等于MAX_FILES,则退出循环 if (count >= MAX_FILES) break; } } // 标记为扫描完毕 m_isScanning = false; } private: // 文件系统模型 CustomFileSystemModel *m_fileSystemModel; // 定时器 QTimer m_timer; // 是否正在扫描 bool m_isScanning = false; }; // 自定义QThread类,用于在单独的线程中运行QApplication::exec函数 class AppThread : public QThread { public: void run() override { QApplication::exec(); } }; int main(int argc, char *argv[]) { QApplication a(argc, argv); // 创建自定义QTreeView对象 CustomTreeView *treeView = new CustomTreeView; // 创建垂直布局 QVBoxLayout *layout = new QVBoxLayout; // 将自定义QTreeView添加到布局中 layout->addWidget(treeView); // 创建QWidget对象,作为窗口的主体 QWidget *widget = new QWidget; // 将布局添加到QWidget中 widget->setLayout(layout); // 创建AppThread对象 AppThread appThread; // 启动线程 appThread.start(); // 显示窗口 widget->show(); // 进入主线程的消息循环 return a.exec(); } ``` 在上面的代码中,我们首先定义了一些常量,包括扫描文件的数量、扫描的时间间隔和文件类型过滤器。然后,我们定义了一个自定义的QFileSystemModel类和一个自定义QTreeView类。自定义的QFileSystemModel类继承自QFileSystemModel类,重写了canFetchMore函数和setTotalFiles函数。canFetchMore函数用于判断是否还有更多的数据需要获取,setTotalFiles函数用于设置总文件数。自定义QTreeView类继承自QTreeView类,具有扫描文件的功能。我们在构造函数中创建了一个QFileSystemModel对象,并设置过滤器和排序方式。然后,我们使用定时器每隔一段时间扫描目录下的文件和子目录,并将它们添加到模型中。我们使用一个布尔变量m_isScanning来判断当前是否正在扫描文件。如果正在扫描,则退出函数。在scanFiles函数中,我们首先获取当前目录下的所有文件和子目录,计算总文件数,设置总文件数和当前目录的QModelIndex。然后,我们遍历所有文件和子目录,将文件添加到模型中。最后,我们标记为扫描完毕。在main函数中,我们创建了一个自定义QTreeView对象和一个QWidget对象,并将其添加到布局中。然后,我们创建了一个AppThread对象,用于在单独的线程中运行QApplication::exec函数。最后,我们显示窗口并进入主线程的消息循环。

“相关推荐”对你有帮助么?

  • 非常没帮助
  • 没帮助
  • 一般
  • 有帮助
  • 非常有帮助
提交
评论 2
添加红包

请填写红包祝福语或标题

红包个数最小为10个

红包金额最低5元

当前余额3.43前往充值 >
需支付:10.00
成就一亿技术人!
领取后你会自动成为博主和红包主的粉丝 规则
hope_wisdom
发出的红包
实付
使用余额支付
点击重新获取
扫码支付
钱包余额 0

抵扣说明:

1.余额是钱包充值的虚拟货币,按照1:1的比例进行支付金额的抵扣。
2.余额无法直接购买下载,可以购买VIP、付费专栏及课程。

余额充值