


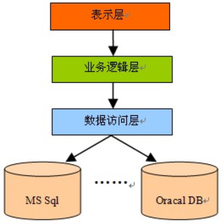
之前学习了三层,但是感觉学完之后依然没有什么感觉,于是这几天又花时间结合实例重新回顾了三层,感觉真是“磨刀不误砍柴工”,瞬间条理清晰多了,嘿嘿!
一、首先建立相应的数据库:
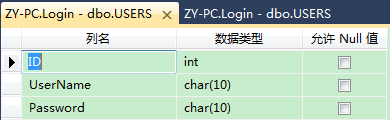
并插入数据:

二、建立四个项目LoginBLL(B层)、LoginDAL(D层)、LoginModel(实体层)、LoginUI(U层)。由于LoginUI属于U层,为了更好的与用户交互所以需要将此项目设置成Windows窗体应用程序;其他项目这设置成类库的输出类型。如图:

其中,他们三者的关系是:LoginUI引用LoginBLL和LoginModel;LoginBLL引用LoginDAL和LoginModel;LoginDAL引用LoginModel。
三、LoginModel(实体层)代码,如下:
<span style="font-family:KaiTi_GB2312;font-size:24px;">namespace Login.Model
{
    public  class UserInfo
    {
        public int ID { get; set; }
        public string UserName { get; set; }
        public string Password { get; set; }
    }
}
</span>
四、在LoginDAL(D层)项目中建立如下两个类:
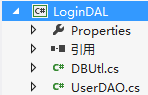
其中DBUtl类用于建立与数据库的连接,代码如下:
<span style="font-family:KaiTi_GB2312;font-size:24px;">namespace Login.DAL
{
    class DBUtl
    {
        public static string ConnString = @"User ID=sa;Password=1;Initial Catalog=Login;Data Source=ZY-PC";
    }
}
</span>
UserDAO类主要在数据库中与表的操作,代码如下:
<span style="font-family:KaiTi_GB2312;font-size:24px;">namespace Login.DAL
{
    public class UserDAO
    {
        public Login.Model.UserInfo SelectUser(string userName, string Password)
        {
            using (SqlConnection conn = new SqlConnection(DBUtl.ConnString))
            {
                SqlCommand cmd = conn.CreateCommand();
                cmd.CommandText = @"SELECT ID,UserName,Password
                                       FROM USERS WHERE UserName=@UserName and Password=@Password";
                cmd.CommandType = CommandType.Text;
                cmd.Parameters.Add(new SqlParameter("@UserName", userName));
                cmd.Parameters.Add(new SqlParameter("@Password", Password));
                conn.Open();
                SqlDataReader reader = cmd.ExecuteReader();
                Login.Model.UserInfo user = null;
                while (reader.Read())
                {
                    if (user == null)
                    {
                        user = new Login.Model.UserInfo();

                    }

                    user.UserName = reader.GetString(1);


                }
                return user;
            }
        }
    }
}
</span>
五、LoginBLL(B层)代码,如下:
<span style="font-family:KaiTi_GB2312;font-size:24px;">namespace Login.BLL
{
    public  class LoginManager
    {
        public Login.Model.UserInfo UserLogin(string userName,string Password)
        {
            Login.DAL.UserDAO uDao = new Login.DAL.UserDAO();
            Login.Model.UserInfo user = uDao.SelectUser(userName, Password);

            if (user != null)
            {
                return user;

            }
            else
            {
                throw new Exception("登录失败。");
            }
        }
    }
}</span>六、需要在LoginUI(U层)的Form1窗体中 绘制与用户交互的界面,如图:

双击按钮控件并编写如下代码:
<span style="font-family:KaiTi_GB2312;font-size:24px;">  private void btnLogin_Click(object sender, EventArgs e)
        {
            //显示层不能直接与数据源打交道
            string userName = txtUsername.Text.Trim();
            string Password = txtPassword.Text;
            Login.BLL.LoginManager mgr = new Login.BLL.LoginManager();
            Login .Model .UserInfo  user=mgr.UserLogin(userName ,Password );

            MessageBox .Show("登录用户:"+user.UserName );
        }</span>
且LoginUI(U层)代码,如下:
<span style="font-family:KaiTi_GB2312;font-size:24px;">namespace LoginUI
{
    static class Program
    {
        /// <summary>
        /// 应用程序的主入口点。
        /// </summary>
        [STAThread]
        static void Main()
        {
            Application.EnableVisualStyles();
            Application.SetCompatibleTextRenderingDefault(false);
            Application.Run(new Form1());
        }
    }
}</span>
好了,下面我们就来运行下,看看结果如何:

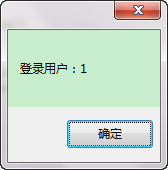
嘿嘿,大功告成啦!


 494
494

 被折叠的 条评论
为什么被折叠?
被折叠的 条评论
为什么被折叠?
 到【灌水乐园】发言


