


 本文详细介绍了Android开发中如何通过registerForActivityResult简化头像设置过程,涉及权限管理、界面实现(包括XPopup组件和BottomListPopupView)、拍照与图库选择的Intent配置,以及TakeImageAndVideoUri和ActivityResultCallback的使用,展示了Glide用于图片显示的应用。
Android开发在个人信息管理中,如果设置头像,一般都提供了从相册选择和拍照两种方式。下午将针对设置用户头像相册和拍照两种方式的具体实现进行详细说明。
在实际实现过程中需要使用到权限管理,新版本的Android需要动态申请权限,权限的相关内容参考: Android 设置头像 - 权限申请一文。
界面实现
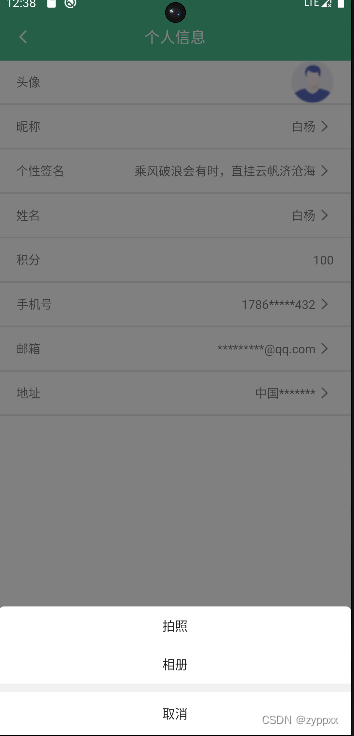
根据分析,个人头像设置的界面中需要使用到ImageView、底部选择框两种组件进行实现。实现效果如下图所示,在该界面中底部选择框使用了XPopup组件库提供的底部选择框组件。
registerForActivityResult介绍
registerForActivityResult()是startActivityForResult()的替代,简化了数据回调的写法。并且目前在新版本的Android开发中,官方建议弃用startActivityForResult()方法。因此本demo的实现过程中将采用registerForActivityResult进行实现。
我们都知道startActivityForResult是实现activity切换回调的一个方法,在使用这个旧方法的过程中我们需要传入一个intent并且在activity中配置回调接收事件。与之不同的是,在使用registerForActivityResult方法时并不会设计到intent的调用,该方法将返回一个ActivityResultLauncher(activity结果启动器)。该方法如下代码所示:
    @NonNull
    @Override
    public final <I, O> ActivityResultLauncher<I> registerForActivityResult(
            @NonNull ActivityResultContract<I, O> contract,
            @NonNull ActivityResultCallback<O> callback) {
        return registerForActivityResult(contract, mActivityResultRegistry, callback);
    }
通过代码最终可知,最终该方法将调用register方法进行注册结果转化器和回调还是,register方法如下:
 /**
  * Register a new callback with this registry.
  *
  * This is normally called by a higher level convenience methods like
  * {@link ActivityResultCaller#registerForActivityResult}.
  *
  * @param key a unique string key identifying this call
  * @param lifecycleOwner a {@link LifecycleOwner} that makes this call.
  * @param contract the contract specifying input/output types of the call
  * @param callback the activity result callback
  *
  * @return a launcher that can be used to execute an ActivityResultContract.
  */
 @NonNull
 public final <I, O> ActivityResultLauncher<I> register(
         @NonNull final String key,
         @NonNull final LifecycleOwner lifecycleOwner,
         @NonNull final ActivityResultContract<I, O> contract,
         @NonNull final ActivityResultCallback<O> callback
从上述源码中不难看出在调用registerForActivityResult方法时需要传入一个结果转化器(ActivityResultContract)和处理回调函数(ActivityResultCallback)。
ActivityResultContract的源码如下:
/**
 * A contract specifying that an activity can be called with an input of type [I]
 * and produce an output of type [O].
 *
 * Makes calling an activity for result type-safe.
 *
 * @see androidx.activity.result.ActivityResultCaller
 */
abstract class ActivityResultContract<I, O> {
    /**
     * Create an intent that can be used for [android.app.Activity.startActivityForResult].
     * 将intent进行加工,可以通过这个方法加过传入的intent
     */
    abstract fun createIntent(context: Context, input: I): Intent

    /**
     * Convert result obtained from [android.app.Activity.onActivityResult] to [O].
     * 加工结果返回的intent
     */
    abstract fun parseResult(resultCode: Int, intent: Intent?): O

    /**
     * An optional method you can implement that can be used to potentially provide a result in
     * lieu of starting an activity.
     *
     * @return the result wrapped in a [SynchronousResult] or `null` if the call
     * should proceed to start an activity.
     */
    open fun getSynchronousResult(context: Context, input: I): SynchronousResult<O>? {
        return null
    }

    /**
     * The wrapper for a result provided in [getSynchronousResult]. This allows differentiating
     * between a null [T] synchronous result and no synchronous result at all.
     */
    class SynchronousResult<T>(val value: T)
}
在该抽象类中createIntent方法和parseResult方法尤为重要,一个对acticity跳转时的intent进行加工,一个对跳回时携带的intent进行处理。在这里需要说明的时,当我们进行拍照时,如果自己设定了一个uri(当我们指定文件名的时候需要自己设定这个uri)时,跳回携带的intent中将不再携带uri,及intent.getData()方法将返回null。
ActivityResultCallback的源码如下:
/**
 * A type-safe callback to be called when an {@link Activity#onActivityResult activity result}
 * is available.
 *
 * @param <O> result type
 */
public interface ActivityResultCallback<O> {

    /**
     * Called when result is available
     */
    void onActivityResult(@SuppressLint("UnknownNullness") O result);
}
在开发的过程中我们需要实现onActivityResult进行接收处理跳回携带的intent数据。
通过以上简单说明可以梳理出以下逻辑:
- 在oncreate方法中调用 ActivityResultLauncher resultLauncher = registerForActivityResult(new TakeImageAndVideoUri(), callback);进行获取ActivityResultLauncher对象,该方法的调用建议在oncreate方法中进行,引用该方法将使用到ActivityResultRegistry对象。
- 在点击拍照或者图库的过程中调用resultLauncher.launch(intent);进行界面跳转
- 跳转的过程中android会自动调用你实现的TakeImageAndVideoUri对象中的createIntent方法进行intent加工。
- 用户进行拍照或者选择图片并进行跳回
- 跳回的过程中android将自动调用你实现的TakeImageAndVideoUri对象中的parseResult方法进行结果判断,以及携带intent加工
- 最后将调用callback对象中的onActivityResult方法进行intent数据获取和处理。
以上内容为registerForActivityResult()方法的简单说明,在学习了解该方法的过程中并未进行深入源码或官网学习,如描述存在问题欢迎斧正。
图片选择实现
intent跳转
无论图库中选择图片还是拍照,其实都是通过intent配置进行实现的,该部分代码如下
        binding.headSculptureLayout.setOnClickListener(e->{
            BottomListPopupView popupView = new XPopup.Builder(PersonalInformationActivity.this)
                    .asBottomList("", ImageSelectSourceEnums.getLabels().toArray(new String[0]),
                            (position, text) -> {
                                if (text.equals(ImageSelectSourceEnums.PHOTO.getLabel())) {
                                    resultLauncher.launch(new Intent(MediaStore.ACTION_IMAGE_CAPTURE));
                                } else {
                                    Intent intent = new Intent(Intent.ACTION_PICK);
                                    intent.setType("image/*");
                                    resultLauncher.launch(intent);
                                }
                            });
            TextView cancel = popupView.findViewById(com.lxj.xpopup.R.id.tv_cancel);
            cancel.setText("取消");
            popupView.show();
        });
代码中定义了一个点击事件,当点击headSculptureLayout布局时将进行BottomListPopupView底部选择视图的弹出,在该视图中存在两个选择【拍照】和【图库】,并配置了不同item的点击事件。及点击不同的选项将进行不同的intent配置,然后通过resultLauncher(ActivityResultLauncher的对象,在oncreate方法中通过registerForActivityResult获取的)进行跳转。
在此额外补充一点,如果是选择进行录像则对intent进行如下配置:
Intent intent = new Intent(MediaStore.ACTION_VIDEO_CAPTURE);
// 设置图像质量
intent.putExtra(MediaStore.EXTRA_VIDEO_QUALITY, 1);
resultLauncher.launch(intent);
TakeImageAndVideoUri的实现
ActivityResultContract的实现类Android已经默认提供了很多种,针对图片处理的也提供了一种。
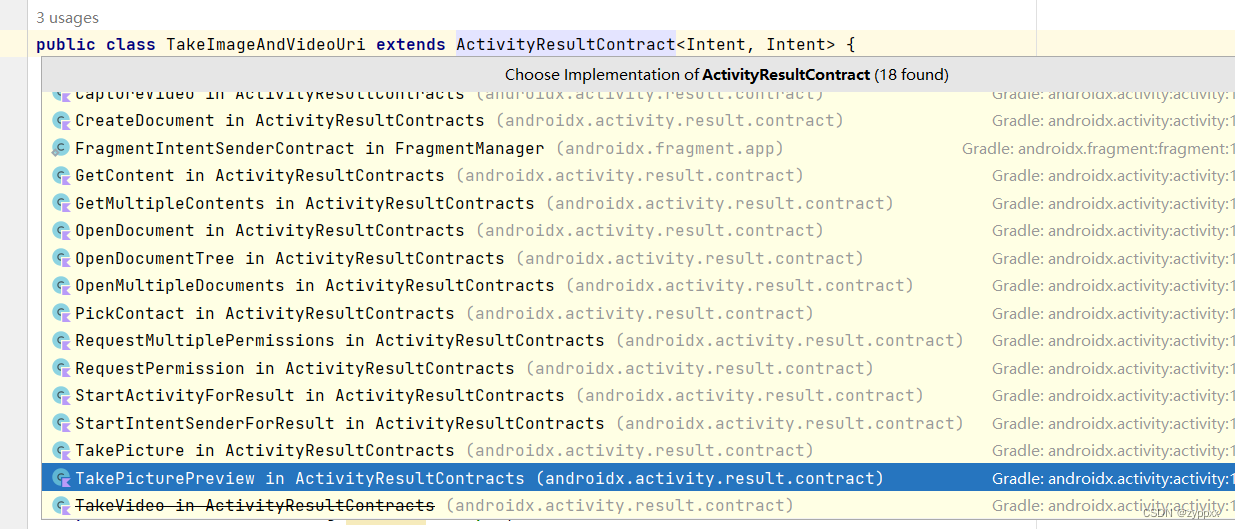
但为了需求的定制化,在这里我自己实现了一个ActivityResultContract的实现类TakeImageAndVideoUri。
该实现类的源码如下:
/**
 * 拍照、录像、选择图库的ActivityResultContract
 *
 * @author baiyang
 * @since 2024-04-27
 */
public class TakeImageAndVideoUri extends ActivityResultContract<Intent, Intent> {
    private Uri uri;
    private Bundle bundle;
    private String type;
    private String action;
    public static final String IMAGE_TYPE = "image/jpeg";
    public static final String VIDEO_TYPE = "video/*";
    public static final String JPG_TYPE = "jpg";
    public static final String MP4_TYPE = "mp4";
    public static final String TYPE = "type";
    /**
    * 设置为你自己的AUTHORITY
    */
    public static final String AUTHORITY = "com.**.***.provider";

    @NonNull
    @Override
    public Intent createIntent(@NonNull Context context, Intent input) {
        action = input.getAction();
        String mimeType = null;
        String fileName = null;
        Uri mediaUri = null;
        if (MediaStore.ACTION_IMAGE_CAPTURE.equals(action)) {
            mimeType = IMAGE_TYPE;
            fileName = System.currentTimeMillis() + "." + JPG_TYPE;
            mediaUri = MediaStore.Images.Media.EXTERNAL_CONTENT_URI;
            type = JPG_TYPE;
        } else if (MediaStore.ACTION_VIDEO_CAPTURE.equals(action)) {
            mimeType = VIDEO_TYPE;
            fileName = System.currentTimeMillis() + "." + MP4_TYPE;
            mediaUri = MediaStore.Video.Media.EXTERNAL_CONTENT_URI;
            type = MP4_TYPE;
        } else if(Intent.ACTION_PICK.equals(action)){
            type = JPG_TYPE;
            bundle = input.getBundleExtra("bundle");
            return input;
        }
        if (Build.VERSION.SDK_INT >= Build.VERSION_CODES.Q) {
            ContentValues values = new ContentValues();
            values.put(MediaStore.MediaColumns.DISPLAY_NAME, fileName);
            values.put(MediaStore.MediaColumns.MIME_TYPE, mimeType);
            values.put(MediaStore.MediaColumns.RELATIVE_PATH, Environment.DIRECTORY_DCIM);
            uri = context.getContentResolver()
                    .insert(mediaUri, values);
        } else {
            uri = FileProvider.getUriForFile(context, AUTHORITY,
                    new File(context.getExternalCacheDir().getAbsolutePath(), fileName));
        }
        input.putExtra(MediaStore.EXTRA_OUTPUT, uri);
        bundle = input.getBundleExtra("bundle");
        return input;
    }

    /**
     * 返回拍照结果,因为在调用相机的过程中设置了EXTRA_OUTPUT,因此返回时intent=null,需要重新设置一下
     *
     * @param resultCode
     * @param intent
     * @return
     */
    @Override
    public Intent parseResult(int resultCode, @Nullable Intent intent) {
        if (resultCode != Activity.RESULT_OK) {
            return null;
        }
        if(Intent.ACTION_PICK.equals(action)){
            intent.putExtra(MediaStore.EXTRA_OUTPUT, intent.getData());
            intent.putExtra(TYPE, type);
            return intent;
        }
        intent = new Intent();
        intent.putExtra(MediaStore.EXTRA_OUTPUT, uri);
        intent.putExtra(TYPE, type);
        intent.putExtra("bundle", bundle);
        return intent;
    }
}
在这里需要说明的有以下几点
- 一旦在createIntent方法中给intent设置了MediaStore.EXTRA_OUTPUT,则在parseResult方法中返回的intent则无法通过getData获取uri。
- createIntent方法和parseResult方法参数intent并不是同一个对象
- 在该实现类中使用了Bundle bundle进行intent携带额外参数的实现
- 在进行拍照、录像、选择相册的过程中需要权限认证,实现类中的参数AUTHORITY 需要和你在AndroidManifest.xml中配置的提供者provider中的android:authorities一直,及如下代码
        <provider
            android:name="androidx.core.content.FileProvider"
            android:authorities="com.***.***.provider"
            android:grantUriPermissions="true">
            <meta-data
                android:name="android.support.FILE_PROVIDER_PATHS"
                android:resource="@xml/file_paths" />
        </provider>
其中file_paths为配置的资源访问范围xml配置文件。该部分内容可自行百度了解。
- 代码中拍照和录像都配置了uri,指定了文件名称,但是从图库中选择为进行uri的配置,因此当intent的action为ACTION_PICK时,parseResult方法中intent已经携带了uri,因此无需再进行设置
ActivityResultCallback的实现
通过上述方法,已经实现了拍照、图库的界面跳转和回挑过程,并且在回跳的时已经携带了我们需要的参数数据。因此我们需要实现ActivityResultCallback进行数据的业务逻辑处理。例如图片回显、裁剪、上传等操作。目前我仅仅实现了简单的回显功能,并且是通过Glide工具进行回显的。代码如下:
    /**
     * 回调
     */
    private final ActivityResultCallback<Intent> callback = result -> {
        if (Objects.nonNull(result)) {
            Uri uri = result.getParcelableExtra(MediaStore.EXTRA_OUTPUT);
            String type = result.getStringExtra(TakeImageAndVideoUri.TYPE);
            Glide.with(getApplicationContext()).load(uri).into(binding.headSculpture);
        } else {
            LogUtils.e("拍照、录像数据回调失败,未回传相关数据");
        }
    };
后续我将实现图片的裁剪、上传等业务逻辑,可见其他文章。
总结
本文主要阐述了android通过图库和拍照两种方法设置头像的功能实现。在具体实现过程中主要使用了以下技术:
- XPopup的BottomListPopupView实现底部选择试图
- ActivityResultLauncher对象、 registerForActivityResult()方法、TakeImageAndVideoUri(ActivityResultContract实现类型)和ActivityResultCallback实现类;分别进行intent跳转,intent输入输出配置以及回跳回调。
- Glide 本地图片回显,后续还将通过该工具进行网络图片回显
- 在布局方面主要使用了ConstraintLayout、LinearLayoutCompat、RelativeLayout三种组合布局。


 706
706


 被折叠的 条评论
为什么被折叠?
被折叠的 条评论
为什么被折叠?
 到【灌水乐园】发言


