


首先分享之前的所有文章 , 欢迎点赞收藏转发三连下次一定 >>>> 😜😜😜
文章合集 : 🎁 https://juejin.cn/post/6941642435189538824
Github : 👉 https://github.com/black-ant
CASE 备份 : 👉 https://gitee.com/antblack/case
一 . 前言
前面一篇说了 AT 模式中到 Template 的所有流程 , 这一篇来看一下后面的 begiunTransaction 做了什么
二 . 流程梳理
流程分为几个节点 :
- 属性部分 : TransactionInfo + GlobalLockConfig
- 事务部分 : beginTransaction + commitTransaction
- 逻辑部分 : execute + TransactionalExecutor
2.1 TransactionInfo 详情
> PS:M52_02_01 TransactionInfo 对象包含了什么?


```java
C53- TransactionInfo
    F53_01- int timeOut : 超时时间
    F53_02- String name : 事务名
    F53_03- Set<RollbackRule> rollbackRules : 回退规则
    F53_04- Propagation propagation
    F53_05- int lockRetryInternal : 重试间隔
    F53_06- int lockRetryTimes : 重试次数
    M53_01- rollbackOn :
    M53_02- getPropagation()

public final class TransactionInfo implements Serializable {

     public boolean rollbackOn(Throwable ex) {

        RollbackRule winner = null;
        int deepest = Integer.MAX_VALUE;

        if (CollectionUtils.isNotEmpty(rollbackRules)) {
            winner = NoRollbackRule.DEFAULT_NO_ROLLBACK_RULE;
            for (RollbackRule rule : this.rollbackRules) {
                int depth = rule.getDepth(ex);
                if (depth >= 0 && depth < deepest) {
                    deepest = depth;
                    winner = rule;
                }
            }
        }

        return !(winner instanceof NoRollbackRule);
    }

    public Propagation getPropagation() {
        if (this.propagation != null) {
            return this.propagation;
        }
        //default propagation
        return Propagation.REQUIRED;
    }

}
Propagation 的作用 ?
Propagation 是一个枚举 , 表示的是事务传播的模式 , 包括如下几种 :
- REQUIRED : 如果事务存在,则使用当前事务执行,否则使用新事务执行
- REQUIRES_NEW : 如果事务存在,将暂停它,然后使用新事务执行业务。
- NOT_SUPPORTED : 如果事务存在,则挂起它,然后执行没有事务的业务
- SUPPORTS : 如果事务不存在,则不执行全局事务,否则执行当前事务的业务
- NEVER : 如果事务存在,抛出异常,否则执行没有事务的业务
- MANDATORY: 如果事务不存在,抛出异常,否则执行与当前事务相关的业务
2.2 GlobalLockConfig 详情
对象属性 :
// 再次回顾一下之前看过的对象
public class GlobalLockConfig {

    // 锁定重试间隔
    private int lockRetryInternal;
    // 锁定重试次数
    private int lockRetryTimes;
}
逻辑处理:
// 再来看一下配置的方式
private GlobalLockConfig replaceGlobalLockConfig(TransactionInfo info) {

    GlobalLockConfig myConfig = new GlobalLockConfig();
    myConfig.setLockRetryInternal(info.getLockRetryInternal());
    myConfig.setLockRetryTimes(info.getLockRetryTimes());
    // 主要看一下这个里面做了什么
    return GlobalLockConfigHolder.setAndReturnPrevious(myConfig);
}


public class GlobalLockConfigHolder {

    // 关键一 : 线程存储
    private static ThreadLocal<GlobalLockConfig> holder = new ThreadLocal<>();

    // 关键二 : 这里有个有趣的地方 , 可以看到取得 Previous , 同时设置 Current
    public static GlobalLockConfig setAndReturnPrevious(GlobalLockConfig config) {
        GlobalLockConfig previous = holder.get();
        holder.set(config);
        return previous;
    }

}
[Pro] : 为什么关键二中 , 获取得是之前的 Config
获取前一个 GlobalLockConfig 主要是用于回退
GlobalLockConfig previousConfig = replaceGlobalLockConfig(txInfo);
try {
    //.......事务
} finally {
    resumeGlobalLockConfig(previousConfig);
    triggerAfterCompletion();
    cleanUp();
}
那么问题来了 ,我都已经到了下一个操作了 ,再获取前一个全局锁是为什么 ?
大概想了一下 , 主要应该是这样的流程 , 当第一个事务获取全局锁时 , 其他本地事务如果要执行 ,必须获取全局锁 , 那么 , 下一个事务应该去关注上一个全局锁配置.
因为上一个全局锁未处理完的情况下 , 下一个事务实际上是拿不到一个全局锁的.
private void resumeGlobalLockConfig(GlobalLockConfig config) {
    if (config != null) {
        GlobalLockConfigHolder.setAndReturnPrevious(config);
    } else {
        GlobalLockConfigHolder.remove();
    }
}
PS : 不知道这里理解得对不对 ,因为这里ThreadLocal 获取到的是当前线程的配置 , 即一个线程内我的全局锁唯一吗?
TODO : 后文看全局锁的时候再来回顾一下
2.3 beginTransaction 开启事务
上文看完了配置信息 , 这里来看一下事务的启动
// 其中可以看到 , 主要是3步走 >>>
private void beginTransaction(TransactionInfo txInfo, GlobalTransaction tx) throws TransactionalExecutor.ExecutionException {
    try {
        triggerBeforeBegin();
        tx.begin(txInfo.getTimeOut(), txInfo.getName());
        triggerAfterBegin();
    } catch (TransactionException txe) {
        throw new TransactionalExecutor.ExecutionException(tx, txe,TransactionalExecutor.Code.BeginFailure);
    }
}
2.3.1 triggerBeforeBegin()
// 先来看一下 trigger 主要逻辑
M51_03- triggerBeforeBegin
    FOR- 循环所有的 TransactionHook : getCurrentHooks
        - hook.beforeBegin()

M51_04- triggerAfterBegin
    FOR- 循环所有的 TransactionHook : getCurrentHooks
        - hook.afterBegin()

// 2个的核心都是调用 TransactionHook的对应方法 , 这里带来了2个问题 :
- TransactionHook 是什么 ?
- TransactionHook 的管理 ?

// [Pro1] : TransactionHook 是什么 ?
TransactionHook 是一个接口 , 它允许通过插槽的方式对流程进行附加操作 , 它的主要实现类为 TransactionHookAdapter

public interface TransactionHook {

    /**
     * before tx begin
     */
    void beforeBegin();

    /**
     * after tx begin
     */
    void afterBegin();

    /**
     * before tx commit
     */
    void beforeCommit();

    /**
     * after tx commit
     */
    void afterCommit();

    /**
     * before tx rollback
     */
    void beforeRollback();

    /**
     * after tx rollback
     */
    void afterRollback();

    /**
     * after tx all Completed
     */
    void afterCompletion();
}

// 这里大概看了一下 , 应该是可以手动配置 Hook 的 , 后面来详细看一下, 案例 :
public void testTransactionCommitHook() throws Throwable {
    TransactionHook transactionHook = Mockito.mock(TransactionHook.class);

    TransactionHookManager.registerHook(transactionHook);
    TransactionalTemplate template = new TransactionalTemplate();
    template.execute(transactionalExecutor);
}


// [Pro2] :TransactionHook 的管理 ?
private List<TransactionHook> getCurrentHooks() {
    // 通过 TransactionHookManager 对 TransactionHook 进行管理
    return TransactionHookManager.getHooks();
}

public final class TransactionHookManager {
    // 同样的 , 其内部也是通过一个 ThreadLocal 进行管理
    private static final ThreadLocal<List<TransactionHook>> LOCAL_HOOKS = new ThreadLocal<>();
}
2.3.2 DefaultGlobalTransaction # begin 处理
继续来看三步中的核心步骤 : tx.begin(txInfo.getTimeOut(), txInfo.getName())
C52- DefaultGlobalTransaction
    M52_01- begin(int timeout, String name)
     	- RootContext.getXID() : 获取 currentXid
     	- transactionManager.begin(null, null, name, timeout) : transactionManager 开始管理
     	- GlobalStatus.Begin : 修改装填
     	- RootContext.bind(xid) : 绑定事务 ID

public void begin(int timeout, String name) throws TransactionException {
    if (role != GlobalTransactionRole.Launcher) {
        assertXIDNotNull();
        return;
    }
    assertXIDNull();
    // Step 1 : 获取当前事务 ID
    String currentXid = RootContext.getXID();
    if (currentXid != null) {
        throw new IllegalStateException("Global transaction already exists," +
                " can't begin a new global transaction, currentXid = " + currentXid);
    }
    // Step 2 : 调用
    xid = transactionManager.begin(null, null, name, timeout);
    status = GlobalStatus.Begin;
    RootContext.bind(xid);
}
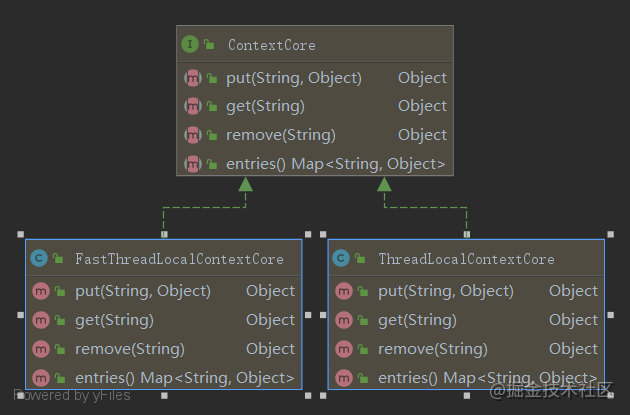
PS : RootContext 是什么 ?
RootContext 是根上下文 ,它会当当前 XID 进行管理
C- RootContext
    F- ContextCore CONTEXT_HOLDER = ContextCoreLoader.load();
    F- BranchType DEFAULT_BRANCH_TYPE;
	M- bind(@Nonnull String xid)
        - CONTEXT_HOLDER.put(KEY_XID, xid)
        	?- 此处的 CONTEXT_HOLDER 为 FastThreadLocalContextCore


C- FastThreadLocalContextCore
private FastThreadLocal<Map<String, Object>> fastThreadLocal = new FastThreadLocal<Map<String, Object>>() {
    @Override
    protected Map<String, Object> initialValue() {
        return new HashMap<>();
    }
};
2.3.3 TransactionManager 详情
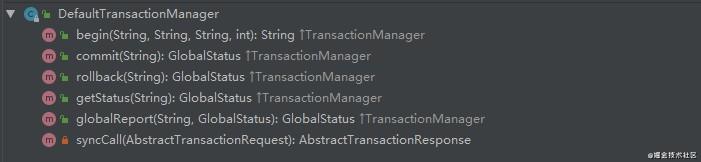
// 这里终于使用 TransactionManager 进行相关的管理了
C53- DefaultTransactionManager
    M53_01- begin(String applicationId, String transactionServiceGroup, String name, int timeout)
        1- 构架一个新的 GlobalBeginRequest
        2- setTransactionName + setTimeout
        3- 调用 syncCall 开启事务 , 同时用 GlobalBeginResponse 接收


public String begin(String applicationId, String transactionServiceGroup, String name, int timeout)
    throws TransactionException {
    // Step 1 : 构建 Request
    GlobalBeginRequest request = new GlobalBeginRequest();
    request.setTransactionName(name);
    request.setTimeout(timeout);
    // Step 2 : 发起请求
    GlobalBeginResponse response = (GlobalBeginResponse) syncCall(request);
    if (response.getResultCode() == ResultCode.Failed) {
        throw new TmTransactionException(TransactionExceptionCode.BeginFailed, response.getMsg());
    }
    // Step 3 : 获取Response
    return response.getXid();
}
GlobalBeginRequest 与 GlobalBeginResponse 详情

2.3.4 远程调用
远程调用分为2步 :
- Step 1 : syncCall 发起远程调用主逻辑
- Step 2 : sendSyncRequest(Object msg) 正式的调用
Step 1 : syncCall 发起远程调用主逻辑
private AbstractTransactionResponse syncCall(AbstractTransactionRequest request) throws TransactionException {
    try {
        // 通过 TmNettyRemotingClient 发起 Netty 远程调用
        return (AbstractTransactionResponse) TmNettyRemotingClient.getInstance().sendSyncRequest(request);
    } catch (TimeoutException toe) {
        throw new TmTransactionException(TransactionExceptionCode.IO, "RPC timeout", toe);
    }
}
Step 2 : sendSyncRequest(Object msg) 正式的调用
 public Object sendSyncRequest(Object msg) throws TimeoutException {
        String serverAddress = loadBalance(getTransactionServiceGroup(), msg);
        int timeoutMillis = NettyClientConfig.getRpcRequestTimeout();
        RpcMessage rpcMessage = buildRequestMessage(msg, ProtocolConstants.MSGTYPE_RESQUEST_SYNC);

        // 批量发送消息 , 将消息放入basketMap
        if (NettyClientConfig.isEnableClientBatchSendRequest()) {

            // 发送批处理消息是同步请求,需要创建messageFuture并将其放入futures
            MessageFuture messageFuture = new MessageFuture();
            messageFuture.setRequestMessage(rpcMessage);
            messageFuture.setTimeout(timeoutMillis);
            futures.put(rpcMessage.getId(), messageFuture);

            // 把信息放入 basketMap
            BlockingQueue<RpcMessage> basket = CollectionUtils.computeIfAbsent(basketMap, serverAddress,
                key -> new LinkedBlockingQueue<>());
            basket.offer(rpcMessage);
            if (!isSending) {
                synchronized (mergeLock) {
                    mergeLock.notifyAll();
                }
            }

            try {
                // 消息发送获取
                return messageFuture.get(timeoutMillis, TimeUnit.MILLISECONDS);
            } catch (Exception exx) {
                if (exx instanceof TimeoutException) {
                    throw (TimeoutException) exx;
                } else {
                    throw new RuntimeException(exx);
                }
            }

        } else {
            Channel channel = clientChannelManager.acquireChannel(serverAddress);
            return super.sendSync(channel, rpcMessage, timeoutMillis);
        }

}
2.4 commitTransaction 提交事务
private void commitTransaction(GlobalTransaction tx) throws TransactionalExecutor.ExecutionException {
        try {
            triggerBeforeCommit();
            tx.commit();
            triggerAfterCommit();
        } catch (TransactionException txe) {
            // 4.1 Failed to commit
            throw new TransactionalExecutor.ExecutionException(tx, txe,
                TransactionalExecutor.Code.CommitFailure);
        }
}


// 去掉log 后 , 可以看到其中的核心代码就是  transactionManager.commit(xid)
 public void commit() throws TransactionException {
        if (role == GlobalTransactionRole.Participant) {
            return;
        }
        assertXIDNotNull();
        int retry = COMMIT_RETRY_COUNT <= 0 ? DEFAULT_TM_COMMIT_RETRY_COUNT : COMMIT_RETRY_COUNT;
        try {
            while (retry > 0) {
                try {
                    status = transactionManager.commit(xid);
                    break;
                } catch (Throwable ex) {
                    retry--;
                    if (retry == 0) {
                        throw new TransactionException("Failed to report global commit", ex);
                    }
                }
            }
        } finally {
            if (xid.equals(RootContext.getXID())) {
                suspend();
            }
        }
    }


@Override
public GlobalStatus commit(String xid) throws TransactionException {
    GlobalCommitRequest globalCommit = new GlobalCommitRequest();
    globalCommit.setXid(xid);
    // 同样的 , commit 也是发起 syncCall
    GlobalCommitResponse response = (GlobalCommitResponse) syncCall(globalCommit);
    return response.getGlobalStatus();
}
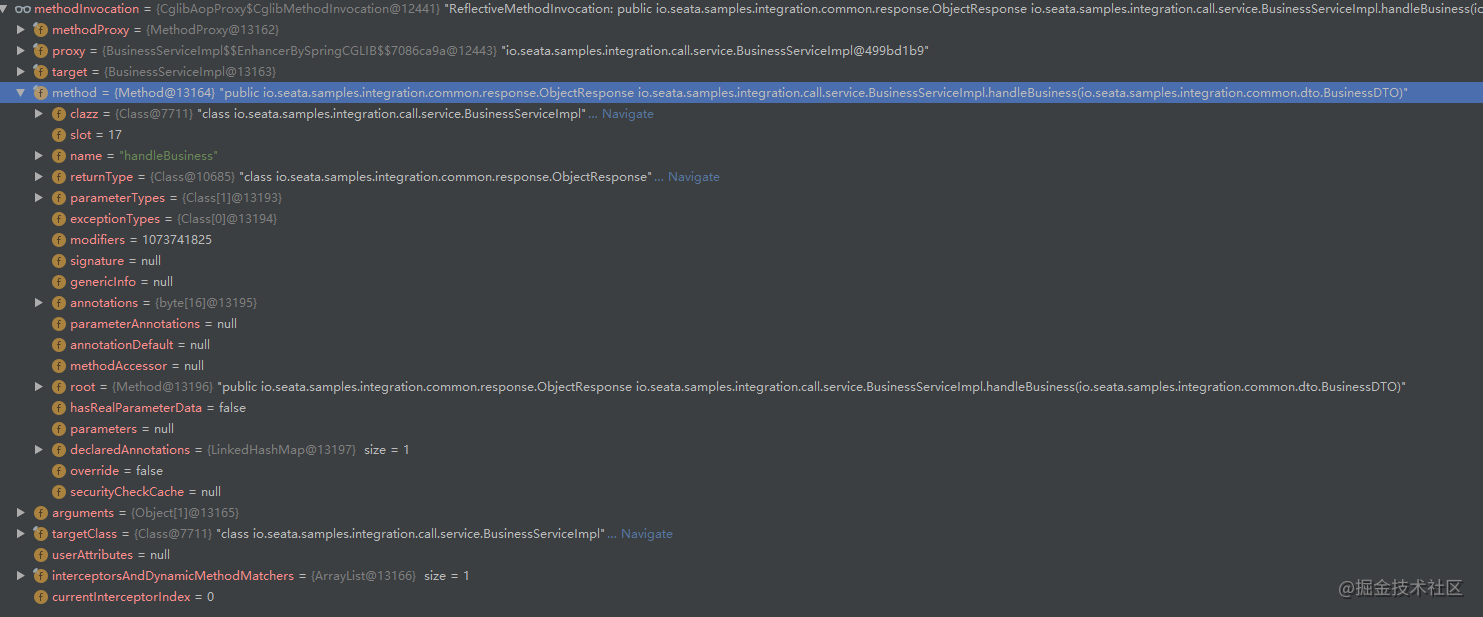
2.5 execute 处理
具体业务的处理只有一句 rs = business.execute() , 来看一下着其中的所有逻辑 :
从上一篇文章我们知道 , business 是再 Inter 中构建的一个 TransactionalExecutor 匿名对象
 C52- TransactionalExecutor
     M52_01- execute
     M52_02- getTransactionInfo : 获取 TransactionInfo 对象 -> PS:M52_02_01

// Step 1 : 发起远程调用
C- GlobalTransactionalInterceptor
return transactionalTemplate.execute(new TransactionalExecutor() {
    @Override
    public Object execute() throws Throwable {
        // 核心语句 , 方法代理
        return methodInvocation.proceed();
    }
});


// Step 2 :AOP 拦截
这里可以看到 , 实际上这里和AOP逻辑是一致的 , 最终通过 CglibAopProxy 中实现了方法的代理
methodInvocation 详情
总结
这一篇暂时不说 rollback 流程 , 仅仅说了正常的事务处理流程 , 下一篇来说说rollback 已经 Server 端的处理


 3532
3532


 被折叠的 条评论
为什么被折叠?
被折叠的 条评论
为什么被折叠?
 到【灌水乐园】发言


