


 本文介绍了如何在Eclipse环境下解决Android项目因方法数超过65535限制的问题,通过Ant脚本合并jar、使用dx工具生成dex文件,并引入MultiDex库进行分包,详细步骤包括修改build.xml、执行Ant命令、配置Manifest及Application类等。
Ant介绍
什么是Ant
Apache Ant算是一个将软件编译、测试、部署等步骤联系在一起加以优化的一个构建(就是把代码从某个地方拿来、编译、再拷贝到某个地方去等操作)工具,常用语Java环境中的软件开发。ANt的默认配置文件是build.xml。
在项目中添加build.xml文件 然后文件内容如下所示
<project name="helloWorld">
<target name="sayHelloWorld">
<echo message="Hello,Amigo"/>
</target>
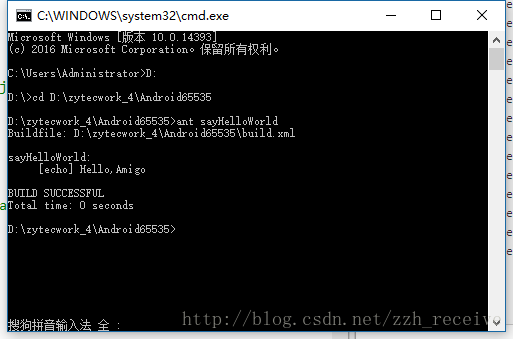
</project>然后进入Cmd 定位到当前项目的路径 然后输入
ant sayHelloWorld // ant 后面为target标签下面 name属性里面的值结果截图为
Eclipse版本android 65535解决方案(原理等同android studio现在的分包方式)
由于工作的需要看了下Eclipse下android65535的解决方案,查了好多文档,真心的发自内心的说一句请不要再拷贝别人的博客了,害人,真害人。
接下来我说下我的实现方式,首先说下65535的最可能的触发原因(三方jar用的太多了)
1. 首先:合并jar
这里合并到jar使用的事ant的脚本,如何你电脑安装了ant,那ok,如果没有安装这里也不啰嗦告诉你怎么安装了,百度一下吧,安装总的来说没啥技术含量。安装ant之后配置如下脚本文件。
<?xml version="1.0" encoding="utf-8"?>
<project name="b" basedir="D:\zytecwork_4\Android65535\libs" default="makeSuperJar">
<target name="makeSuperJar"  description="description">
    <jar destfile="all.jar">
        <zipfileset src="eventbus-3.0.0-beta1.jar"/>
        <zipfileset src="glide-3.7.0.jar"/>
        <zipfileset src="gson-2.4.jar"/>
        <zipfileset src="httpmime-4.0.1.jar"/>
        <zipfileset src="jobqueue-1.1.2.jar"/>
        <zipfileset src="ksoap2-android-assembly-2.5.8-jar-with-dependencies.jar"/>
        <zipfileset src="logger.jar"/>
        <zipfileset src="mqtt3.jar"/>
        <zipfileset src="okhttp-3.4.1.jar"/>
        <zipfileset src="okio-1.10.0.jar"/>
        <zipfileset src="photo_view_library.jar"/>
        <zipfileset src="umeng_sdk.jar"/>
        <zipfileset src="universal-image-loader-1.9.3.jar"/>
        <zipfileset src="zxing.jar"/>
    </jar>
</target>
</project>
这里你只需要改下你的basedir目录地址,destfile输出文件的名字和zipfileset你需要合并的jar即可。
![这里写图片描述]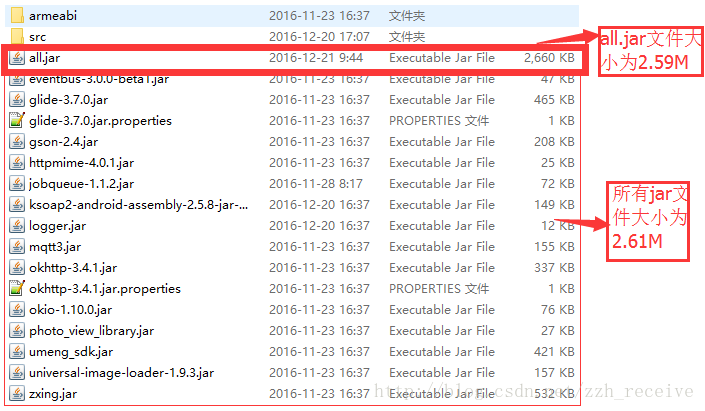 (
(然后将合并的jar转换成dex文件,怎么找到dx工具,见图
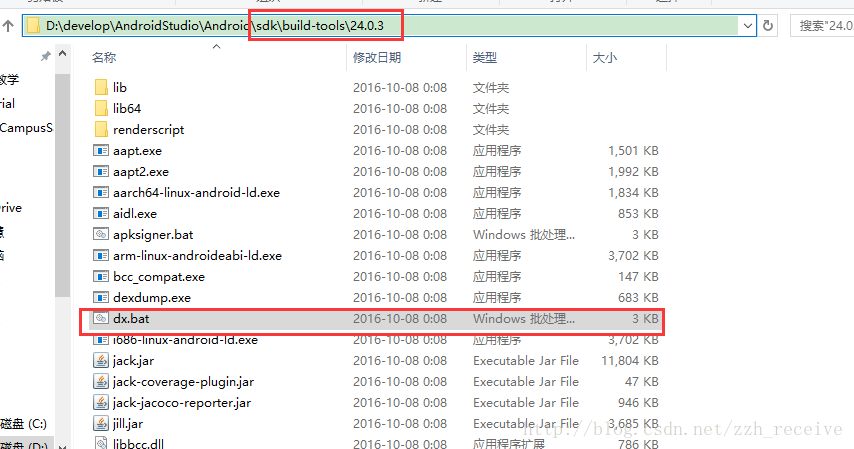
直接在当前路径下执行cmd命令,然后输入
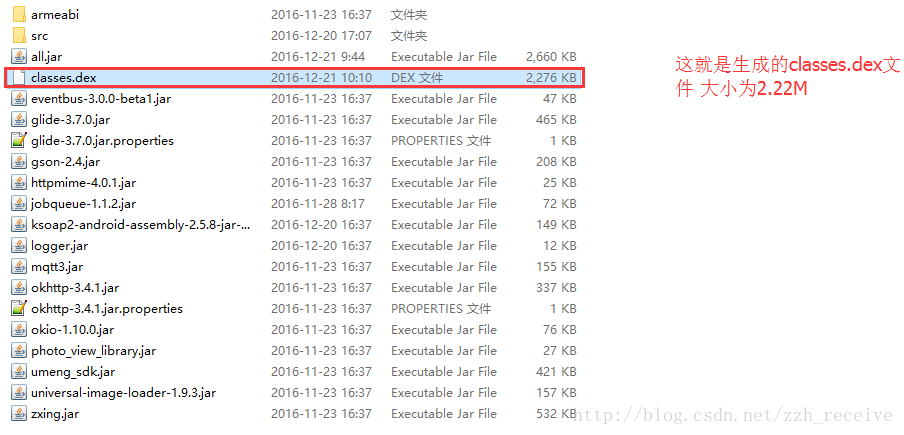
dx --dex --output=D:\zytecwork_4\Android65535\libs\classes.dex D:\zytecwork_4\Android65535\libs\all.jar,'这里我写的是我自己的路径。输出文件为classes.dex,由于apk默认会将项目中的class文件编译成classes.dex,所以这里你需要更改下你的输出文件名,这里这个名字要有规范,严格的命名classes2.dex,classes3.dex…..,至于为什么,这是MultiDex的自己要求的,这里是仿Android sutudio的分包方式,请严格执行。
之后将classes.dex文件放置到项目的src目录下即可。 现在执行你还差最后一步导入MutiDex类库,你可以在网上去下载,或者直接copy我下边的代码,这里最主要想说的是如何使用 在你的项目的Application类中配置如下代码:
一、在manifest文件中指定Application为MultiDexApplication,如下所示:
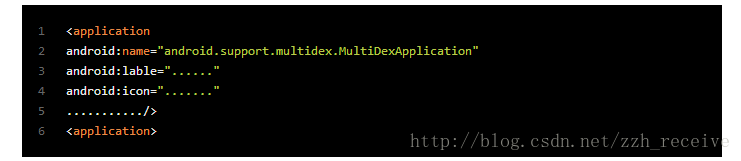
二、让应用的Application继承MultiDexApplication,如下所示:

三、如果不想让应用的Application继承MultiDexApplication,还可以选择重写Application的

attachBaseContext方法,这个方法比Application的onCreate要先执行,如下所示:
public class App extends Application {


    @Override
    protected void attachBaseContext(Context base) {
        super.attachBaseContext(base);
         MultiDex.install(this);
    }
}
到这里基本上配置算是完成了,this all over. 一下是类库MultiDex的类库Code,有需要的直接拷贝即可,这里不作为关键点来分析 MultiDex类:
/*
 * Copyright (C) 2013 The Android Open Source Project
 *
 * Licensed under the Apache License, Version 2.0 (the "License");
 * you may not use this file except in compliance with the License.
 * You may obtain a copy of the License at
 *
 *      http://www.apache.org/licenses/LICENSE-2.0
 *
 * Unless required by applicable law or agreed to in writing, software
 * distributed under the License is distributed on an "AS IS" BASIS,
 * WITHOUT WARRANTIES OR CONDITIONS OF ANY KIND, either express or implied.
 * See the License for the specific language governing permissions and
 * limitations under the License.
 */
package com.wisdozzh.android65535;

import android.app.Application;
import android.content.Context;
import android.content.pm.ApplicationInfo;
import android.content.pm.PackageManager;
import android.content.pm.PackageManager.NameNotFoundException;
import android.os.Build;
import android.util.Log;

import dalvik.system.DexFile;

import java.io.File;
import java.io.IOException;
import java.lang.reflect.Array;
import java.lang.reflect.Field;
import java.lang.reflect.InvocationTargetException;
import java.lang.reflect.Method;
import java.util.ArrayList;
import java.util.Arrays;
import java.util.HashSet;
import java.util.List;
import java.util.ListIterator;
import java.util.Set;
import java.util.regex.Matcher;
import java.util.regex.Pattern;
import java.util.zip.ZipFile;

/**
 * Monkey patches {@link Context#getClassLoader() the application context class
 * loader} in order to load classes from more than one dex file. The primary
 * {@code classes.dex} must contain the classes necessary for calling this
 * class methods. Secondary dex files named classes2.dex, classes3.dex... found
 * in the application apk will be added to the classloader after first call to
 * {@link #install(Context)}.
 *
 * <p/>
 * This library provides compatibility for platforms with API level 4 through 20. This library does
 * nothing on newer versions of the platform which provide built-in support for secondary dex files.
 */
public final class MultiDex {


    public static final String TAG = "MultiDex";

    private static final String OLD_SECONDARY_FOLDER_NAME = "secondary-dexes";

    private static final String SECONDARY_FOLDER_NAME = "code_cache" + File.separator +
        "secondary-dexes";

    private static final int MAX_SUPPORTED_SDK_VERSION = 20;

    private static final int MIN_SDK_VERSION = 4;

    private static final int VM_WITH_MULTIDEX_VERSION_MAJOR = 2;

    private static final int VM_WITH_MULTIDEX_VERSION_MINOR = 1;

    private static final Set<String> installedApk = new HashSet<String>();

    private static final boolean IS_VM_MULTIDEX_CAPABLE =
            isVMMultidexCapable(System.getProperty("java.vm.version"));

    private MultiDex() {}

    /**
     * Patches the application context class loader by appending extra dex files
     * loaded from the application apk. This method should be called in the
     * attachBaseContext of your {@link Application}, see
     * {@link MultiDexApplication} for more explanation and an example.
     *
     * @param context application context.
     * @throws RuntimeException if an error occurred preventing the classloader
     *         extension.
     */
    public static void install(Context context) {
        Log.i(TAG, "install");
        if (IS_VM_MULTIDEX_CAPABLE) {
            Log.i(TAG, "VM has multidex support, MultiDex support library is disabled.");
            return;
        }

        if (Build.VERSION.SDK_INT < MIN_SDK_VERSION) {
            throw new RuntimeException("Multi dex installation failed. SDK " + Build.VERSION.SDK_INT
                    + " is unsupported. Min SDK version is " + MIN_SDK_VERSION + ".");
        }

        try {
            ApplicationInfo applicationInfo = getApplicationInfo(context);
 最低0.47元/天 解锁文章


 2302
2302

 被折叠的 条评论
为什么被折叠?
被折叠的 条评论
为什么被折叠?
 到【灌水乐园】发言


