


springMVC入门(1):尝试
尝试使用SpringMVC框架创建一个web应用,但是问题百出,还是书没看明白就急着动手,其次对Intellij IDEA不熟,以前一直用eclipse,很多都没明白。
1.使用IDEA创建spring MVC项目
IDEA创建项目的时候可以选择spring mvc项目,但是选择后没有pom.xml,不知道怎么加依赖,以及会出现jar包缺失的问题,目前还没有解决。
在基于spring4.3.3创建mvc项目的时候配置文件和spring3.2.17有一定区别,需要注意。
2.使用IDEA创建Maven项目
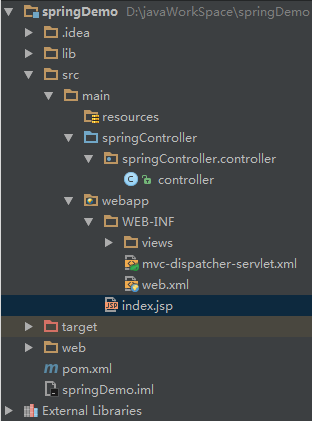
创建Maven项目比较好控制依赖,而且项目结构也比较方便的创建好了,项目结构如下所示:本项目使用的spring版本为3.2.17
配置文件web.xml如下:
<web-app version="2.4"
         xmlns="http://java.sun.com/xml/ns/j2ee" xmlns:xsi="http://www.w3.org/2001/XMLSchema-instance"
         xsi:schemaLocation="http://java.sun.com/xml/ns/j2ee
    http://java.sun.com/xml/ns/j2ee/web-app_2_4.xsd">

  <display-name>Archetype Created Web Application</display-name>

    <!--默认页面-->
    <welcome-file-list>
        <welcome-file>index.jsp</welcome-file>
    </welcome-file-list>

    <servlet>
        <servlet-name>mvc-dispatcher</servlet-name>
        <servlet-class>org.springframework.web.servlet.DispatcherServlet</servlet-class>
        <!--最好指定spring servlet配置文件具体路径-->
        <init-param>
            <param-name>contextConfigLocation</param-name>
            <param-value>WEB-INF/mvc-dispatcher-servlet.xml</param-value>
        </init-param>
        <load-on-startup>1</load-on-startup>
    </servlet>

    <!--servlet映射,后缀为do-->
    <servlet-mapping>
        <servlet-name>mvc-dispatcher</servlet-name>
        <url-pattern>*.do</url-pattern>
    </servlet-mapping>
</web-app>
mvc-dispatcher-servlet.xml如下:
<?xml version="1.0" encoding="UTF-8"?>
<beans xmlns="http://www.springframework.org/schema/beans"
       xmlns:xsi="http://www.w3.org/2001/XMLSchema-instance" xmlns:mvc="http://www.springframework.org/schema/mvc"
       xmlns:context="http://www.springframework.org/schema/context"
       xsi:schemaLocation="http://www.springframework.org/schema/beans http://www.springframework.org/schema/beans/spring-beans.xsd http://www.springframework.org/schema/context http://www.springframework.org/schema/context/spring-context.xsd http://www.springframework.org/schema/mvc http://www.springframework.org/schema/mvc/spring-mvc.xsd">

    <bean class="org.springframework.web.servlet.view.InternalResourceViewResolver">
        <property name="prefix" value="/WEB-INF/views/"/>
        <property name="suffix" value=".jsp"/>
    </bean>

    <mvc:annotation-driven/>
    <mvc:default-servlet-handler/>
    <context:component-scan base-package="springController.controller"/>
</beans>
controller如下所示:
@Controller
@RequestMapping(value = "/test")
public class controller {
    @RequestMapping(method = RequestMethod.GET,value = "/login")
    public ModelAndView login(){
        System.out.println("login controller");
        ModelAndView mv=new ModelAndView();
        mv.addObject("message","hello");
        mv.setViewName("login");
        return mv;
    }
}
login的请求路径为/test/login.do,请求最后返回视图login,显示views文件夹下的login.jsp页面
index,jsp页面代码如下:
<html>
<body>
<h3>index</h3>
<form method="get" action="${pageContext.request.contextPath}/test/login.do">
    <button type="submit">submit</button>
</form>
</body>
</html>
其中${pageContext.request.contextPath}为应用程序部署名,不加上也同样可以,但是最好加上,使用绝对路径。
这样,项目运行后打开index.jsp,点击按钮后请求/test/login.do,然后处理并转向login视图。算是一个Hello world级别的小Demo吧,但是费了我不少时间,还是配置文件没搞清楚,需要再多看看书再来动手了,然而项目都已经用到了Hibernate,我也还不会,蛋疼,努力学习吧。
以上,快到饭点了,就写这么多。


 698
698

 被折叠的 条评论
为什么被折叠?
被折叠的 条评论
为什么被折叠?
 到【灌水乐园】发言


