


本文通过Vue-Cli3.0脚手架生成项目,并在项目的HelloWorld.Vue中增加3D的Demo,只是为了学习3d模型的展示与操作。
开发环境说明:node :v12.14.0;@vue/cli 4.5.8;
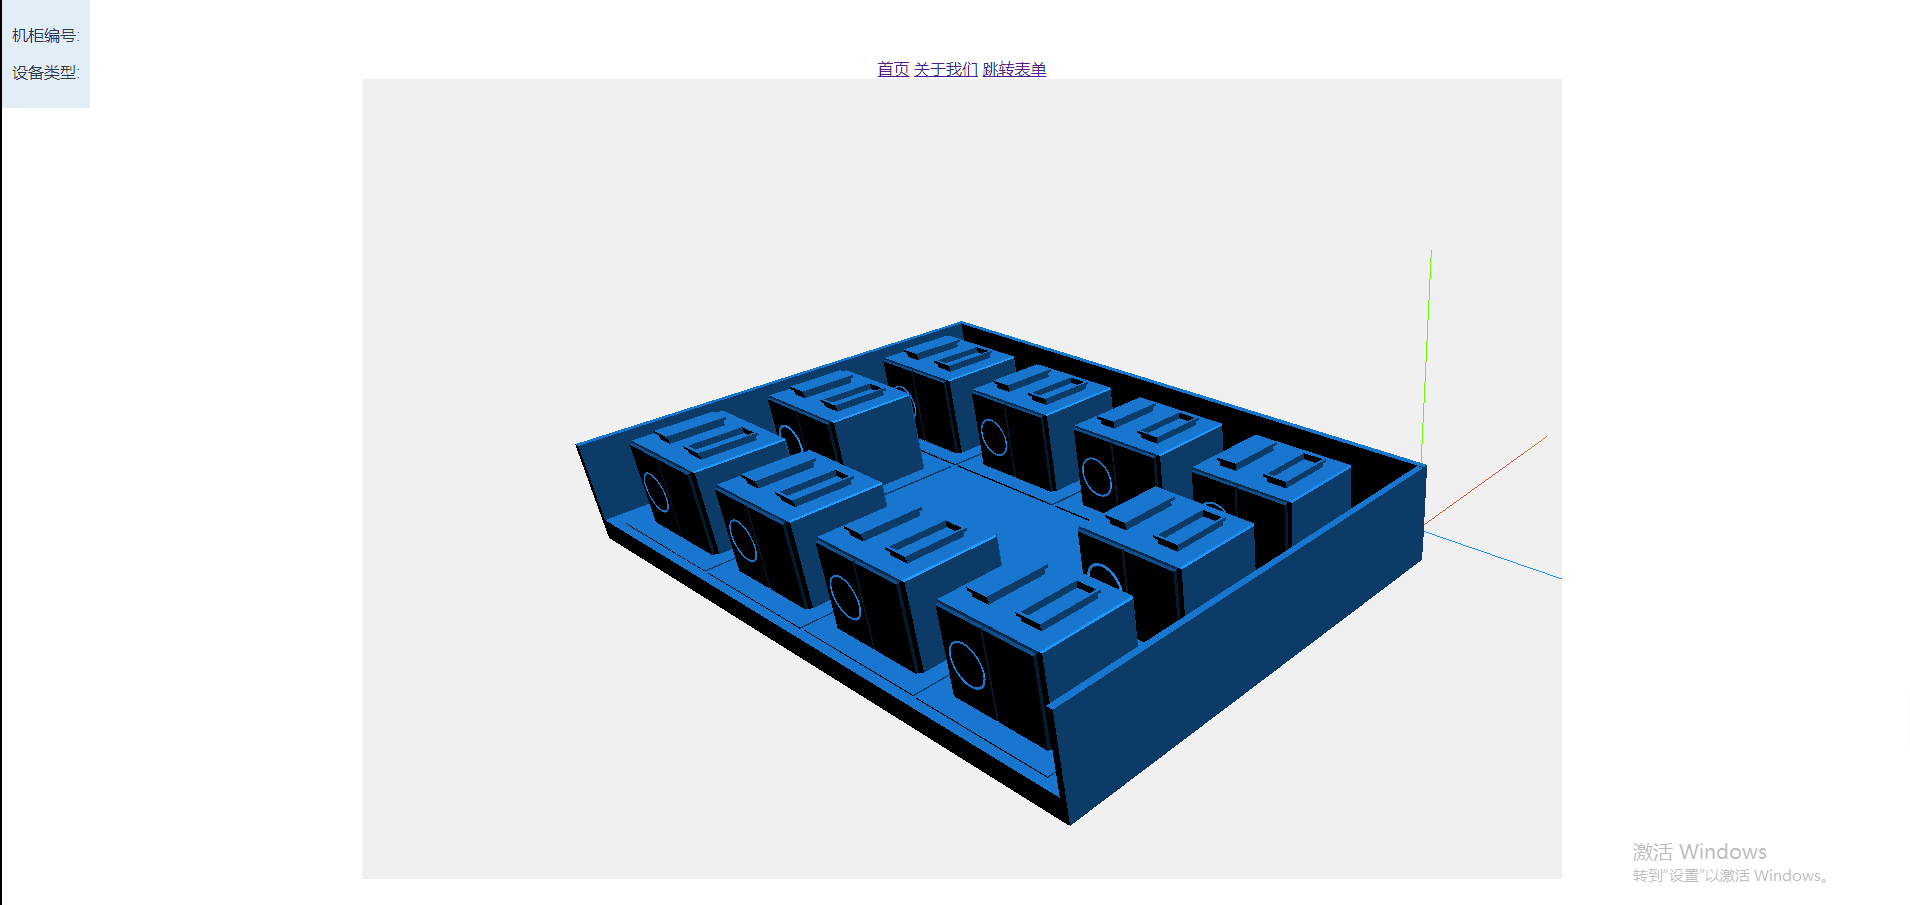
先来看看效果:
开始撸代码,走起!
1、安装Three
npm install three

2.接下来利用npm安装轨道控件插件:
npm install three-orbit-controls

3.接下来安装加载.obj和.mtl文件的插件:
npm i --save three-obj-mtl-loader

4.安装渲染器插件:
npm i --save three-css2drender
HelloWorld.vue文件内容
   <template>
  <div id="container" @click="mouseClick">
    <div class="moveText" :style="{ top: '0px', left: '0px' }">
      <p>机柜编号: {{ texts.code }}</p>
      <p>设备类型: {{ texts.type }}</p>
    </div>
  </div>
</template>
<script>
import * as THREE from "three";
import { OBJLoader, MTLLoader } from "three-obj-mtl-loader";
import { CSS2DRenderer, CSS2DObject } from "three-css2drender";

const OrbitControls = require("three-orbit-controls")(THREE);
export default {
  name: "vue-three",
  data() {
    return {
      texts: {
        code: "",
        type: "",
      },
      dragTop: -100,
      dragLeft: -200,
      widthBox: '',
      heightBox: '',
      cabinetData: [
        { code: '1#箱', type: '1#箱' },
        { code: '2#箱', type: '2#箱' },
        { code: '3#箱', type: '3#箱' },
        { code: '4#箱', type: '4#箱' },
        { code: '5#箱', type: '5#箱' },
        { code: '6#箱', type: '6#箱' },
        { code: '7#箱', type: '7#箱' },
        { code: '8#箱', type: '8#箱' },
        { code: '9#箱', type: '9#箱' },
        { code: '10#箱', type: '10#箱' },
      ],
      scene: "",
      light: "",
      camera: "",
      controls: "",
      renderer: "",

    };
  },
  methods: {
    //初始化three.js相关内容
    init() {
      this.scene = new THREE.Scene();
      this.scene.background = new THREE.Color(0xf0f0f0);
      this.scene.add(new THREE.AmbientLight(0x0000)); //环境光
      this.light = new THREE.DirectionalLight(0x1e90ff, 1); //从正上方(不是位置)照射过来的平行光,0.45的强度
      this.light.position.set(100, 200, 100);
      this.light.position.multiplyScalar(0.3);
      this.scene.add(this.light);
      var axisHelper = new THREE.AxisHelper(20); //参数是坐标轴的长度
      this.scene.add(axisHelper);
      //初始化相机
      this.camera = new THREE.PerspectiveCamera(
        45,
        window.innerWidth / window.innerHeight,
        1,
        1000
      );
      this.camera.position.set(-60, 30, 45);
      this.camera.lookAt(this.scene.position);
      //初始化控制器
      this.controls = new OrbitControls(this.camera);
      this.controls.target.set(0, 0, 0);
      this.controls.minDistance = 80;
      this.controls.maxDistance = 400;
      this.controls.maxPolarAngle = Math.PI / 3;
      this.controls.update();
      //渲染
      this.renderer = new THREE.WebGLRenderer({
        alpha: true,
      });
      // this.renderer.setClearColor(0x000000);
      this.renderer.setPixelRatio(window.devicePixelRatio); //为了兼容高清屏幕
      this.renderer.setSize(window.innerWidth, window.innerHeight);

      const container = document.getElementById("container");
      container.appendChild(this.renderer.domElement);
      window.addEventListener("resize", this.onWindowResize, false); //添加窗口监听事件(resize-onresize即窗口或框架被重新调整大小)
    },
    //窗口监听函数
    onWindowResize() {
      this.camera.aspect = window.innerWidth / window.innerHeight;
      this.camera.updateProjectionMatrix();
      this.renderer.setSize(window.innerWidth, window.innerHeight);
    },
    animate() {
      this.controls.update();
      requestAnimationFrame(this.animate);
      this.render();
    },
    render() {
      this.renderer.render(this.scene, this.camera);
    },
    //外部模型加载函数
    loadObj() {
      let objLoader = new OBJLoader();
      let mtlLoader = new MTLLoader();
      let _this = this;
      //包含材质
      // mtlLoader.setPath("/static/models/")
      mtlLoader.load("/static/models/acm.mtl", (materials) => {
        // console.log("acm", acm);
        // materials.preload();
        objLoader.setMaterials(materials);
        objLoader.load("/static/models/acm.obj", (obj) => {
          // obj.scale.set(30, 30, 30);
          // obj.position.set(0, 0, 0);
          _this.oldChildren = _this.dealMeshMaterial(obj.children);
          obj.position.set(45, 0, 0); //模型摆放的位置
          obj.scale.set(0.01, 0.01, 0.01); //模型放大或缩小,有的时候看不到模型,考虑是不是模型太小或太大。
          this.scene.add(obj);
        });
      });
    },
    /**
     * 留住每个模型的原材质
     */
    dealMeshMaterial(arrs) {
      let result = [];
      for (let i = 0; i < arrs.length; i++) {
        let obj = {
          name: arrs[i].name,
          material: arrs[i].material,
        };
        result.push(obj);
      }
      return result;
    },
    /**
     * 用户交换事件
     */
    initControls() {
      this.controls = new OrbitControls(this.camera, this.renderer.domElement);
      // 拉近摄像头
      this.controls.minDistance = 5;
      this.controls.maxDistance = 600;
      // 垂直旋转
      this.controls.maxPolarAngle = Math.PI / 2;
      this.controls.minPolarAngle = Math.PI / 4;

      this.controls.target.set(0, 5, 0);
      this.controls.autoRotate = false;
      this.controls.autoRotateSpeed = 0.5;
    },
    /**
     * 点击事件
     */
    mouseClick(event) {
      // 还原之前的 点击状态
      this.restore(this.scene.children[3].children, this.oldChildren);
      // 获取 raycaster 和所有模型相交的数组,其中的元素按照距离排序,越近的越靠前
      let intersects = this.getIntersects(event);
      console.log('点击了对象:'+intersects);
      // 获取选中最近的 Mesh 对象
      if (
        intersects.length != 0 &&
        intersects[0].object instanceof THREE.Mesh
      ) {
        let selectObject = intersects[0].object;
        this.showObject(selectObject, event);
      }
    },
    /**点击事件,高亮的原理是之前先备份一份原材质,在点击之前先还原,最后通过new THREE.材质map 使用原来记录的材质map添加一个高亮颜色就可以了*/
    restore(arrsNew, arrsOld) {
      for (let i = 0; i < arrsNew.length; i++) {
        for (let j = 0; j < arrsOld.length; j++) {
          if (arrsNew[i].name === arrsOld[j].name) {
            arrsNew[i].material = arrsOld[j].material;
            break;
          }
        }
      }
    },
    /**
     * 展示点击内容
     */
    showObject(obj, event) {
      console.log(obj.name);
      let key = obj.name;
      let objs = this.cabinetData.filter((item) => {
        return item.code === key;
      });
      // 显示内容,高亮
      if (objs.length > 0) {
        let oldOneMaterial = this.oldChildren.filter(
          (item) => item.name === key
        )[0];
        obj.material = new THREE.MeshPhongMaterial({
          color: 0xfff,
          map: oldOneMaterial.material.map,
        });
        // oldOneMaterial.material.visible = false;
        //obj.material.visible = false;
        this.texts = objs[0];
        // 处理坐标
        this.dragTop = event.clientY - 50;
        this.dragLeft = event.clientX - 100;
      }
    },
    /**
     * 将屏幕坐标转换为3d 坐标
     */
    getIntersects(event) {
      var mainCanvas=event.path[0];
      event.preventDefault();
      var raycaster = new THREE.Raycaster();
      var mouse = new THREE.Vector2();
      // mouse.x = (event.clientX / window.innerWidth) * 2 - 1;
      // mouse.y = -(event.clientY / window.innerHeight) * 2 + 1;
      mouse.x = ((event.clientX - mainCanvas.getBoundingClientRect().left)/mainCanvas.offsetWidth) * 2 - 1;
      mouse.y = -((event.clientY - mainCanvas.getBoundingClientRect().top)/mainCanvas.offsetHeight) * 2 + 1;
      raycaster.setFromCamera(mouse, this.camera);
      var intersects = raycaster.intersectObjects(this.scene.children, true);
      return intersects;
    },
  },
  mounted() {
    this.init();
    this.loadObj();
    this.animate();
  },
};
</script>

<style scoped>
#container {
  width: 1200px;
  margin: 0 auto;
  height: 800px;
  overflow: hidden;
}

.text {
  position: absolute;
  font-size: 40px;
  color: #47fff8;
  left: 40px;
  bottom: 60px;
  cursor: pointer;
  animation: glow-animation 2s linear infinite alternate;
}
.moveText {
  position: absolute;
  padding: 10px;
  background: rgba(154, 200, 225, 0.3);
}
@keyframes glow-animation {
  0% {
    font-size: 40px;
  }
  50% {
    font-size: 42px;
  }
  100% {
    font-size: 44px;
  }
}
</style>
运行:npm run dev


 1804
1804


 被折叠的 条评论
为什么被折叠?
被折叠的 条评论
为什么被折叠?
 到【灌水乐园】发言


