


首先,创建一个 名为Student的类, 该类实现了 System.ComponentModel命名空间的 INotifyPropertyChanged 接口,当为Binding设置了数据源后,Binding就会自动侦听来自这个接口的 PropertyChanged 事件。代码如下:
class Student:INotifyPropertyChanged
{
public event PropertyChangedEventHandler PropertyChanged;
private string name;
public string Name
{
get { return name; }
set
{
name = value;
if (this.PropertyChanged != null)
{
this.PropertyChanged.Invoke(this, new PropertyChangedEventArgs("Name"));
}
}
}
}
当Name属性的值发生变化时 PropertyChanged 事件就会被激发,Binding 接口收到这个事件后发现它是名为Name的属性发生了值的变化,于是就会通知Binding目标端的UI元素显示新的值。
然后,我们在窗体上准备一个TextBox 和一个Button。TextBox 将作为Binding目标,我们还会在Button 的Click事件发生时改变Student对象的Name属性值。
<Window x:Class="WPFPROGRAMLERAING.MainWindow" x:ClassModifier="internal"
xmlns="http://schemas.microsoft.com/winfx/2006/xaml/presentation"
xmlns:x="http://schemas.microsoft.com/winfx/2006/xaml"
xmlns:local="clr-namespace:WPFPROGRAMLERAING"
Title="simple Binding" Height="110" Width="300">
<StackPanel>
<TextBox x:Name="textBoxName" BorderBrush="Black" Margin="5"/>
<Button Content="Add Age" Margin="5" Click="Button_Click_1"/>
</StackPanel>
</Window>
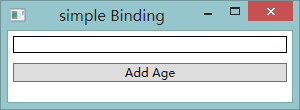
显示效果如下
接下来,我们将进入最重要的一步——使用Binding把数据源和UI元素连接起来,C#代码如下:
internal partial class MainWindow : Window
{
Student stu;
public MainWindow()
{
InitializeComponent();
//准备数据源
stu = new Student();
//准备Binding
Binding binding = new Binding();
binding.Source = stu;
binding.Path = new PropertyPath("Name");
//使用Binding连接数据源与Binding目标
BindingOperations.SetBinding(this.textBoxName, TextBox.TextProperty, binding);
}
private void Button_Click_1(object sender, RoutedEventArgs e)
{
stu.Name += "Name";
}
}
在准备Binding的部分,先是用“Binding binding = new Binding();” 声明Binding类型变量并创建实例,然后使用“binding.Source = stu;” 为Binding实例指定数据源,最后使用“binding.Path = new PropertyPath("Name");”语句为Binding指定访问路径。
把数据源和目标连接在一起的任务是使用"BindingOperations.SetBinding(...)"方法完成的。这个方法的3个参数是我们记忆的重点:
1、第一个参数用于指定Binding的目标,本例中是this.textBoxName.
2、与数据源的Path原理类似,第二个参数用于为Binding指明把数据送达目标的哪个属性。只是你会发现在这里用的不是对象的属性而是类的一个静态只读(static readonly)的DependencyProperty(依赖属性)类型成员变量。这类属性的值可以通过Binding依赖在其他对象的属性值上,被其他对象的属性值所驱动。
3、第三个参数很明了,就是指定使用哪个Binding实例将数据源与目标关联起来。
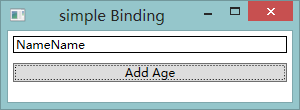
运行程序,当你单击Button时,TextBox就会即时显示更新后的Name属性值,如下图


 2337
2337

 被折叠的 条评论
为什么被折叠?
被折叠的 条评论
为什么被折叠?
 到【灌水乐园】发言


