


前言
vue2保姆级的高德地图开发步骤,从npm引入到地图截图全过程,没有讲解,直接跟着cv就完事
准备工作
高德地图开发者注册
官网网址:https://lbs.amap.com/

因为我已经创建好了,而且这一步如果在公司,可以最好使用公司的账号,这一步我就不演示了
高德2.0新增
创建完后就拥有了key和密钥,这是后面创建地图所必须得

vue2项目 npm引入高德地图
api官网地址:https://lbs.amap.com/api/javascript-api-v2/guide/abc/jscode
安装
npm i @amap/amap-jsapi-loader --save
创建承载地图的vue文件(按需创建)

创建地图容器
在 MapContainer.vue 地图组件中创建一个div作为地图容器 ,并设置该div的 id 属性为 container。
div的id不是固定的,自定义,你想叫什么都行,只有后面初始化才会用到
<template>
    <div id="container"></div>
</template>
给地图设置样式(宽高大小)
因为我这里没有很多样式,所以没有用lang="scss"
<style scoped>
#container {
    padding: 0px;
    margin: 0px;
    width: 100%;
    height: 100%;
    position: absolute;
}
</style>
script 中引入 AMapLoader
1.import引入
<script>
import AMapLoader from "@amap/amap-jsapi-loader";
</script>
2.引入安全密钥
window._AMapSecurityConfig = {
    securityJsCode: "安全密钥",//你自己的安全密钥,去复制放进来
};
3.完整代码
import AMapLoader from "@amap/amap-jsapi-loader";
window._AMapSecurityConfig = {
    securityJsCode: "安全密钥",
};
4.初始化map
export default {
    data() {
        return {
            map: null,
        }
    }
}
5.创建地图
methods中构建创建地图的方法initMap()
methods:{
    initMap(){
        AMapLoader.load({
            key:"",             // 申请好的Web端开发者Key,首次调用 load 时必填
            version:"2.0",      // 指定要加载的 JSAPI 的版本,缺省时默认为 1.4.15
            plugins:[''],       // 需要使用的的插件列表,如比例尺 ["AMap.Scale","AMap.MapType"]等
        }).then((AMap)=>{
            this.map = new AMap.Map("container",{  //设置地图容器id
                viewMode:"3D",    //是否为3D地图模式
                zoom:5,           //初始化地图级别
                center:[105.602725,37.076636], //初始化地图中心点位置
            });
        }).catch(e=>{
            console.log(e);
        })
    },
},
6.mouted生命周期中调用
mounted() {
        this.initMap();
    },
完整代码
<template>
  <div id="container"></div>
</template>

<script>
import AMapLoader from '@amap/amap-jsapi-loader'
    window._AMapSecurityConfig = {
          securityJsCode: '你的安全密钥'
    }
export default {
  data() {
    return {
      map: null
    }
  },
  methods: {
    initMap() {
      AMapLoader.load({
        key: '', // 申请好的Web端开发者Key,首次调用 load 时必填
        version: '2.0', // 指定要加载的 JSAPI 的版本,缺省时默认为 1.4.15
        plugins: [''] // 需要使用的的插件列表,如比例尺 ["AMap.Scale","AMap.MapType"]等
      })
        .then(AMap => {
          this.map = new AMap.Map('container', {
            //设置地图容器id
            viewMode: '3D', //是否为3D地图模式
            zoom: 10, //初始化地图级别
            center: [121.473667, 31.230525] //初始化地图中心点位置
          })

        })
        .catch(e => {
          console.log(e)
        })
    }
  },
  mounted() {
    this.initMap()
  }
}
</script>

<style lang="less">
#container {
  padding: 0px;
  margin: 0px;
  width: 100%;
  height: 100%;
}
</style>
父组件中调用(我是全局引入的组件在main.js)
1.
import Location from './location/index.vue'
2.
//地图组件
Vue.component("Location", Location);
3.在需要用的地方使用
<template>
    <div>
        <Location></Location>
    </div>
</template>
到这一步地图就可以显示了 !!!
接下来是做地图控件了
地图控件的api网址
网站:https://lbs.amap.com/api/javascript-api-v2/documentation#control
1.控件的使用(因为我用的是vue2的语法)
关键语法:
this.map.addControl(new AMap.xxxx());
2.在initMap的函数load中的plugins:[]添加控件
plugins: [
            "AMap.Scale", //比例尺控件
            "AMap.MapType", //地图类型切换插件
            "AMap.Geolocation", //定位服务插件
],
3.在.then的回调函数中注册<br>
我这里的center的经纬度是定义在data中的
.then((AMap) => {
                    this.map = new AMap.Map("container"//设置地图容器id, {
                        viewMode: "3D", //是否为3D地图模式
                        zoom: 18, //初始化地图级别
                        center: [this.lng, this.lat], //初始化地图中心点位置
                    });
                    this.map.addControl(new AMap.Scale());//这里就是注册控件的方法
                    this.map.addControl(new AMap.MapType());
                    this.map.addControl(new AMap.Geolocation());
})
现在来做地图截图(我做的是web端的)
1.我这里是创建了一个button按钮来做截图(我用的是element的)我就直接上代码了
这个是tamplate的代码,我用的定位,样式你们可以自己调一下
 <el-button @click="GenerateImg" type="primary">
     <i class="el-icon-download" style="font-size: 16px; margin-right: 5px; margin-top: 2px"</i>
     保存为图片
</el-button>
因为我这里的地图和button我是写在父组件中

就是地图组件的名字不一样,但是这个文件就是Location/index.vue,所以不影响我全局引入location组件,样式我也放在下面
<style lang="scss" scoped>
.location {
    width: 100%;
    height: 100%;
    .back {
        z-index: 3;
        position: absolute;
        top: 5%;
        left: 5%;
    }
    .btn {
        position: absolute;
        bottom: 5%;
        left: 50%;
        transform: translateX(-50%);
        z-index: 3;
    }
}
</style>
2.npm装一下html2canvas
npm install --save html2canvas
3.script中import
import html2canvas from "html2canvas";
4.构建button绑定的保存图片的方法
//转换成图片
        GenerateImg() {
            let canvas = document.querySelector(".canvasImgObj"); //先获取要截取页面的DOM
            let that = this;
            html2canvas(canvas, {
                scale: 2,
                logging: false,
                useCORS: true,
            }).then(function (canvas) {
                let type = "png";
                let imgData = canvas.toDataURL(type);
                // 照片格式处理
                let _fixType = function (type) {
                    type = type.toLowerCase().replace(/jpg/i, "jpeg");
                    let r = type.match(/png|jpeg|bmp|gif/)[0];
                    return "image/" + r;
                };
                imgData = imgData.replace(_fixType(type), "image/octet-stream");
                let filename = "设备地图" + "." + type;
                that.saveFile(imgData, filename);
            });
        },
        //下载至本地
        saveFile(data, filename) {
            let save_link = document.createElementNS(
                "http://www.w3.org/1999/xhtml",
                "a"
            );
            save_link.href = data;
            save_link.download = filename;
            let event = document.createEvent("MouseEvents");
            event.initMouseEvent(
                "click",
                true,
                false,
                window,
                0,
                0,
                0,
                0,
                0,
                false,
                false,
                false,
                false,
                0,
                null
            );
            save_link.dispatchEvent(event);
        },
我记得这里会有一个问题,截出来的图片是空白的,只需要在创建地图的函数中添加一串代码

HTMLCanvasElement.prototype.getContext = (function (origFn) {
                return function (type, attributes) {
                    if (type === "webgl") {
                        attributes = Object.assign({}, attributes, {
                            preserveDrawingBuffer: true,
                        });
                    }
                    return origFn.call(this, type, attributes);
                };
})(HTMLCanvasElement.prototype.getContext);
或者这种方法
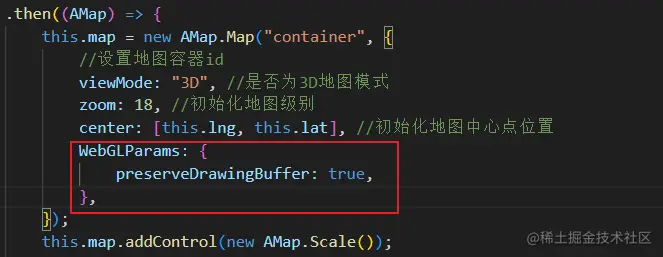
new AMap.Map('container', {
        //加上这串代码
        WebGLParams:{
          preserveDrawingBuffer:true
        }
}
最终效果图


 1762
1762


 被折叠的 条评论
为什么被折叠?
被折叠的 条评论
为什么被折叠?
 到【灌水乐园】发言


