


我们在Android原生系统中所看到的设置界面,使用的是与Preference相关的视图完成的。使用Preference相关的视图能较好地进行了文字的分类和排版。而原生的preference基本很难满足我们的需求开发,所以自定义preference必不可缺。而为了使应用更轻量更碎片化,preferencefragment也是需要的。
本篇文章结构
将围绕一个例子进行详解,同时使用了自定义preference和preferencefragment。
1.先讲解选择开关的自定义preference(数据存储在这里细讲)
2.结合本图例子讲解preferencefragment的使用
先上图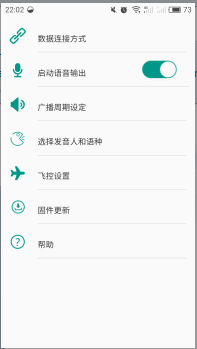 可以看到,这是仿谷歌样式的自定义preferenc结合preferencefragment的体现。本博文将重点讲解最难的图中第二项部分。相信懂得第二项(启动语音输出)的制作,大家都会掌握自定义preference的使用啦!!此外本文也将讲解选择开关的制作(附带的!)
1.当然是该栏的布局啦,item_preference_voice.xml
<?xml version="1.0" encoding="UTF-8"?>
<LinearLayout xmlns:android="http://schemas.android.com/apk/res/android"
    android:id="@+id/widget_frame"
    android:layout_width="fill_parent"
    android:layout_height="wrap_content"
    android:gravity="center_vertical"
    android:minHeight="?android:attr/listPreferredItemHeight"
    android:orientation="horizontal"
    android:paddingRight="?android:attr/scrollbarSize">

    <ImageView
        android:id="@+id/item_preference_icon"
        android:layout_width="30dp"
        android:layout_height="30dp"
        android:layout_gravity="center_vertical"
        android:layout_marginBottom="6dp"
        android:layout_marginLeft="6dip"
        android:layout_marginRight="20dip" />


    <LinearLayout
        android:layout_width="wrap_content"
        android:layout_height="50dp"
        android:layout_marginLeft="2dip"
        android:layout_weight="13"
        android:orientation="vertical"
        >


        <TextView
            android:id="@+android:id/title"
            android:layout_width="match_parent"
            android:layout_height="49dp"
            android:layout_centerVertical="true"
            android:ellipsize="marquee"
            android:fadingEdge="horizontal"
            android:gravity="center_vertical"
            android:singleLine="true"
            android:textAppearance="?android:attr/textAppearanceLarge"
            android:textSize="15sp" />

        <TextView
            android:layout_width="match_parent"
            android:layout_height="1px"
            android:layout_gravity="bottom"
            android:background="@color/gray" />

    </LinearLayout>

    <LinearLayout
        android:layout_width="wrap_content"
        android:layout_height="50dp"
        android:layout_marginLeft="2dip"
        android:layout_marginRight="6dip"
        android:layout_weight="1"
        android:orientation="vertical"
        android:layout_marginEnd="0dp">
<!-- 可以看到我这里选了个自定义选择开关啦 android:button这个属性就是设置选中以及未选中的样式啦,可以自定义,关于这个下面会给出-->
    <ToggleButton xmlns:android="http://schemas.android.com/apk/res/android"
        android:id="@+id/mTogBtn_voice"
        android:layout_width="80dp"
        android:layout_height="35dp"
        android:layout_marginTop="0dp"
        android:background="@android:color/transparent"
        android:button="@drawable/checkbox_checked_style"
        android:text=" "
        android:textOff=""
        android:textOn="" />
        <TextView
            android:layout_width="match_parent"
            android:layout_height="1px"
            android:layout_gravity="bottom"
            android:background="@color/gray"
            android:layout_marginTop="14dp"/>
    </LinearLayout>

</LinearLayout>
2.还有那个选择开关的样式,就是利用selector来决定选中与非选中啦
<?xml version="1.0" encoding="utf-8"?>
<selector xmlns:android="http://schemas.android.com/apk/res/android">

    <item android:state_checked="true" android:drawable="@drawable/switch_on" />
    <item android:drawable="@drawable/switch_off" />
</selector>
3.就是自定义preference的文件啦:
package org.fishDroneGCS.preference;

import android.content.Context;
import android.content.SharedPreferences;
import android.content.res.TypedArray;
import android.graphics.drawable.Drawable;
import android.preference.Preference;
import android.util.AttributeSet;
import android.view.LayoutInflater;
import android.view.View;
import android.view.ViewGroup;
import android.widget.ImageView;
import android.widget.ToggleButton;

import org.fishDroneGCS.android.R;

/**
 * Created by 符柱成 on 2016/8/2.
 */
public class VoicePreference extends Preference {
    private Drawable mIcon;    //这里设置了一些属性,是为了方便保存以及设置,关于attrs中的属性一会会给出
    boolean ischoose;
    boolean state_ischoose;
    ToggleButton toggleButton;

    public VoicePreference(Context context, AttributeSet attrs) {
        this(context, attrs, 0);
    }

    public VoicePreference(Context context, AttributeSet attrs, int defStyle) {
        super(context, attrs, defStyle);
        setLayoutResource(R.layout.item_preference_voice);
      //从属性文件取出属性配置到我们自己设定的属性
        TypedArray a = context.obtainStyledAttributes(attrs, R.styleable.SwitchBoxPreferenceScreen, defStyle, 0);
        mIcon = a.getDrawable(R.styleable.SwitchBoxPreferenceScreen_preference_switchbox);
        //一个选择开关的标记,记录选中与没被选中
        ischoose = a.getBoolean(R.styleable.SwitchBoxPreferenceScreen_ischoose,false);
        a.recycle();
    }

    @Override
    public void onBindView(View view) {
        super.onBindView(view);
        ImageView imageView = (ImageView) view.findViewById(R.id.item_preference_icon);
        imageView.setImageDrawable(mIcon);
        //选择开关的监听
        toggleButton=(ToggleButton)view.findViewById(R.id.mTogBtn_voice);

                if (showSettingInfo()==true) {
                    toggleButton.setChecked(true);
                }
                else {
                    toggleButton.setChecked(false);
                }
                toggleButton.setOnClickListener(new View.OnClickListener() {
                    @Override
                    public void onClick(View v) {
                        if (showSettingInfo()==false) {
                            toggleButton.setChecked(true);
                            changeData(true);
                        }
                        else {
                            toggleButton.setChecked(false);
                            changeData(false);
                        }
                    }
                });
    }

    protected View onCreateView(ViewGroup parent) {
        return LayoutInflater.from(getContext()).inflate(R.layout.item_preference_voice,
                parent, false);
    }
//数据保存的逻辑,很简单,就是利用sharepreference来进行读取与存储
    private  boolean showSettingInfo() {
        SharedPreferences settings = getContext().getSharedPreferences("state",Context.MODE_PRIVATE);
        state_ischoose=settings.getBoolean("ischoose",false);
        return state_ischoose;

    }

    public void changeData(boolean isUpdate) {
        SharedPreferences.Editor editor = getContext().getSharedPreferences("state",Context.MODE_PRIVATE).edit();
        editor.putBoolean("ischoose", isUpdate);
        editor.commit();
    }
}
4.自定义preference的属性:
    <declare-styleable name="SwitchBoxPreferenceScreen">
        <attr name="preference_switchbox" format="reference" />
        <attr name="ischoose" format="boolean" />
    </declare-styleable>
5.就是最后的调用啦,这个就是我的preferencefragment的布局文件啦
<?xml version="1.0" encoding="utf-8"?>
<PreferenceScreen xmlns:android="http://schemas.android.com/apk/res/android"
    xmlns:coomix="http://schemas.android.com/apk/res-auto"
    xmlns:preference="http://schemas.android.com/tools">

    <org.fishDroneGCS.preference.PreferenceView
        android:key="preference_dataConnect"
        android:title="数据连接方式"
        coomix:preference_icon="@drawable/link"/>
<!-- 可见这里是直接调用了我们的自定义文件啦,然后就是逻辑封装在了我们的自定义preference里,这里还需要做一步就是,设定这个选择preference的初始状态-->
    <org.fishDroneGCS.preference.VoicePreference
        android:key="preference_voice"
        android:title="启动语音输出"
        coomix:preference_switchbox="@drawable/voice"
        preference:ischoose="false"/>

    <org.fishDroneGCS.preference.PreferenceView
        android:key="preference_broadcast"
        android:title="广播周期设定"
        coomix:preference_icon="@drawable/broadcast" />

    <org.fishDroneGCS.preference.PreferenceView
        android:key="preference_accent"
        android:title="选择发音人和语种"
        coomix:preference_icon="@drawable/accent" />

    <org.fishDroneGCS.preference.PreferenceView
        android:key="preference_plane"
        android:title="飞控设置"
        coomix:preference_icon="@drawable/plane" />

    <org.fishDroneGCS.preference.PreferenceView
        android:key="preference_firmware"
        android:title="固件更新"
        coomix:preference_icon="@drawable/firmware" />

    <org.fishDroneGCS.preference.PreferenceView
        android:key="preference_help"
        android:title="帮助"
        coomix:preference_icon="@drawable/help" />

</PreferenceScreen>
6.然后给出最终的在preferencefragment的调用:
如果您是开发针对 Android 3.0(API 级别 11)及更高版本系统的应用,则应使用 PreferenceFragment 显示 Preference 对象的列表。您可以将 PreferenceFragment 添加到任何 Activity,而不必使用 PreferenceActivity。
无论您在构建何种 Activity,片段都可为应用提供一个更加灵活的体系结构。 因此,我们建议您尽可能使用 PreferenceFragment 控制设置的显示,而不是使用 PreferenceActivity。
PreferenceFragment 的实现就像定义 onCreate() 方法以使用 addPreferencesFromResource() 加载首选项文件一样简单。
public class SettingFragment extends PreferenceFragment {

//那个自定义的PreferenceView一会再给出
    private PreferenceView connect;
    private VoicePreference voice;
    private PreferenceView broadcast;
    private PreferenceView accent;
    private PreferenceView planeSetting;
    private PreferenceView firmware;
    private PreferenceView help;

    @Override
    public View onCreateView(LayoutInflater inflater, ViewGroup container, Bundle savedInstanceState) {
    //注意为什么要先套一个布局呢?因为有没有注意到一开始的图片呢,每个preference的分隔线,为什么只在内容那里才有呢?因为如果不先加这个布局,那么分隔线是布满一整行的。所以这就是谷歌的设计风格啦!!拉拉啦!布局一会给出
        View view = inflater.inflate(R.layout.preference_list, null);
        addPreferencesFromResource(R.xml.preference);
        initPreferences(getPreferenceManager());
        initListener();
        return view;
    }
//很简单就是初始化啦
    private void initPreferences(PreferenceManager manager) {
        connect = (PreferenceView) manager.findPreference("preference_dataConnect");
        voice = (VoicePreference) manager.findPreference("preference_voice");
        broadcast = (PreferenceView) manager.findPreference("preference_broadcast");
        accent = (PreferenceView) manager.findPreference("preference_accent");
        planeSetting = (PreferenceView) manager.findPreference("preference_plane");
        firmware = (PreferenceView) manager.findPreference("preference_firmware");
        help = (PreferenceView) manager.findPreference("preference_help");
    }
//附送写好了的监听,哈哈
    private void initListener() {
        connect.setOnPreferenceClickListener(new Preference.OnPreferenceClickListener() {
            @Override
            public boolean onPreferenceClick(Preference preference) {
//刚刚没有给出activity调用preferencefragment就在这里给出啦!!很简单的一句话。
                         getFragmentManager().beginTransaction().replace(android.R.id.content, new LinkFragment()).commit();

                return false;
            }
        });
        broadcast.setOnPreferenceClickListener(new Preference.OnPreferenceClickListener() {
            @Override
            public boolean onPreferenceClick(Preference preference) {
                return false;
            }
        });
        accent.setOnPreferenceClickListener(new Preference.OnPreferenceClickListener() {
            @Override
            public boolean onPreferenceClick(Preference preference) {
                return false;
            }
        });
        planeSetting.setOnPreferenceClickListener(new Preference.OnPreferenceClickListener() {
            @Override
            public boolean onPreferenceClick(Preference preference) {

                return false;
            }
        });
        firmware.setOnPreferenceClickListener(new Preference.OnPreferenceClickListener() {
            @Override
            public boolean onPreferenceClick(Preference preference) {

                return false;
            }
        });
        help.setOnPreferenceClickListener(new Preference.OnPreferenceClickListener() {
            @Override
            public boolean onPreferenceClick(Preference preference) {

                return false;
            }
        });
    }
}
7.preference_list.xml
<?xml version="1.0" encoding="utf-8"?>
<LinearLayout xmlns:android="http://schemas.android.com/apk/res/android"
    android:layout_width="fill_parent"
    android:layout_height="fill_parent"
    android:orientation="vertical">
<!-- 注意id喔,是系统id的格式,哈哈哈-->
    <ListView
        android:id="@android:id/list"
        android:layout_width="fill_parent"
        android:layout_height="wrap_content"
        android:layout_marginLeft="10dp"
        android:layout_marginTop="10dp"
        android:cacheColorHint="#00000000"
        android:divider="@color/white" />

</LinearLayout>
### 8.补充刚刚遗漏的自定义PreferenceView
<!-- 布局-->
<?xml version="1.0" encoding="UTF-8"?>
<LinearLayout xmlns:android="http://schemas.android.com/apk/res/android"
    android:id="@+id/widget_frame"
    android:layout_width="fill_parent"
    android:layout_height="wrap_content"
    android:gravity="center_vertical"
    android:minHeight="?android:attr/listPreferredItemHeight"
    android:orientation="horizontal"
    android:paddingRight="?android:attr/scrollbarSize">

    <ImageView
        android:id="@+id/item_preference_icon"
        android:layout_width="30dp"
        android:layout_height="30dp"
        android:layout_gravity="center_vertical"
        android:layout_marginBottom="6dp"
        android:layout_marginLeft="6dip"
        android:layout_marginRight="20dip" />

    <LinearLayout
        android:layout_width="wrap_content"
        android:layout_height="50dp"
        android:layout_marginLeft="2dip"
        android:layout_marginRight="6dip"
        android:layout_weight="1"
        android:orientation="vertical">

        <TextView
            android:id="@+android:id/title"
            android:layout_width="match_parent"
            android:layout_height="49dp"
            android:layout_centerVertical="true"
            android:ellipsize="marquee"
            android:fadingEdge="horizontal"
            android:gravity="center_vertical"
            android:singleLine="true"
            android:textAppearance="?android:attr/textAppearanceLarge"
            android:textSize="15sp" />

        <TextView
            android:layout_width="match_parent"
            android:layout_height="1px"
            android:layout_gravity="bottom"
            android:background="@color/gray" />
    </LinearLayout>

</LinearLayout>
//大体跟我上面举例的那个自定义preference差不多
public class PreferenceView extends Preference {

    private static final String TAG = "IconPreferenceScreen";

    private Drawable mIcon;

    public PreferenceView(Context context, AttributeSet attrs) {
        this(context, attrs, 0);
    }

    public PreferenceView(Context context, AttributeSet attrs, int defStyle) {
        super(context, attrs, defStyle);
        setLayoutResource(R.layout.item_preference_view);
        TypedArray a = context.obtainStyledAttributes(attrs, R.styleable.PreferenceScreen, defStyle, 0);
        mIcon = a.getDrawable(R.styleable.PreferenceScreen_preference_icon);
    }

    @Override
    public void onBindView(View view) {
        super.onBindView(view);
        ImageView imageView = (ImageView) view.findViewById(R.id.item_preference_icon);
        if (imageView != null && mIcon != null) {
            imageView.setImageDrawable(mIcon);
        }
    }
}
好啦,到此就讲完自定义preference和PreferenceFragment的使用啦。最后给出一篇基本应用preference的文章,还没学过用preference的同学可以看下。基本的preference应用
欢迎指出错误,共同学习!啦啦啦啦!
转载请注明:【JackFrost的博客】


 1688
1688


 被折叠的 条评论
为什么被折叠?
被折叠的 条评论
为什么被折叠?
 到【灌水乐园】发言


