


Specular Highlights(镜面光)
在模拟一个diffuse surface时,使用的是光滑,无光泽的object。这种方法,对于场景中的大部分objects都是合适的,而且很多光照模型都基于此种方法。但是,有时也要模拟闪光的模型表面,比如抛光的金属或者大理石地板的表面。Specular highlights就是用于模拟这些带有光泽的object表面。
Phong
有两种方法可以模拟镜面反射。第一种是Phong反射模型中的镜面反射部分,Phong模型以它的发明者,来自Utah大学的Bui Tuong Phong命名。与diffuse shading不同的是,镜面光与观察者(即camera)相对于表面的位置有关。只要看向一个发光的object,就自己观察到这一点,注意观察从不同的方向看向object时,该object的光泽如何改变。Phong模型指出,镜面光由观察方向和光的反射向量之间的夹角确定。公式为:

其中,R为反射向量,V表示观察方向,s表示亮点(照亮的区域)的大小。Specular exponent(镜面指数)越大,产生的亮点越小。反射向量可以使用如下的公式计算:
R = 2*(N • L)*N-L
其中,N表示表面的法向量,L指light向量。
列表6.5列出了一种Phong effect的代码。与之前一样,把这段代码拷贝到NVIDIA FX Composer中编译,并把相应的material指定给Render panel中的某个object上。下面将详细讲述Phong effect。
列表6.5 Phong.fx
#include "include\\Common.fxh"

/************* Resources *************/

cbuffer CBufferPerFrame
{
	float4 AmbientColor : AMBIENT <
		string UIName =  "Ambient Light";
		string UIWidget = "Color";
	> = {1.0f, 1.0f, 1.0f, 0.0f};

	float4 LightColor : COLOR <
		string Object = "LightColor0";
		string UIName =  "Light Color";
		string UIWidget = "Color";
	> = {1.0f, 1.0f, 1.0f, 1.0f};

	float3 LightDirection : DIRECTION <
		string Object = "DirectionalLight0";
		string UIName =  "Light Direction";
		string Space = "World";
	> = {0.0f, 0.0f, -1.0f};

	float3 CameraPosition : CAMERAPOSITION < string UIWidget="None"; >;
}

cbuffer CBufferPerObject
{
	float4x4 WorldViewProjection : WORLDVIEWPROJECTION < string UIWidget="None"; >;
	float4x4 World : WORLD < string UIWidget="None"; >;

	float4 SpecularColor : SPECULAR <
    	string UIName =  "Specular Color";
    	string UIWidget = "Color";
	> = {1.0f, 1.0f, 1.0f, 1.0f};

	float SpecularPower : SPECULARPOWER <
		string UIName =  "Specular Power";
		string UIWidget = "slider";
		float UIMin = 1.0;
		float UIMax = 255.0;
		float UIStep = 1.0;
	> = {25.0f};
}

Texture2D ColorTexture <
    string ResourceName = "default_color.dds";
    string UIName =  "Color Texture";
    string ResourceType = "2D";
>;

SamplerState ColorSampler
{
	Filter = MIN_MAG_MIP_LINEAR;
	AddressU = WRAP;
	AddressV = WRAP;
};

RasterizerState DisableCulling
{
    CullMode = NONE;
};

/************* Data Structures *************/

struct VS_INPUT
{
    float4 ObjectPosition : POSITION;
    float2 TextureCoordinate : TEXCOORD;
	float3 Normal : NORMAL;
};

struct VS_OUTPUT
{
    float4 Position : SV_Position;
	float3 Normal : NORMAL;
    float2 TextureCoordinate : TEXCOORD0;
	float3 LightDirection : TEXCOORD1;
	float3 ViewDirection : TEXCOORD2;
};

/************* Vertex Shader *************/

VS_OUTPUT vertex_shader(VS_INPUT IN)
{
	VS_OUTPUT OUT = (VS_OUTPUT)0;

    OUT.Position = mul(IN.ObjectPosition, WorldViewProjection);
    OUT.TextureCoordinate = get_corrected_texture_coordinate(IN.TextureCoordinate);
	OUT.Normal = normalize(mul(float4(IN.Normal, 0), World).xyz);
	OUT.LightDirection = normalize(-LightDirection);

	float3 worldPosition = mul(IN.ObjectPosition, World).xyz;
	OUT.ViewDirection = normalize(CameraPosition - worldPosition);

	return OUT;
}

/************* Pixel Shader *************/

float4 pixel_shader(VS_OUTPUT IN) : SV_Target
{
	float4 OUT = (float4)0;

	float3 normal = normalize(IN.Normal);
    float3 lightDirection = normalize(IN.LightDirection);
	float3 viewDirection = normalize(IN.ViewDirection);
	float n_dot_l = dot(lightDirection, normal);

	float4 color = ColorTexture.Sample(ColorSampler, IN.TextureCoordinate);
	float3 ambient = AmbientColor.rgb * AmbientColor.a * color.rgb;

	float3 diffuse = (float3)0;
	float3 specular = (float3)0;

	if (n_dot_l > 0)
	{
		diffuse = LightColor.rgb * LightColor.a * n_dot_l * color.rgb;

		// R = 2 * (N.L) * N - L
    	float3 reflectionVector = normalize(2 * n_dot_l * normal - lightDirection);

		// specular = R.V^n with gloss map stored in color texture's alpha channel
		specular = SpecularColor.rgb * SpecularColor.a * min(pow(saturate(dot(reflectionVector, viewDirection)), SpecularPower), color.w);
	}

	OUT.rgb = ambient + diffuse + specular;
	OUT.a = 1.0f;

	return OUT;
}

technique10 main10
{
    pass p0
	{
        SetVertexShader(CompileShader(vs_4_0, vertex_shader()));
		SetGeometryShader(NULL);
        SetPixelShader(CompileShader(ps_4_0, pixel_shader()));

		SetRasterizerState(DisableCulling);
    }
}
Phong Preamble
与diffuse lighting effect相比,Phong effect中的CBufferPerFrame模块只增加一个shader constant:CameraPosition。该constant用于存储camera的坐标位置并表示view direction。如果CameraPosition指定了CAMERAPOSITION语义,NVIDIA FX Composer会自动把CameraPosition与Render panel中的camera object进行绑定。
CBufferPerObject模块增加了两个shader constants:SpecularColor和SpecularPower。SpecularColor的作用与ambient light和directional light中的colors一样;指定了specular highlight的颜色和强度。SpecularPower表示Phong specular公式中的指数s。
另外需要注意的是VS_OUTPUT结构体中增加了一个成员:ViewDirection,用于把计算好的view direction传递到rasterizer阶段。
CBufferPerObject模块增加了两个shader constants:SpecularColor和SpecularPower。SpecularColor的作用与ambient light和directional light中的colors一样;指定了specular highlight的颜色和强度。SpecularPower表示Phong specular公式中的指数s。
另外需要注意的是VS_OUTPUT结构体中增加了一个成员:ViewDirection,用于把计算好的view direction传递到rasterizer阶段。
Phong Vertex Shader
在vertex shader中,将camera坐标与vertex的坐标相减得到view direction向量。但是用于相减的两个坐标必须变换到同一个坐标空间中,因此要先把vertex坐标(IN.ObjectPosition)使用world矩阵进行变换。
Phong Pixel Shader
在pixel shader中增加了用于计算specular相关变量的运算。只有directional light在object 表面“闪光”时才会执行这些运算步骤,因此这些语句放在if条件n_dot_l > 0内部。用于计算specular值的语句需要特别讲解一下,列表6.6列出了该段代码。
列表6.6 Computing the Specular Term Within Phong.fx
列表6.6 Computing the Specular Term Within Phong.fx
// specular = R.V^n with gloss map stored in color texture's alpha channel
specular = SpecularColor.rgb * SpecularColor.a * min(pow(saturate(dot(reflectionVector, viewDirection)), SpecularPower), color.w);
首先,代码注释里已经说明,该段代码使用Phong specular公式计算specular值。其中使用内置函数pow(),计算反射向量与view direction向量的dot-product值以SpecularPower为指数的指数运算值。内置函数saturate用于clamps dot-product的输出总是在0.0和1.0之间,防止出现夹角为负的情况。
注释中还指出了,计算结果会由一个gloss map(带有光泽的纹理图)进行调整,而该gloss map值存储在纹理的alpha通道中。一种gloss map,或者说specular map,要么是存储一个独立的纹理文件中(一般来说,就是只包含单个通道值的纹理格式)或者作为纹理的一部分存储在另一个纹理中(就像这个例子一样)。Specular map根据纹理图的输入限制specular的计算结果。本章使用的Earth纹理贴图,真正意义上来说,在地球上应该只有有水的区域才有光泽,而陆地应该是粗糙的。通过speular map对每一个pixel进行调整就可以实现这种效果。内置函数min()返回由Phong公式计算得到的specular值与纹理alpha通道值(w分量)两者中的较小值。因此,在specular map中对应的值0.0会消除任何的specular效果,即使计算出的specular达到了最高强度值(强度为1.0)。图6.7显示了本节所使用的specular map图。
注释中还指出了,计算结果会由一个gloss map(带有光泽的纹理图)进行调整,而该gloss map值存储在纹理的alpha通道中。一种gloss map,或者说specular map,要么是存储一个独立的纹理文件中(一般来说,就是只包含单个通道值的纹理格式)或者作为纹理的一部分存储在另一个纹理中(就像这个例子一样)。Specular map根据纹理图的输入限制specular的计算结果。本章使用的Earth纹理贴图,真正意义上来说,在地球上应该只有有水的区域才有光泽,而陆地应该是粗糙的。通过speular map对每一个pixel进行调整就可以实现这种效果。内置函数min()返回由Phong公式计算得到的specular值与纹理alpha通道值(w分量)两者中的较小值。因此,在specular map中对应的值0.0会消除任何的specular效果,即使计算出的specular达到了最高强度值(强度为1.0)。图6.7显示了本节所使用的specular map图。
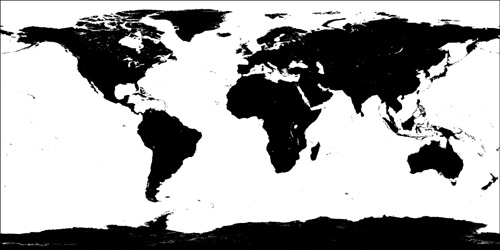
图6.7 Specular map for the Earth texture. (Original texture from Reto Stöckli, NASA Earth
Observatory. Additional texturing by Nick Zuccarello, Florida Interactive Entertainment Academy.)
最后把ambient,diffuse和specular值结合一起,得到最终的pixel color。注意,alpha通道值被设为1.0(完全不透明)而不是由color texture赋值,因为在这里texture的alpha通道值用于specular map而不是代表透明度。如果透明度和specular两个值都需要,需要再增加一种texture。
Phong Output
图6.8显示了一个sphere使用Phong effect以及Earth texture(不包括cloud)的输出结果,其中一个使用了specular map一个没有。两幅图具有相同的颜色通道,但是在左图中,使用了specular map,所以在地球的水面上和陆地上显示的specular highlight是不同的。
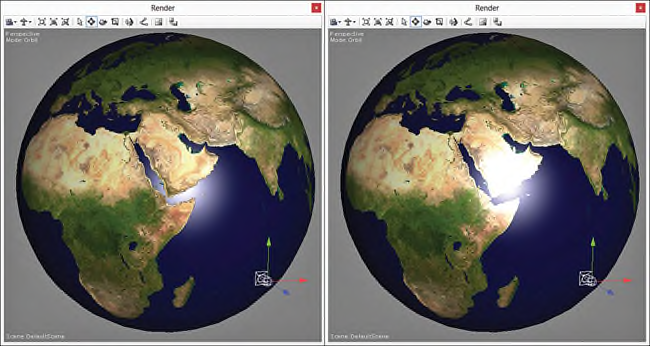
图6.8 Phong.fx applied to a sphere with a texture of Earth with a specular map (left) and without one
(right). (Texture from Reto Stöckli, NASA Earth Observatory.)
图6.8 Phong.fx applied to a sphere with a texture of Earth with a specular map (left) and without one
(right). (Texture from Reto Stöckli, NASA Earth Observatory.)
Blinn-Phong
1977年,Jim Blinn在Phong specular的基础上做了一些改进,使用half-vector替换reflection vector。half-vector(半角向量)是指view和light向量夹角的一半所对应的向量,计算公式为:

Phong specular中是计算reflection向量与view direction向量的dot-product的指数,而Blinn-Phong则是计算half-vector与面法线向量的dot-product的指数。Blinn-Phong计算公式为:

Blinn-Phong Pixel Shader
Blinn-Phong effect代码的前面部分以及vertex shader与Phong effect的对应部分完全一样。因此,列表6.7只列表出了修改过的pixel shader。在本书的配套网站上提供了完整的代码。
列表6.7 The Pixel Shader from BlinnPhong.fx(注:为了方便直接拷贝代码,这里还是列表了全部代码)
列表6.7 The Pixel Shader from BlinnPhong.fx(注:为了方便直接拷贝代码,这里还是列表了全部代码)
#include "..\include\\Common.fxh"

/************* Resources *************/

cbuffer CBufferPerFrame
{
	float4 AmbientColor : AMBIENT <
		string UIName = "Ambient Light";
		string UIWidget = "Color";
	> = { 1.0f, 1.0f, 1.0f, 0.0f };

	float4 LightColor : COLOR <
		string Object = "LightColor0";
		string UIName = "Light Color";
		string UIWidget = "Color";
	> = { 1.0f, 1.0f, 1.0f, 1.0f };

	float3 LightDirection : DIRECTION <
		string Object = "DirectionalLight0";
		string UIName = "Light Direction";
		string Space = "World";
	> = { 0.0f, 0.0f, -1.0f };

	float3 CameraPosition : CAMERAPOSITION < string UIWidget = "None"; >;
}

cbuffer CBufferPerObject
{
	float4x4 WorldViewProjection : WORLDVIEWPROJECTION < string UIWidget = "None"; >;
	float4x4 World : WORLD < string UIWidget = "None"; >;

	float4 SpecularColor : SPECULAR <
		string UIName = "Specular Color";
		string UIWidget = "Color";
	> = { 1.0f, 1.0f, 1.0f, 1.0f };

	float SpecularPower : SPECULARPOWER <
		string UIName = "Specular Power";
		string UIWidget = "slider";
		float UIMin = 1.0;
		float UIMax = 255.0;
		float UIStep = 1.0;
	> = { 25.0f };
}

Texture2D ColorTexture <
	string ResourceName = "default_color.dds";
	string UIName = "Color Texture";
	string ResourceType = "2D";
>;

SamplerState ColorSampler
{
	Filter = MIN_MAG_MIP_LINEAR;
	AddressU = WRAP;
	AddressV = WRAP;
};

RasterizerState DisableCulling
{
	CullMode = NONE;
};

/************* Data Structures *************/

struct VS_INPUT
{
	float4 ObjectPosition : POSITION;
	float2 TextureCoordinate : TEXCOORD;
	float3 Normal : NORMAL;
};

struct VS_OUTPUT
{
	float4 Position : SV_Position;
	float3 Normal : NORMAL;
	float2 TextureCoordinate : TEXCOORD0;
	float3 LightDirection : TEXCOORD1;
	float3 ViewDirection : TEXCOORD2;
};

/************* Vertex Shader *************/

VS_OUTPUT vertex_shader(VS_INPUT IN)
{
	VS_OUTPUT OUT = (VS_OUTPUT)0;

	OUT.Position = mul(IN.ObjectPosition, WorldViewProjection);
	OUT.TextureCoordinate = get_corrected_texture_coordinate(IN.TextureCoordinate);
	OUT.Normal = normalize(mul(float4(IN.Normal, 0), World).xyz);
	OUT.LightDirection = normalize(-LightDirection);

	float3 worldPosition = mul(IN.ObjectPosition, World).xyz;
	OUT.ViewDirection = normalize(CameraPosition - worldPosition);

	return OUT;
}

/************* Pixel Shader *************/

float4 pixel_shader(VS_OUTPUT IN) : SV_Target
{
	float4 OUT = (float4)0;
	float3 normal = normalize(IN.Normal);
	float3 lightDirection = normalize(IN.LightDirection);
	float3 viewDirection = normalize(IN.ViewDirection);
	float n_dot_l = dot(lightDirection, normal);
	float4 color = ColorTexture.Sample(ColorSampler,
		IN.TextureCoordinate);
	float3 ambient = AmbientColor.rgb * AmbientColor.a * color.rgb;
	float3 diffuse = (float3)0;
	float3 specular = (float3)0;
	if (n_dot_l > 0)
	{
		diffuse = LightColor.rgb * LightColor.a * saturate(n_dot_l) *
			color.rgb;
		float3 halfVector = normalize(lightDirection + viewDirection);
		//specular = N.H^s w/ gloss map stored in color texture's alpha channel
		specular = SpecularColor.rgb * SpecularColor.a *
			min(pow(saturate(dot(normal, halfVector)), SpecularPower), color.w);
	}
	OUT.rgb = ambient + diffuse + specular;
	OUT.a = 1.0f;
	return OUT;
}

technique10 main10
{
	pass p0
	{
		SetVertexShader(CompileShader(vs_4_0, vertex_shader()));
		SetGeometryShader(NULL);
		SetPixelShader(CompileShader(ps_4_0, pixel_shader()));

		SetRasterizerState(DisableCulling);
	}
}
在Blinn-Phong effect中去掉了reflection vector,增加了half-vector的计算。与之前一样,也使用了specular map来调整specular的值。Blinn-Phong的输出与Phong effect的显示结果一样,但是需要调整指数的值。
Blinn-Phong with Intrinsics
HLSL中提供了一个内置函数lit(),用于计算Lambertian diffuse和Blinn-Phong specular部分。一个好的规则是:只要有可能就使用内置的函数,因为内置的函数很可能是经过优化的或者由硬件实现的。因此,可以重新编写Blinn-Phong的pixel shader部分,如列表6.8所示。
列表6.8 Utility Functions and the Pixel Shader from BlinnPhongIntrinsics.fx
列表6.8 Utility Functions and the Pixel Shader from BlinnPhongIntrinsics.fx
float3 get_vector_color_contribution(float4 light, float3 color)
{
	// Color (.rgb) * Intensity (.a)
	return light.rgb * light.a * color;
}
float3 get_scalar_color_contribution(float4 light, float color)
{
	// Color (.rgb) * Intensity (.a)
	return light.rgb * light.a * color;
}
float4 pixel_shader(VS_OUTPUT IN) : SV_Target
{
	float4 OUT = (float4)0;
	float3 normal = normalize(IN.Normal);
	float3 lightDirection = normalize(IN.LightDirection);
	float3 viewDirection = normalize(IN.ViewDirection);
	float n_dot_l = dot(normal, lightDirection);
	float3 halfVector = normalize(lightDirection + viewDirection);
	float n_dot_h = dot(normal, halfVector);
	float4 color = ColorTexture.Sample(ColorSampler,
		IN.TextureCoordinate);
	float4 lightCoefficients = lit(n_dot_l, n_dot_h, SpecularPower);
	float3 ambient = get_vector_color_contribution(AmbientColor, color.
		rgb);
	float3 diffuse = get_vector_color_contribution(LightColor,
		lightCoefficients.y * color.rgb);
	float3 specular = get_scalar_color_contribution(SpecularColor,
		min(lightCoefficients.z, color.w));
	OUT.rgb = ambient + diffuse + specular;
	OUT.a = 1.0f;
	return OUT;
}
在这个pixel shader中所做的修改是非常明显的。去掉了对diffuse和specular的显式计算,以及对应的if条件语句。使用了一个新的函数调用lit(),该函数有三个参数,分别为n_dot_l,n_dot_h和specularr指数(SpecularPower)。内置函数lit()执行相同的diffuse和specular运算,并返回一个float4类型的变量值。返回值的x和w分量总是1,y分量存储了diffuse系数,z分量则存储了specular系数,使用y和z就可以计算出相应的diffuse和specular值。
此外,代码还使用了一些通用的函数,用于执行light color和intensity的乘法运算。这种方式使得代码维护更容易,比如,有时候需要在CPU中执行light color和intensity相乘,而不是在pixel shader中计算,因为乘积是一个常量,不需要进行多次乘法运算(前面已经提过),这时只需要修改通用函数即可,不用修改pixel shader。把这些通用函数存储到Common.fxh文件中,以便于在多个shader中使用。
Blinn-Phong vs. Phong
Phong和Blinn-Phong的输出结果是一样的,这两种光照模型之间主要的区别是效率问题。Blinn-Phong的效率可能会慢一点因为多了一个平方根运算(half-vector的normalizetion运算)。但是实际上,由于使用了HLSL的内置函数lit(),使得Blinn-Phong比Phong模型在速度得到了一点点提升。本书中讲述了两种模型是为了完整的介绍,在后面所有要用到diffuse和specular运算的effects中,都将使用内置函数lit()。
总结
本章,主要介绍了一系列光照模型,包括ambient lighting,diffuse lighting以及specular highlights。对于这些模型都通过effects实现了模拟,并进一步扩充了HLSL相关的知识。下一章将介绍更多的光照概念,包括point lights和spotlights,并在一个场景中使用多个光源。
Exercises
1. Experiment with the ambient lighting effect. Modify the ambient light’s color and intensity from within the
Properties panel of NVIDIA FX Composer.
2. Explore the output of the diffuse lighting effect. Create a directional light within your scene, and bind it to
the color and directional light shader inputs. Rotate the light, modify its color, and observe the results.
Additionally, create an Object annotation for the AmbientLight constant, and create and bind an ambient
light to this object. Then modify the ambient light in the scene and observe the impact to the rendered
output.
3. Vary the specular power in the Phong effect and observe the results. Experiment with different
combinations of color and intensity for the ambient, directional, and specular color constants.
4. Implement the complete Blinn-Phong effect, and compare its output to the Phong effect.
5. Implement a Blinn-Phong effect using the HLSL lit() intrinsic, and compare its output to that of the
Blinn-Phong effect you implemented in the previous exercise.
1.测试ambient lighting effect。在NVIDIA FX Composer的Properties panel中修改ambient light的颜色和强度,观察输出结果。
2.探究diffuse lighting effect的输出结果。在场景中新建一个dirctional light,并与shader输入中的directional light绑定。在场景中旋转light,改变颜色并观察输出结果。
另外,对AmbientLight constant创建一个Object annotation,并在NVIDIA FX Composer中新建一个ambient light与该Object绑定。然后修改场景中的ambient light并观察渲染的输出结果。
3.在Phong effect中使用多个不同的specular指数,并观察输出结果。针对ambient,directional以及specular使用不同的颜色和强度组合进行测试。
4.实现完整的Blinn-Phong effect,并与Phong effect的输出结果进行比较。
5.使用HLSL内置函数lit()实现完整的Blinn-Phong effect,并与第4个练习中的输出结果进行比较。
本章配套的学习代码:


 1230
1230


 被折叠的 条评论
为什么被折叠?
被折叠的 条评论
为什么被折叠?
 到【灌水乐园】发言


