


转载请注明出处:王亟亟的大牛之路
古人学问无遗力,少壮工夫老始成。 —— 陆游《冬夜读书示子聿》
继上一篇自定义Dialog之后的又一篇自定义控件的文章上一篇http://blog.csdn.net/ddwhan0123/article/details/48651905
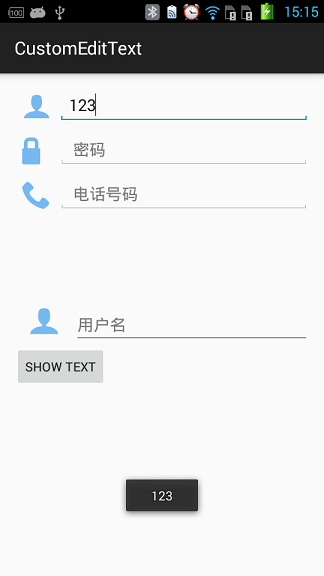
这一次是封装 EditText+ImageView在我们的LinearLayout中,进一步简化了表单类UI的搭建工作,效果如下:
上面是我们的封装类的实现,下面那个是另外拼接组合的实现,我们来看下简便了什么?
自定义控件:
<customedittext.wjj.com.customedittext.IconEditText
        android:layout_width="match_parent"
        android:layout_height="wrap_content"
        widget:isPassword="false"
        widget:hint="@string/username"
        widget:iconSrc="@mipmap/user"
        android:id="@+id/user">
    </customedittext.wjj.com.customedittext.IconEditText>
旧式的拼接
  <RelativeLayout
        android:orientation="horizontal"
        android:layout_width="match_parent"
        android:layout_height="wrap_content"
        android:layout_centerVertical="true"
        android:layout_alignParentLeft="true"
        android:layout_alignParentStart="true"
        android:id="@+id/relativeLayout">

        <ImageView
            android:layout_width="35dp"
            android:layout_height="35dp"
            android:id="@+id/imageView"
            android:background="@drawable/user"
            android:layout_weight="3"
            android:layout_marginLeft="15dp" />

        <EditText
            android:layout_width="match_parent"
            android:layout_height="wrap_content"
            android:id="@+id/editText"
            android:layout_weight="7"
            android:hint="@string/username"
            android:layout_alignParentTop="true"
            android:layout_toRightOf="@+id/imageView"
            android:layout_toEndOf="@+id/imageView"
            android:layout_marginLeft="15dp" />
    </RelativeLayout>
是不是在代码层面少了很多的拼接组合甚至是拖拽,只需要填入你需要的内容即可。
贴一下具体的实现并在过程中做一些解释
先贴实验Activity:MainActivity
public class MainActivity extends AppCompatActivity {
    private IconEditText user;
    private Button btn;

    @Override
    protected void onCreate(Bundle savedInstanceState) {
        super.onCreate(savedInstanceState);
        setContentView(R.layout.activity_main);
        user=(IconEditText)findViewById(R.id.user);
        btn=(Button)findViewById(R.id.button);
        btn.setOnClickListener(new View.OnClickListener() {
            @Override
            public void onClick(View v) {
                String value=user.getText().toString();
                if(value!=null&&value.length()>0){
                    Toast.makeText(MainActivity.this,value,Toast.LENGTH_LONG).show();
                }else{
                    Toast.makeText(MainActivity.this,"请输入内容",Toast.LENGTH_LONG).show();
                }

            }
        });
    }

    @Override
    public boolean onCreateOptionsMenu(Menu menu) {
        // Inflate the menu; this adds items to the action bar if it is present.
        getMenuInflater().inflate(R.menu.menu_main, menu);
        return true;
    }

    @Override
    public boolean onOptionsItemSelected(MenuItem item) {
        // Handle action bar item clicks here. The action bar will
        // automatically handle clicks on the Home/Up button, so long
        // as you specify a parent activity in AndroidManifest.xml.
        int id = item.getItemId();

        //noinspection SimplifiableIfStatement
        if (id == R.id.action_settings) {
            return true;
        }

        return super.onOptionsItemSelected(item);
    }
}
分析:就是看一下有没有获取我们想要的内容以及封装的方法简单的调用。
public class IconEditText extends LinearLayout {

    private static final String TAG = IconEditText.class.getSimpleName();

    /**
     * UI的参数
     */
    private static final float ICON_WEIGHT = 0.15f;
    private static final float EDIT_TEXT_WEIGHT = 0.85f;


    private static final String HINT_PREFIX = " ";

    /**
     * 图片素材
     */
    private Integer _iconResource;

    /**
     * 提示用的字体
     */
    private String _hint;

    /**
     * 是否为密码属性
     */
    private boolean _isPassword = false;

    /**
     * 空间组成
     */
    private ImageView _icon;
    private EditText _editText;

    /**
     * 构造函数
     * @param context
     */
    public IconEditText(Context context) {
        this(context, null);
    }

    /**
     * 构造函数
     * @param context
     * @param attrs
     */
    public IconEditText(Context context, AttributeSet attrs) {
        this(context, attrs, 0);
    }

    /**
     * 构造函数
     * @param context
     * @param attrs
     * @param defStyleAttr
     */
    public IconEditText(Context context, AttributeSet attrs, int defStyleAttr) {
        super(context, attrs, defStyleAttr);

        this.parseAttributes(context, attrs);
        this.initialize();
    }

    /**
     * 解析出的自定义属性。
     *
     * @param context
     * @param attrs
     */
    private void parseAttributes(Context context, AttributeSet attrs) {
        Log.d(TAG, "parseAttributes()");
        if (attrs == null) {
            return;
        }

        TypedArray a = context.getTheme()
                .obtainStyledAttributes(attrs, R.styleable.IconEditText, 0, 0);

        try {
            _iconResource = a.getResourceId(R.styleable.IconEditText_iconSrc, 0);
            _hint = a.getString(R.styleable.IconEditText_hint);
            _isPassword = a.getBoolean(R.styleable.IconEditText_isPassword, false);

            Log.d(TAG, "{ _iconResource: " + _iconResource + ", _hint: " + _hint + ", _isPassword: " + _isPassword + "}");
        } catch (Exception ex) {
            Log.e(TAG, "Unable to parse attributes due to: " + ex.getMessage());
            ex.printStackTrace();
        } finally {
            a.recycle();
        }
    }

    /**
     * 初始化
     */
    private void initialize() {
        Log.d(TAG, "initialize()");

        // 强制水平
        this.setOrientation(LinearLayout.HORIZONTAL);

        // 创建Icon
        if (_icon == null) {
            _icon = new ImageView(this.getContext());
            _icon.setLayoutParams(
                    new LayoutParams(0, LayoutParams.MATCH_PARENT, ICON_WEIGHT)
            );
            _icon.setScaleType(ImageView.ScaleType.CENTER_INSIDE);

            if (_iconResource != null && _iconResource != 0) {
                _icon.setImageResource(_iconResource);
            }

            this.addView(_icon);
        }

        // 创建EditText
        if (_editText == null) {
            _editText = new EditText(this.getContext());
            _editText.setInputType(
                    _isPassword ? InputType.TYPE_TEXT_VARIATION_PASSWORD : InputType.TYPE_TEXT_FLAG_AUTO_CORRECT
            );
            _editText.setLayoutParams(
                    new LayoutParams(0, LayoutParams.MATCH_PARENT, EDIT_TEXT_WEIGHT)
            );

            if (_hint != null) {
                //格式处理
                _editText.setHint(String.format("%s%s", HINT_PREFIX, _hint.toLowerCase()));
            }

            this.addView(_editText);
        }
    }

    /**
     * 获取输入内容。
     *
     * @return
     */
    public Editable getText() {
        return _editText.getText();
    }

    /**
     * 返回一个EditText.
     *
     * @return
     */
    public EditText getEditText() {
        return _editText;
    }

    /**
     * 返回icon.
     *
     * @return
     */
    public ImageView getImageView() {
        return _icon;
    }

}
补充:因为是EditText所以没有必要像TextView一样重写一些setText之类的方法。
功能就这些,还有一个attrs.xml在源码中看吧。
源码:http://yunpan.cn/cHcewFeFrGCVR 访问密码 78e8


 116
116

 被折叠的 条评论
为什么被折叠?
被折叠的 条评论
为什么被折叠?
 到【灌水乐园】发言


