


Android-Handler消息机制
概述
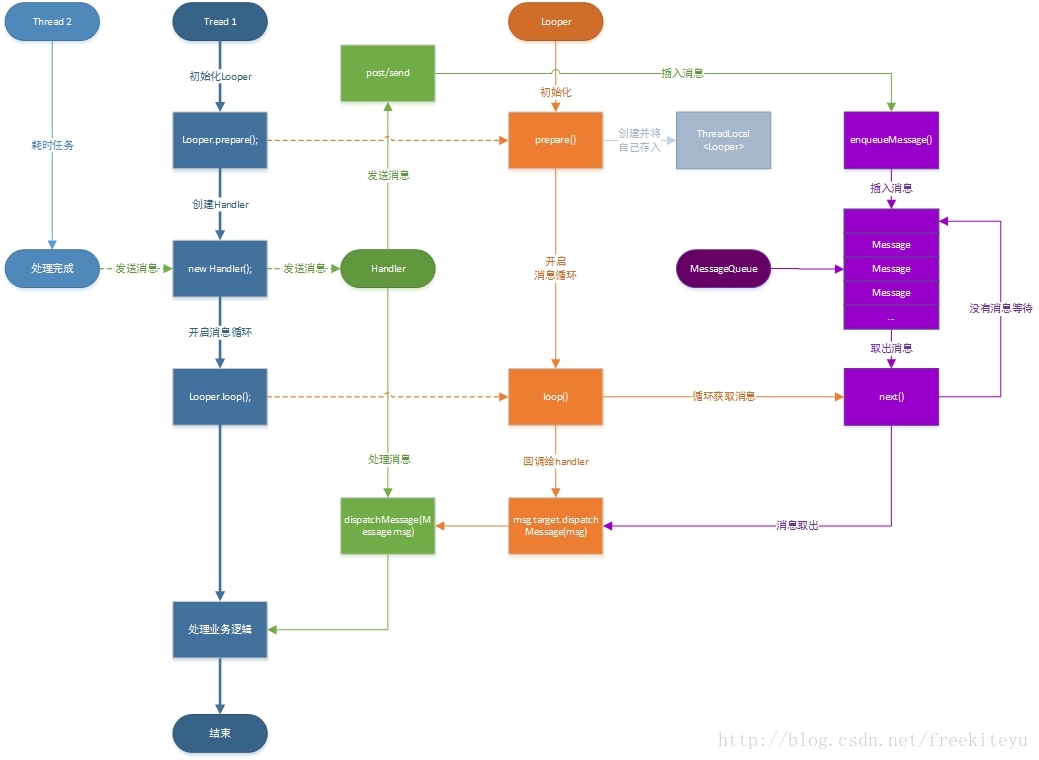
Android 的消息机制主要是指 Handler 的运行机制以及 Handler 所附带的 MessageQueue 和 Looper 的工作过程。 Handler 的主要作用是将某个任务切换到 Handler 所在的线程中去执行。
Handler机制
Handler工作流程
Looper
每个线程中最多只能有一个 Looper 对象,由 Looper 来管理此线程里的 MessageQueue (消息队列)。
可以通过 Looper.myLooper() 获取当前线程的 Looper 实例,通过 Looper.getMainLooper() 获取主(UI)线程的 Looper 实例。
Lopper 会以无限循环的形式去查找是否有新消息,如果有就处理消息,否则就一直等待着。
Handler
你可以构造 Handler 对象来与 Looper 沟通,通过 push 发送新消息到 MessageQueue 里;或者通过 handleMessage 接收 Looper 从 MessageQueue 取出来消息。
MessageQueue
MessageQueue是一个消息队列,内部存储了一组消息,以队列的形式对外提供插入和
删除的工作,内部采用单链表的数据结构来存储消息列表。
ActivityThread
我们经常提到的主线程,也叫UI线程,它就是 ActivityThread,主线程启动会默认初始化一个 Looper 并创建 Handler。
一个线程中只有一个 Looper 实例,一个 MessageQueue 实例,可以有多个 Handler 实例。
ThreadLocal
一个线程内部的数据存储类,通过它可以在指定线程中存储数据,数据存储后,只有在指定线程中可以获取到存储的数据,对于其他线程来说无法获得数据。
对于 Handler 来说,它需要获取当前线程的 Looper ,而 Looper 的作用于就是线程并且不同的线程具有不同的 Looper ,通过 ThreadLocal 可以轻松实现线程中的存取。
ThreadLocal原理:不同线程访问同一个ThreadLoacl的get方法,ThreadLocal的get方法会从各自的线程中取出一个数组,然后再从数组中根据当前ThreadLocal的索引去查找对应的Value值。
源码分析
通过上面分析我们知道使用 Handler 之前必须先调用 Looper.prepare(); 进行初始化,我们先看下 Looper 的源码。
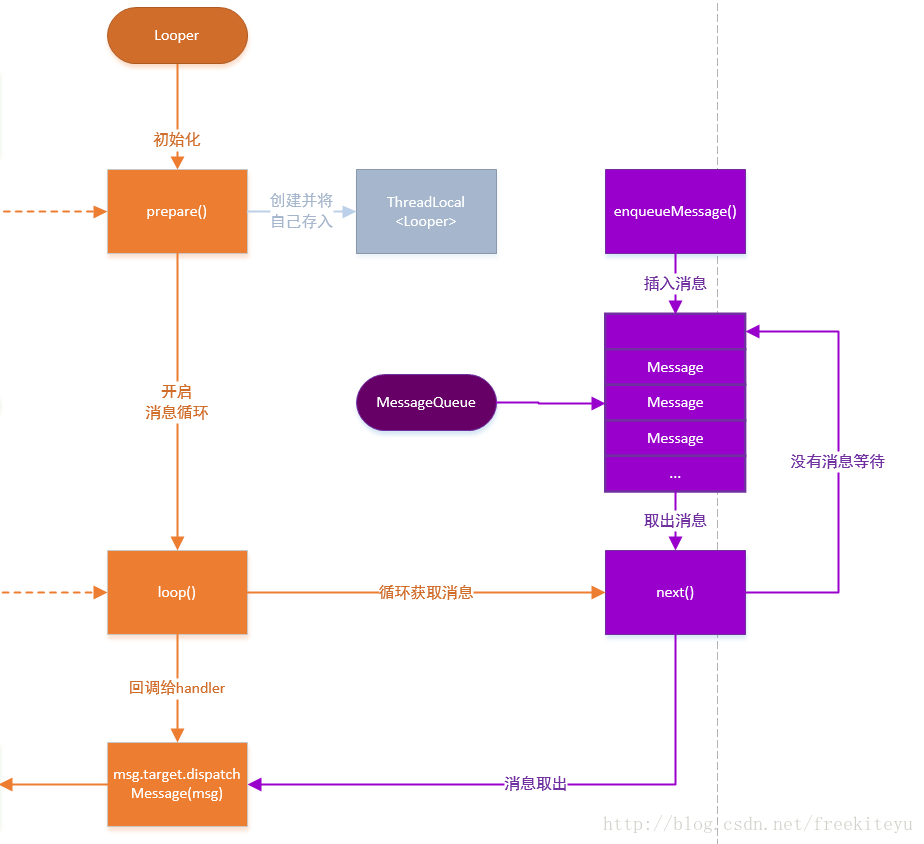
1. Looper 工作原理
先看一下 Looper 工作流程
Looper 源码最上面的注释里有一个使用示例如下,可以清晰的看出 Looper 的使用方法。
class LooperThread extends Thread {
     public Handler mHandler;
     public void run() {
         Looper.prepare();//先初始化 Looper
         mHandler = new Handler() {//创建 Handler
             public void handleMessage(Message msg) {
                 // process incoming messages here
             }
         };
         Looper.loop();//启用 Looper 的 loop 方法开启消息轮询
     }
}
接续看一下 Looper 的完整源码,分析下工作过程。
public final class Looper {

    static final ThreadLocal<Looper> sThreadLocal = new ThreadLocal<Looper>();
    //每个线程都会有一个ThreadLocal 用来保存 Looper对象(里面包含了主线程和 MessageQueue)

    private static Looper sMainLooper;  // 主线程的 Looper

    final MessageQueue mQueue;//保存消息队列
    final Thread mThread;//保存主线程

    public static void prepare() {//为当前线程创建 Looper
        prepare(true);
    }

    private static void prepare(boolean quitAllowed) {
        if (sThreadLocal.get() != null) {
            //一个线程只能有一个 Looper, 否则抛出异常
            throw new RuntimeException("Only one Looper may be created per thread");
        }
        sThreadLocal.set(new Looper(quitAllowed));//将创建的 Looper 放入 ThreadLocal
    }

    //初始化主线程的 Looper
    public static void prepareMainLooper() {
        prepare(false);
        synchronized (Looper.class) {
            if (sMainLooper != null) {
                throw new IllegalStateException("The main Looper has already been prepared.");
            }
            sMainLooper = myLooper();
        }
    }

    //获取主线程的 Looper
    public static Looper getMainLooper() {
        synchronized (Looper.class) {
            return sMainLooper;
        }
    }

    //在当前线程中开启轮询
    public static void loop() {
        final Looper me = myLooper();//从 ThreadLocal 中取出当前线程的 Looper 对象
        if (me == null) {
            //Looper 没有调用 Looper.prepare() 初始化,抛出异常
            throw new RuntimeException("No Looper; Looper.prepare() wasn't called on this thread.");
        }
        final MessageQueue queue = me.mQueue;//从 Looper 对象中取出消息队列

        for (;;) {//死循环
            Message msg = queue.next(); // 不断的取出消息
            if (msg == null) {
                // No message indicates that the message queue is quitting.
                return;
            }

            ...

            try {
                msg.target.dispatchMessage(msg);
                //取出消息的 target (也就是 Handler),执行分发消息的操作
            } finally {
                if (traceTag != 0) {
                    Trace.traceEnd(traceTag);
                }
            }

            ...

            msg.recycleUnchecked();//消息已经分发,进行回收操作
        }
    }

    public static @Nullable Looper myLooper() {
        return sThreadLocal.get();//从 ThreadLocal 中取出当前线程的 Looper 对象
    }

    private Looper(boolean quitAllowed) {
        mQueue = new MessageQueue(quitAllowed);//创建消息队列
        mThread = Thread.currentThread();//保存当前线程
    }

    public void quit() {
        mQueue.quit(false);//直接退出消息循环,不管是否还有消息
    }

    public void quitSafely() {
        mQueue.quit(true);//执行完所有的消息,退出消息循环
    }

    ...
}
2. MessageQueue 工作原理
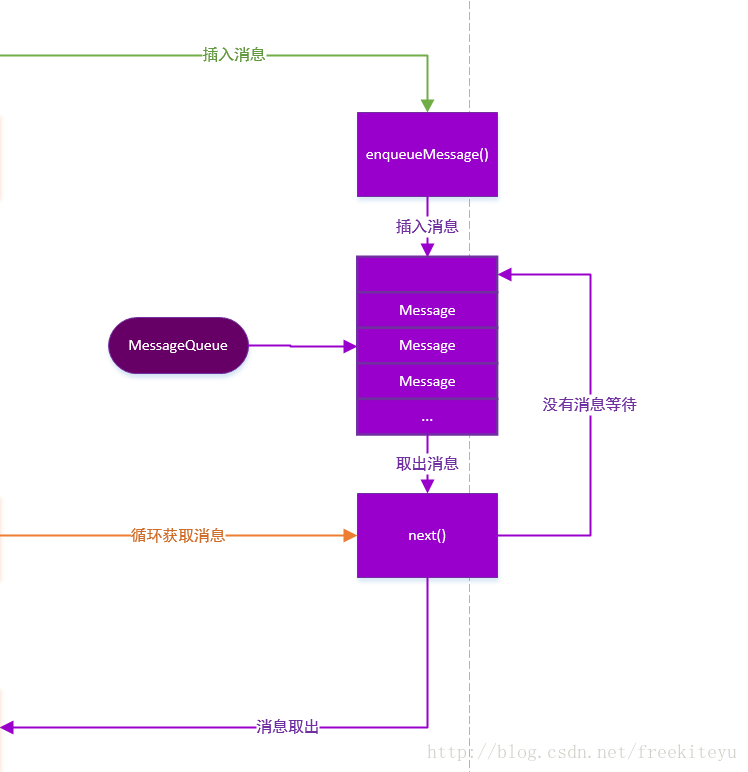
在 Looper 中创建了 MessageQueue,我们接着看下 MessageQueue 是怎么工作的。
MessageQueue 工作流程
MessageQueue的构造方法。
MessageQueue(boolean quitAllowed) {
    mQuitAllowed = quitAllowed;
    //构造函数,quitAllowed 用来标识是否允许退出。
    //主线程是不允许退出的(不然会退出整个程序),子线程可以退出。
    mPtr = nativeInit();
}
然后我们再看一下 MessageQueue.enqueueMessage() 的源码,分析下是怎么添加消息的。
boolean enqueueMessage(Message msg, long when) {
    if (msg.target == null) {
        throw new IllegalArgumentException("Message must have a target.");
    }
    if (msg.isInUse()) {
        throw new IllegalStateException(msg + " This message is already in use.");
    }

    synchronized (this) {
        if (mQuitting) {
            IllegalStateException e = new IllegalStateException(
                    msg.target + " sending message to a Handler on a dead thread");
            Log.w(TAG, e.getMessage(), e);
            msg.recycle();
            return false;
        }

        msg.markInUse();
        msg.when = when;
        Message p = mMessages;
        boolean needWake;
        if (p == null || when == 0 || when < p.when) {
            // 如果消息队列里面没有消息,或者消息的执行时间比里面的消息早,就把这条消息设置成第一条消息。
            //一般不会出现这种情况,因为系统一定会有很多消息。
            msg.next = p;
            mMessages = msg;
            needWake = mBlocked;
        } else {//如果消息队列里面有消息
            needWake = mBlocked && p.target == null && msg.isAsynchronous();
            Message prev;
            for (;;) {//找到消息队列里面的最后一条消息
                prev = p;
                p = p.next;
                if (p == null || when < p.when) {
                    break;
                }
                if (needWake && p.isAsynchronous()) {
                    needWake = false;
                }
            }
            msg.next = p; // invariant: p == prev.next
            prev.next = msg;//把消息添加到最后
        }

        // We can assume mPtr != 0 because mQuitting is false.
        if (needWake) {
            nativeWake(mPtr);
        }
    }
    return true;
}
知道了怎么添加消息,我们再看下 MessageQueue.next() 方法是怎么取出消息的,也就是 Looper.loop() 方法中不断取消息的方法。
Message next() {
    int pendingIdleHandlerCount = -1; // -1 only during first iteration
    int nextPollTimeoutMillis = 0;
    for (;;) {
        if (nextPollTimeoutMillis != 0) {
            Binder.flushPendingCommands();
        }

        nativePollOnce(ptr, nextPollTimeoutMillis);

        synchronized (this) {
            final long now = SystemClock.uptimeMillis();
            Message prevMsg = null;
            Message msg = mMessages;//拿到当前的消息队列
            if (msg != null && msg.target == null) {
                //处理异步的消息,暂不讨论
                do {
                    prevMsg = msg;
                    msg = msg.next;
                } while (msg != null && !msg.isAsynchronous());
            }
            if (msg != null) {
                if (now < msg.when) {
                    // Next message is not ready.  Set a timeout to wake up when it is ready.
                    nextPollTimeoutMillis = (int) Math.min(msg.when - now, Integer.MAX_VALUE);
                } else {
                    //取出一条消息,消息队列往后移动一个
                    mBlocked = false;
                    if (prevMsg != null) {
                        prevMsg.next = msg.next;
                    } else {
                        mMessages = msg.next;
                    }
                    msg.next = null;
                    if (DEBUG) Log.v(TAG, "Returning message: " + msg);
                    msg.markInUse();//标记为已使用
                    return msg;
                }
            } else {
                // No more messages.
                nextPollTimeoutMillis = -1;
            }

            ...
    }
}
我们知道 MessageQueue 是个链表结构,里面保存的是 Message,我们再看下 Message 是什么。
public final class Message implements Parcelable {

    public int what;//消息类型,标识消息的作用

    public int arg1;//整型参数1

    public int arg2;//整型参数2

    public Object obj;//复杂对象参数

    public Messenger replyTo;

    public int sendingUid = -1;

    /*package*/ static final int FLAG_IN_USE = 1 << 0;//标记消息已使用

    /** If set message is asynchronous */
    /*package*/ static final int FLAG_ASYNCHRONOUS = 1 << 1;//标记消息是否异步

    /** Flags to clear in the copyFrom method */
    /*package*/ static final int FLAGS_TO_CLEAR_ON_COPY_FROM = FLAG_IN_USE;

    /*package*/ int flags;//消息当前标记

    /*package*/ long when;//消息执行时间

    /*package*/ Bundle data;

    /*package*/ Handler target;//Handler 用于执行 handleMessage();

    /*package*/ Runnable callback;//消息是一个Runnable

    // sometimes we store linked lists of these things
    /*package*/ Message next;//下一个消息

    private static final Object sPoolSync = new Object();//控制并发访问
    private static Message sPool;//消息池
    private static int sPoolSize = 0;//消息池数量

    private static final int MAX_POOL_SIZE = 50;//消息最大数量

    ...

}
3. Handler 工作原理
在 Message 中我们看到了 target 是一个 Handler,我们看下 Handler 是怎么与 Looper 和 MessageQueue 一起搭配工作的。
看一下 Handler 的源码。
public class Handler {

    public interface Callback {
        public boolean handleMessage(Message msg);
    }


    public void handleMessage(Message msg) {}

    /**
     * 消息处理
     */
    public void dispatchMessage(Message msg) {
        if (msg.callback != null) {//如果消息体是 Runnable 就执行 run()
            handleCallback(msg);
        } else {
            if (mCallback != null) {
                //如果创建 Handler 时传入了 Callback,就执行 Callback 里面的逻辑
                if (mCallback.handleMessage(msg)) {
                    return;
                }
            }
            handleMessage(msg);//如果上述两种都没有实现,就执行 handleMessage 的逻辑
        }
    }


    public Handler() {
        this(null, false);
    }

    public Handler(Callback callback) {
        this(callback, false);
    }

    public Handler(Looper looper) {//可以指定关联哪个线程的 Looper
        this(looper, null, false);
    }

    public Handler(Looper looper, Callback callback) {
        this(looper, callback, false);
    }

    public Handler(boolean async) {
        this(null, async);
    }

    /**
     * 主线程调用的构造方法,主线程已经调用了 Looper.prepareMainLooper();
     *
     * @hide
     */
    public Handler(Callback callback, boolean async) {
        if (FIND_POTENTIAL_LEAKS) {
            final Class<? extends Handler> klass = getClass();
            if ((klass.isAnonymousClass() || klass.isMemberClass() || klass.isLocalClass()) &&
                    (klass.getModifiers() & Modifier.STATIC) == 0) {
                Log.w(TAG, "The following Handler class should be static or leaks might occur: " +
                    klass.getCanonicalName());
            }
        }

        mLooper = Looper.myLooper();//取出主线程的 Looper
        if (mLooper == null) {
            throw new RuntimeException(
                "Can't create handler inside thread that has not called Looper.prepare()");
        }
        mQueue = mLooper.mQueue;//把 Handler 的 mQueue 指向 Looper 中的 mQueue
        mCallback = callback;
        mAsynchronous = async;
    }

    /**
     * 第二种构造方法,专门给子线程中创建 Handler 时使用的
     *
     * @hide
     */
    public Handler(Looper looper, Callback callback, boolean async) {
        mLooper = looper;
        mQueue = looper.mQueue;
        mCallback = callback;
        mAsynchronous = async;
    }

    //发送 Runnable 消息
    public final boolean post(Runnable r){
       return  sendMessageDelayed(getPostMessage(r), 0);
    }

    private static Message getPostMessage(Runnable r) {
        Message m = Message.obtain();
        m.callback = r;
        return m;
    }

    //一般更新 UI 时发送的消息,延时时间为0
    public final boolean sendMessage(Message msg){
        return sendMessageDelayed(msg, 0);
    }

    //发送延时消息
    public final boolean sendMessageDelayed(Message msg, long delayMillis){
        if (delayMillis < 0) {
            delayMillis = 0;
        }
        return sendMessageAtTime(msg, SystemClock.uptimeMillis() + delayMillis);
    }

    //发送指定时间发送的消息
    public boolean sendMessageAtTime(Message msg, long uptimeMillis) {
        MessageQueue queue = mQueue;
        if (queue == null) {
            RuntimeException e = new RuntimeException(
                    this + " sendMessageAtTime() called with no mQueue");
            Log.w("Looper", e.getMessage(), e);
            return false;
        }
        return enqueueMessage(queue, msg, uptimeMillis);
    }


    private boolean enqueueMessage(MessageQueue queue, Message msg, long uptimeMillis) {
        msg.target = this;
        //把字节传入 Message 中一起发送
        //Looper 中需要使用 Handler 来执行 dispatchMessage 方法
        if (mAsynchronous) {
            msg.setAsynchronous(true);
        }
        return queue.enqueueMessage(msg, uptimeMillis);
    }

}
4. ActivityThread 创建默认的 Handler
上面说过,ActivityThread 主线程默认是有一个 Handler 的,我们来看一下主线程是怎么创建默认的 Handler 的。
我们看一下 ActivityThread 类中的 main 方法。
public static void main(String[] args) {
    Trace.traceBegin(Trace.TRACE_TAG_ACTIVITY_MANAGER, "ActivityThreadMain");
    SamplingProfilerIntegration.start();

    // CloseGuard defaults to true and can be quite spammy.  We
    // disable it here, but selectively enable it later (via
    // StrictMode) on debug builds, but using DropBox, not logs.
    CloseGuard.setEnabled(false);

    Environment.initForCurrentUser();//准备一些相关环境,给我们的组件启动

    // Set the reporter for event logging in libcore
    EventLogger.setReporter(new EventLoggingReporter());

    // Make sure TrustedCertificateStore looks in the right place for CA certificates
    final File configDir = Environment.getUserConfigDirectory(UserHandle.myUserId());
    TrustedCertificateStore.setDefaultUserDirectory(configDir);

    Process.setArgV0("<pre-initialized>");

    Looper.prepareMainLooper();//初始化主线程 Looper

    ActivityThread thread = new ActivityThread();
    thread.attach(false);

    if (sMainThreadHandler == null) {
        sMainThreadHandler = thread.getHandler();
    }

    if (false) {
        Looper.myLooper().setMessageLogging(new
                LogPrinter(Log.DEBUG, "ActivityThread"));
    }

    // End of event ActivityThreadMain.
    Trace.traceEnd(Trace.TRACE_TAG_ACTIVITY_MANAGER);
    Looper.loop();//开启消息轮询,不断取出消息

    throw new RuntimeException("Main thread loop unexpectedly exited");
}
在 Activity 可以直接用 runOnUiThread() 来使用默认的 Handler 发送消息,我们来看下它是怎么实现的。
public final void runOnUiThread(Runnable action) {
    if (Thread.currentThread() != mUiThread) {//非主线程,发送 Runnable 消息
        mHandler.post(action);
    } else {//在主线程中直接执行 run()
        action.run();
    }
}
5. HandlerThread 异步消息处理机制
- HandlerThread 继承了 Thread,是一种可以使用 Handler 的 Thread;
- 在 run 方法中通过 looper.prepare() 来开启消息循环,这样就可以在 HandlerThread 中创
建Handler了;- 外界可以通过一个 Handler 的消息方式来通知 HandlerThread 来执行具体任务;确定不使
用之后,可以通过 quit 或 quitSafely 方法来终止线程执行。
先分析一下 HandlerThread 的源码。
public class HandlerThread extends Thread {
    //线程的优先级
    int mPriority;
    //线程的id
    int mTid = -1;
    //一个与Handler关联的Looper对象
    Looper mLooper;

    public HandlerThread(String name) {
        super(name);
        //设置优先级为默认线程
        mPriority = android.os.Process.THREAD_PRIORITY_DEFAULT;
    }

    public HandlerThread(String name, int priority) {
        super(name);
        mPriority = priority;
    }
    //可重写方法,Looper.loop之前在线程中需要处理的其他逻辑在这里实现
    protected void onLooperPrepared() {
    }
    //HandlerThread线程的run方法
    @Override
    public void run() {
        //获取当前线程的id
        mTid = Process.myTid();
        //创建Looper对象
        //这就是为什么我们要在调用线程的start()方法后才能得到Looper(Looper.myLooper不为Null)
        Looper.prepare();
        //同步代码块,当获得mLooper对象后,唤醒所有线程
        synchronized (this) {
            mLooper = Looper.myLooper();
            notifyAll();
        }
        //设置线程优先级
        Process.setThreadPriority(mPriority);
        //Looper.loop之前在线程中需要处理的其他逻辑
        onLooperPrepared();
        //建立了消息循环
        Looper.loop();
        //一般执行不到这句,除非quit消息队列
        mTid = -1;
    }

    public Looper getLooper() {
        if (!isAlive()) {
            //线程死了
            return null;
        }

        //同步代码块,正好和上面run方法中同步块对应
        //只要线程活着并且mLooper为null,则一直等待
        // If the thread has been started, wait until the looper has been created.
        synchronized (this) {
            while (isAlive() && mLooper == null) {
                try {
                    wait();
                } catch (InterruptedException e) {
                }
            }
        }
        return mLooper;
    }

    public boolean quit() {
        Looper looper = getLooper();
        if (looper != null) {
            //退出消息循环
            looper.quit();
            return true;
        }
        return false;
    }

    public boolean quitSafely() {
        Looper looper = getLooper();
        if (looper != null) {
            //退出消息循环
            looper.quitSafely();
            return true;
        }
        return false;
    }

    public int getThreadId() {
        //返回线程id
        return mTid;
    }
}
HandlerThread 使用代码示例
public class MainActivity extends AppCompatActivity {

    private HandlerThread mHandlerThread = null;
    private Handler mThreadHandler = null;
    private Handler mUiHandler = null;

    @Override
    protected void onCreate(Bundle savedInstanceState) {
        super.onCreate(savedInstanceState);
        setContentView(R.layout.activity_main);

        mHandlerThread = new HandlerThread("HandlerWorkThread");
        //必须在实例化mThreadHandler之前调运start方法,原因上面源码已经分析了
        mHandlerThread.start();
        //将当前mHandlerThread子线程的Looper传入mThreadHandler,使得
        //mThreadHandler的消息队列依赖于子线程(在子线程中执行)
        mThreadHandler = new Handler(mHandlerThread.getLooper()) {
            @Override
            public void handleMessage(Message msg) {
                super.handleMessage(msg);
                Log.i(null, "在子线程中处理!id="+Thread.currentThread().getId());
                //从子线程往主线程发送消息
                mUiHandler.sendEmptyMessage(0);
            }
        };

        mUiHandler = new Handler() {
            @Override
            public void handleMessage(Message msg) {
                super.handleMessage(msg);
                Log.i(null, "在UI主线程中处理!id="+Thread.currentThread().getId());
            }
        };
        //从主线程往子线程发送消息
        mThreadHandler.sendEmptyMessage(1);

    }
}
总结
到此 Handler 消息机制的源码已经分析完了,相信你一定明白了 Handler 消息机制。
一句话,每个线程可以创建一个 Looper ,每个 Looper 轮询着一个 MessageQueue 不断取出消息,有消息则回调给 Handler,Handler 负责向 MessageQueue 中发送消息和处理回调的消息来完成线程之间的转换。
更多文章
https://github.com/jeanboydev/Android-ReadTheFuckingSourceCode


 588
588


 被折叠的 条评论
为什么被折叠?
被折叠的 条评论
为什么被折叠?
 到【灌水乐园】发言


