 Android USB Host通信详解及U盘操作示例


 本文提供Android USB Host通信的全面介绍,包括官方文档引用、USB设备信息查看、相关API简介和U盘操作示例。通过代码实现获取USB设备详细信息,深入理解Android USB Host模式下与USB设备的通信过程。
首先说一下为什么要写关于Android USB Host通信的介绍,对于Android程序原来说不懂硬件做USB通信确实开头比较难,但是Google API介绍还是很详细的,而且网上也有很多例子,不过网上的基本把介绍和例子分开,光介绍不给例子,给个例子又不知道它是干什么的或者运行不了。那么我把自己通过阅读别人的博客和USB通信协议等来做下面的介绍,并给出一个通用的例子。
Android USB Host分以下三部份介绍:
(三)给出一个U盘操作的例子。
Android USB Host使用详解之一:查看USB设备信息
首先来看一下Google的官方文档中关于Android USB的介绍:Android USB Host and Accessory
Android USB有两种模式Host Mode和Accessory Mode:

在Host Mode下,Android手机作为主设备,如通过OTG线连接的HID设备或者U盘为从设备;在Accessory Mode下,Android手机作为从设备,如通过USB数据线连接的电脑为主设备。
本文主要介绍在Host Mode下,Android手机与USB设备之间的通信。Android USB Host的介绍可参见Google 官方文档:Android USB Host介绍
关于Android USB相关类的介绍留在下面慢慢展开,先编写一个Android程序:
1)在AndroidManifest.xml文件中添加
<uses-feature android:name="android.hardware.usb.host" />
<uses-sdk android:minSdkVersion="12" /><uses-feature android:name="android.hardware.usb.host" android:required="true"/>2)在<activity ...>添加
<intent-filter>
     <action android:name="android.hardware.usb.action.USB_DEVICE_ATTACHED" />
</intent-filter>
<meta-data android:name="android.hardware.usb.action.USB_DEVICE_ATTACHED"
     android:resource="@xml/device_filter" />
<resources>
    <usb-device vendor-id="3544" product-id="8199" />
    <usb-device vendor-id="5251" product-id="4608" />
</resources>3)获取所有已连接上的USD设备的信息
public class MainActivity extends ActionBarActivity {
    @Override
    protected void onCreate(Bundle savedInstanceState) {
        super.onCreate(savedInstanceState);
        setContentView(R.layout.activity_main);
        UsbManager mManager = (UsbManager) getSystemService(Context.USB_SERVICE);
        HashMap<String, UsbDevice> deviceList = mManager.getDeviceList();
        Iterator<UsbDevice> deviceIterator = deviceList.values().iterator();

        String info = new String();
        while (deviceIterator.hasNext())
        {
        	UsbDevice device = deviceIterator.next();
        	info += "Device Name:" + device.getDeviceName() + "\n";
        	info += "Device ID:" + device.getDeviceId() + "\n";
        	info += "Device Class:" + device.getDeviceClass() + "\n";
        	info += "Device Protocl:" + device.getDeviceProtocol() + "\n";
        	info += "Device Vendor ID:" + device.getVendorId() + "\n";
        	info += "Device Product ID:" + device.getProductId() + "\n";
        	info += "Device Interface Count:" + device.getInterfaceCount() + "\n\n";
            // Get interface details
            for (int index = 0; index < device.getInterfaceCount(); index++)
            {
            	UsbInterface mUsbInterface = device.getInterface(index);
            	info += "Interface " + index + ":\n";
            	info += "Interface ID:" + mUsbInterface.getId() + "\n";
            	info += "Inteface class:" + mUsbInterface.getInterfaceClass() + "\n";
            	info += "Interface protocol:" + mUsbInterface.getInterfaceProtocol() + "\n";
            	info += "Endpoint count:" + mUsbInterface.getEndpointCount() + "\n\n";
            	// Get endpoint details
            	for (int epi = 0; epi < mUsbInterface.getEndpointCount(); epi++)
            	{
            		UsbEndpoint mEndpoint = mUsbInterface.getEndpoint(epi);
            		info += "Endpoint " + epi + ":\n";
            		info += "Attributes: " + mEndpoint.getAttributes() + "\n";
            		info += "Direction: " + mEndpoint.getDirection() + "\n";
            		info += "Number: " + mEndpoint.getEndpointNumber() + "\n";
            		info += "Interval: " + mEndpoint.getInterval() + "\n";
            		info += "Packet size: " + mEndpoint.getMaxPacketSize() + "\n";
            		info += "Type: " + mEndpoint.getType() + "\n\n";
            	}
            }
        }
        TextView textView = (TextView)findViewById(R.id.info);
        textView.setText(info);
    }
}
通过上面这段代码可以获得USB设备的所有信息,包括接口(interface)和端点(endpoint)的信息,只有了解设备的类型才能在后面进行通信。注:本人在测试时即使没有连接设备也会有显示一个设备,这个设备即使删除它后系统也会自动生成,这里不用管它,之后把它过滤掉就可以了。
测试结果如下:
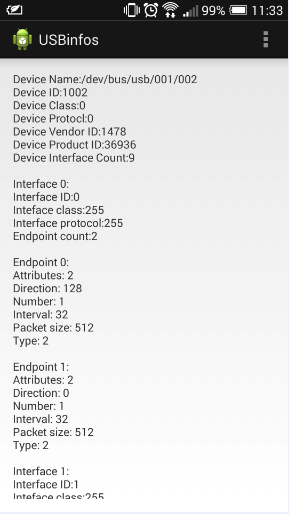
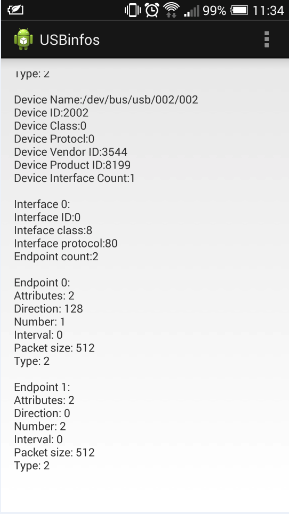
上面左图为第一个设备(无对应设备,懂的大神可以解释一下),右图为连接的U盘。Device Name 的值是一个文件路径,在路径下可以看到相应的文件,插入设备时自动生成,拔出时自动删除,懂Linux的应该明白原理,我是不懂,所以就不解释了。
源码下载链接:源码链接


 922
922

 被折叠的 条评论
为什么被折叠?
被折叠的 条评论
为什么被折叠?
 到【灌水乐园】发言


