


 本文深入探讨了iOS Core Animation的高级技术,包括cornerRadius、边框阴影、shadowPath、Layer Masking、Scaling Filters以及Group Opacity。通过实例分析了不同属性如minificationFilter和magnificationFilter的影响,并解释了为何设置layer的透明度会导致子视图的复杂透明效果,提出了解决方案。
第四章:Visual Effects
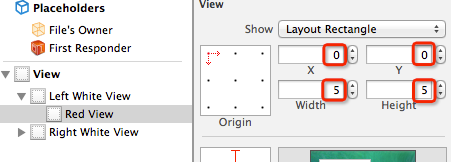
例子4.1 cornerRadius
源码在这里下载:http://www.informit.com/title/9780133440751
#import "ViewController.h"
#import <QuartzCore/QuartzCore.h>

@interface ViewController ()

@property (nonatomic, weak) IBOutlet UIView *layerView1;
@property (nonatomic, weak) IBOutlet UIView *layerView2;

@end

@implementation ViewController

- (void)viewDidLoad
{
    [super viewDidLoad];

    //set the corner radius on our layers
    self.layerView1.layer.cornerRadius = 20.0f;
    self.layerView2.layer.cornerRadius = 20.0f;

    //enable clipping on the second layer
    self.layerView2.layer.masksToBounds = YES;
}

@end

稍微修改一下
- (void)viewDidLoad
{
    [super viewDidLoad];

    //set the corner radius on our layers
    self.layerView1.layer.cornerRadius = 20.0f;
    self.layerView2.layer.cornerRadius = 20.0f;

    self.layerView1.clipsToBounds = YES;

    //enable clipping on the second layer
    self.layerView2.layer.masksToBounds = YES;
}
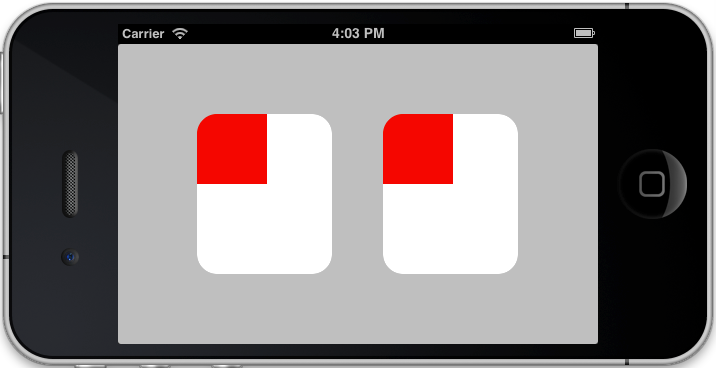
前面讲过了,UIView的clipsToBounds的函数等同于masksToBounds
Layer Borders
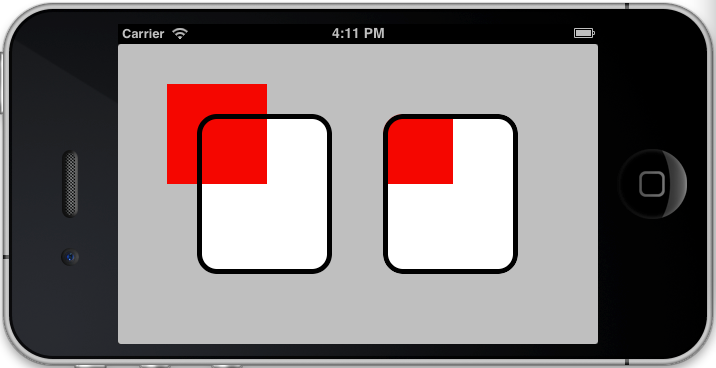
例子4.2 borderWidth
@interface ViewController ()

@property (nonatomic, weak) IBOutlet UIView *layerView1;
@property (nonatomic, weak) IBOutlet UIView *layerView2;

@end

@implementation ViewController

- (void)viewDidLoad
{
    [super viewDidLoad];

    //set the corner radius on our layers
    self.layerView1.layer.cornerRadius = 20.0f;
    self.layerView2.layer.cornerRadius = 20.0f;

    //add a border to our layers
    self.layerView1.layer.borderWidth = 5.0f;
    self.layerView2.layer.borderWidth = 5.0f;

    //enable clipping on the second layer
    self.layerView2.layer.masksToBounds = YES;
}

@end
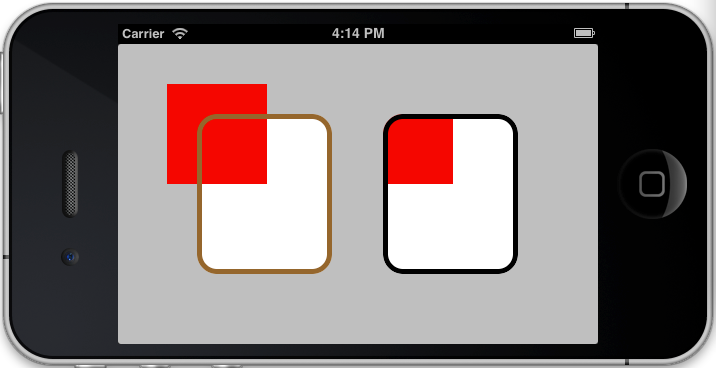
修改代码 borderColor
- (void)viewDidLoad
{
    [super viewDidLoad];

    //set the corner radius on our layers
    self.layerView1.layer.cornerRadius = 20.0f;
    self.layerView2.layer.cornerRadius = 20.0f;

    //add a border to our layers
    self.layerView1.layer.borderWidth = 5.0f;
    self.layerView1.layer.borderColor = [UIColor brownColor].CGColor;
    self.layerView2.layer.borderWidth = 5.0f;

    //enable clipping on the second layer
    self.layerView2.layer.masksToBounds = YES;
}
再做个试验,修改代码
- (void)viewDidLoad
{
    [super viewDidLoad];

    //set the corner radius on our layers
    //self.layerView1.layer.cornerRadius = 20.0f;
    self.layerView2.layer.cornerRadius = 20.0f;

    //add a border to our layers
    self.layerView1.layer.borderWidth = 5.0f;
    self.layerView1.layer.borderColor = [UIColor brownColor].CGColor;
    self.layerView2.layer.borderWidth = 5.0f;

    //enable clipping on the second layer
    self.layerView2.layer.masksToBounds = YES;
}
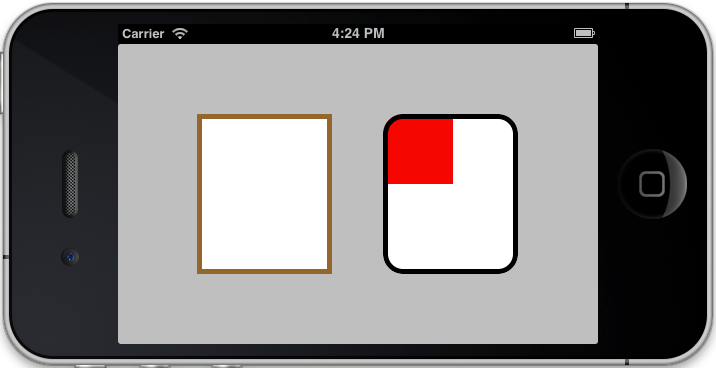
没有看到红色
再修改
看结果
验证borderWidth是往内部画的,和使用CGContextStrokeEllipseInRect画圆时的方式不同
Drop Shadows & Shadow Clipping
先修改例子2.2
- (void)viewDidLoad
{
[super viewDidLoad];
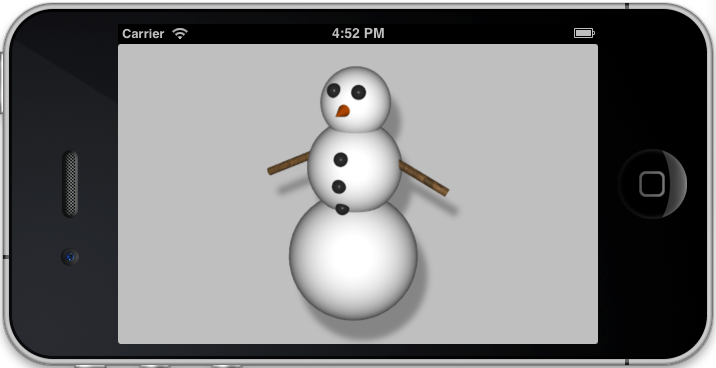
//load an image
UIImage *image = [UIImage imageNamed:@"Snowman.png"];
self.layerView.backgroundColor = [UIColor clearColor];
//add it directly to our view's layer
self.layerView.layer.contents = (__bridge id)image.CGImage;
//center the image
self.layerView.layer.contentsGravity = kCAGravityCenter;
//set the contentsScale to match screen
self.layerView.layer.contentsScale = image.scale;
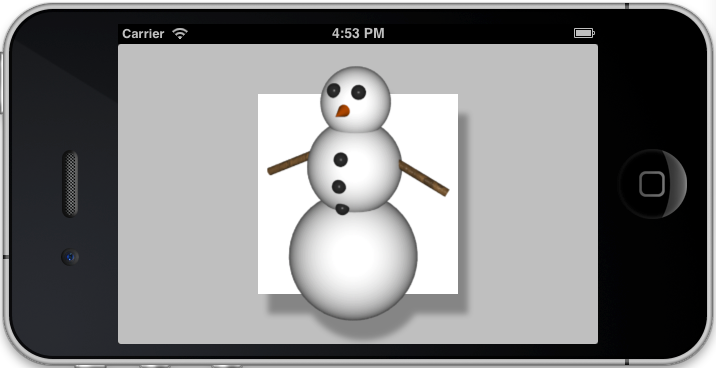
self.layerView.layer.shadowOpacity = 0.3;
self.layerView.layer.shadowOffset = CGSizeMake(10, 20);
//clip the snowman to fit his bounds
//self.layerView.layer.masksToBounds = YES;
}
继续
- (void)viewDidLoad
{
    [super viewDidLoad];

    //load an image
    UIImage *image = [UIImage imageNamed:@"Snowman.png"];

    //self.layerView.backgroundColor = [UIColor clearColor];

    //add it directly to our view's layer
    self.layerView.layer.contents = (__bridge id)image.CGImage;

    //center the image
    self.layerView.layer.contentsGravity = kCAGravityCenter;

    //set the contentsScale to match screen
    self.layerView.layer.contentsScale = image.scale;

    self.layerView.layer.shadowOpacity = 0.3;
    self.layerView.layer.shadowOffset = CGSizeMake(10, 20);

    //clip the snowman to fit his bounds
    //self.layerView.layer.masksToBounds = YES;
}
再改
- (void)viewDidLoad
{
[super viewDidLoad];
//load an image
UIImage *image = [UIImage imageNamed:@"Snowman.png"];
self.layerView.backgroundColor = [UIColor clearColor];
//add it directly to our view's layer
self.layerView.layer.contents = (__bridge id)image.CGImage;
//center the image
self.layerView.layer.contentsGravity = kCAGravityCenter;
//set the contentsScale to match screen
self.layerView.layer.contentsScale = image.scale;
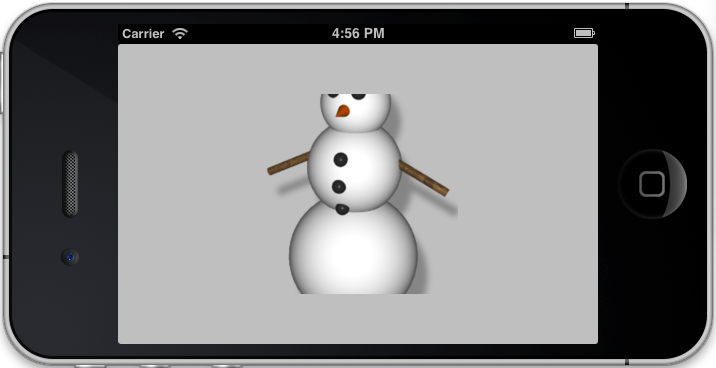
self.layerView.layer.shadowOpacity = 0.3;
self.layerView.layer.shadowOffset = CGSizeMake(10, 20);
//clip the snowman to fit his bounds
self.layerView.layer.masksToBounds = YES;
}
再改
- (void)viewDidLoad
{
    [super viewDidLoad];

    //load an image
    UIImage *image = [UIImage imageNamed:@"Snowman.png"];

    //self.layerView.backgroundColor = [UIColor clearColor];

    //add it directly to our view's layer
    self.layerView.layer.contents = (__bridge id)image.CGImage;

    //center the image
    self.layerView.layer.contentsGravity = kCAGravityCenter;

    //set the contentsScale to match screen
    self.layerView.layer.contentsScale = image.scale;

    self.layerView.layer.shadowOpacity = 0.3;
    self.layerView.layer.shadowOffset = CGSizeMake(10, 20);

    //clip the snowman to fit his bounds
    self.layerView.layer.masksToBounds = YES;
}
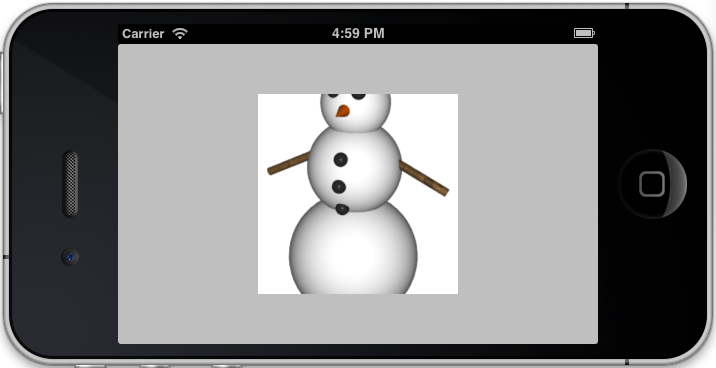
shadow是根据layer实际显示的内容绘制的
再看看例子4.3去体会一下
源码在这里下载:http://www.informit.com/title/9780133440751
The shadowPath Property
例子4.4
@interface ViewController ()
@property (nonatomic, weak) IBOutlet UIView *layerView1;
@property (nonatomic, weak) IBOutlet UIView *layerView2;
@end
@implementation ViewController
- (void)viewDidLoad
{
[super viewDidLoad];
//enable layer shadows
self.layerView1.layer.shadowOpacity = 0.5f;
self.layerView2.layer.shadowOpacity = 0.5f;
//create a square shadow
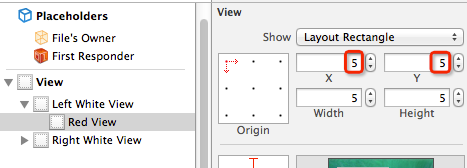
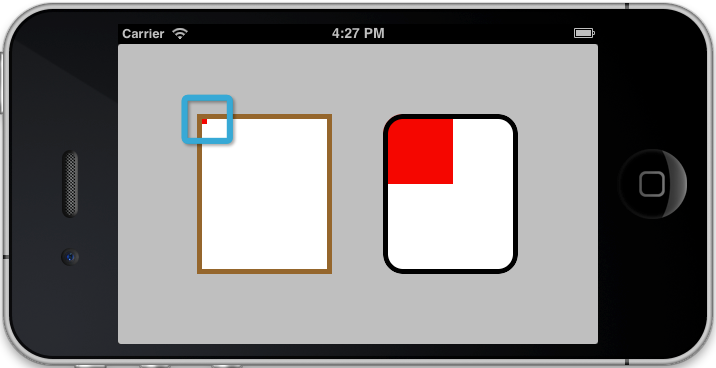
CGMutablePathRef squarePath = CGPathCreateMutable();
CGPathAddRect(squarePath, NULL, self.layerView1.bounds);
self.layerView1.layer.shadowPath = squarePath;
CGPathRelease(squarePath);
//create a circular shadow
CGMutablePathRef circlePath = CGPathCreateMutable();
CGPathAddEllipseInRect(circlePath, NULL, self.layerView2.bounds);
self.layerView2.layer.shadowPath = circlePath;
CGPathRelease(circlePath);
}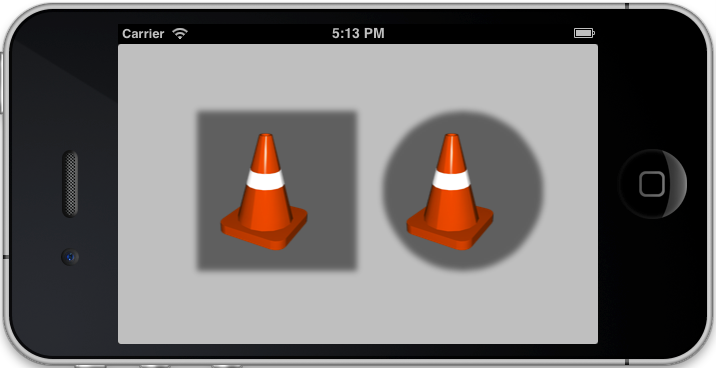
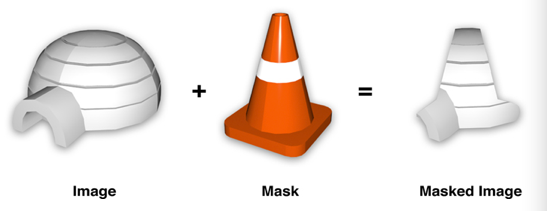
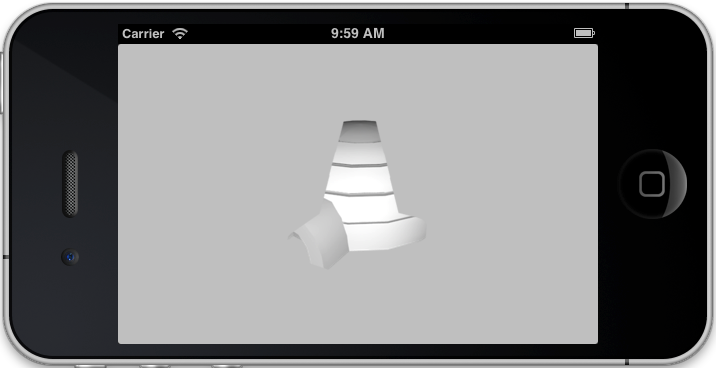
Layer Masking
例子4.5
@interface ViewController ()

@property (nonatomic, weak) IBOutlet UIImageView *imageView;

@end

@implementation ViewController

- (void)viewDidLoad
{
    [super viewDidLoad];

    //create mask layer
    CALayer *maskLayer = [CALayer layer];
    maskLayer.frame = self.imageView.bounds;
    UIImage *maskImage = [UIImage imageNamed:@"Cone.png"];
    maskLayer.contents = (__bridge id)maskImage.CGImage;

    //apply mask to image layer
    self.imageView.layer.mask = maskLayer;
}

@end
Scaling Filters
minificationFilter和magnificationFilter属性
这两个属性主要是设置layer的‘contents’数据缩放拉伸时的描绘方式,minificationFilter用于缩小,magnificationFilter用于放大
默认值都是kCAFilterLinear即‘linear’
有3中设置:kCAFilterLinear,kCAFilterNearest,kCAFilterTrilinear
kCAFilterLinear:默认值,缩放平滑,但容易产生模糊效果
kCAFilterTrilinear:基本和kCAFilterLinear相同
kCAFilterNearest:速度快不会产生模糊,但会降低质量并像素化图像
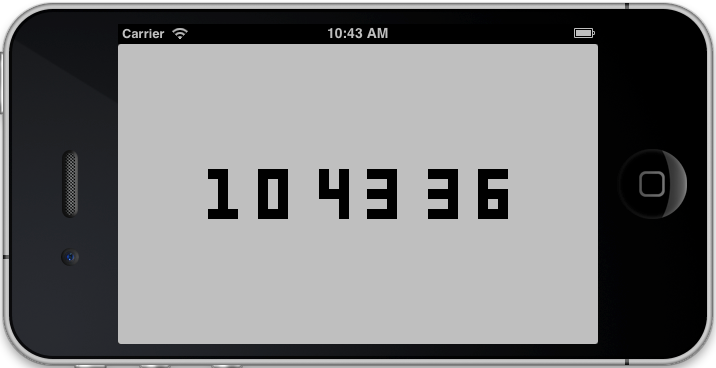
例子4.6,放大图像,设置magnificationFilter
原图

@interface ViewController ()

@property (nonatomic, strong) IBOutletCollection(UIView) NSArray *digitViews;
@property (nonatomic, weak) NSTimer *timer;

@end

@implementation ViewController

- (void)viewDidLoad
{
    [super viewDidLoad];

    //get spritesheet image
    UIImage *digits = [UIImage imageNamed:@"Digits.png"];

    //set up digit views
    for (UIView *view in self.digitViews)
    {
        //set contents
        view.layer.contents = (__bridge  id)digits.CGImage;
        view.layer.contentsRect = CGRectMake(0, 0, 0.1, 1.0);
        view.layer.contentsGravity = kCAGravityResizeAspect;

        //use nearest-neighbor scaling
        view.layer.magnificationFilter = kCAFilterNearest;
    }

    //start timer
    self.timer = [NSTimer scheduledTimerWithTimeInterval:1.0
                                                  target:self
                                                selector:@selector(tick)
                                                userInfo:nil
                                                 repeats:YES];
    //set initial clock time
    [self tick];
}

- (void)setDigit:(NSInteger)digit forView:(UIView *)view
{
    //adjust contentsRect to select correct digit
    view.layer.contentsRect = CGRectMake(digit * 0.1, 0, 0.1, 1.0);
}

- (void)tick
{
    //convert time to hours, minutes and seconds
    NSCalendar *calendar = [[NSCalendar alloc] initWithCalendarIdentifier:NSGregorianCalendar];
    NSUInteger units = NSHourCalendarUnit | NSMinuteCalendarUnit | NSSecondCalendarUnit;
    NSDateComponents *components = [calendar components:units fromDate:[NSDate date]];

    //set hours
    [self setDigit:components.hour / 10 forView:self.digitViews[0]];
    [self setDigit:components.hour % 10 forView:self.digitViews[1]];

    //set minutes
    [self setDigit:components.minute / 10 forView:self.digitViews[2]];
    [self setDigit:components.minute % 10 forView:self.digitViews[3]];

    //set seconds
    [self setDigit:components.second / 10 forView:self.digitViews[4]];
    [self setDigit:components.second % 10 forView:self.digitViews[5]];
}

@end
注释掉
//view.layer.magnificationFilter = kCAFilterNearest;使用用默认kCAFilterLinear效果
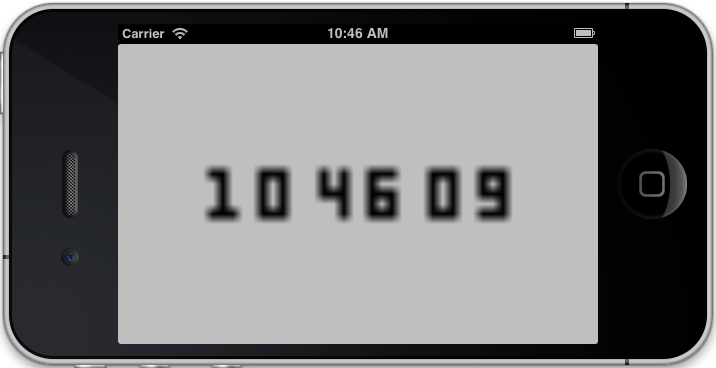
明显模糊了
Group Opacity
先看例子4.7:
@interface ViewController ()

@property (nonatomic, weak) IBOutlet UIView *containerView;

@end

@implementation ViewController

- (UIButton *)customButton
{
    //create button
    CGRect frame = CGRectMake(0, 0, 150, 50);
    UIButton *button = [[UIButton alloc] initWithFrame:frame];
    button.backgroundColor = [UIColor whiteColor];
    button.layer.cornerRadius = 10;

    //add label
    frame = CGRectMake(20, 10, 110, 30);
    UILabel *label = [[UILabel alloc] initWithFrame:frame];
    label.text = @"Hello World";
    //label.backgroundColor = [UIColor clearColor];
    label.textAlignment = NSTextAlignmentCenter;
    [button addSubview:label];

    return button;
}

- (void)viewDidLoad
{
    [super viewDidLoad];

    //create opaque button
    UIButton *button1 = [self customButton];
    button1.center = CGPointMake(50, 150);
    [self.containerView addSubview:button1];

    //create translucent button
    UIButton *button2 = [self customButton];
    button2.center = CGPointMake(250, 150);
    button2.alpha = 0.5;
    [self.containerView addSubview:button2];

    //enable rasterization for the translucent button
    //button2.layer.shouldRasterize = YES;
    //button2.layer.rasterizationScale = [UIScreen mainScreen].scale;
}

@end
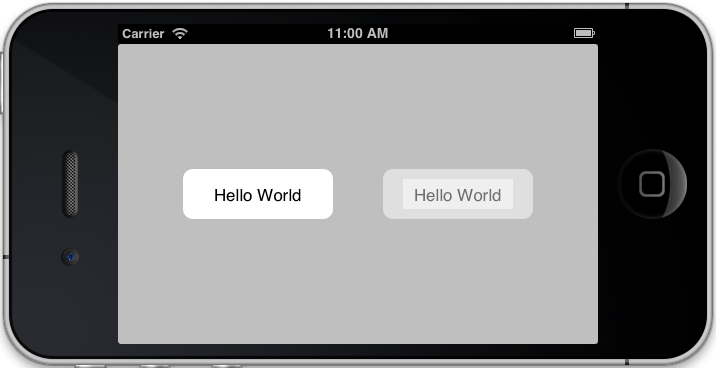
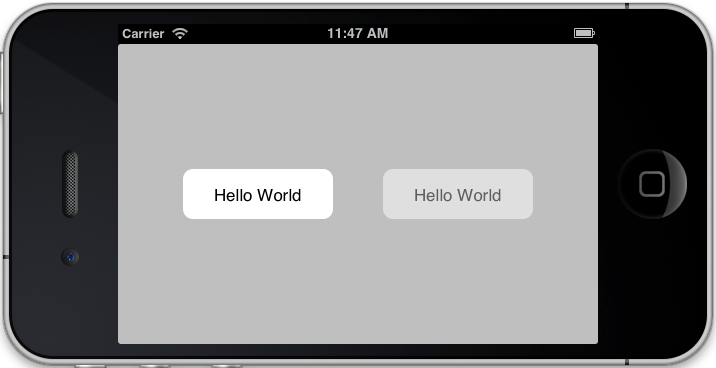
button的背景和其subView label的背景同为白色,
左边的button是不透明的,右边用同样方式创建的button透明度为50%,发现右边的label透明度不同于button
其实很容易发现原因,将button透明度设为50%后,button显示50%自己的颜色和其后面50%的颜色,label在
button上面,label也是50%显示择机的颜色,但后面有已经50%透明的button,还要再显示它的50%,即原
button的25%,重合后为75%,即出现上图效果。
有两种解决方法:
1.在工程的Info.plist文件中,添加UIViewGroupOpacity并设为YES

2.设置layer属性shouldRasterize,设为YES可在设置opacity属性时将layer及其sublayer叠加为一张图像
修改代码,
- (void)viewDidLoad
{
    [super viewDidLoad];

    //create opaque button
    UIButton *button1 = [self customButton];
    button1.center = CGPointMake(50, 150);
    [self.containerView addSubview:button1];

    //create translucent button
    UIButton *button2 = [self customButton];
    button2.center = CGPointMake(250, 150);
    button2.alpha = 0.5;
    [self.containerView addSubview:button2];

    //enable rasterization for the translucent button
    button2.layer.shouldRasterize = YES;
    button2.layer.rasterizationScale = [UIScreen mainScreen].scale;
}


 被折叠的 条评论
为什么被折叠?
被折叠的 条评论
为什么被折叠?
 到【灌水乐园】发言


