


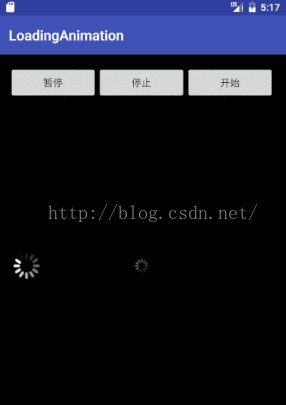
实现效果
功能说明
简单的载入视图和载入动画,相信大家一听名字就知道是些什么功能了,本Demo主要实现了安卓逐帧动画的开始播放,暂停和停止功能,适用于新手及新学习Android的码友们,老玩家当然也可以看看,这个还是挺简单挺实用的,在后面会简略介绍实现方法及源代码,同时博客的最后还提供源代码和图片等资源github下载地址。
实现步骤
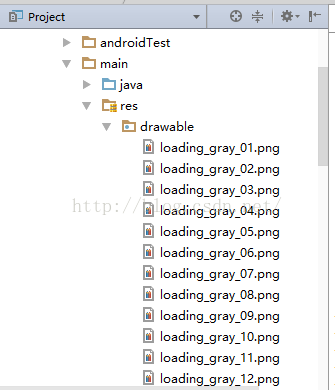
步骤一:添加逐帧动画资源
顾名思义,逐帧动画就是一帧一帧的播放,在Android原生组件不主持gif的情况下,我们要实现逐帧动画只能使用一张一张图片来逐帧播放以达到效果,如下面的几张图(其他图片资源在源代码内,需要的自行下载,有白色和灰色两套资源):


将所有帧图片导入到Android项目目录的drawable文件夹下:
步骤二:新建逐帧动画Drawable
在drawable目录下新建xml,取名loading_progress_gray_rotate,输入如下代码(附属性说明):
animation-list:Android动画列表
oneshot:true播放一次,false循环播放
item:每项动画
android:drawable:图片索引
android:duration:每帧持续时间
<?xml version="1.0" encoding="utf-8"?>
<animation-list xmlns:android="http://schemas.android.com/apk/res/android"
    android:oneshot="false" >

    <item android:duration="100" android:drawable="@drawable/loading_gray_01">
    </item>
    <item android:duration="100" android:drawable="@drawable/loading_gray_02">
    </item>
    <item android:duration="100" android:drawable="@drawable/loading_gray_03">
    </item>
    <item android:duration="100" android:drawable="@drawable/loading_gray_04">
    </item>
    <item android:duration="100" android:drawable="@drawable/loading_gray_05">
    </item>
    <item android:duration="100" android:drawable="@drawable/loading_gray_06">
    </item>
    <item android:duration="100" android:drawable="@drawable/loading_gray_07">
    </item>
    <item android:duration="100" android:drawable="@drawable/loading_gray_08">
    </item>
    <item android:duration="100" android:drawable="@drawable/loading_gray_09">
    </item>
    <item android:duration="100" android:drawable="@drawable/loading_gray_10">
    </item>
    <item android:duration="100" android:drawable="@drawable/loading_gray_11">
    </item>
    <item android:duration="100" android:drawable="@drawable/loading_gray_12">
    </item>

</animation-list>
步骤三:新建自定义动画类
新建类ListAniImageView,代码如下,此类主要继承自ImageView,实现了基本动画播放,暂停和停止功能,注意包名改为自己的:
package com.jaiky.test.loadinganimation;

import android.content.Context;
import android.graphics.drawable.AnimationDrawable;
import android.util.AttributeSet;
import android.widget.ImageView;

/**
 * Author by Jaiky, Email jaikydota@163.com, Date on 9/22/2016.
 * PS: Not easy to write code, please indicate.
 */
public class ListAniImageView extends ImageView {

    private AnimationDrawable animationDrawable;

    public ListAniImageView(Context context) {
        super(context);
        inti();

    }

    public ListAniImageView(Context context, AttributeSet attrs) {
        super(context, attrs);
        inti();
    }

    public ListAniImageView(Context context, AttributeSet attrs, int defStyleAttr) {
        super(context, attrs, defStyleAttr);
        inti();
    }

    public void inti() {
        animationDrawable = (AnimationDrawable) getDrawable();
        animationDrawable.start();
    }

    public void startAnimation() {
        animationDrawable.start();
    }

    public void stopAnimation() {
        animationDrawable.setVisible(true, true);
        animationDrawable.stop();
    }

    public void pauseAnimation() {
        animationDrawable.stop();
    }

}
步骤四:Demo测试修改布局和主类
修改activity_main.xml内容如下(注意自定义控件包名):
<?xml version="1.0" encoding="utf-8"?>
<RelativeLayout xmlns:android="http://schemas.android.com/apk/res/android"
    xmlns:tools="http://schemas.android.com/tools"
    android:layout_width="match_parent"
    android:layout_height="match_parent"
    android:background="@android:color/black"
    android:paddingBottom="@dimen/activity_vertical_margin"
    android:paddingLeft="@dimen/activity_horizontal_margin"
    android:paddingRight="@dimen/activity_horizontal_margin"
    android:paddingTop="@dimen/activity_vertical_margin"
    tools:context="com.jaiky.test.loadinganimation.MainActivity">

    <LinearLayout
        android:layout_width="match_parent"
        android:layout_height="wrap_content"
        android:orientation="horizontal">

        <Button
            android:id="@+id/btn1"
            android:text="暂停"
            android:layout_width="0dp"
            android:layout_height="wrap_content"
            android:layout_weight="1" />

        <Button
            android:id="@+id/btn2"
            android:text="停止"
            android:layout_width="0dp"
            android:layout_height="wrap_content"
            android:layout_weight="1" />

        <Button
            android:id="@+id/btn3"
            android:text="开始"
            android:layout_width="0dp"
            android:layout_height="wrap_content"
            android:layout_weight="1" />
    </LinearLayout>

    <com.jaiky.test.loadinganimation.ListAniImageView
        android:id="@+id/flGray"
        android:layout_width="35dp"
        android:layout_height="35dp"
        android:layout_centerInParent="true"
        android:src="@drawable/loading_progress_gray_rotate" />

    <com.jaiky.test.loadinganimation.ListAniImageView
            android:id="@+id/flWhite"
        android:layout_width="50dp"
        android:layout_height="50dp"
        android:layout_centerVertical="true"
        android:src="@drawable/loading_progress_white_rotate" />
</RelativeLayout>
修改MainActiivty内容如下(注意包名):
package com.jaiky.test.loadinganimation;

import android.support.v7.app.AppCompatActivity;
import android.os.Bundle;
import android.view.View;
import android.widget.Button;

public class MainActivity extends AppCompatActivity {

    Button btn1, btn2, btn3;
    ListAniImageView flWhite, flGray;

    Object mObject;

    @Override
    protected void onCreate(Bundle savedInstanceState) {
        super.onCreate(savedInstanceState);
        setContentView(R.layout.activity_main);
        btn1 = (Button) findViewById(R.id.btn1);
        btn2 = (Button) findViewById(R.id.btn2);
        btn3 = (Button) findViewById(R.id.btn3);
        flWhite = (ListAniImageView) findViewById(R.id.flWhite);
        flGray = (ListAniImageView) findViewById(R.id.flGray);

        //暂停动画(停留在当前帧)
        btn1.setOnClickListener(new View.OnClickListener() {
            @Override
            public void onClick(View v) {
                flWhite.pauseAnimation();
                flGray.pauseAnimation();
            }
        });
        //停止动画(停止到第一帧)
        btn2.setOnClickListener(new View.OnClickListener() {
            @Override
            public void onClick(View v) {
                flWhite.stopAnimation();
                flGray.stopAnimation();
            }
        });
        //开始动画
        btn3.setOnClickListener(new View.OnClickListener() {
            @Override
            public void onClick(View v) {
                flWhite.startAnimation();
                flGray.startAnimation();
            }
        });
    }
}
--------------------------------------------------------------------------------------------------------------------
获取源代码及资源文件:
--------------------------------------------------------------------------------------------------------------------


 535
535


 被折叠的 条评论
为什么被折叠?
被折叠的 条评论
为什么被折叠?
 到【灌水乐园】发言


