


首先来看一下 手淘HD - 商品详情 - 选择商品属性 页面的UI
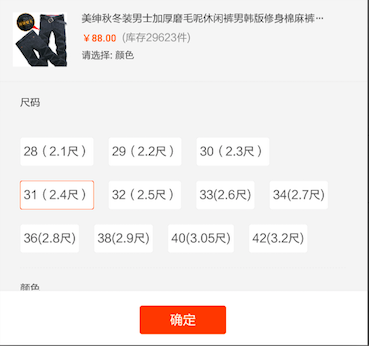
商品有很多尺码,而且展现每个尺码所需要的View的大小也不同(主要是宽度),所以在从服务器端拉到数据之前,展现所有尺码所需要的行数和每一行的个数都无法确定,因此不能直接使用GridView或ListView。
如果使用LinearLayout呢?
一个LinearLayout只能显示一行,如果要展示多行,则每一行都要new一个LinearLayout出来,而且还必须要计算出每一个LinearLayout能容纳多少个尺码对应的View,实现起来也会比较复杂。
其实要实现这个功能,只需要借鉴一下CSS3的flex-box就可以了。

要实现一个Android版本的flexbox,原理非常简单,为了与Android的命名规范保持一致,我们称之为FlowLayout。
- 首先新建一个
FlowLayout类,继承自ViewGroup - 在
onMeasure中根据 child views 计算出FlowLayout高度 - 在
onLayout中对child views 的进行布局(layout)
下面只列出了最核心的代码片段,完整代码已经放到Github上-AndroidFlowLayout,欢迎fork。
在onMeasure中计算FlowLayout的高度
<code class="language-java hljs " style="box-sizing: border-box; font-family: 'Source Code Pro', monospace;font-size:undefined; padding: 0.5em; color: rgb(0, 0, 0); border-top-left-radius: 0px; border-top-right-radius: 0px; border-bottom-right-radius: 0px; border-bottom-left-radius: 0px; display: block; background-color: transparent !important;"><span class="hljs-comment" style="box-sizing: border-box; color: rgb(136, 136, 136);">// 遍历所有的子View</span>
<span class="hljs-keyword" style="box-sizing: border-box; font-weight: bold;">for</span> (<span class="hljs-keyword" style="box-sizing: border-box; font-weight: bold;">int</span> i = <span class="hljs-number" style="box-sizing: border-box; color: rgb(0, 136, 0);">0</span>, childCount = getChildCount(); i < childCount; ++i) {
    View childView = getChildAt(i);
    <span class="hljs-comment" style="box-sizing: border-box; color: rgb(136, 136, 136);">// measure子View,并获取它的宽度和高度</span>
    LayoutParams childLayoutParams = childView.getLayoutParams();
    childView.measure(
            getChildMeasureSpec(widthMeasureSpec, paddingLeft + paddingRight, childLayoutParams.width),
            getChildMeasureSpec(heightMeasureSpec, paddingTop + paddingBottom, childLayoutParams.height));
    <span class="hljs-keyword" style="box-sizing: border-box; font-weight: bold;">int</span> childWidth = childView.getMeasuredWidth();
    <span class="hljs-keyword" style="box-sizing: border-box; font-weight: bold;">int</span> childHeight = childView.getMeasuredHeight();
    <span class="hljs-comment" style="box-sizing: border-box; color: rgb(136, 136, 136);">// 计算当前行的高度(当前行所有子View中最高的那个)</span>
    lineHeight = Math.max(childHeight, lineHeight);

    <span class="hljs-comment" style="box-sizing: border-box; color: rgb(136, 136, 136);">// 把当前child view放到上一个child view的右边,如果放不下,则换行</span>
    <span class="hljs-keyword" style="box-sizing: border-box; font-weight: bold;">if</span> (childLeft + childWidth + paddingRight > myWidth) {
        childLeft = paddingLeft;
        childTop += mVerticalSpacing + lineHeight;
        lineHeight = childHeight;
    } <span class="hljs-keyword" style="box-sizing: border-box; font-weight: bold;">else</span> {
        childLeft += childWidth + mHorizontalSpacing;
    }
}

<span class="hljs-keyword" style="box-sizing: border-box; font-weight: bold;">int</span> wantedHeight = childTop + lineHeight + paddingBottom;
<span class="hljs-comment" style="box-sizing: border-box; color: rgb(136, 136, 136);">// 计算FlowLayout所需要高度</span>
setMeasuredDimension(myWidth, resolveSize(wantedHeight, heightMeasureSpec));</code>
在onLayout中对child views进行布局
代码与onMeasure非常类似,只需要根据child view的宽度和高度放到指定位置即可。
<code class="language-java hljs " style="box-sizing: border-box; font-family: 'Source Code Pro', monospace;font-size:undefined; padding: 0.5em; color: rgb(0, 0, 0); border-top-left-radius: 0px; border-top-right-radius: 0px; border-bottom-right-radius: 0px; border-bottom-left-radius: 0px; display: block; background-color: transparent !important;"><span class="hljs-keyword" style="box-sizing: border-box; font-weight: bold;">for</span> (<span class="hljs-keyword" style="box-sizing: border-box; font-weight: bold;">int</span> i = <span class="hljs-number" style="box-sizing: border-box; color: rgb(0, 136, 0);">0</span>, childCount = getChildCount(); i < childCount; ++i) {
    View childView = getChildAt(i);

    <span class="hljs-keyword" style="box-sizing: border-box; font-weight: bold;">if</span> (childView.getVisibility() == View.GONE) {
        <span class="hljs-keyword" style="box-sizing: border-box; font-weight: bold;">continue</span>;
    }

    <span class="hljs-keyword" style="box-sizing: border-box; font-weight: bold;">int</span> childWidth = childView.getMeasuredWidth();
    <span class="hljs-keyword" style="box-sizing: border-box; font-weight: bold;">int</span> childHeight = childView.getMeasuredHeight();

    lineHeight = Math.max(childHeight, lineHeight);

    <span class="hljs-keyword" style="box-sizing: border-box; font-weight: bold;">if</span> (childLeft + childWidth + paddingRight > myWidth) {
        childLeft = paddingLeft;
        childTop += mVerticalSpacing + lineHeight;
        lineHeight = childHeight;
    }

    <span class="hljs-comment" style="box-sizing: border-box; color: rgb(136, 136, 136);">// 关键代码</span>
    childView.layout(childLeft, childTop, childLeft + childWidth, childTop + childHeight);
    childLeft += childWidth + mHorizontalSpacing;
}</code>
完整版代码已经放到Github-FlowLayout,打出来的aar包已经上传到了bintray,使用方式非常简单,只需要在项目(project)对应的build.gradle中添加一条dependency即可。
<code class=" hljs nginx" style="box-sizing: border-box; font-family: 'Source Code Pro', monospace;font-size:undefined; padding: 0.5em; color: rgb(0, 0, 0); border-top-left-radius: 0px; border-top-right-radius: 0px; border-bottom-right-radius: 0px; border-bottom-left-radius: 0px; display: block; background-color: transparent !important;"><span class="hljs-title" style="box-sizing: border-box; font-weight: bold;">compile</span> <span class="hljs-string" style="box-sizing: border-box; color: rgb(136, 0, 0);">'com.liangfeizc:flowlayout:1.0.0<span class="hljs-variable" style="box-sizing: border-box;">@aar</span>'</span></code>
把aar包上传到 jCenter
具体做法可参考 publishing gradle android library to jcenter
打包脚本可参考 flowlayout/build.gradle
有问题请留言。よろしくお願いします


 231
231

 被折叠的 条评论
为什么被折叠?
被折叠的 条评论
为什么被折叠?
 到【灌水乐园】发言


