


AJAX上传文件通过Web API或 http handler
Upload file using jQuery AJAX in ASP.NET Web API
This article provides an easy way to upload an image file using jQuery AJAX in ASP.NET Web API.
Upload Idea:
The idea here is to add the uploaded file's content to the FormData's collection by jQuery and in the action/method get the posted file's content from the Files' collection by a key.
In the next walk-through I will show how to add a Web API controller to an empty ASP.NET web application and how the file will be posted through jQuery AJAX to the controller's action.
Steps
1. Add an empty ASP.NET Web application as follows. The below mentioned walk-through for this demo application is created by using Visual Studio 2013.
From Visual Studio click "New Project" and then from the Templates tab select Visual C#. From the list of template categories, select ASP.NET Web Application. Provide a name for the web application and click the "OK" button.
![]()
2. The next window will ask for the type of ASP.NET Web Application template you want to apply. Choose "Empty" and click "OK" button. It will create an empty web application which will contain packages.config andWeb.config files.
![]()
3. Now let's add the "Global.asax" file which is essential for an ASP.NET Web Application. Right click on the Project in Visual Studio and select Add -> New Item. It will display the "Add New Item" window as follows. Choose "Global Application Class" file from the list as highlighted below.

4. Then we have to add the ASP.NET Web API package to the project. To do so, right-click on the project in Visual Studio and select "Manage Nuget Packages".

It will display the "Manage Nuget Packages" window and from the left side select "Online" tab and search for "Microsoft.AspNet.WebApi". The results will be similar to below screenshot:
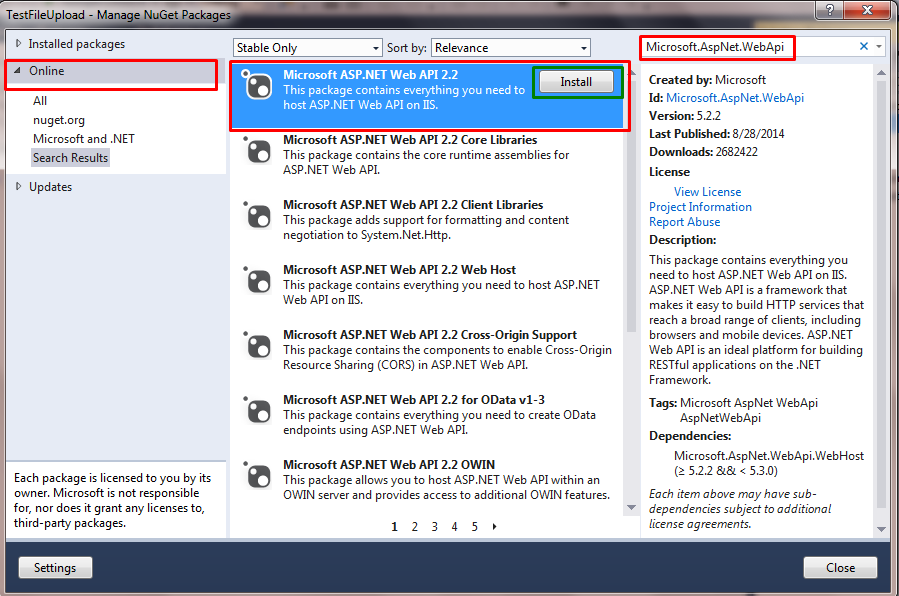
Select "Microsoft ASP.NET Web API 2.2" and click the "Install" button. Note that the version of the Web API may vary as when the article was written the latest available version was 2.2. After the package is downloaded if it will ask for license acceptance click "I Accept" button.
You can install the Web API nuget package from the Package Manager Console(View -> Other Windows -> Package Manager Console) by using the following command:
Install-Package Microsoft.AspNet.WebApi
It will install the latest Web API package to the project.
5. Now we have successfully installed the Web API package. Let's add a simple class which will act as the controller. It will contain an action i.e method which will handle the file upload.
Right click on the project in Visual Studio and select Add -> Class. Name it like "FileUploadController.cs". By convention, all the controller class file names are suffix with "controller".

Now go to "FileUploadController.cs" class file and inherit it from "ApiController". Every ASP.NET Web API controller files are inherited from this "ApiController".
public class FileUploadController : ApiController
6. We have added the controller. We need to register a route for this controller. For that, go to "Global.asax.cs" fileand register a route like follows:
GlobalConfiguration.Configure(config =>
{
     config.MapHttpAttributeRoutes();

     config.Routes.MapHttpRoute(
          name: "DefaultApi",
          routeTemplate: "api/{controller}/{action}/{id}",
          defaults: new { id = RouteParameter.Optional }
          );
});
Here the {controller}, {action} and {id} are the keywords for the route. The Web API controller is registered with a route where the path is prefixed with "/api".
7. Let's add an action i.e method inside "FileUploadController.cs" file which will handle the file upload operation.
[HttpPost]
public void UploadFile()
{
    if (HttpContext.Current.Request.Files.AllKeys.Any())
    {
       // Get the uploaded image from the Files collection
       var httpPostedFile = HttpContext.Current.Request.Files["UploadedImage"];

       if (httpPostedFile != null)
       {
	   // Validate the uploaded image(optional)

	   // Get the complete file path
           var fileSavePath = Path.Combine(HttpContext.Current.Server.MapPath("~/UploadedFiles"), httpPostedFile.FileName);

	    // Save the uploaded file to "UploadedFiles" folder
	    httpPostedFile.SaveAs(fileSavePath);
	}
     }
}
The UploadFile() method/action is only accessible by POST request as it is assiged with [HttpPost] attribute.
The uploaded files are saved to "UploadedFiles" folder. You can add an empty folder by right-clicking on the project and select Add -> New Folder.
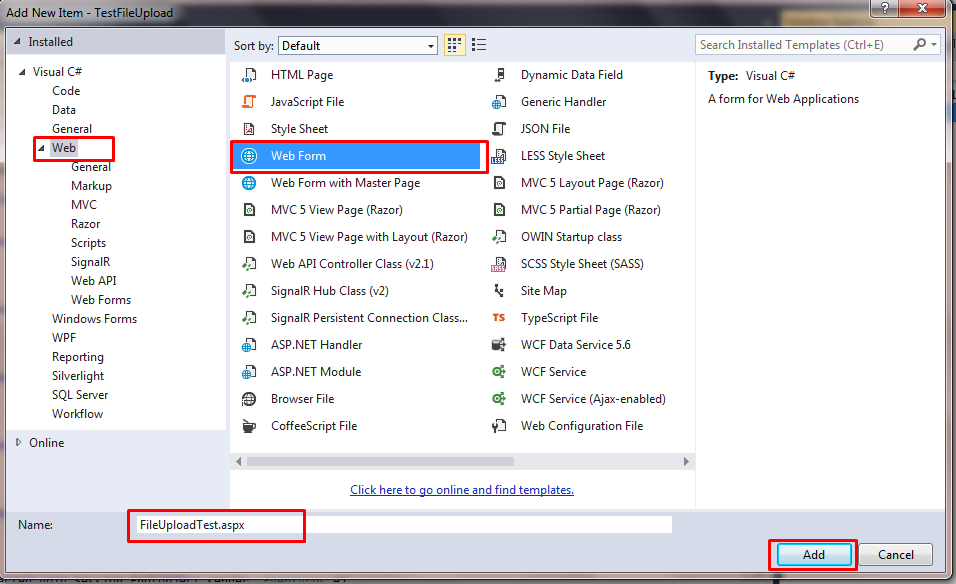
8. Let's add an ".aspx" page which will upload the file. right-click on the project -> Add -> New Item
From the "Add New Item" window select "Web Form" and give a name for it. Set the newly added ".aspx" page as start page for the project. To do so, right-click on the ".aspx"page and select "Set As Start Page" option from the context menu.
Let's add the HTML controls i.e for this case add a file upload control and a button. The file upload control will browse the file which will be uploaded on button click.
<div><label for="fileUpload">Select File to Upload: <input id="fileUpload" type="file" />

<input id="btnUploadFile" type="button" value="Upload File" /></div>
9. Now we are left with only one change i.e adding jQuery code to save the file content to FormData's collection. First let's add a reference to jQuery from Google CDN library as follows:
<script src="//ajax.googleapis.com/ajax/libs/jquery/2.1.1/jquery.min.js">
The code shown next adds the file content to FormData's collection.
 Copy Code
<script type="text/javascript">
$(document).ready(function () {

   $('#btnUploadFile').on('click', function () {

      var data = new FormData();

      var files = $("#fileUpload").get(0).files;

      // Add the uploaded image content to the form data collection
      if (files.length > 0) {
           data.append("UploadedImage", files[0]);
      }

      // Make Ajax request with the contentType = false, and procesDate = false
      var ajaxRequest = $.ajax({
           type: "POST",
           url: "/api/fileupload/uploadfile",
           contentType: false,
           processData: false,
           data: data
           });

      ajaxRequest.done(function (xhr, textStatus) {
                    // Do other operation
             });
   });
});
</script>
Here we are making an jQuery AJAX request to UploadFile() action of FileUploadController.cs file with path "/api/fileupload/uploadfile".
Note: The contentType and processData is set to false which is important.
You can see the uploaded content is added to the FormData's collection with key "UploadedImage" which is also used to retrieve the uploaded file's content inside the UploadFile() action.
// Get the uploaded image from the Files collection
var httpPostedFile = HttpContext.Current.Request.Files["UploadedImage"];
Now run the application and from the "FileUploadTest.aspx" page(it may vary if you have given other name in step #8) you can a upload file.
This idea can also be applied to ASP.NET MVC Controller to upload a file by jQuery AJAX.
How to change the size limitation to upload large files?
If you want to upload large file(maximum 2 GB!) then you need to change the <httpRuntime>and <requestLimits> default settings in Web.config file like follows:
<system.web>
  <httpRuntime executionTimeout="240000" maxRequestLength="2147483647" />
</system.web>

<security>
  <requestFiltering>
    <requestLimits maxAllowedContentLength="4294967295"/>
  </requestFiltering>
</security>
executionTimeout
It is the maximum number of seconds a request is allowed to execute before being automatically shut down by ASP.NET. The value is in seconds.
Default Value: For ASP.NET 1.x it is 90 seconds and for ASP.NET 2.0 or higher it is 110 seconds.
Maximum Value: Theoretically its maximum value is the maximum value of TimeSpani.e 10675199.02:48:05.4775807. The value of this setting is ignored in debug mode.
maxRequestLength
It is the maximum allowed request length. The value is in K.B(Kilo Bytes).
Default Value: 4 MB
Maximum Value: Theoretically its maximum value is the maximum value of int i.e 2147483647.
It specifies the maximum length of content in a request. The value is in bytes.
Default Value: 30000000 bytes(~29 MB)
Maximum Value: Theoretically its maximum value is the maximum value of uint(unsigned interger) i.e 4294967295.


 296
296

 被折叠的 条评论
为什么被折叠?
被折叠的 条评论
为什么被折叠?
 到【灌水乐园】发言


