


Handling Player Input处理用户输入
As you saw in Chapter 1, capturing the keyboard and gamepad input is quite easy in XNA. Writing an extra unit test just for that would be overkill; you already know how this works and you just want to test controlling the paddles here. You don’t even need a new unit test; you can just use the TestGameSprites test and maybe rename it to TestSingleplayerGame. The content of the unit test stays the same; you will now just change input handling and update the paddle positions in the Update method of PongGame:
正如你在第一张所见,捕获键盘和手柄的输入对XNA来说是非常简单的。为这个写一个额外的单元测试是多余的。你已经知道了这是如何工作的,并只想测试一下控制挡板。你不需要写一个新的单元测试,你可以使用TestGameSprites来测试,或者将它重命名为TestSingleplayerGame。单元测试的内容还是一样,你只需要在PongGame的Update方法中改变输入处理和更新档版的位置。
You might see a few new variables here (multiplayer, gamePad, gamePad2, keyboard, and ComputerPaddleSpeed), but this section focuses on the code that changes the paddle positions for now. To make sure you always move the ball and the paddles at the same speed no matter how many frames you get, moveFactorPerSecond is calculated. moveFactorPerSecond will be 1 for 1 fps (frame per second), 0.1 for 10 fps, 0.01 for 100 fps, and so on.
 //
Get current gamepad and keyboard states
//
获得当前手柄和键盘状态
gamePad
=
GamePad.GetState(PlayerIndex.One);gamePad2
=
GamePad.GetState(PlayerIndex.Two);keyboard
=
Keyboard.GetState();gamePadUp
=
gamePad.DPad.Up
==
ButtonState.Pressed
||
gamePad.ThumbSticks.Left.Y
>
0.5f
;gamePadDown
=
gamePad.DPad.Down
==
ButtonState.Pressed
||
gamePad.ThumbSticks.Left.Y
<
-
0.5f
;gamePad2Up
=
gamePad2.DPad.Up
==
ButtonState.Pressed
||
gamePad2.ThumbSticks.Left.Y
>
0.5f
;gamePad2Down
=
gamePad2.DPad.Down
==
ButtonState.Pressed
||
gamePad2.ThumbSticks.Left.Y
<
-
0.5f
;
//
Move half way across the screen each second
//
每秒移动屏幕的一半路程
float
moveFactorPerSecond
=
0.5f
*
(
float
)gameTime.ElapsedRealTime.TotalMilliseconds
/
1000.0f
;
//
Move up and down if we press the cursor or gamepad keys.
//
当按下方向键或手柄是上下移动
if
(gamePadUp
||
keyboard.IsKeyDown(Keys.Up)) rightPaddlePosition
-=
moveFactorPerSecond;
if
(gamePadDown
||
keyboard.IsKeyDown(Keys.Down)) rightPaddlePosition
+=
moveFactorPerSecond;
//
Second player is either controlled by player 2 or by the computer
//
第二位玩家2可以是玩家2操作也可以是电脑
if
(multiplayer)
//
Get current gamepad and keyboard states
//
获得当前手柄和键盘状态
gamePad
=
GamePad.GetState(PlayerIndex.One);gamePad2
=
GamePad.GetState(PlayerIndex.Two);keyboard
=
Keyboard.GetState();gamePadUp
=
gamePad.DPad.Up
==
ButtonState.Pressed
||
gamePad.ThumbSticks.Left.Y
>
0.5f
;gamePadDown
=
gamePad.DPad.Down
==
ButtonState.Pressed
||
gamePad.ThumbSticks.Left.Y
<
-
0.5f
;gamePad2Up
=
gamePad2.DPad.Up
==
ButtonState.Pressed
||
gamePad2.ThumbSticks.Left.Y
>
0.5f
;gamePad2Down
=
gamePad2.DPad.Down
==
ButtonState.Pressed
||
gamePad2.ThumbSticks.Left.Y
<
-
0.5f
;
//
Move half way across the screen each second
//
每秒移动屏幕的一半路程
float
moveFactorPerSecond
=
0.5f
*
(
float
)gameTime.ElapsedRealTime.TotalMilliseconds
/
1000.0f
;
//
Move up and down if we press the cursor or gamepad keys.
//
当按下方向键或手柄是上下移动
if
(gamePadUp
||
keyboard.IsKeyDown(Keys.Up)) rightPaddlePosition
-=
moveFactorPerSecond;
if
(gamePadDown
||
keyboard.IsKeyDown(Keys.Down)) rightPaddlePosition
+=
moveFactorPerSecond;
//
Second player is either controlled by player 2 or by the computer
//
第二位玩家2可以是玩家2操作也可以是电脑
if
(multiplayer)
 ...
{
...
{ // Move up and down if we press the cursor or gamepad keys. if (gamePad2Up || keyboard.IsKeyDown(Keys.W)) leftPaddlePosition -= moveFactorPerSecond; if (gamePad2Down || keyboard.IsKeyDown(Keys.S)) leftPaddlePosition += moveFactorPerSecond;
 }
//
if
else
...
{// Just let the computer follow the ball position// 让电脑跟着球的位置 float computerChange = ComputerPaddleSpeed * moveFactorPerSecond; if (leftPaddlePosition > ballPosition.Y + computerChange) leftPaddlePosition -= computerChange; else if (leftPaddlePosition < ballPosition.Y - computerChange) leftPaddlePosition += computerChange;}
//
else
//
Make sure paddles stay between 0 and 1
//
保证挡板位置在0和1之间
if
(leftPaddlePosition
<
0
) leftPaddlePosition
=
0
;
if
(leftPaddlePosition
>
1
) leftPaddlePosition
=
1
;
if
(rightPaddlePosition
<
0
) rightPaddlePosition
=
0
;
if
(rightPaddlePosition
>
1
) rightPaddlePosition
=
1
;
}
//
if
else
...
{// Just let the computer follow the ball position// 让电脑跟着球的位置 float computerChange = ComputerPaddleSpeed * moveFactorPerSecond; if (leftPaddlePosition > ballPosition.Y + computerChange) leftPaddlePosition -= computerChange; else if (leftPaddlePosition < ballPosition.Y - computerChange) leftPaddlePosition += computerChange;}
//
else
//
Make sure paddles stay between 0 and 1
//
保证挡板位置在0和1之间
if
(leftPaddlePosition
<
0
) leftPaddlePosition
=
0
;
if
(leftPaddlePosition
>
1
) leftPaddlePosition
=
1
;
if
(rightPaddlePosition
<
0
) rightPaddlePosition
=
0
;
if
(rightPaddlePosition
>
1
) rightPaddlePosition
=
1
;
在这里你会看到一些新的变量(multiplayer, gamePad, gamePad2, keyboard, 和 ComputerPaddleSpeed),但眼下关注的是可以改变挡板位置的那部分代码。确定球和挡板都以同样的速度运动而无论帧数的快慢,moveFactorPerSecond用于计算。如果每秒一帧则moveFactorPerSecond为1,每秒10帧则为0.1,每秒100帧则为0.01,以此类推。
Next you will change the right paddle position if up or down buttons or cursor keys are pressed. The left paddle is either controlled by player 2 using a second gamepad if available or the W and S keys. If multiplayer is not true you are in singleplayer mode and the left paddle is controlled by the computer, which just follows the ball limited by the ComputerPaddleSpeed, which is 0.5f. The ball will initially move much slower, but the speed gets increased at each contact and you can also hit the ball with the edge of the paddles to make it speed up. Then the computer will not catch up and you can win.
下一步你要根据按键情况来改变右挡板的位置。左挡板可以由玩家2用第二个手柄或W和S键来控制。如果multiplayer非真,这你就是在单人模式,左挡板将由电脑来控制,以ComputerPaddleSpeed = 0.5f的速度来追踪球。一开始球比挡板运动慢得多,但是你可以通过用挡板的边角撞击球来不断的提高球的速度。这样电脑就会跟不上球的速度,你就可以赢得游戏的胜利了。
To make the new Update method work, add the new variables and constants:
添加新的变量和常数,让Update正常运行:
For the current test you just need the variables I mentioned before. However, take a look at all the rest of the variables you need for the game. BallSpeedMultiplicator determinates how fast the ball is and therefore how fast the game is. The game mode is used to handle all the three game modes you can be in. Either you just started the game and are in the menu or you are in the game. When you are in the game, but one player lost, the mode is changed to the game over state, showing the winner.
/**/
/// <summary>/// Ball speed multiplicator, this is how much screen space the ball/// will travel each second.///球的速度乘数,决定球每秒钟在屏幕上运动多少/// </summary>
const
float
BallSpeedMultiplicator
=
0.5f
;
/**/
/// <summary>/// Computer paddle speed. If the ball moves faster up or down than/// this, the computer paddle can't keep up and finally we will win./// 电脑挡板的速度。如果球的速度快于挡板的速度,电脑就会跟不上,最终你会胜利。/// </summary>
const
float
ComputerPaddleSpeed
=
0.5f
;
/**/
/// <summary>/// Game modes/// 游戏模式/// </summary>
enum
GameMode
...
{ Menu, Game, GameOver,}
//
enum GameMode
GamePadState gamePad, gamePad2;KeyboardState keyboard;
bool
gamePadUp
=
false
, gamePadDown
=
false
, gamePad2Up
=
false
, gamePad2Down
=
false
;
/**/
/// <summary>/// Are we playing a multiplayer game? If this is false, the computer/// controls the left paddle./// 是否在双人模式。否则电脑控制左挡板。/// </summary>
bool
multiplayer
=
false
;
/**/
/// <summary>/// Game mode we are currently in. Very simple game flow./// 我们现处的游戏模式。一个简单的游戏流程。/// </summary>
GameMode gameMode
=
GameMode.Menu;
/**/
/// <summary>/// Currently selected menu item./// 当前选择的菜单选项。/// </summary>
int
currentMenuItem
=
0
;
对于现在的测试你只需要我之前提到的那些变量。再看看游戏所需要的其它变量。BallSpeedMultiplicator决定球的速度同时也是游戏的速度。游戏模式处理你可以在的三个模式。你或者刚开始游戏在菜单画面或者在游戏中。当你处于游戏中时,但一个玩家输了,模式就转换到游戏结束状态,显示胜利者。
You don’t need this code yet, but it is the last part of input you have to handle, so take a look at the input for the menu:
你还不需要这些代码,但是这是你要处理的输入操作的最后部分,所以看看菜单的输入操作:
There are a few new variables like remDownPressed or gamePadUp, which are used to make handling the input a little easier. Check out the source code for additional details. The next chapter discusses the Input helper class in more detail, and that will simplify the process even more.
//
Show screen depending on our current screen mode
if
(gameMode
==
GameMode.Menu)
...
{ // Show menu RenderSprite(menuTexture, 512-XnaPongLogoRect.Width/2, 150, XnaPongLogoRect); RenderSprite(menuTexture, 512-MenuSingleplayerRect.Width/2, 300, MenuSingleplayerRect, currentMenuItem == 0 ? Color.Orange : Color.White); RenderSprite(menuTexture, 512-MenuMultiplayerRect.Width/2, 350, MenuMultiplayerRect, currentMenuItem == 1 ? Color.Orange : Color.White); RenderSprite(menuTexture, 512-MenuExitRect.Width/2, 400, MenuExitRect, currentMenuItem == 2 ? Color.Orange : Color.White); if ((keyboard.IsKeyDown(Keys.Down) || gamePadDown) && remDownPressed == false)
 ...{ currentMenuItem = (currentMenuItem + 1)%3;
 } // else if else if ((keyboard.IsKeyDown(Keys.Up) || gamePadUp) && remUpPressed == false) ...{ currentMenuItem = (currentMenuItem + 2)%3; } // else if else if ((keyboard.IsKeyDown(Keys.Space) || keyboard.IsKeyDown(Keys.LeftControl) || keyboard.IsKeyDown(Keys.RightControl) || keyboard.IsKeyDown(Keys.Enter) || gamePad.Buttons.A == ButtonState.Pressed || gamePad.Buttons.Start == ButtonState.Pressed || // Back or Escape exits our game keyboard.IsKeyDown(Keys.Escape) || gamePad.Buttons.Back == ButtonState.Pressed) && remSpaceOrStartPressed == false && remEscOrBackPressed == false) ...{ // Quit app. if (currentMenuItem == 2 || keyboard.IsKeyDown(Keys.Escape) || gamePad.Buttons.Back == ButtonState.Pressed) ...{ this.Exit(); } // if else ...{ // Start game.. handle game, etc. ..
有几个像remDownPressed 或 gamePadUp的新变量,它们用来使输入处理更简单。详见源代码。下一章更详细的讨论Input辅助类,这会更大的简化处理。
That’s all you need to know for handling the input in this Pong game. If you execute the unit test again you can still see the same screen as before, but you can now control the paddles.
这些就是在Pong游戏中所需要知道的关于输入处理的所有内容。如果你再次运行这个单元测试,你会看到和之前一样的画面,但是现在你可以控制挡板了。
Collision Testing碰撞测试
To move the ball away from the middle, the following method has to be called in your unit test TestSingleplayerGame. The ball moves to a random location (at least randomly in the four directions you have defined here):
在单元测试TestSingleplayerGame中,调用下面的方法来让球中屏幕中间开始移动。球会向一个随机的位置移动(这里至少在四个方向上是随机的):
In the Update method the ball position gets updated based on the ballSpeedVector:
/**/
/// <summary>/// Start new ball at the beginning of each game and when a ball is/// lost./// 每一次游戏开始时候或丢掉一个球后开始一个新的球/// </summary>
public
void
StartNewBall()
...
{ ballPosition = new Vector2(0.5f, 0.5f); Random rnd = new Random((int)DateTime.Now.Ticks); int direction = rnd.Next(4); ballSpeedVector = direction == 0 ? new Vector2(1, 0.8f) : direction == 1 ? new Vector2(1, -0.8f) : direction == 2 ? new Vector2(-1, 0.8f) : new Vector2(-1, -0.8f);}
//
StartNewBall()
在Update方法中,球的位置依据ballSpeedVector更新:
// Update ball position
ballPosition += ballSpeedVector *
moveFactorPerSecond * BallSpeedMultiplicator;
If you start the game now with your unit test the ball will move away from the center and go out of the screen, which is not really cool. This is why you need collision testing. Take a look at the concept again (see Figure 2-7) and add some improvements for the collision code. This is one of the times it makes sense to go back to the concept and make improvements based on your new ideas and knowledge. There are three kinds of collisions that can happen:
如果你现在就运行你的测试,球将会从屏幕中央飞出屏幕,这看起来就不够酷了。这就是你为什么需要碰撞检验的原因。再看看概念,添加一些碰撞代码来改进游戏。这是又一次让概念更有意义,依靠新的都想和知识来改进游戏。这里将有三种类型的碰撞:

Figure 2-7
§ Collision with Screen Border at the top and bottom screen borders碰撞屏幕的上下边界
§ Collision with a Paddle to push the ball back to the other player碰到挡板后反弹
§ Lose life if collision with screen border behind paddle happens. Player will lose a life when this happens and the ball is reset with the help of StartNewBall.球飞到当班之后碰撞到屏幕边界,失去一条命。如果这种情况发生,玩家将失去一条命,调用StartNewBall将球重置。
You could continue using TestSingleplayerGame to check out the collisions, but it is far easier to construct a few tests and have every single issue tested. Again, unit testing is great for exactly this kind of problem. You have a clear idea on what you have to do now, but you don’t know yet how to do it. Just write a unit test and then work on the implementation:
你可以继续使用TestSingleplayerGame来检测碰撞,但是构造一些新的测试是更容易的方法,对每一项单独的碰撞项目进行测试。我们又一次看到,单元测试非常适合这一类问题。关于你要做什么你有一个清晰的认识,但是你还不知道你该怎么做。写下一个测试并运行:
The idea here is to press 1–5 to set up custom collision test scenes. For example, if 1 is pressed the ball is moved to (0.6, 0.9), which is near the center at the bottom of the screen. The ball speed is set to (1, 1) to make sure it moves to the screen border, where the ball should bounce off as described in the concept. If you press 4 or 5 the advanced paddle tests are started to check if you hit the edges of the right paddle, which requires a little bit more fine-tuning than the other quite simple collision tests. Collision testing is done in the Update method of PongGame.
public
static
void
TestBallCollisions()
...
{ StartTest( delegate ...{ // Make sure we are in the game and in singleplayer mode // 确定我们在游戏中的单人模式 testGame.gameMode = GameMode.Game; testGame.multiplayer = false; testGame.Window.Title = "Xna Pong - Press 1-5 to start collision tests"; // Start specific collision scene based on the user input. // 根据用户输入开始制定的碰撞情况 if (testGame.keyboard.IsKeyDown(Keys.D1)) ...{ // First test, just collide with screen border testGame.ballPosition = new Vector2(0.6f, 0.9f); testGame.ballSpeedVector = new Vector2(1, 1); } // if else if (testGame.keyboard.IsKeyDown(Keys.D2)) ...{ // Second test, straight on collision with right paddle testGame.ballPosition = new Vector2(0.9f, 0.6f); testGame.ballSpeedVector = new Vector2(1, 1); testGame.rightPaddlePosition = 0.7f; } // if else if (testGame.keyboard.IsKeyDown(Keys.D3)) ...{ // Thrid test, straight on collision with left paddle testGame.ballPosition = new Vector2(0.1f, 0.4f); testGame.ballSpeedVector = new Vector2(-1, -0.5f); testGame.leftPaddlePosition = 0.35f; } // if else if (testGame.keyboard.IsKeyDown(Keys.D4)) ...{ // Advanced test to check if we hit the edge of the right paddle // 检查是否碰到有右挡板的边角 testGame.ballPosition = new Vector2(0.9f, 0.4f); testGame.ballSpeedVector = new Vector2(1, -0.5f); testGame.rightPaddlePosition = 0.29f; } // if else if (testGame.keyboard.IsKeyDown(Keys.D5)) ...{ // Advanced test to check if we hit the edge of the right paddle testGame.ballPosition = new Vector2(0.9f, 0.4f); testGame.ballSpeedVector = new Vector2(1, -0.5f); testGame.rightPaddlePosition = 0.42f; } // if // Show lifes testGame.ShowLives(); // Ball in center testGame.RenderBall(); // Render both paddles testGame.RenderPaddles(); });}
//
TestBallCollisions ()
这里有一个好主意,使用1-5来进行不同的碰撞测试。例如,如果按下1,球就会向(0.6,0.9)移动,这个方向朝向画面下方中央附近。球速设为(1,1)来让它飞向画面边界,这里球应该反弹。如果按下4或5就会启动高级部分的挡板测试——碰撞挡板边界,这需要比其他简单的碰撞更多的微调。碰撞测试在PongGame里的Update方法中完成。
Now you can start testing. Obviously if you just start the test now, it will not work because you have not implemented any collision testing yet.
现在你可以开始测试了。显然如果你现在开始,游戏将不会工作,因为你还没有执行任何碰撞测试。
Testing if you hit the top or bottom screen borders is the easiest test; all of the following code is added to the Update method just before you update the ball position for the next frame:
测试是否碰到屏幕上下边界是最简单的,在Update方法中的为下一帧更新球的位置的代码之前添加下面的代码:
The important part here is to just invert the y part of the ball speed vector. Sometimes it can happen that in the next frame the moveFactorPerSecond is smaller than in this frame. Then the ball position can be still out of the screen border and you would invert the y part of the speed vector every frame. To fix this issue you make sure the ball position is always inside the screen and does not goes outside. The same adjustment is done for the paddles too.
//
Check top and bottom screen border
if
(ballPosition.Y
<
0
||
ballPosition.Y
>
1
)
...
{ ballSpeedVector.Y = -ballSpeedVector.Y; // Move ball back into screen space if (ballPosition.Y < 0) ballPosition.Y = 0; if (ballPosition.Y > 1) ballPosition.Y = 1;}
//
if
这里关键的是将球速向量的y量倒转。有时会发生moveFactorPerSecond在下一帧比这一帧小的情况。如此,球的位置就会到屏幕边界的外面,你就要每一帧都倒转速度向量的y量。为了修正这个问题,你需要确定球的位置保持在画面中,不让它离开画面。挡板也需要同样的调节方法。
The paddle collisions are a little bit more complicated. If you just want to test the top and bottom screen collision, just start the unit test with F5 now. To do the paddle collisions, bounding boxes are constructed to perform the intersection tests, which are available in the BoundingBox class of XNA. The BoundingBox struct uses Vector3 struct and works in 3D space, but you can just ignore the z value and always use 0 and use it just fine in 2D space of your Pong game:
挡板部分的碰撞检验有点更复杂。如果你只想测试画面顶部和底部的碰撞,只需要按下F5来运行单元测试。要完成挡板部分的碰撞测试,需要构造范围框(bounding box),用来进行相交测试,在XNA中有一个BoundingBox的结构可以利用。BoundingBox结构在三维空间中使用Vector3来构造,但是你可以忽略z轴的值,将其赋值为0既可用于二维空间中的Pong游戏了:
The bounding boxes are constructed in a similar way as the rendering code is handled in RenderBall and RenderPaddles. The edge detection code makes it a little bit more complicated and it is just a quick and dirty way to speed up the ball if you hit it with the edge of your paddle. But these few lines make the game a lot more fun.
//
Check for collisions with the paddles.
//
Construct bounding boxes to use the intersection helper method.
Vector2 ballSize
=
new
Vector2( GameBallRect.Width
/
1024.0f
, GameBallRect.Height
/
768.0f
);BoundingBox ballBox
=
new
BoundingBox(
new
Vector3(ballPosition.X
-
ballSize.X
/
2
, ballPosition.Y
-
ballSize.Y
/
2
,
0
),
new
Vector3(ballPosition.X
+
ballSize.X
/
2
, ballPosition.Y
+
ballSize.Y
/
2
,
0
));Vector2 paddleSize
=
new
Vector2( GameRedPaddleRect.Width
/
1024.0f
, GameRedPaddleRect.Height
/
768.0f
);BoundingBox leftPaddleBox
=
new
BoundingBox(
new
Vector3(
-
paddleSize.X
/
2
, leftPaddlePosition
-
paddleSize.Y
/
2
,
0
),
new
Vector3(
+
paddleSize.X
/
2
, leftPaddlePosition
+
paddleSize.Y
/
2
,
0
));BoundingBox rightPaddleBox
=
new
BoundingBox(
new
Vector3(
1
-
paddleSize.X
/
2
, rightPaddlePosition
-
paddleSize.Y
/
2
,
0
),
new
Vector3(
1
+
paddleSize.X
/
2
, rightPaddlePosition
+
paddleSize.Y
/
2
,
0
));
//
Ball hit left paddle?
if
(ballBox.Intersects(leftPaddleBox))
...
{ // Bounce of the paddle ballSpeedVector.X = -ballSpeedVector.X; // Increase speed a little ballSpeedVector *= 1.05f; // Did we hit the edges of the paddle? if (ballBox.Intersects(new BoundingBox( new Vector3(leftPaddleBox.Min.X - 0.01f, leftPaddleBox.Min.Y - 0.01f, 0), new Vector3(leftPaddleBox.Min.X + 0.01f, leftPaddleBox.Min.Y + 0.01f, 0)))) // Bounce of at a more difficult angle for the other player ballSpeedVector.Y = -2; else if (ballBox.Intersects(new BoundingBox( new Vector3(leftPaddleBox.Min.X - 0.01f, leftPaddleBox.Max.Y - 0.01f, 0), new Vector3(leftPaddleBox.Min.X + 0.01f, leftPaddleBox.Max.Y + 0.01f, 0)))) // Bounce of at a more difficult angle for the other player ballSpeedVector.Y = +2; // Move away from the paddle ballPosition.X += moveFactorPerSecond * BallSpeedMultiplicator;}
//
if
在RenderBall和RenderPaddles的渲染代码中的范围框也是以同样的方法构造的。边角的检测代码有点复杂,如果球击中挡板的边角时会使球加速。但是这几行代码会让游戏更有趣。
Exactly the same code you use for the left paddle is also used for the right paddle; you just have to replace all left paddle variables with right paddle variables and negate the move away code.
事实上用于左挡板的代码和用于右挡板的代码是完全一样的,你只需要用右挡板的变量代替左挡板的变量,并将移动路线的代码的符号与原来相反(负变正,正变负)。
The final thing you have to do for your game to handle all the game play and the final collision test is to check when the ball gets behind the players paddle and the player loses a life. The code for that is quite simple. You can also directly handle if one of the players loses all his lives and the game is over then. Displaying the “Red Won” or “Blue Won” messages is done in the Draw method. If the user presses Space or Escape, he will return to the main menu and the game can start again:
你最后要为游戏和最终碰撞检验做的就是检验球是否落在了挡板后面,如果是,玩家就失去一条命。这段代码写起来很简单。当一个玩家失去了所有的名字后,游戏可以直接结束。用Draw方法显示“Red Won”或“Blue Won”的信息。如果用户按下空格或返回键,他将返回到游戏主菜单并可以重新开始游戏:
Well, this was the hardest part for this game; the bounding box collision tests were a little bit complicated, but the rest of the game was very straightforward and could be implemented quite easily. You also learned a bit about unit testing and how to handle sprites in an effective manner. You can now test the game with your unit test by pressing F5 and fine-tune the collisions a bit (see Figure 2-8).
//
Ball lost?
if
(ballPosition.X
<
-
0.065f
)
...
{ // Play sound soundBank.PlayCue("PongBallLost"); // Reduce number of lives leftPlayerLives -- ; // Start new ball StartNewBall();}
//
if
else
if
(ballPosition.X
>
1.065f
)
...
{ // Play sound soundBank.PlayCue("PongBallLost"); // Reduce number of lives rightPlayerLives -- ; // Start new ball StartNewBall();}
//
if
//
If either player has no more lives, the other player has won!
if
(gameMode
==
GameMode.Game
&&
(leftPlayerLives
==
0
||
rightPlayerLives
==
0
))
...
{ gameMode = GameMode.GameOver; StopBall();}
//
if
好了,这是游戏最难的部分了,范围框的碰撞检验有点复杂,但是游戏的剩下部分就可以很容易得完成了。你好要学一些关于单元测试的知识,还有如何使用有效的方法来控制精灵。你现在可以测试你的游戏了,还可以进行一些微调。
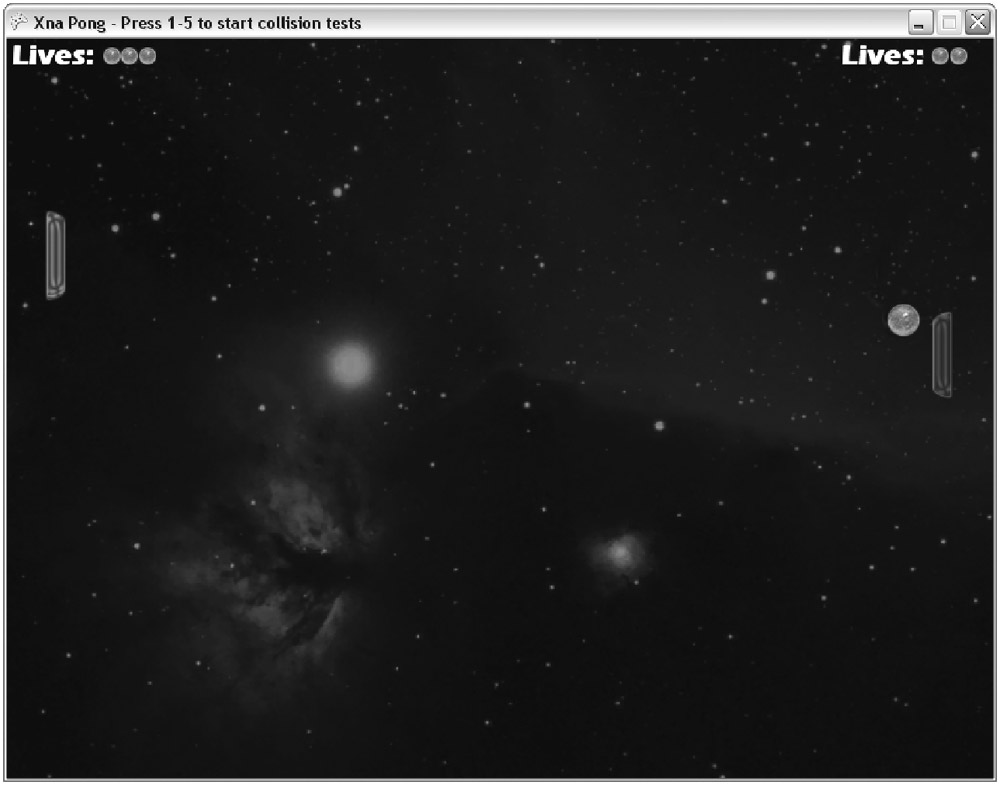
Figure 2-8
Adding Sound添加音效
To add sound to your game you would usually just drop a couple of .wav files into your project and play them back. In XNA, loading .wav files is not supported and the reason for that is that the Xbox 360 and Windows use different formats for sound and music. To overcome this issue Microsoft invented the XACT tool, which has been available in the DirectX SDK and the Xbox 360 SDK for quite some time now. XACT is short for “Microsoft Cross-Platform Audio Creation Tool.” XNA also makes use of this tool and Microsoft decided to make this the only way to play sound files.
通常往游戏中添加音乐只用向项目中拖入几个.wav文件然后播放它们。XNA不支持加载.wav文件,因为Xbox360和Windows使用的是不同的声音和音乐文件格式。为了解决这个问题,MS开发了XACT工具,现在DX SDK和Xbox360 SDK都可以利用这个工具。XACT是“微软跨平平台音频创作工具”的缩写。XNA同样利用这个工具,MS决定将这个作为播放声音的唯一方法。
Although XACT is a great tool for adding effects, making a lot of adjustments, and having all sound files managed in one place, it can overcomplicate things a little for a project like this one. There is a full chapter on XACT in this book; check it out in Chapter 9. For your Pong game you will just use two simple sound files:
尽管XACT是一个很好的工具,可以添加效果、做很多调整,并且在一个工作区里管理所有的声音文件,但是像这样会使工程有点过于复杂。本书第九章将用一整章的篇幅来讲述关于XACT的是使用。对于你的Pong游戏来说,只需要两个简单的声音文件:
§ PongBallHit.wav is played every time you collide with something (border or paddle) and it is also used for the menu as the sound for changing the selection. 每当球和一些东西(边界或挡板)发生碰撞是播放PongBallHit.wav文件,它同样被用于菜单选项被改变的时候。
§ PongBallLost.wav is used when a player lost a life because he didn’t catch the ball in time. PongBallLost.wav用于当一个玩家因不能跟上球而丢失一条命的时候。
To add these files to your game, you have to create a new XACT project. You can find XACT at Start All Programs Microsoft XNA Game Studio Express Tools.
要添加这些文件到你的游戏中,你需要创建一个新的XACT项目。你可以在“开始->所有程序->MS XNA GES->Tools”中找到XACT。(译著:在DX SDK中也有)
In the new XACT project add a wave bank by clicking Wave Banks Create Wave Bank and then add a sound bank by clicking Sound Banks Create Sound Bank. Now drag the two .wav files into the new XACT wave bank (see Figure 2-9).
在新的XACR项目里单击Wave Banks-> Create Wave Bank添加一个wave bank,然后点击Sound Banks-> Create Sound Bank添加一个sound bank。现在把那两个需要的.wav文件拖入到新的XACT wave bank中。
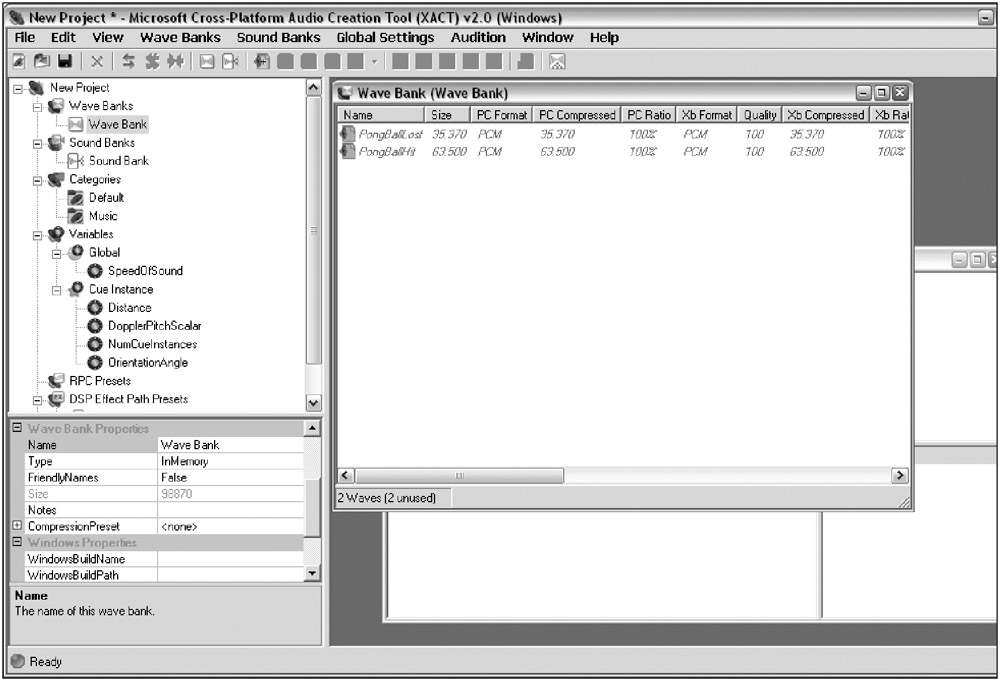
Figure 2-9
Next drag the two new wave bank entries over to the sound bank, and then drag them over to the cues. If you are confused or run into problems, check out Chapter 9 for more details.
下一步拖动两个新的wave bank进入sound bank,然后再拖动他们到【cue】中。如果你混乱了,或者运行有了问题,查看第九章可以参看更详细的信息。
These are the main components used in XACT for sounds:
XACT中有几个主要的部分:
§ Wave Bank stores all your .wav files; you can’t add anything but wav files here. No support for .mp3, .wma, or any format other than .wav. Importing compressed files is also not an option; ACPCM for Windows and XMA compression for the Xbox 360 is possible, but you have to follow the rules, which are described in Chapter 9.
Wave Bank储存你所有的.wav文件,除了wav文件你不能添加其它格式的文件。不支持导入mp3、wma或其他格式压缩格式的文件。Wind的ACPCM和Xbox360的XMA要说格式是可以的,但是你要遵循第九章中所描述的规则。
§ Sound Bank is used to play back sounds later in the game with help of the cues. You can modify the sound settings here by changing the volume and pitch, adding categories, and attaching sound effects (RPC). You can also define multiple tracks here. Usually you will just set the volume here.
Sound Bank用于稍后在cue的帮助下在游戏中播放声音,并配上声音效果(RPC)。你也可以制作多声道。通常在这里仅仅只是调节音量的。
§ Sound Cues are used to play sounds. A sound cue has at least one sound bank entry attached, but you can assign multiple sound files to one cue and set rules - if one of the sounds should be played randomly, if you can only play one sound of this kind at a time, and rules for replacing sounds. The important thing here is the cue name, which is used in the game to access the cue and finally play the sound.
Sound Cues用于播放声音。一个cue至少有一个sound bank,但是你可以分配多个声音文件到一个cue里,然后设定规则——像随机播放一个声音,想一种时候只能播放一种声音,或者是替代声音的规则。这里重要的是cue name,用来在游戏中连接到cue并播放声音。
Figure 2-10 shows how your XACT project should look like now. You will set the volume of PongBallHit to –8 and the PongBallLost to –4; the default value of –12 is too silent and your hit sound is a little bit to loud, so reducing it sounds nicer in the game. The rest can use the default values and you can just save the project as PongSound.xap. Then add this file to your XNA Studio project and it will use the XNA content pipeline to automatically compile and build all files for both the Windows and Xbox 360 platform for you. Also make sure the two wav files are in the same directory as the PongSound.xap file, otherwise the content pipeline might not be able to find these files and it won’t be able to build your XACT project.
图2-10显示了你现在的XACT项目应该是怎样的。你要设置PongBallHit的音量到-8,PongBallLost的到-4;默认的音量是-12,这台小声了,你的撞击生应该大声点,然后降低声音听起来会更好。剩下的你可以使用默认的音量,就可以将项目保存成PongSound.xap了。然后把这个文件添加到XNA中,XNA的素材管线会自动为Windows和Xbox360平台编译和生成所有的文件。要保证那两个wav文件和PongSound.xap文件在同一个目录下,否则素材管线可能就找不到这些文件,就不能生成你的XACT项目了。
-

Figure 2-10
The code to play back the sounds is quite easy, and just to make sure the sounds work fine and the volume is correct, here is simple unit test for the sounds:
编写播放声音的代码很简单,只要确保声音正常工作,音量正确,下面是一个简单的声音单元测试:
Now all you have to do to implement the sounds to the game is to add a couple of lines at the locations where you want the sound to happen. First of all, add the hit sound to the menu and every time a ball collision occurs with the screen borders or the paddles (see the earlier collision tests).
public
static
void
TestSounds()
...
{ StartTest( delegate ...{ if (testGame.keyboard.IsKeyDown(Keys.Space)) testGame.soundBank.PlayCue("PongBallHit"); if (testGame.keyboard.IsKeyDown(Keys.LeftControl)) testGame.soundBank.PlayCue("PongBallLost"); });}
//
TestSounds()
现在你需要做的就是在你想要播放声音的地方加入几行代码。首先,向菜单中和每一次球的碰撞添加撞击声。
Then add the lost sound like this to the part where you find out if a player lost a life:
然后在玩家丢失一条命的地方添加丢命的声音:
After adding these lines you can re-enable the TestSingleplayerGame unit test and see if the sounds are played correctly. For more complex games a better system for checking when to play sounds might be required, but most simple games will work fine just with the PlayCue method, which just plays the sound and holds the cue as long as it is needed. You can also get a sound cue and manage it yourself; this has the advantage of being able to stop it and resume it, and so on.
//
Ball lost?
if
(ballPosition.X
<
-
0.065f
)
...
{ // Play sound soundBank.PlayCue("PongBallLost"); // Reduce life leftPlayerLives -- ; // Start new ball StartNewBall();}
//
if
else
if
(ballPosition.X
>
1.065f
)
...
{ // Play sound soundBank.PlayCue("PongBallLost"); // Reduce life rightPlayerLives -- ; // Start new ball StartNewBall();}
//
if
在添加了这些代码之后你可以再使用TestSingleplayerGame了,看看声音是否正常播放。对于更复杂的游戏,可能需要一套检验什么时候播放什么声音的系统,但是大多数简单的游戏配合PlayCue方法就能很好工作了,在需要的时候立即播放声音。你也可以自己管理声音cue,这样可以更好的停止和回复声音的播放,还有其他等等。


 4万+
4万+


 被折叠的 条评论
为什么被折叠?
被折叠的 条评论
为什么被折叠?
 到【灌水乐园】发言


