


所谓漫水填充算法,是给定一个联通域内的一个点,以此为起点找到这个联通域的其余所有点并将其填充为指定颜色的一种算法。
之所以称之为漫水填充,是因为这种算法就是模拟了涨水的过程,从一点开始,水流慢慢加大,直到漫过了全部区域。
这个算法的详细介绍可以参考下面的链接。
https://en.wikipedia.org/wiki/Flood_fill
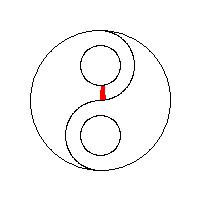
这个算法在我们寻找一片指定区域时非常有用。因此,我就花了点时间写了个程序。我所实现的算法类似于下面这张图片中的方法,不过我是每次填充一行。
下面这个 floodFill_Gray 函数用于填充灰度图像,讲一个联通域的灰度填充为 newVal。
static inline bool fillPoint_Gray( QImage &image, QPoint p, uchar val, uchar newVal, QStack<QPoint> &stack)
{
    int x = p.rx();
    int y = p.ry();
    uchar *line = image.scanLine(y);
    if( line[x] != val )
    {
        return false;
    }
    line[x] = newVal;
    if( y > 0 )
    {
        uchar *last = image.scanLine(y - 1);
        if( last[x] == val )
        {
            stack.push(QPoint(x, y - 1));
        }
    }
    if( y < image.height() - 1 )
    {
        uchar *next = image.scanLine(y + 1);
        if( next[x] == val )
        {
            stack.push(QPoint(x, y + 1));
        }
    }
    return true;
}

bool floodFill_Gray(QImage &image, QPoint seedPoint, uchar newVal )
{
    if(image.format() != QImage::Format_Indexed8)
    {
        return false;
    }
    int width = image.width();
    int height = image.height();
    int x = seedPoint.rx();
    int y = seedPoint.ry();
    if(x < 0 || x >= width || y < 0 || y >= height)
    {
        return false;
    }
    int value = image.scanLine(y)[x];
    QStack<QPoint> stack;
    stack.push(seedPoint);

    while(!stack.isEmpty())
    {
        QPoint p = stack.pop();
        bool ret = fillPoint_Gray(image, p, value, newVal, stack);
        bool ret2 = ret;
        y = p.ry();
        x = p.rx();
        x--;
        while(x >= 0 && ret)
        {
            ret = fillPoint_Gray(image, QPoint(x, y), value, newVal, stack);
            x--;
        }

        x = p.rx();
        x ++;
        while(x < width && ret2)
        {
            ret2 = fillPoint_Gray(image, QPoint(x, y), value, newVal, stack);
            x++;
        }
    }
    return true;
}
有时,由于有噪声等影响,我们的待填充区域内的原始颜色并不完全一样,这时可以采用模糊填充。所谓模糊填充就是我们设定一个颜色范围,将这个颜色范围内的点都认为是区域的内点。
下面的代码就实现了这个功能。
static inline bool fillPoint_Gray( QImage &image, QPoint p, uchar low, uchar high, uchar newVal, QStack<QPoint> &stack)
{
    int x = p.rx();
    int y = p.ry();
    uchar *line = image.scanLine(y);
    if( line[x] < low || line[x] > high )
    {
        return false;
    }
    line[x] = newVal;
    if( y > 0 )
    {
        uchar *last = image.scanLine(y - 1);
        if( last[x] >= low && last[x] <= high )
        {
            stack.push(QPoint(x, y - 1));
        }
    }
    if( y < image.height() - 1 )
    {
        uchar *next = image.scanLine(y + 1);
        if( next[x] >= low && next[x] <= high )
        {
            stack.push(QPoint(x, y + 1));
        }
    }
    return true;
}

bool floodFill_Gray(QImage &image, QPoint seedPoint, int low, int high, uchar newVal )
{
    if(image.format() != QImage::Format_Indexed8)
    {
        return false;
    }
    low = qBound(0, low, 255);
    high = qBound(0, high, 255);
    if(low > high)
    {
        return false;
    }

    QStack<QPoint> stack;
    stack.push(seedPoint);

    int width = image.width();
    while(!stack.isEmpty())
    {
        QPoint p = stack.pop();
        bool ret = fillPoint_Gray(image, p, low, high, newVal, stack);
        bool ret2 = ret;
        int y = p.ry();
        int x = p.rx();
        x--;
        while(x >= 0 && ret)
        {
            ret = fillPoint_Gray(image, QPoint(x, y), low, high, newVal, stack);
            x--;
        }

        x = p.rx();
        x ++;
        while(x < width && ret2)
        {
            ret2 = fillPoint_Gray(image, QPoint(x, y), low, high, newVal, stack);
            x++;
        }
    }
    return true;
}
我还写了一个用来填充彩色图像的。这个代码还比较简单,暂时还没实现模糊颜色的判别。之所以没有写,主要还是在RGB颜色空间中,不太方便度量两个颜色值之间的距离。如果简单的采用欧氏距离,则与我们眼睛对色彩的感受会有些出入。可能我们觉得颜色差别很大的两个颜色的距离并不远,而看起来差不多的两个颜色可能距离挺大的。
static inline bool fillPoint_RGB32( QImage &image, QPoint p, QRgb val, QRgb newVal, QStack<QPoint> &stack)
{
    int x = p.rx();
    int y = p.ry();
    QRgb *line = (QRgb*)image.scanLine(y);
    if( line[x] != val )
    {
        return false;
    }
    line[x] = newVal;
    if( y > 0 )
    {
        QRgb *last = (QRgb*)image.scanLine(y - 1);
        if( last[x] == val )
        {
            stack.push(QPoint(x, y - 1));
        }
    }
    if( y < image.height() - 1 )
    {
        QRgb *next = (QRgb*)image.scanLine(y + 1);
        if( next[x] == val )
        {
            stack.push(QPoint(x, y + 1));
        }
    }
    return true;
}

bool floodFill_RGB32(QImage &image, QPoint seedPoint, QRgb newVal )
{
    qDebug() << image.format();
    if(image.format() != QImage::Format_RGBA8888 && image.format() != QImage::Format_ARGB32 )
    {
        return false;
    }
    int width = image.width();
    int height = image.height();
    int x = seedPoint.rx();
    int y = seedPoint.ry();
    if(x < 0 || x >= width || y < 0 || y >= height)
    {
        return false;
    }
    QRgb value = image.pixel(x, y);
    QStack<QPoint> stack;
    stack.push(seedPoint);

    while(!stack.isEmpty())
    {
        QPoint p = stack.pop();
        bool ret = fillPoint_RGB32(image, p, value, newVal, stack);
        bool ret2 = ret;
        y = p.ry();
        x = p.rx();
        x--;
        while(x >= 0 && ret)
        {
            ret = fillPoint_RGB32(image, QPoint(x, y), value, newVal, stack);
            x--;
        }

        x = p.rx();
        x ++;
        while(x < width && ret2)
        {
            ret2 = fillPoint_RGB32(image, QPoint(x, y), value, newVal, stack);
            x++;
        }
    }
    return true;
}
下面是一个测试图像。
我要将其中最大的红色的联通区域填充为蓝色。下面是填充后的结果。

但是这个算法有一个注意事项,就是它只将上下左右相邻的像素视为连同,斜向相邻的像素认为是不连通的。之所以这样设计是为了处理下面这种情况。如果斜向也认为是连同的话那么下图中所有的白色区域就都是联通的了,这和我们直观的感觉是不相同的。

当然,这样处理后,黑色区域中有两个孤立点就被程序认为不与其他黑色区域联通了。这个与我们直观感觉也是有差异的。总之,这两种情况无法兼顾。


 3128
3128


 被折叠的 条评论
为什么被折叠?
被折叠的 条评论
为什么被折叠?
 到【灌水乐园】发言


