


一、概要
前两篇Core Animation(一)iOS图形和动画的初步认识和Core Animation(二)动画基础部分从动画的核心库架构、基本用法、效果、分类等几方面简单的描述了iOS动画,并举了几个简单的例子,通过例子来看,iOS动画学习貌似也挺容易的,所以这一篇我们深入且系统的了解下Core Animation。
在iOS中核心动画分为几类:基本动画、关键帧动画、动画组、过度动画,如下图:
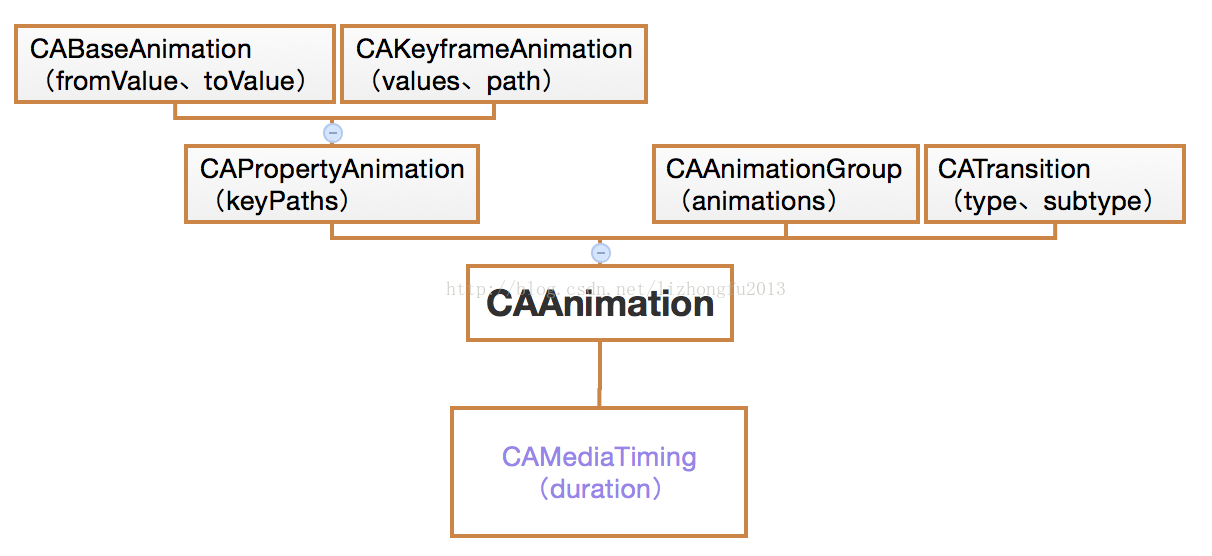
| CAAnimation:核心动画的基础类,不能直接使用,负责动画运行时间、速度的控制,本身实现了CAMediaTiming协议 |
| CAPropertyAnimation:属性动画的基类(通过属性进行动画设置,注意是可动画属性),不能直接使用 |
| CAAnimationGroup:动画组,动画组是一种组合模式设计,可以通过动画组来进行所有动画行为的统一控制,组中所有动画效果可以并发执行 |
| CATransition:过度动画,主要通过滤镜进行动画效果设置 |
| CABasicAnimation:基本动画,通过属性修改进行动画参数控制,只有初始状态和结束状态 |
| CAKeyframeAnimation:关键帧动画,同样是通过属性进行动画参数控制,但是同基础动画不同的是它可以有多个状态控制 |
注意:基础动画、关键帧动画都属于属性动画,就是通过修改属性值产生动画效果,开发人员只需要设置初始值和结束值,中间的过程动画(又叫“补间动画”)由系统自动计算产生。和基础动画不同的是关键帧动画可以设置多个属性值,每两个属性中间的补间动画由系统自动完成,因此从这个角度而言基础动画又可以看成是有两个关键帧的关键帧动画。
二、图层与动画
1、UIView和CALayer
先看一段简单的代码,动画效果很简单,当执行动画的时候,View的背景颜色由白色变成了红色,动画持续时间为5秒:
- (void) animationOfBasic {
    self.view.backgroundColor = [UIColor whiteColor];

    CABasicAnimation *animation = [CABasicAnimation animation];
    animation.toValue = (id)[UIColor redColor].CGColor;
    animation.duration = 5.0;

    [self.view.layer addAnimation:animation forKey:@"backgroundColor"];
}   // 代码(一)
注意:CABasicAnimation是Core Animation库的一个重要的类,而Core Animation 包含于QuartzCore.framwork中,所以项目中如果想使用Core Animation则必须先引入QuartzCore.framwork库(Xcode6不需要显示的引入)
使用CABasicAnimation初始化一个动画对象,然后添加到self.view.layer上。因为,我们看到的是UIView动画,可是animation对象却添加到了view.layer上?CALayer是什么?UIView和CALayer具体什么关系?
根据官网描述:UIView是iOS页面控件的基类,应为UIView直接继承自UIResponder,所以可以响应用户事件,在iOS中创建的每一个UIView都有一个属性layer(CALayer),layer继承自己NSObject,不能响应用户事件,但layer提供了UIView内容的绘制功能,也就是说UIView侧重于对显示内容的管理,CALayer侧重于对内容的绘制。UIView和CALayer相互依赖,UIView依赖于CALayer提供的内容,CALayer依赖UIView提供的容器来显示绘制的内容,UIView可以理解为是CALayer的高级封装。
所以,当使用简单的UIView动画的时候,直接这样实现:
[UIView animateWithDuration:3 delay:0 options:UIViewAnimationOptionCurveEaseInOut animations:^{
        //对View可动画属性操作
    } completion:^(BOOL finished) {
}]; // 代码(二)</span>2、CALayer和动画
(1)CALayer负责UIView的绘制功能,CALayer与UIView的关系如下图:
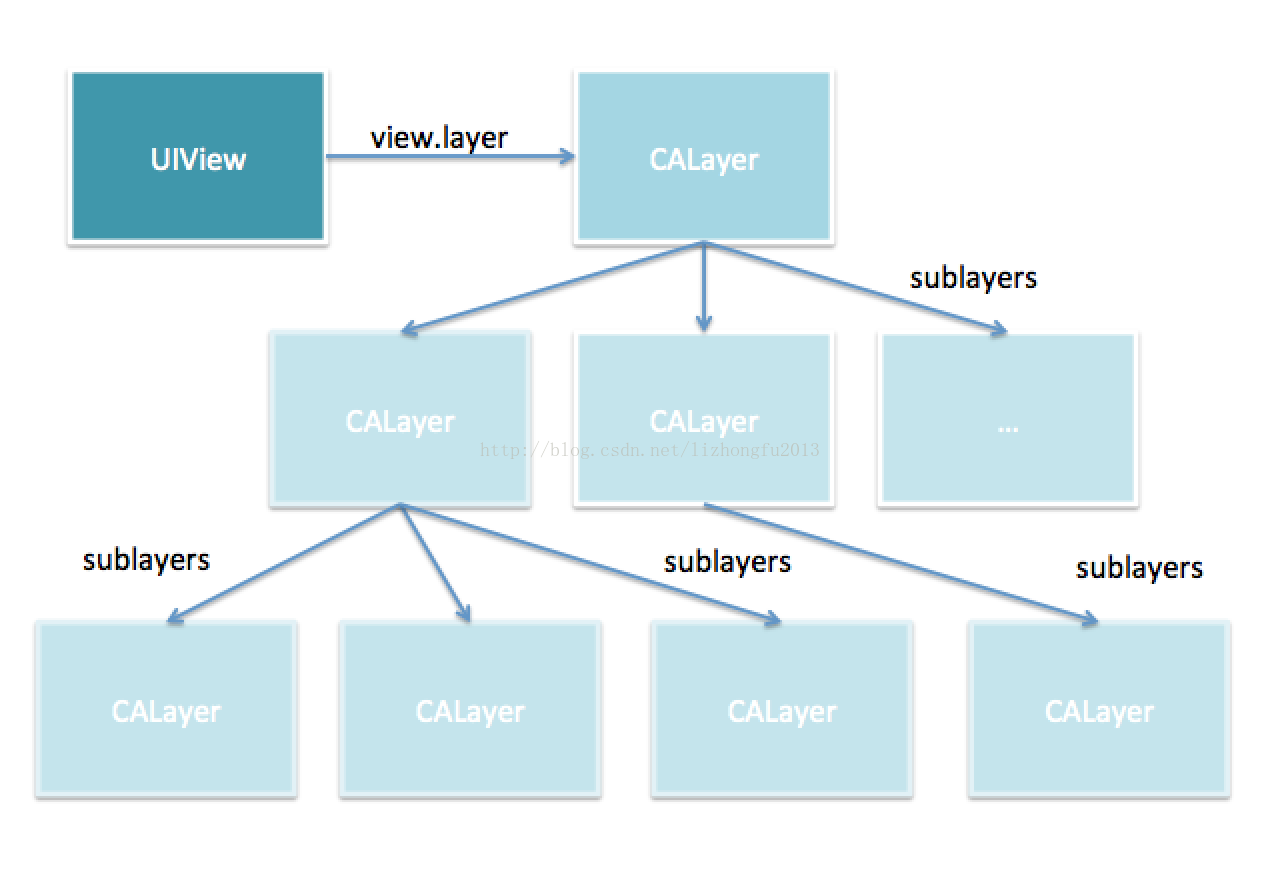
CALayer也有类似UIView及其子View的树形结构,也可以向layer上添加子layer:
- (void) addSubLayerTest {
    CALayer *subLayer = [CALayer layer];
    subLayer.bounds = self.view.bounds;
    subLayer.anchorPoint = CGPointMake(0.5, 0.5);
    subLayer.position = CGPointMake(self.view.bounds.size.width * 0.5, self.view.bounds.size.height * 0.5);
    subLayer.backgroundColor = [UIColor redColor].CGColor;

    [self.view.layer addSublayer:subLayer];
}
以上代码中,我们发现了一个新面孔的属性anchorPoint,这个新的属性名字叫“ 锚点”,可以看看 这篇了解下,如果上边代码中注释掉这两句:
subLayer.anchorPoint = CGPointMake(0, 0);
subLayer.position = CGPointMake(self.view.bounds.size.width * 0.5, self.view.bounds.size.height * 0.5);
就会发现,新添加的红色layer右下方的1/4显示在view上,因为 锚点默认值是(0.5,0.5),这就引出了另一个知识点-CALayer的坐标系统。
(2)CALayer使用两种坐标系统,一种是基于点的坐标系统,另一种是单位坐标系统。
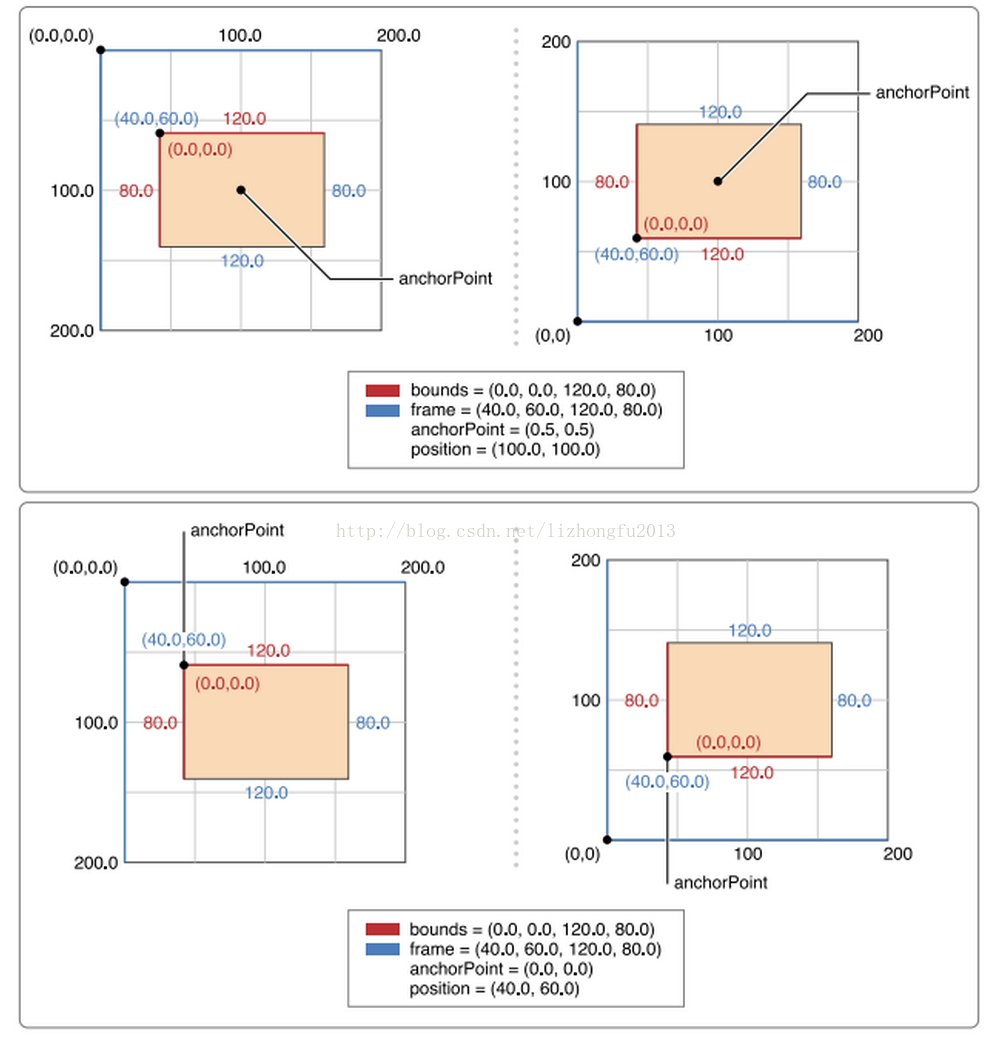
CALayer利用基于点的坐标系统和单位坐标系统指定内容的布局。坐标系统的选择依赖于被传达的信息类型。当指定的值是直接映射到屏幕或相对于其他图层的坐标,比如图层的position属性,则使用基于点的坐标系统。当指定的值是相对于一些其他的值,与屏幕坐标不相关联,则使用单位坐标。比如图层的anchorPoint属性,anchorPoint属性指定了相对于图层边界的一个点。anchorPoint属性可以更改,默认是(0.5,0.5)
(3)基于点的坐标最常用于指定图层的尺寸和位置。可通过图层的bounds和postion属性设定图层的尺寸和位置。bound定义了图层自身的坐标系统并包含图层在屏幕上的尺寸。position属性定义了图层相对于父坐标系统的位置。虽然图层有一个frame属性,该属性实际上是从bounds和position属性派生而来,极少被使用。
(4)图层的bounds和frame矩形的方向始终与底层平台的默认方向相匹配:
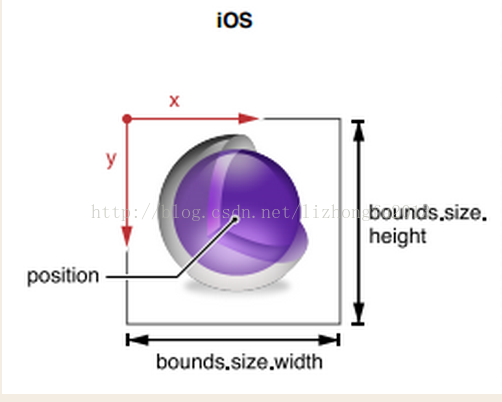
锚点是使用单位坐标系统的属性之一。Core Animation中使用单位坐标表示的属性值可能会因为图层的尺寸变化而发生改变。你可以把单位坐标当做是总数的百分比。在单位坐标系统空间中每一个坐标的取值范围在0.0和1.0之间。比如说,沿着x轴,最左侧是0.0,最右侧是1.0.沿着y轴,单位坐标值方向的不同依赖于具体的平台(iOS坐标原点在左上角,而Mac OSX在左下角,对于点坐标系统和单位坐标系统,这个原点和坐标轴方向规则是一致的)
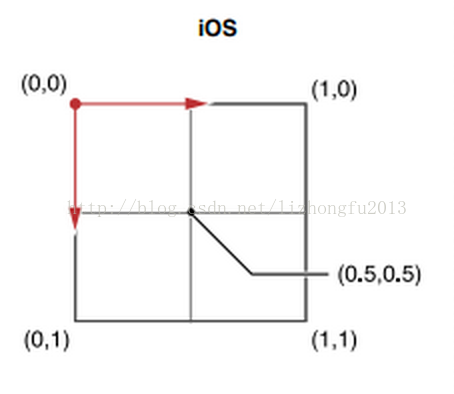
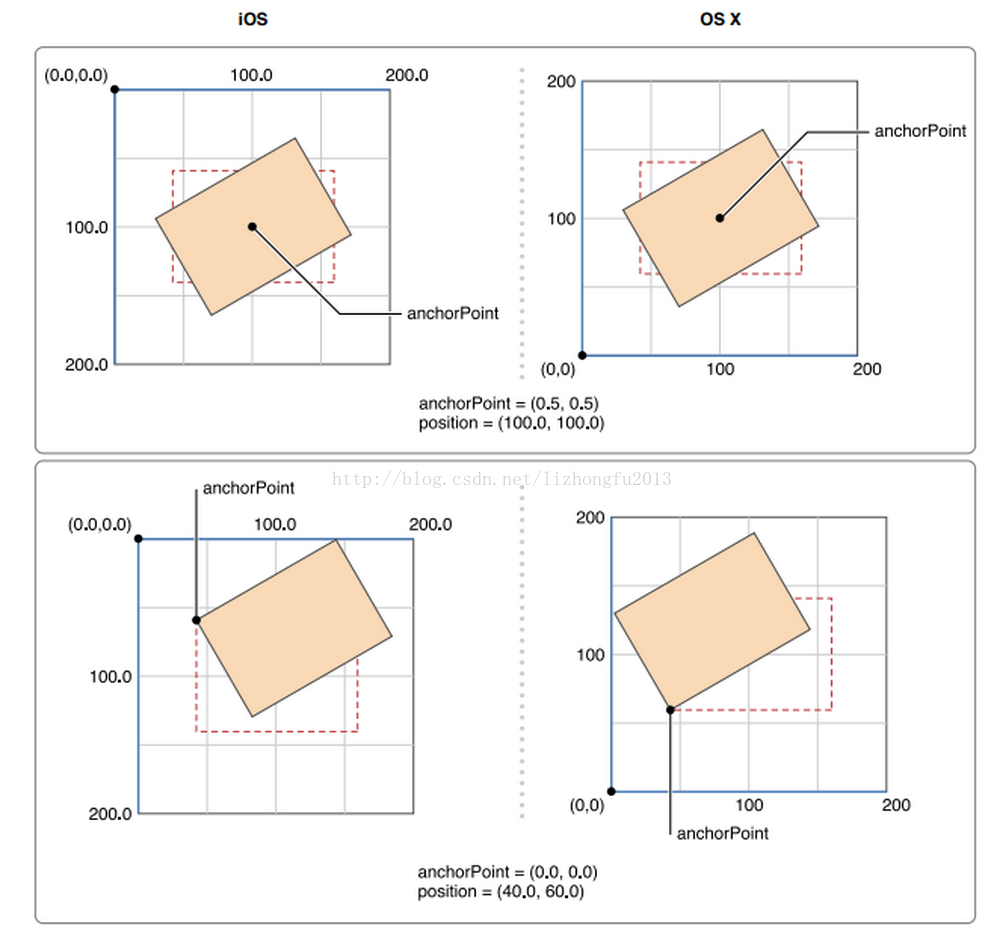
(5)锚点确定CALayer的几何结构操作和变换
图层的几何操是相对于图层的锚点进行的,anchorPoint属性可以访问图层的锚点值。当改变图层的postion和transform属性值,锚点的影响就很明显。position属性是相对于图层的锚点被指定。并且任何你对图层阴影的变换操作也是相对于锚点。
下图说明了改变锚点对图层position属性的影响。尽管图层没有在它的父边界内移动,将锚点从中心点移动到图层边界的原点将改变position属性值。
当你对图层应用了一个旋转变换,图层将围绕中心点旋转。因为默认情况下,锚点被设定在图层的中心位置。一般创建这类旋转行为正是你所期望的。然而如果你改变了锚点值,旋转的结果也会发生变化。
以上五条内容,有部分来自于互联网及官网,所以不在重复造轮子,关于CALayer部分还有不少内容没有涉及到,例如绘制图层,调整图层内容显示,对图层的属性也没有多提到,图层基本的属性和View类似,比如frame、bounds、backgroundColor等,为了不发散太远,所以要回到动画部分,图层其他内容后续补充。
(6)图层上的动画渲染
这个就要从Core Animation的基本定义开始说起了:
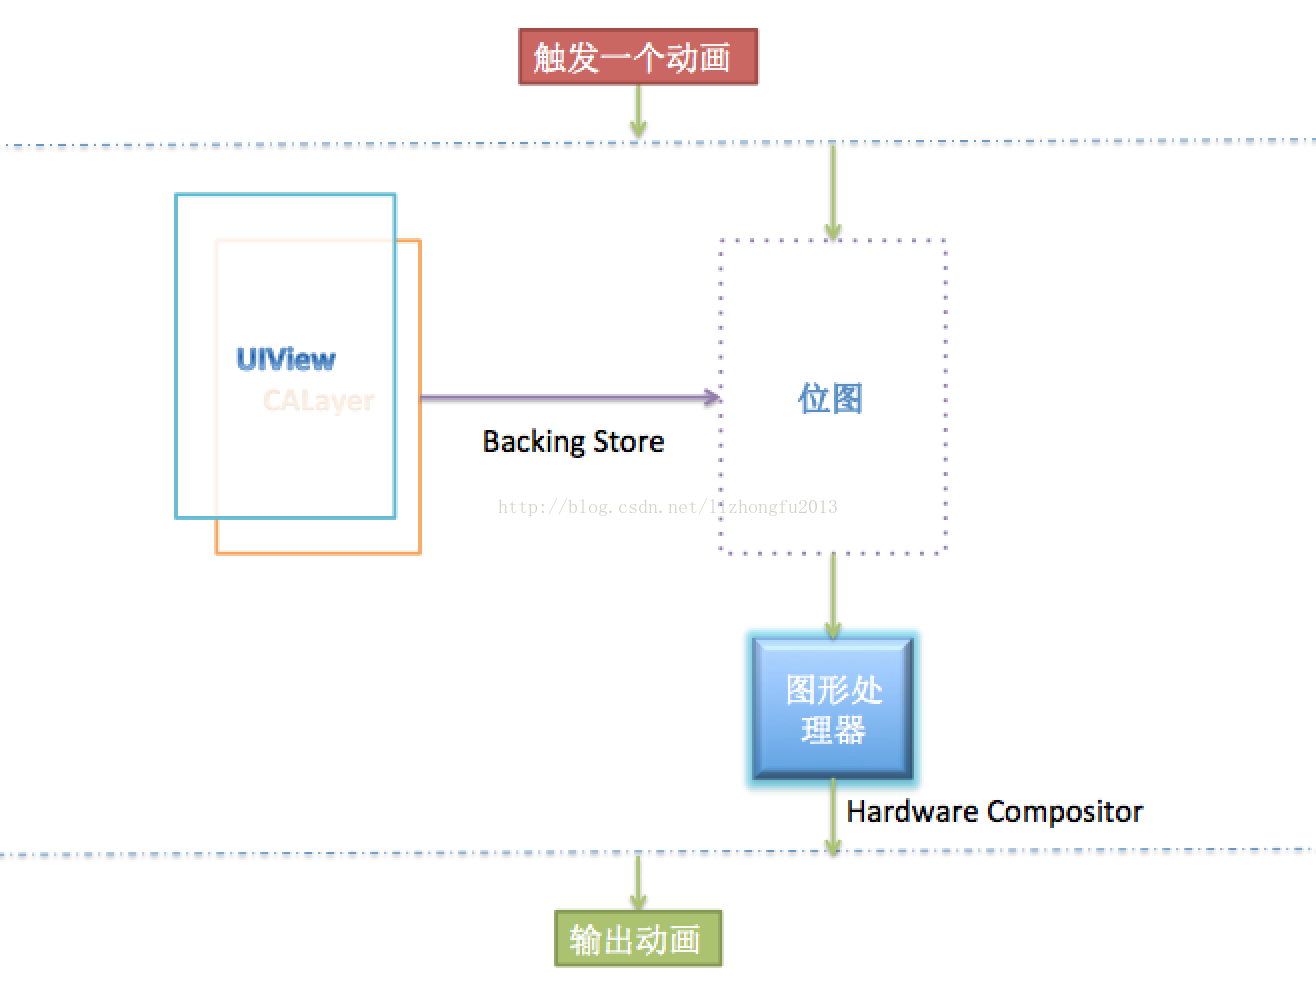
Core Animation是iOS与OS X平台上负责图形渲染与动画的基础设施。Core Animation可以动画视图和其他的可视元素,为你完成了动画所需的大部分绘帧工作。只需配置少量的动画参数(如开始点位置和结束点的位置)就可实现绚丽的Core Animation动画效果。
Core Animation将大部分实际的绘图任务交给了图形硬件来处理,图形硬件会加速图形渲染的速度。这种自动化的图形加速技术让动画拥有更高的帧率并且更加的平滑,而且不会加重CPU的负担而影响程序的运行速度。
Core Animation自身并不是一个绘图系统。它只是一个负责在硬件上合成和操纵应用内容的基础构件。Core Animation的核心是图层对象,图层对象用于管理和操控你的应用内容。图层将捕获的内容放到一副位图中,图形硬件能够非常容易的操控你的位图。
Core Animation创建的大部分动画都包含对图层属性的配置。像视图一样,图层对象也具有frame、origin、size、opacity、transform以及许多其他面向可视的属性(如backgroundColor)。更改图层这些属性的值发生了变化都将会触发隐式动画被创建。隐式动画是一种从旧属性值动画到新属性值的动画形式。
当然我们学习Core Animation就是为了创建自己的绚丽动画,我们自己写的动画都属于显式动画,当定义显示动画后,相应的隐式动画会自动取消。
下图表达了Core Animation的动画原理:
3、CALayer可以动画的属性
由于CALayer在iOS中任务主要是内容展示和动画操作,并且动画操作是CALayer的一个重要功能,因此CALayer很多属性的值在变化的时都有动画效果,这个就是我们之前提到的“隐式动画”,但UIView的根图层是一个例外,根图层属性修改的时候不形成动画效果,因为根图层充当容器的作用,如果它的属性变化形成动画效果会直接干扰子图层。另外,根图层是是由UIView管理,不能重新创建。
常用的图层属性和默认动画:
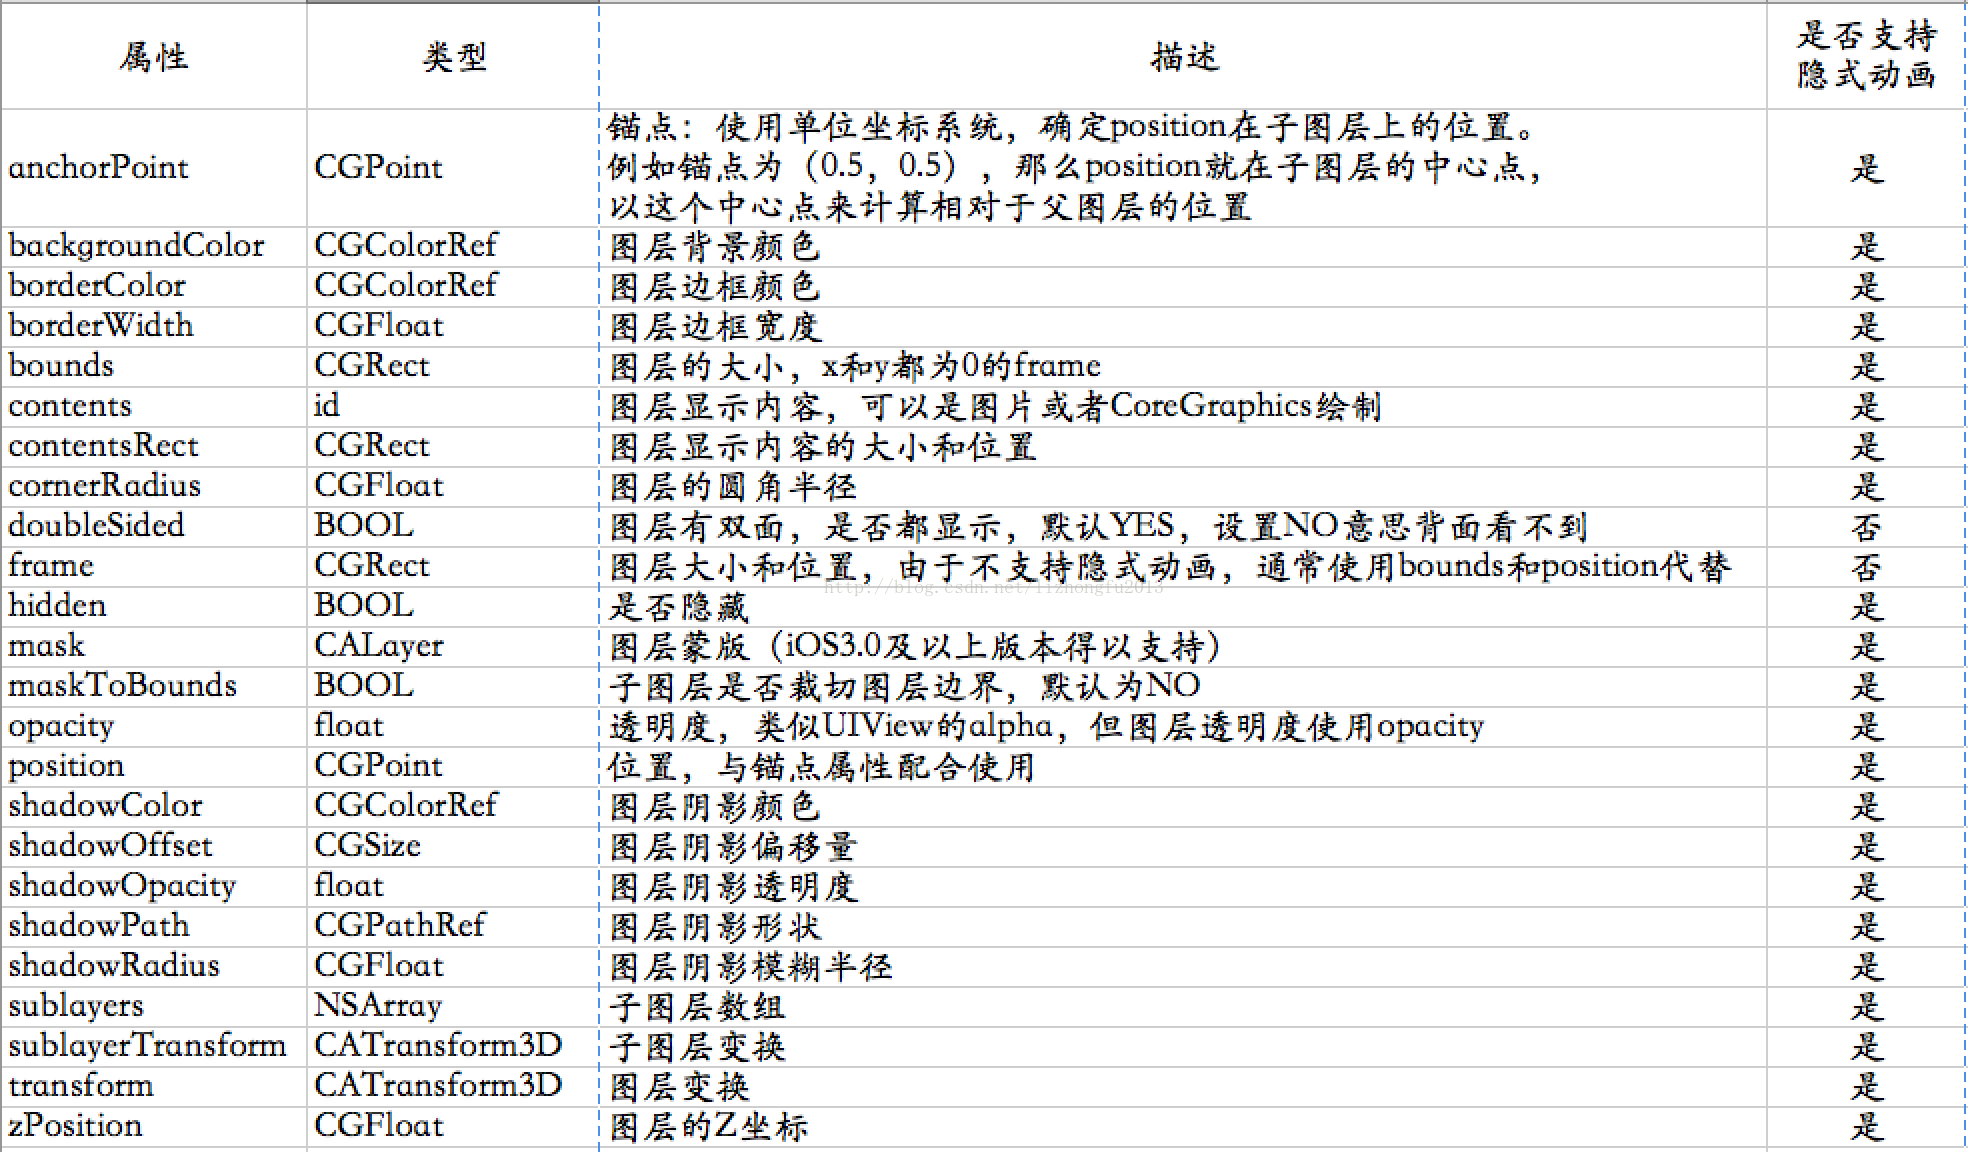
注意:
1、上表中支持隐式动画的属性,本质式属性变化的时候默认使用了CABasicAnimation动画
2、CALayer使用bounds和position属性,position在子图层的位置由anchorPoint决定,frame属性很少使用
3、CALayer透明度使用opacity,而不是alpha
下面来看一个简单的例子,理解以上属性的使用:定义一个layer,内容使用一张图片填充,位置在屏幕中间,当点击屏幕的时候,layer变大,并且变圆,边框颜色变成红色。
#define LAYER_W 100- (void) addSubLayerTest {
layer = [[CALayer alloc] init];
//设置内容
    layer.contents = (__bridge id)([UIImage imageNamed:@"u=4202713349,3732790669&fm=11&gp=0.jpg"].CGImage);
//设置大小
layer.bounds = CGRectMake(0, 0, LAYER_W, LAYER_W);
//设置锚点,可以不设置,默认(0.5, 0.5)
layer.anchorPoint = CGPointMake(0.5, 0.5);
//设置背景颜色
layer.backgroundColor = [UIColor redColor].CGColor;
//设置位子
layer.position = CGPointMake(self.view.bounds.size.width * 0.5, self.view.bounds.size.height * 0.5);
//设置圆角
layer.cornerRadius = 8;
//设置边框颜色
layer.borderColor = [UIColor blackColor].CGColor;
//设置边框宽度
layer.borderWidth = 2;
// subLayer.shadowColor = [UIColor grayColor].CGColor;
// subLayer.shadowOffset = CGSizeMake(1, 3);
// subLayer.shadowOpacity = 0.8;
// 裁切图片边缘,阴影也裁切
layer.masksToBounds = YES;
[self.view.layer addSublayer:layer];
}- (void) touchesBegan:(NSSet *)touches withEvent:(UIEvent *)event {
CGFloat width = layer.bounds.size.width;
if (width == LAYER_W) {
width = 3 * LAYER_W;
layer.cornerRadius = width * 0.5;
layer.borderColor = [UIColor redColor].CGColor;
} else {
width = LAYER_W;
layer.cornerRadius = 8;
layer.borderColor = [UIColor blackColor].CGColor;
}
layer.bounds = CGRectMake(0, 0, width, width);
}

3、CALayer的内容绘制
图层是管理程序内容的数据对象,图层根据可视的内容缓存到位图中,然后利用图形硬件来渲染动画。图层的内容绘制可以使用以下三种方式提供:
(1)使用图片为图层提供内容(适用于图层内容几乎不改变的情况)
//设置内容
layer.contents = (__bridge id)([UIImage imageNamed:@"u=4202713349,3732790669&fm=11&gp=0.jpg"].CGImage);(2)使用代理提供图层内容
如果图层内容是动态改变的,则可以使用代理对象在需要的时候提供图层并更新内容。图层显示的时候,从代理方法获取内容,代理方法主要有以下两个:
- (void)displayLayer:(CALayer *)layer;- (void)drawLayer:(CALayer *)layer inContext:(CGContextRef)ctx;如果实现了drawLayer: inContext:方法,Core Animation创建一个位图,创业一个用于绘制位图的上下文,并调用代理方法填充该位图,代理方法所需要做的是将内容画在图形上下文中。
注意:代理对象必须实现以上两个方法之一,如果代理对象把以上两个法都实现了,那么图层需要内容的时候,只调用displayLayer:代理方法。
//使用displayLayer:代理方法绘制图层
- (void) addSubLayerTest {
    layer = [[CALayer alloc] init];
    //设置内容
//    layer.contents = (__bridge id)([UIImage imageNamed:@"u=4202713349,3732790669&fm=11&gp=0.jpg"].CGImage);
    //设置大小
    layer.bounds = CGRectMake(0, 0, LAYER_W, LAYER_W);
    //设置锚点,可以不设置,默认(0.5, 0.5)
    layer.anchorPoint = CGPointMake(0.5, 0.5);
    //设置背景颜色
    layer.backgroundColor = [UIColor redColor].CGColor;
    //设置位子
    layer.position = CGPointMake(self.view.bounds.size.width * 0.5, self.view.bounds.size.height * 0.5);
    //设置圆角
    layer.cornerRadius = 8;
    //设置边框颜色
    layer.borderColor = [UIColor blackColor].CGColor;
    //设置边框宽度
    layer.borderWidth = 2;

//    subLayer.shadowColor = [UIColor grayColor].CGColor;
//    subLayer.shadowOffset = CGSizeMake(1, 3);
//    subLayer.shadowOpacity = 0.8;

//    裁切图片边缘,阴影也裁切
    layer.masksToBounds = YES;

    [self.view.layer addSublayer:layer];

    //设置图层代理
    layer.delegate = self;

    //调用图层setNeedDisplay,否则代理方法不会被调用
    [layer setNeedsDisplay];
}

#pragma mark -CALayerDelegate
- (void) displayLayer:(CALayer *)theLayer {
    layer.contents = (__bridge id)([UIImage imageNamed:@"u=4202713349,3732790669&fm=11&gp=0.jpg"].CGImage);
}
如果没有预渲染的图片或者辅助对象来创建位图,代理对象可以使用 drawLayer: inContext:方法动态的绘制内容:
- (void)drawLayer:(CALayer *)theLayer inContext:(CGContextRef)theContext {
    CGContextSaveGState(theContext);
    //CG的坐标系统原点在左下角,所以要做翻转
    CGContextScaleCTM(theContext, 1, -1);
    CGContextTranslateCTM(theContext, 0, -LAYER_W);
    UIImage *image=[UIImage imageNamed:@"u=4202713349,3732790669&fm=11&gp=0.jpg"];
    CGContextDrawImage(theContext, CGRectMake(0, 0, LAYER_W, LAYER_W), image.CGImage);
    CGContextRestoreGState(theContext);
}
1、displayLayer:和drawLayer: inContext:在CALayerDelegate协议中定义,但代理对象不用在头文件中声明CALayerDelegate,因为CALayer中对NSObject类做了扩展,所有NSObject类都包含了代理方法;
2、设置完代理之后,代理方法不会自动调用,要通过[layer setNeedsDisplay];方法让图层调用代理方法来更新内容。
补充:利用CoreGraphics绘制图层内容时候,之前使用CGContextScaleCTM(theContext, 1, -1);来翻转倒立的内容,还有一种方式可以达到同样的效果
- (void) addSubLayerTest {
    layer = [[CALayer alloc] init];
    //设置内容
//    layer.contents = (__bridge id)([UIImage imageNamed:@"u=4202713349,3732790669&fm=11&gp=0.jpg"].CGImage);
    //设置大小
    layer.bounds = CGRectMake(0, 0, LAYER_W, LAYER_W);
    //设置锚点,可以不设置,默认(0.5, 0.5)
    layer.anchorPoint = CGPointMake(0.5, 0.5);
    //设置背景颜色
    layer.backgroundColor = [UIColor redColor].CGColor;
    //设置位子
    layer.position = CGPointMake(self.view.bounds.size.width * 0.5, self.view.bounds.size.height * 0.5);
    //设置圆角
    layer.cornerRadius = 8;
    //设置边框颜色
    layer.borderColor = [UIColor blackColor].CGColor;
    //设置边框宽度
    layer.borderWidth = 2;

//    subLayer.shadowColor = [UIColor grayColor].CGColor;
//    subLayer.shadowOffset = CGSizeMake(1, 3);
//    subLayer.shadowOpacity = 0.8;

//    裁切图片边缘,阴影也裁切
    layer.masksToBounds = YES;

    [self.view.layer addSublayer:layer];

    //设置图层代理
    layer.delegate = self;

    //利用图层形变解决图像倒立问题
    layer.transform=CATransform3DMakeRotation(M_PI, 1, 0, 0);

    //调用图层setNeedDisplay,否则代理方法不会被调用
    [layer setNeedsDisplay];
}

#pragma mark -CALayerDelegate
- (void)drawLayer:(CALayer *)theLayer inContext:(CGContextRef)theContext {
    CGContextSaveGState(theContext);
    //CG的坐标系统原点在左下角,所以要做翻转
//    CGContextScaleCTM(theContext, 1, -1);
//    CGContextTranslateCTM(theContext, 0, -LAYER_W);
    UIImage *image=[UIImage imageNamed:@"u=4202713349,3732790669&fm=11&gp=0.jpg"];
    CGContextDrawImage(theContext, CGRectMake(0, 0, LAYER_W, LAYER_W), image.CGImage);
    CGContextRestoreGState(theContext);
}
这里利用了图层的变换属性 transform, transform是CATransform3D类型,可以在三个维度上变换,对应的函数:
CATransform3DMakeTranslation()、CATransform3DMakeScale()、CATransform3DMakeRotation()
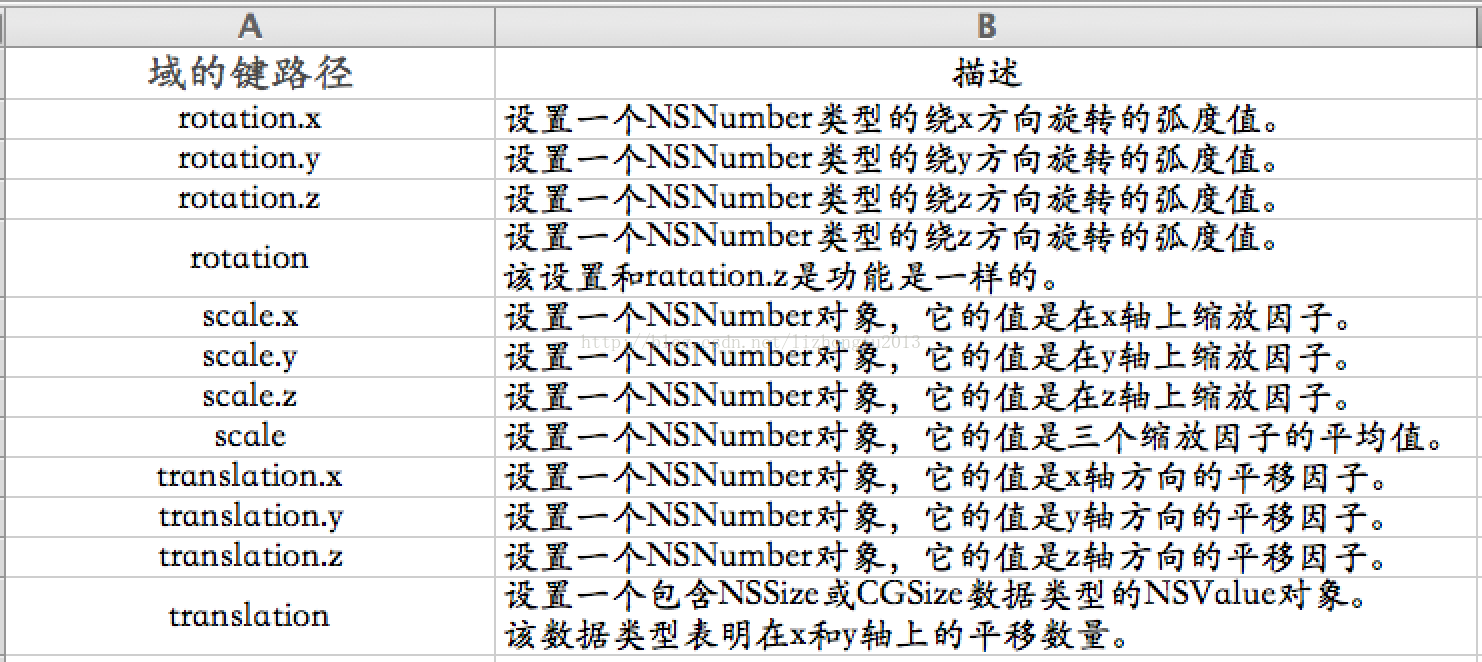
也可以使用键路径支持检索包含一个CATransform3D数据类型的属性的指定变换值,可以达到transform同样的效果:
//利用图层形变解决图像倒立问题
    //    layer.transform=CATransform3DMakeRotation(M_PI, 1, 0, 0);
    [layer setValue:@M_PI forKeyPath:@"transform.rotation.x"];
//设置x轴的平移因子为10点,图层将按指定的坐标轴方向平移给定的点数量。
[layer setValue:[NSNumber numberWithFloat:10.0] forKeyPath:@"transform.translation.x"];联合使用setValue:forKeyPath:和valueForKeyPath:方法设置和获取结构体的域。
更多的key path设置(也可以参照Xcode帮助文档中“CATransform3D Key Paths”):
三、核心动画
1、基础动画(CABasicAnimation)
在平时开发中,通常基础动画就可以满足需求,例如大多数隐式动画,UIView动画,其中UIView动画虽然需要动手去实现,但其实现过程隐藏了较多的实现细节,如果不使用UIView封装的方法,要创建一个动画一般分为以下几步:
1)、初始化动画,设置动画属性
2)、设置要动画的属性的初始值(如果不设置,默认初始值就是当前值)、结束值以及其他动画属性
3)、添加动画到图层
下面以一个位置移动动画为例了解下基础动画,在例子中点击屏幕上某个位置,英雄将移动到点击位置:
//
//  ViewController.m
//  CADemo
//
//  Created by lizhongfu on 15/2/7.
//  Copyright (c) 2015年 lizhongfu. All rights reserved.
//

#import "ViewController.h"
#import "CGTestView.h"

#define pi 3.14159265359
#define   DEGREES_TO_RADIANS(degrees)  ((pi * degrees)/ 180)
#define LAYER_W 100

@interface ViewController () {
    CALayer *layer;
}
@property (strong, nonatomic) UIView *ptV;
@end

@implementation ViewController

- (void) loadView {
    [super loadView];
}

- (void) touchesBegan:(NSSet *)touches withEvent:(UIEvent *)event {
    UITouch *touch = touches.anyObject;
    CGPoint location = [touch locationInView:self.view];

//    开始动画
    [self startBaseAnimation:location];
}

- (void) startBaseAnimation:(CGPoint) location {
//    1、创建动画,并且指定位置(position)作为动画属性
    CABasicAnimation *baseAnimation = [CABasicAnimation animationWithKeyPath:@"position"];

//    2、设置动画属性初始值和结束值
    baseAnimation.toValue = [NSValue valueWithCGPoint:location];

//    设置其他动画属性
    baseAnimation.duration = 3.0;

//    3、添加动画到图层,key相当于给动画命名,可以通过此key来获取该动画
    [layer addAnimation:baseAnimation forKey:@"kBaseAnimation"];
}

//使用displayLayer:代理方法绘制图层
- (void) addSubLayerTest {
    layer = [[CALayer alloc] init];
    //设置内容
//    layer.contents = (__bridge id)([UIImage imageNamed:@"u=4202713349,3732790669&fm=11&gp=0.jpg"].CGImage);
    //设置大小
    layer.bounds = CGRectMake(0, 0, LAYER_W, LAYER_W);
    //设置锚点,可以不设置,默认(0.5, 0.5)
    layer.anchorPoint = CGPointMake(0.5, 0.5);
    //设置背景颜色
    layer.backgroundColor = [UIColor redColor].CGColor;
    //设置位子
    layer.position = CGPointMake(self.view.bounds.size.width * 0.5, self.view.bounds.size.height * 0.5);
    //设置圆角
    layer.cornerRadius = 8;
    //设置边框颜色
    layer.borderColor = [UIColor blackColor].CGColor;
    //设置边框宽度
    layer.borderWidth = 2;

//    subLayer.shadowColor = [UIColor grayColor].CGColor;
//    subLayer.shadowOffset = CGSizeMake(1, 3);
//    subLayer.shadowOpacity = 0.8;

//    裁切图片边缘,阴影也裁切
    layer.masksToBounds = YES;

    [self.view.layer addSublayer:layer];

    //设置图层代理
    layer.delegate = self;

    //利用图层形变解决图像倒立问题
    //    layer.transform=CATransform3DMakeRotation(M_PI, 1, 0, 0);
    [layer setValue:@M_PI forKeyPath:@"transform.rotation.x"];

    //调用图层setNeedDisplay,否则代理方法不会被调用
    [layer setNeedsDisplay];
}


#pragma mark -CALayerDelegate
- (void)drawLayer:(CALayer *)theLayer inContext:(CGContextRef)theContext {
    CGContextSaveGState(theContext);
    //CG的坐标系统原点在左下角,所以要做翻转
//    CGContextScaleCTM(theContext, 1, -1);
//    CGContextTranslateCTM(theContext, 0, -LAYER_W);
    UIImage *image=[UIImage imageNamed:@"u=4202713349,3732790669&fm=11&gp=0.jpg"];
    CGContextDrawImage(theContext, CGRectMake(0, 0, LAYER_W, LAYER_W), image.CGImage);
    CGContextRestoreGState(theContext);
}

- (void)viewDidLoad {
    [super viewDidLoad];
    self.view.backgroundColor = [UIColor whiteColor];

    [self addSubLayerTest];
}

@end
以上实现了一个基本动画效果,但发现实际效果不是我们预期的,发现动画结束后图层又回到了原来的位置,之前使用UIView封装的动画不存在这个问题。之前已经提到过图层动画的本质就是将图层内容转化为位图,然后经过图形硬件渲染而形成动画效果,也就是说动画中图层的位置改变了,但实际上图层没有任何改变,所以动画结束后,图层又回到了原来的位置。如果在一个动画过程中点击屏幕,发现图层又回到了初始的位置,然后开始另一次动画,原因就是图层本身没有改变。解决这个问题的方法比较多,这里通过动画完成后重新设置图层位置来解决这个问题。
//
//  ViewController.m
//  CADemo
//
//  Created by lizhongfu on 15/2/7.
//  Copyright (c) 2015年 lizhongfu. All rights reserved.
//

#import "ViewController.h"
#import "CGTestView.h"

#define pi 3.14159265359
#define   DEGREES_TO_RADIANS(degrees)  ((pi * degrees)/ 180)
#define LAYER_W 100

@interface ViewController () {
    CALayer *layer;
}
@property (strong, nonatomic) UIView *ptV;
@end

@implementation ViewController

- (void) loadView {
    [super loadView];
}

- (void) touchesBegan:(NSSet *)touches withEvent:(UIEvent *)event {
    UITouch *touch = touches.anyObject;
    CGPoint location = [touch locationInView:self.view];

//    开始动画
    [self startBaseAnimation:location];
}

- (void) startBaseAnimation:(CGPoint) location {
//    1、创建动画,并且指定位置(position)作为动画属性
    CABasicAnimation *baseAnimation = [CABasicAnimation animationWithKeyPath:@"position"];

//    2、设置动画属性初始值和结束值
    baseAnimation.toValue = [NSValue valueWithCGPoint:location];

//    设置其他动画属性
    baseAnimation.duration = 3.0;

//    设定代理
    baseAnimation.delegate = self;

//    存储要设定的目标值
    [baseAnimation setValue:[NSValue valueWithCGPoint:location] forKey:@"BaseAnimationPosition"];

//    3、添加动画到图层,key相当于给动画命名,可以通过此key来获取该动画
    [layer addAnimation:baseAnimation forKey:@"kBaseAnimation"];
}

#pragma mark - 动画代理方法
#pragma mark 动画开始
-(void)animationDidStart:(CAAnimation *)anim{
    //通过前面的设置的key获得动画
    NSLog(@"%@", [layer animationForKey:@"kBaseAnimation"]);
}

#pragma mark 动画结束
-(void)animationDidStop:(CAAnimation *)anim finished:(BOOL)flag {
    layer.position = [[anim valueForKey:@"BaseAnimationPosition"] CGPointValue];
}

//使用displayLayer:代理方法绘制图层
- (void) addSubLayerTest {
    layer = [[CALayer alloc] init];
    //设置内容
//    layer.contents = (__bridge id)([UIImage imageNamed:@"u=4202713349,3732790669&fm=11&gp=0.jpg"].CGImage);
    //设置大小
    layer.bounds = CGRectMake(0, 0, LAYER_W, LAYER_W);
    //设置锚点,可以不设置,默认(0.5, 0.5)
    layer.anchorPoint = CGPointMake(0.5, 0.5);
    //设置背景颜色
    layer.backgroundColor = [UIColor redColor].CGColor;
    //设置位子
    layer.position = CGPointMake(self.view.bounds.size.width * 0.5, self.view.bounds.size.height * 0.5);
    //设置圆角
    layer.cornerRadius = 8;
    //设置边框颜色
    layer.borderColor = [UIColor blackColor].CGColor;
    //设置边框宽度
    layer.borderWidth = 2;

//    subLayer.shadowColor = [UIColor grayColor].CGColor;
//    subLayer.shadowOffset = CGSizeMake(1, 3);
//    subLayer.shadowOpacity = 0.8;

//    裁切图片边缘,阴影也裁切
    layer.masksToBounds = YES;

    [self.view.layer addSublayer:layer];

    //设置图层代理
    layer.delegate = self;

    //利用图层形变解决图像倒立问题
    //    layer.transform=CATransform3DMakeRotation(M_PI, 1, 0, 0);
    [layer setValue:@M_PI forKeyPath:@"transform.rotation.x"];

    //调用图层setNeedDisplay,否则代理方法不会被调用
    [layer setNeedsDisplay];
}


#pragma mark -CALayerDelegate
- (void)drawLayer:(CALayer *)theLayer inContext:(CGContextRef)theContext {
    CGContextSaveGState(theContext);
    //CG的坐标系统原点在左下角,所以要做翻转
//    CGContextScaleCTM(theContext, 1, -1);
//    CGContextTranslateCTM(theContext, 0, -LAYER_W);
    UIImage *image=[UIImage imageNamed:@"u=4202713349,3732790669&fm=11&gp=0.jpg"];
    CGContextDrawImage(theContext, CGRectMake(0, 0, LAYER_W, LAYER_W), image.CGImage);
    CGContextRestoreGState(theContext);
}

- (void)viewDidLoad {
    [super viewDidLoad];
    self.view.backgroundColor = [UIColor whiteColor];

    [self addSubLayerTest];
}

@end
以上通过给动画设置一个代理去监听动画的开始和结束,在动画结束的时候重新设置图层位置。并且通过一个自定义属性来保存动画结束时候图层的位置信息。
但运行以上代码,又发现问题了,动画结束后设定图层位置,图层会重新从起始位置运动到终点位置,这是因为对于非根图层而言,设置图层的可动画属性会产生隐式动画,当然可以设置动画图层为根图层来解决这个问题,但实际当中是通过关闭隐式动画来解决这个问题。要关闭隐式动画,需要用到动画事务CATransaction,在事务内关闭隐式动画,例如:
//
//  ViewController.m
//  CADemo
//
//  Created by lizhongfu on 15/2/7.
//  Copyright (c) 2015年 lizhongfu. All rights reserved.
//

#import "ViewController.h"
#import "CGTestView.h"

#define pi 3.14159265359
#define   DEGREES_TO_RADIANS(degrees)  ((pi * degrees)/ 180)
#define LAYER_W 100

@interface ViewController () {
    CALayer *layer;

    CGPoint startPoint;
    CGPoint endPoint;
}
@property (strong, nonatomic) UIView *ptV;
@end

@implementation ViewController

- (void) loadView {
    [super loadView];
}

- (void) touchesBegan:(NSSet *)touches withEvent:(UIEvent *)event {
    UITouch *touch = touches.anyObject;
    CGPoint location = [touch locationInView:self.view];

//    开始动画
    [self startBaseAnimation:location];
}

- (void) startBaseAnimation:(CGPoint) location {

    endPoint = location;

    //开启动画事物
    [CATransaction begin];
    //禁用隐式动画
    [CATransaction setDisableActions:YES];
    layer.position = endPoint;


//    1、创建动画,并且指定位置(position)作为动画属性
    CABasicAnimation *baseAnimation = [CABasicAnimation animationWithKeyPath:@"position"];

//    2、设置动画属性初始值和结束值
    baseAnimation.fromValue = [NSValue valueWithCGPoint:startPoint];
    baseAnimation.toValue = [NSValue valueWithCGPoint:endPoint];

//    设置其他动画属性
    baseAnimation.duration = 3.0;

//    设定代理
    baseAnimation.delegate = self;

//    存储要设定的目标值
    [baseAnimation setValue:[NSValue valueWithCGPoint:location] forKey:@"BaseAnimationPosition"];

//    3、添加动画到图层,key相当于给动画命名,可以通过此key来获取该动画
    [layer addAnimation:baseAnimation forKey:@"kBaseAnimation"];

    //提交动画事务
    [CATransaction commit];
}

#pragma mark - 动画代理方法
#pragma mark 动画开始
-(void)animationDidStart:(CAAnimation *)anim{
    //通过前面的设置的key获得动画
    NSLog(@"%@", [layer animationForKey:@"kBaseAnimation"]);
}

#pragma mark 动画结束
-(void)animationDidStop:(CAAnimation *)anim finished:(BOOL)flag {
    startPoint = endPoint;
}

//使用displayLayer:代理方法绘制图层
- (void) addSubLayerTest {
    layer = [[CALayer alloc] init];
    //设置内容
//    layer.contents = (__bridge id)([UIImage imageNamed:@"u=4202713349,3732790669&fm=11&gp=0.jpg"].CGImage);
    //设置大小
    layer.bounds = CGRectMake(0, 0, LAYER_W, LAYER_W);
    //设置锚点,可以不设置,默认(0.5, 0.5)
    layer.anchorPoint = CGPointMake(0.5, 0.5);
    //设置背景颜色
    layer.backgroundColor = [UIColor redColor].CGColor;
    //设置位子
    layer.position = CGPointMake(self.view.bounds.size.width * 0.5, self.view.bounds.size.height * 0.5);
    //设置圆角
    layer.cornerRadius = 8;
    //设置边框颜色
    layer.borderColor = [UIColor blackColor].CGColor;
    //设置边框宽度
    layer.borderWidth = 2;

//    subLayer.shadowColor = [UIColor grayColor].CGColor;
//    subLayer.shadowOffset = CGSizeMake(1, 3);
//    subLayer.shadowOpacity = 0.8;

//    裁切图片边缘,阴影也裁切
    layer.masksToBounds = YES;

    [self.view.layer addSublayer:layer];

    //设置图层代理
    layer.delegate = self;

    //利用图层形变解决图像倒立问题
    //    layer.transform=CATransform3DMakeRotation(M_PI, 1, 0, 0);
    [layer setValue:@M_PI forKeyPath:@"transform.rotation.x"];

    //调用图层setNeedDisplay,否则代理方法不会被调用
    [layer setNeedsDisplay];
}


#pragma mark -CALayerDelegate
- (void)drawLayer:(CALayer *)theLayer inContext:(CGContextRef)theContext {
    CGContextSaveGState(theContext);
    //CG的坐标系统原点在左下角,所以要做翻转
//    CGContextScaleCTM(theContext, 1, -1);
//    CGContextTranslateCTM(theContext, 0, -LAYER_W);
    UIImage *image=[UIImage imageNamed:@"u=4202713349,3732790669&fm=11&gp=0.jpg"];
    CGContextDrawImage(theContext, CGRectMake(0, 0, LAYER_W, LAYER_W), image.CGImage);
    CGContextRestoreGState(theContext);
}

- (void)viewDidLoad {
    [super viewDidLoad];
    self.view.backgroundColor = [UIColor whiteColor];

    [self addSubLayerTest];

    startPoint = layer.position;
    endPoint = CGPointZero;
}

@end
一个图层可以同时运行多个动画,例如上文中图层位置随便点击屏幕的位置不同而改变,也可以在位置改变的同时让图层发生其他动画,例如旋转:
//
//  ViewController.m
//  CADemo
//
//  Created by lizhongfu on 15/2/7.
//  Copyright (c) 2015年 lizhongfu. All rights reserved.
//

#import "ViewController.h"
#import "CGTestView.h"

#define pi 3.14159265359
#define   DEGREES_TO_RADIANS(degrees)  ((pi * degrees)/ 180)
#define LAYER_W 100

@interface ViewController () {
    CALayer *layer;

    CGPoint startPoint;
    CGPoint endPoint;
}
@property (strong, nonatomic) UIView *ptV;
@end

@implementation ViewController

- (void) loadView {
    [super loadView];
}

- (void) touchesBegan:(NSSet *)touches withEvent:(UIEvent *)event {
    UITouch *touch = touches.anyObject;
    CGPoint location = [touch locationInView:self.view];

//    开始动画
    [self startBaseAnimation:location];

//    旋转
    [self startBaseAnimationRotation];
}

- (void) startBaseAnimationRotation {
    CABasicAnimation *basicAnimation = [CABasicAnimation animationWithKeyPath:@"transform.rotation.x"];
    basicAnimation.toValue = [NSNumber numberWithFloat:M_PI * 3];
    basicAnimation.duration = 2.0;
    basicAnimation.autoreverses = YES;
    [layer addAnimation:basicAnimation forKey:@"BaseAnimationRotation"];
}

- (void) startBaseAnimation:(CGPoint) location {

    endPoint = location;

    //开启动画事物
    [CATransaction begin];
    //禁用隐式动画
    [CATransaction setDisableActions:YES];
    layer.position = endPoint;


//    1、创建动画,并且指定位置(position)作为动画属性
    CABasicAnimation *baseAnimation = [CABasicAnimation animationWithKeyPath:@"position"];

//    2、设置动画属性初始值和结束值
    baseAnimation.fromValue = [NSValue valueWithCGPoint:startPoint];
    baseAnimation.toValue = [NSValue valueWithCGPoint:endPoint];

//    设置其他动画属性
    baseAnimation.duration = 3.0;

//    设定代理
    baseAnimation.delegate = self;

//    存储要设定的目标值
    [baseAnimation setValue:[NSValue valueWithCGPoint:location] forKey:@"BaseAnimationPosition"];

//    3、添加动画到图层,key相当于给动画命名,可以通过此key来获取该动画
    [layer addAnimation:baseAnimation forKey:@"kBaseAnimation"];

    //提交动画事务
    [CATransaction commit];
}

#pragma mark - 动画代理方法
#pragma mark 动画开始
-(void)animationDidStart:(CAAnimation *)anim{
    //通过前面的设置的key获得动画
    NSLog(@"%@", [layer animationForKey:@"kBaseAnimation"]);
}

#pragma mark 动画结束
-(void)animationDidStop:(CAAnimation *)anim finished:(BOOL)flag {
    startPoint = endPoint;
}

//使用displayLayer:代理方法绘制图层
- (void) addSubLayerTest {
    layer = [[CALayer alloc] init];
    //设置内容
//    layer.contents = (__bridge id)([UIImage imageNamed:@"u=4202713349,3732790669&fm=11&gp=0.jpg"].CGImage);
    //设置大小
    layer.bounds = CGRectMake(0, 0, LAYER_W, LAYER_W);
    //设置锚点,可以不设置,默认(0.5, 0.5)
    layer.anchorPoint = CGPointMake(0.5, 0.5);
    //设置背景颜色
    layer.backgroundColor = [UIColor redColor].CGColor;
    //设置位子
    layer.position = CGPointMake(self.view.bounds.size.width * 0.5, self.view.bounds.size.height * 0.5);
    //设置圆角
    layer.cornerRadius = 8;
    //设置边框颜色
    layer.borderColor = [UIColor blackColor].CGColor;
    //设置边框宽度
    layer.borderWidth = 2;

//    subLayer.shadowColor = [UIColor grayColor].CGColor;
//    subLayer.shadowOffset = CGSizeMake(1, 3);
//    subLayer.shadowOpacity = 0.8;

//    裁切图片边缘,阴影也裁切
    layer.masksToBounds = YES;

    [self.view.layer addSublayer:layer];

    //设置图层代理
    layer.delegate = self;

    //利用图层形变解决图像倒立问题
    //    layer.transform=CATransform3DMakeRotation(M_PI, 1, 0, 0);
    [layer setValue:@M_PI forKeyPath:@"transform.rotation.x"];

    //调用图层setNeedDisplay,否则代理方法不会被调用
    [layer setNeedsDisplay];
}


#pragma mark -CALayerDelegate
- (void)drawLayer:(CALayer *)theLayer inContext:(CGContextRef)theContext {
    CGContextSaveGState(theContext);
    //CG的坐标系统原点在左下角,所以要做翻转
//    CGContextScaleCTM(theContext, 1, -1);
//    CGContextTranslateCTM(theContext, 0, -LAYER_W);
    UIImage *image=[UIImage imageNamed:@"u=4202713349,3732790669&fm=11&gp=0.jpg"];
    CGContextDrawImage(theContext, CGRectMake(0, 0, LAYER_W, LAYER_W), image.CGImage);
    CGContextRestoreGState(theContext);
}

- (void)viewDidLoad {
    [super viewDidLoad];
    self.view.backgroundColor = [UIColor whiteColor];

    [self addSubLayerTest];

    startPoint = layer.position;
    endPoint = CGPointZero;
}

@end
注意:同一图层运行两个动画,但这两个动画没有必然的联系,一个动画停止时,另一个动画不受影响
2、关键帧动画(CAKeyframeAnimation)
关键帧动画就是在动画控制的过程中,指定动画主要的动画状态,每个状态之间的过程由系统自动运算补充(补间动画)。下面例子图层根据设定的关键帧动画:
//
//  ViewController.m
//  CADemo
//
//  Created by lizhongfu on 15/2/7.
//  Copyright (c) 2015年 lizhongfu. All rights reserved.
//

#import "ViewController.h"
#import "CGTestView.h"

#define pi 3.14159265359
#define   DEGREES_TO_RADIANS(degrees)  ((pi * degrees)/ 180)
#define LAYER_W 100

@interface ViewController () {
    CALayer *layer;

    CGPoint startPoint;
    CGPoint endPoint;
}
@property (strong, nonatomic) UIView *ptV;
@end

@implementation ViewController

- (void) loadView {
    [super loadView];
}

- (void) touchesBegan:(NSSet *)touches withEvent:(UIEvent *)event {
    [self startKeyFrameAnimation];
}

- (void) startKeyFrameAnimation {
    CGFloat W = self.view.bounds.size.width;
    CGFloat H = self.view.bounds.size.height;

//    创建关键帧动画,设置position为动画属性
    CAKeyframeAnimation *keyFrameAniamtion = [CAKeyframeAnimation animationWithKeyPath:@"position"];

//    设置关键帧
    NSValue *key1 = [NSValue valueWithCGPoint:layer.position];
    NSValue *key2 = [NSValue valueWithCGPoint:CGPointMake(0, 0)];
    NSValue *key3 = [NSValue valueWithCGPoint:CGPointMake(0, H)];
    NSValue *key4 = [NSValue valueWithCGPoint:CGPointMake(W, 0)];
    NSValue *key5 = [NSValue valueWithCGPoint:CGPointMake(W, H)];
    NSValue *key6 = [NSValue valueWithCGPoint:layer.position];
    keyFrameAniamtion.values = @[key1, key2, key3, key4, key5, key6];

//    设置其他属性
    keyFrameAniamtion.duration = 6;
    keyFrameAniamtion.beginTime = CACurrentMediaTime();

//    添加动画到图层
    [layer addAnimation:keyFrameAniamtion forKey:@"KeyframeAnimationPosition"];
}

#pragma mark - 动画代理方法
#pragma mark 动画开始
-(void)animationDidStart:(CAAnimation *)anim{
    //通过前面的设置的key获得动画
    NSLog(@"%@", [layer animationForKey:@"kBaseAnimation"]);
}

#pragma mark 动画结束
-(void)animationDidStop:(CAAnimation *)anim finished:(BOOL)flag {
    startPoint = endPoint;
}

//使用displayLayer:代理方法绘制图层
- (void) addSubLayerTest {
    layer = [[CALayer alloc] init];
    //设置内容
//    layer.contents = (__bridge id)([UIImage imageNamed:@"u=4202713349,3732790669&fm=11&gp=0.jpg"].CGImage);
    //设置大小
    layer.bounds = CGRectMake(0, 0, LAYER_W, LAYER_W);
    //设置锚点,可以不设置,默认(0.5, 0.5)
    layer.anchorPoint = CGPointMake(0.5, 0.5);
    //设置背景颜色
    layer.backgroundColor = [UIColor redColor].CGColor;
    //设置位子
    layer.position = CGPointMake(self.view.bounds.size.width * 0.5, self.view.bounds.size.height * 0.5);
    //设置圆角
    layer.cornerRadius = 8;
    //设置边框颜色
    layer.borderColor = [UIColor blackColor].CGColor;
    //设置边框宽度
    layer.borderWidth = 2;

//    subLayer.shadowColor = [UIColor grayColor].CGColor;
//    subLayer.shadowOffset = CGSizeMake(1, 3);
//    subLayer.shadowOpacity = 0.8;

//    裁切图片边缘,阴影也裁切
    layer.masksToBounds = YES;

    [self.view.layer addSublayer:layer];

    //设置图层代理
    layer.delegate = self;

    //利用图层形变解决图像倒立问题
    //    layer.transform=CATransform3DMakeRotation(M_PI, 1, 0, 0);
    [layer setValue:@M_PI forKeyPath:@"transform.rotation.x"];

    //调用图层setNeedDisplay,否则代理方法不会被调用
    [layer setNeedsDisplay];
}


#pragma mark -CALayerDelegate
- (void)drawLayer:(CALayer *)theLayer inContext:(CGContextRef)theContext {
    CGContextSaveGState(theContext);
    //CG的坐标系统原点在左下角,所以要做翻转
//    CGContextScaleCTM(theContext, 1, -1);
//    CGContextTranslateCTM(theContext, 0, -LAYER_W);
    UIImage *image=[UIImage imageNamed:@"u=4202713349,3732790669&fm=11&gp=0.jpg"];
    CGContextDrawImage(theContext, CGRectMake(0, 0, LAYER_W, LAYER_W), image.CGImage);
    CGContextRestoreGState(theContext);
}

- (void)viewDidLoad {
    [super viewDidLoad];
    self.view.backgroundColor = [UIColor whiteColor];

    [self addSubLayerTest];
}

@end
除了可以指定值来确定关键帧,还可以通过绘制路径来进行关键帧控制,如果同时指定值和路径,路径的优先级更高。
//
//  ViewController.m
//  CADemo
//
//  Created by lizhongfu on 15/2/7.
//  Copyright (c) 2015年 lizhongfu. All rights reserved.
//

#import "ViewController.h"
#import "CGTestView.h"

#define pi 3.14159265359
#define   DEGREES_TO_RADIANS(degrees)  ((pi * degrees)/ 180)
#define LAYER_W 100

@interface ViewController () {
    CALayer *layer;

    CGPoint startPoint;
    CGPoint endPoint;
}
@property (strong, nonatomic) UIView *ptV;
@end

@implementation ViewController

- (void) loadView {
    [super loadView];
}

- (void) touchesBegan:(NSSet *)touches withEvent:(UIEvent *)event {
    [self startKeyFrameAnimation];
}

- (void) startKeyFrameAnimation {
//    创建关键帧动画,设置position为动画属性
    CAKeyframeAnimation *keyFrameAniamtion = [CAKeyframeAnimation animationWithKeyPath:@"position"];

    //设置path属性
    keyFrameAniamtion.path = CFAutorelease(CGPathCreateWithEllipseInRect(self.view.bounds, NULL));

//    设置其他属性
    keyFrameAniamtion.duration = 6;
    keyFrameAniamtion.beginTime = CACurrentMediaTime();

//    添加动画到图层
    [layer addAnimation:keyFrameAniamtion forKey:@"KeyframeAnimationPosition"];
}

#pragma mark - 动画代理方法
#pragma mark 动画开始
-(void)animationDidStart:(CAAnimation *)anim{
    //通过前面的设置的key获得动画
    NSLog(@"%@", [layer animationForKey:@"kBaseAnimation"]);
}

#pragma mark 动画结束
-(void)animationDidStop:(CAAnimation *)anim finished:(BOOL)flag {
    startPoint = endPoint;
}

//使用displayLayer:代理方法绘制图层
- (void) addSubLayerTest {
    layer = [[CALayer alloc] init];
    //设置内容
//    layer.contents = (__bridge id)([UIImage imageNamed:@"u=4202713349,3732790669&fm=11&gp=0.jpg"].CGImage);
    //设置大小
    layer.bounds = CGRectMake(0, 0, LAYER_W, LAYER_W);
    //设置锚点,可以不设置,默认(0.5, 0.5)
    layer.anchorPoint = CGPointMake(0.5, 0.5);
    //设置背景颜色
    layer.backgroundColor = [UIColor redColor].CGColor;
    //设置位子
    layer.position = CGPointMake(self.view.bounds.size.width * 0.5, self.view.bounds.size.height * 0.5);
    //设置圆角
    layer.cornerRadius = 8;
    //设置边框颜色
    layer.borderColor = [UIColor blackColor].CGColor;
    //设置边框宽度
    layer.borderWidth = 2;

//    subLayer.shadowColor = [UIColor grayColor].CGColor;
//    subLayer.shadowOffset = CGSizeMake(1, 3);
//    subLayer.shadowOpacity = 0.8;

//    裁切图片边缘,阴影也裁切
    layer.masksToBounds = YES;

    [self.view.layer addSublayer:layer];

    //设置图层代理
    layer.delegate = self;

    //利用图层形变解决图像倒立问题
    //    layer.transform=CATransform3DMakeRotation(M_PI, 1, 0, 0);
    [layer setValue:@M_PI forKeyPath:@"transform.rotation.x"];

    //调用图层setNeedDisplay,否则代理方法不会被调用
    [layer setNeedsDisplay];
}


#pragma mark -CALayerDelegate
- (void)drawLayer:(CALayer *)theLayer inContext:(CGContextRef)theContext {
    CGContextSaveGState(theContext);
    //CG的坐标系统原点在左下角,所以要做翻转
//    CGContextScaleCTM(theContext, 1, -1);
//    CGContextTranslateCTM(theContext, 0, -LAYER_W);
    UIImage *image=[UIImage imageNamed:@"u=4202713349,3732790669&fm=11&gp=0.jpg"];
    CGContextDrawImage(theContext, CGRectMake(0, 0, LAYER_W, LAYER_W), image.CGImage);
    CGContextRestoreGState(theContext);
}

- (void)viewDidLoad {
    [super viewDidLoad];
    self.view.backgroundColor = [UIColor whiteColor];

    [self addSubLayerTest];
}

@end
从iOS7开始,UIView动画中封装了关键帧动画:
- (void) touchesBegan:(NSSet *)touches withEvent:(UIEvent *)event {
    [UIView animateKeyframesWithDuration:5.0 delay:0 options: UIViewAnimationOptionCurveLinear| UIViewAnimationOptionCurveLinear animations:^{
        //第二个关键帧(准确的说第一个关键帧是开始位置):从0秒开始持续50%的时间,也就是5.0*0.5=2.5秒
        [UIView addKeyframeWithRelativeStartTime:0.0 relativeDuration:0.5 animations:^{
            imageView.center=CGPointMake(80.0, 220.0);
        }];
        //第三个关键帧,从0.5*5.0秒开始,持续5.0*0.25=1.25秒
        [UIView addKeyframeWithRelativeStartTime:0.5 relativeDuration:0.25 animations:^{
            imageView.center=CGPointMake(45.0, 300.0);
        }];
        //第四个关键帧:从0.75*5.0秒开始,持所需5.0*0.25=1.25秒
        [UIView addKeyframeWithRelativeStartTime:0.75 relativeDuration:0.2 animations:^{
            imageView.center=CGPointMake(55.0, 400.0);
        }];
        //第五个关键帧:从0.05*5.0秒开始,持所需5.0*0.05=0.25秒
        [UIView addKeyframeWithRelativeStartTime:0.95 relativeDuration:0.05 animations:^{
            imageView.center=self.view.center;
        }];

    } completion:^(BOOL finished) {
        NSLog(@"Animation <span style="font-family: Arial, Helvetica, sans-serif;">finished</span>.");
    }];
}
3、动画组( CAAnimationGroup )
一个图层上可以同时运行多个动画,而且实际中一个物体的运动大多是符合运动,单一属性变化很少。一个属性动画每次只能对一个属性进行动画控制,上文例子中我们实现了一个图层上运行两种动画,但如果更多的属性要动画往往就变得麻烦了,动画组就是基于这样的情况产生的,动画组是一系列动画的组合,添加到动画组里的动画行为可以统一的设置,可以并发执行,构造出复杂的动画效果。
//
//  ViewController.m
//  CADemo
//
//  Created by lizhongfu on 15/2/7.
//  Copyright (c) 2015年 lizhongfu. All rights reserved.
//

#import "ViewController.h"
#import "CGTestView.h"

#define pi 3.14159265359
#define   DEGREES_TO_RADIANS(degrees)  ((pi * degrees)/ 180)
#define LAYER_W 100

@interface ViewController () {
    CALayer *layer;

    CGPoint startPoint;
    CGPoint endPoint;
}
@property (strong, nonatomic) UIView *ptV;
@end

@implementation ViewController

- (void) loadView {
    [super loadView];
}

- (void) touchesBegan:(NSSet *)touches withEvent:(UIEvent *)event {
    CABasicAnimation *basic = [self baseAnimation];
    CAKeyframeAnimation *keyFrame = [self startKeyFrameAnimation];

//    创建动画组
    CAAnimationGroup *group = [CAAnimationGroup animation];
    group.animations = @[basic, keyFrame];

//    设置动画时间,如果动画组中动画已经设置过动画属性则不再生效
    group.duration = 6.0;

    group.delegate = self;
    group.beginTime = CACurrentMediaTime();

    [layer addAnimation:group forKey:nil];
}

- (CABasicAnimation *) baseAnimation {
    CABasicAnimation *basicAnimation = [CABasicAnimation animationWithKeyPath:@"transform.rotation.x"];
    basicAnimation.toValue = [NSNumber numberWithFloat:M_PI * 3];
    basicAnimation.autoreverses = YES;

    return basicAnimation;
}

- (CAKeyframeAnimation *) startKeyFrameAnimation {
//    创建关键帧动画,设置position为动画属性
    CAKeyframeAnimation *keyFrameAniamtion = [CAKeyframeAnimation animationWithKeyPath:@"position"];

    //设置path属性
    keyFrameAniamtion.path = CFAutorelease(CGPathCreateWithEllipseInRect(self.view.bounds, NULL));

    return keyFrameAniamtion;
}

#pragma mark - 动画代理方法
#pragma mark 动画开始
-(void)animationDidStart:(CAAnimation *)anim{
}

#pragma mark 动画结束
-(void)animationDidStop:(CAAnimation *)anim finished:(BOOL)flag {
}

//使用displayLayer:代理方法绘制图层
- (void) addSubLayerTest {
    layer = [[CALayer alloc] init];
    //设置内容
//    layer.contents = (__bridge id)([UIImage imageNamed:@"u=4202713349,3732790669&fm=11&gp=0.jpg"].CGImage);
    //设置大小
    layer.bounds = CGRectMake(0, 0, LAYER_W, LAYER_W);
    //设置锚点,可以不设置,默认(0.5, 0.5)
    layer.anchorPoint = CGPointMake(0.5, 0.5);
    //设置背景颜色
    layer.backgroundColor = [UIColor redColor].CGColor;
    //设置位子
    layer.position = CGPointMake(self.view.bounds.size.width * 0.5, self.view.bounds.size.height * 0.5);
    //设置圆角
    layer.cornerRadius = 8;
    //设置边框颜色
    layer.borderColor = [UIColor blackColor].CGColor;
    //设置边框宽度
    layer.borderWidth = 2;

//    subLayer.shadowColor = [UIColor grayColor].CGColor;
//    subLayer.shadowOffset = CGSizeMake(1, 3);
//    subLayer.shadowOpacity = 0.8;

//    裁切图片边缘,阴影也裁切
    layer.masksToBounds = YES;

    [self.view.layer addSublayer:layer];

    //设置图层代理
    layer.delegate = self;

    //利用图层形变解决图像倒立问题
    //    layer.transform=CATransform3DMakeRotation(M_PI, 1, 0, 0);
    [layer setValue:@M_PI forKeyPath:@"transform.rotation.x"];

    //调用图层setNeedDisplay,否则代理方法不会被调用
    [layer setNeedsDisplay];
}

#pragma mark -CALayerDelegate
- (void)drawLayer:(CALayer *)theLayer inContext:(CGContextRef)theContext {
    CGContextSaveGState(theContext);
    //CG的坐标系统原点在左下角,所以要做翻转
//    CGContextScaleCTM(theContext, 1, -1);
//    CGContextTranslateCTM(theContext, 0, -LAYER_W);
    UIImage *image=[UIImage imageNamed:@"u=4202713349,3732790669&fm=11&gp=0.jpg"];
    CGContextDrawImage(theContext, CGRectMake(0, 0, LAYER_W, LAYER_W), image.CGImage);
    CGContextRestoreGState(theContext);
}

- (void)viewDidLoad {
    [super viewDidLoad];
    self.view.backgroundColor = [UIColor whiteColor];

    [self addSubLayerTest];
}

@end
4、过度动画( CATransition )
过度动画就是从一个场景以动画的形式过度到另一个场景,先来看一个例子:
//
//  ViewController.m
//  CADemo
//
//  Created by lizhongfu on 15/2/7.
//  Copyright (c) 2015年 lizhongfu. All rights reserved.
//

#import "ViewController.h"
#import "CGTestView.h"

#define pi 3.14159265359
#define   DEGREES_TO_RADIANS(degrees)  ((pi * degrees)/ 180)
#define LAYER_W 100

@interface ViewController () {
    UIImageView *imageView;
}
@property (strong, nonatomic) NSArray *imageArray;
@end

@implementation ViewController

- (void) loadView {
    [super loadView];
}

- (void) touchesBegan:(NSSet *)touches withEvent:(UIEvent *)event {
    //1.创建转场动画对象
    CATransition *transition = [[CATransition alloc]init];

    //2.设置动画类型,注意对于苹果官方没公开的动画类型只能使用字符串,并没有对应的常量定义
    transition.type = @"cube";

    //设置子类型
    transition.subtype = kCATransitionFromRight;

    //设置动画时常
    transition.duration = 1.0f;

    //3.设置转场后的新视图添加转场动画

    NSInteger randIndex = rand()%(self.imageArray.count - 1);
    imageView.image = [self.imageArray objectAtIndex:randIndex];
    [imageView.layer addAnimation:transition forKey:@"KCTransitionAnimation"];
}

- (void)viewDidLoad {
    [super viewDidLoad];

    srand((unsigned)time(NULL));

    self.view.backgroundColor = [UIColor whiteColor];

    self.imageArray = [[NSArray alloc] initWithObjects:
                  [UIImage imageNamed:@"u=1381358738,2041209046&fm=21&gp=0.jpg"],
                  [UIImage imageNamed:@"u=2158533919,1825886998&fm=21&gp=0.jpg"],
                  [UIImage imageNamed:@"u=2454329933,3312919897&fm=21&gp=0.jpg"],
                  [UIImage imageNamed:@"u=2855960711,1457439459&fm=11&gp=0.jpg"],
                  [UIImage imageNamed:@"u=3996786886,2745458337&fm=11&gp=0.jpg"],nil];

    imageView = [[UIImageView alloc] initWithFrame:CGRectMake(0, 0, 200, 300)];
    imageView.image = self.imageArray[0];
    imageView.center = self.view.center;
    [self.view addSubview:imageView];
}

@end
过度动画使用的时候一般分为以下几步:
1、创建过度动画
2、设置过度类型,子类型可选(控制过度方向)
3、添加过度动画到图层
下表列出一些常用的过度类型,其中未公开的动画类型也可以使用,可以通过审核。
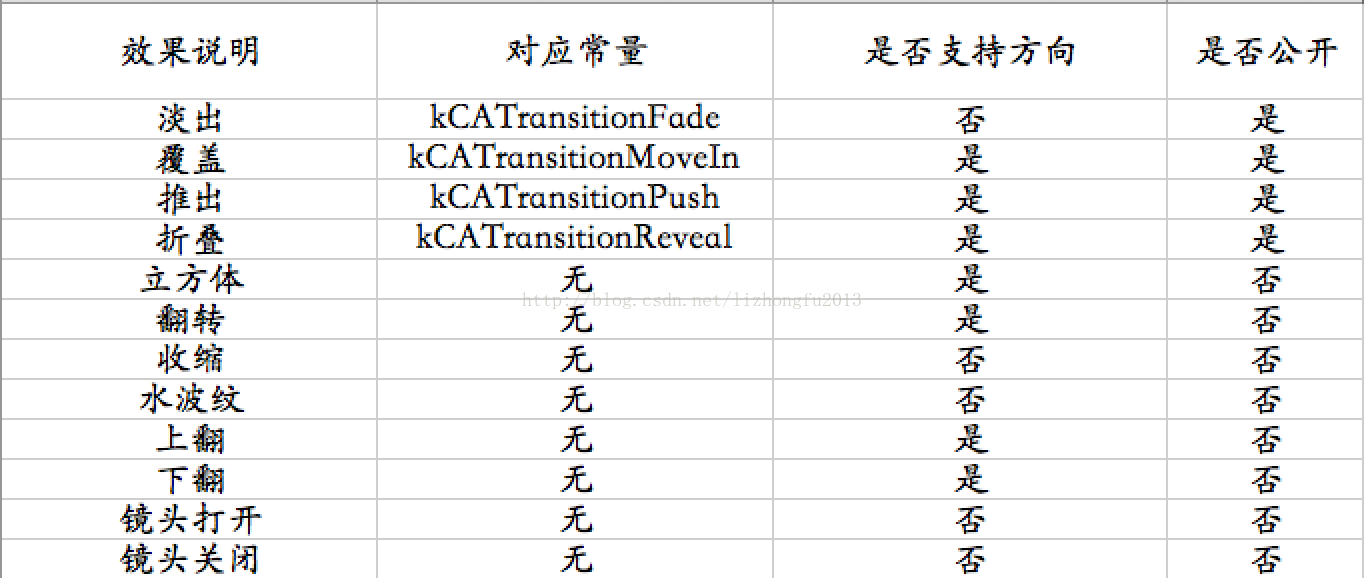
子类型一般控制动画方向:
kCATransitionFromRight 从右侧过度
kCATransitionFromLeft 从左侧过度
kCATransitionFromTop 从顶部过度
kCATransitionFromBottom 从底部过度
注意:理解了CATransition之后,我们是否还记得之前提到的利用CATransaction禁用隐式动画,CATransition和CATransaction拼写上很容易看错,实际上他们是完全不同的对象,CATransition继承自CAAnimation,CATransaction集成自NSObject,下面说一说CATransaction。
对图层属性的每次更改都是事务的一部分。CATransaction类管理动画的创建和分组并在适当的时间执行动画。在大部分情况下,你不需要创建你自己的事务。无论什么时候,给图层添加显式或隐式动画,Core Animation会自动创建一个隐式事务。然而你也可以创建显式事务以能够更精确的管理动画。
使用CATransaction类提供的方法创建与管理事务。通过调用begin类方法,可以开始(或隐式地创建)一个新的事务;调用commit类方法可结束一个事务。两个方法之间的代码就是作为事务部分的变化。比如说,改变一个图层的两个属性,你可以使用如下代码。
 //创建显式事务
[CATransaction begin];
theLayer.zPosition = 200.0;
theLayer.opacity = 0.0;
[CATransitoin commit];
使用事务的主要一个原因是显式事务的限制内,你可以改变动画的持续时间,定时函数以及其他参数。你也可以赋值一个完成块给整个事务,这样当动画组完成后能够得到一个通知。改变动画参数须要在事务字典中使用setValue:forKey:方法更改适当的键。比如说,为了改变默认的持续时间为10秒,则你需要改变kCATransactionAnimationDuration键:
[CATransaction begin];
[CATransaction setValue:[NSNumber numberWithFloat:10.0f];
forKey:kCATransactionAnimationDuration];
[CATransaction commit];
在你想提供不同默认值给不同的动画集合的情况下你可以内嵌事务。为了一个事务中内嵌一个事务,仅需要再次调用begin类方法。每一个begin类方法必须有一个与之配对的commit类方法。仅在你提交了对最外层事务的变化之后,Core Animation开始相关的动画。
    [CATransaction begin]; // Outer transaction
    // Change the animation duration to two seconds
    [CATransaction setValue:[NSNumber numberWithFloat:2.0f] forKey:kCATransactionAnimationDuration];
    // Move the layer to a new position
    theLayer.position = CGPointMake(0.0,0.0);
    [CATransaction begin]; // Inner transaction
    // Change the animation duration to five seconds
    [CATransaction setValue:[NSNumber numberWithFloat:5.0f] forKey:kCATransactionAnimationDuration];
    // Change the zPosition and opacity
    theLayer.zPosition=200.0;
    theLayer.opacity=0.0;
    [CATransaction commit]; // Inner transaction
    [CATransaction commit]; // Outer transaction
5、逐帧动画
前面介绍了核心动画的大部分动画类型,但在动画制作中还有一种动画类型“逐帧动画”,提起逐帧动画首先会想到UIImageView,在Core Animation(二)动画基础部分中已经提到了,如果要我们自己动手实现逐帧动画,会想到使用NSTimer来实现,但这里介绍另一种更优的实现方法CADisplayLink。
(1)什么是CADisplayLink
CADisplayLink是一个能让我们以和屏幕刷新率相同的频率将内容画到屏幕上的定时器。
(2)CADisplayLink 与 NSTimer 有什么不同
iOS设备的屏幕刷新频率是固定的,CADisplayLink在正常情况下会在每次刷新结束都被调用,精确度相当高。NSTimer的精确度相对低,比如NSTimer的触发时间到的时候,runloop如果在阻塞状态,触发时间就会推迟到下一个runloop周期。
使用方法:
//定义时钟对象
CADisplayLink *displayLink=[CADisplayLink displayLinkWithTarget:self selector:@selector(update)];
//添加时钟对象到主运行循环
[displayLink addToRunLoop:[NSRunLoop mainRunLoop] forMode:NSDefaultRunLoopMode];

#pragma mark 每次屏幕刷新就会执行一次此方法(每秒接近60次)
-(void)update {
}
注意:
通常来讲:iOS设备的刷新频率事60HZ也就是每秒60次。那么每一次刷新的时间就是1/60秒 大概16.7毫秒。当我们的frameInterval值为1的时候我们需要保证的是 CADisplayLink调用的`target`的函数计算时间不应该大于 16.7否则就会出现严重的丢帧现象。
在mac应用中我们使用的不是CADisplayLink而是 CVDisplayLink它是基于C接口。


 1169
1169


 被折叠的 条评论
为什么被折叠?
被折叠的 条评论
为什么被折叠?
 到【灌水乐园】发言


