boost::thread的实现总体上是比较简单的
thread只是跨平台的线程封装库
以下只讨论windows,即使用BOOST_HAS_WINTHREAD的情况
Boost::Thread有两个构造函数
一个是thread,构造一个表示当前执行线程的线程对象
一个是explicit thread(const boost::function0<void>& threadfunc)
这里的boost::function0<void>可以简单看为一个无返回无参数的函数
这里的函数可以是类重载operator()构成的函数
该构造函数传入的是函数 对象而非是函数指针
这样一个具有一般函数特性的类也能作为参数传入
1)最简单方法
#include <boost/thread/thread.hpp>
#include <iostream>
void hello()
{
std::cout<<"Hello world, I'm a thread!"<<std::endl;
}
int main()
{
boost::thread thrd(&hello);
thrd.join();
system("pause");
return 0;
}
2)复杂类型对象作为参数来创建线程
#include <boost/thread/thread.hpp>
#include <boost/thread/mutex.hpp>
#include <iostream>
boost::mutex io_mutex;
struct count
{
count(int id) : id(id) {}
void operator()()
{
for(int i = 0; i < 10; ++i)
{
boost::mutex::scoped_lock lock(io_mutex);
std::cout<<id<<": "<<i<<std::endl;
}
}
int id;
};
int main()
{
boost::thread thrd1(count(1));
boost::thread thrd2(count(2));
thrd1.join();
thrd2.join();
system("pause");
return 0;
}
3)在类内部创建线程
类内部静态方法启动线程
#include <boost/thread/thread.hpp>
#include <iostream>
class HelloWorld
{
public:
static void hello()
{
std::cout<<"Hello world, I'm a thread!"<<std::endl;
}
static void start()
{
boost::thread thrd(hello);
thrd.join();
}
};
int main()
{
HelloWorld::start();
system("pause");
return 0;
}
在这里,start()和hello()方法都必须是static方法。如果要求start()和hello()方法不能是静态方法则采用下面的方法创建线程:
#include <boost/function/function0.hpp>
#include <boost/thread/thread.hpp>
#include <iostream>
class HelloWorld
{
public:
void hello()
{
std::cout<<"Hello world, I'm a thread!"<<std::endl;
}
void start()
{
boost::function0<void> f = boost::bind(&HelloWorld::hello, this);
boost::thread thrd(f);
thrd.join();
}
};
int main()
{
HelloWorld hello;
hello.start();
system("pause");
return 0;
}
3)在Singleton模式内部创建线程:
#include <boost/thread/thread.hpp>
#include <iostream>
class HelloWorld
{
public:
void hello()
{
std::cout<<"Hello world, I'm a thread!"<<std::endl;
}
static void start()
{
boost::thread thrd(boost::bind(&HelloWorld::hello, &HelloWorld::getInstance()));
thrd.join();
}
static HelloWorld& getInstance()
{
if(!instance)
instance = new HelloWorld;
return *instance;
}
private:
HelloWorld() {}
static HelloWorld* instance;
};
HelloWorld* HelloWorld::instance = 0;
int main()
{
HelloWorld::start();
system("pause");
return 0;
}
4)用类内部函数在类外部创建线程
#include <boost/thread/thread.hpp>
#include <iostream>
#include <string>
class HelloWorld
{
public:
void hello(const std::string& str)
{
std::cout<<str<<std::endl;
}
};
int main()
{
HelloWorld obj;
boost::thread thrd(boost::bind(&HelloWorld::hello, &obj, "Hello World, I'm a thread!"));
thrd.join();
system("pause");
return 0;
}
+++++++++++++++++++++++++++++++++++++++++++++++++++++++++++++++++++++++++++++++++++++++++++++++++++++++++
++++++++++++++++++++++++++++++++++++++++++++++++++++++++++++++++++++++++++++++++++++++++++++++++++++++++++
使用boost::thread跨平台多线程
头文件 <boost/thread/thread.hpp>
namespace boost {
class thread;
class thread_group;
}
++++++++++++++++++++++++++++++++++++++++++++++++++++++++++++++++++++++++++++++++++++++++++++++1,thread
thread的构造形式为explicit thread(const boost::function0<void>&);
boost::function0<void>可以简单看为:一个无返回(返回void),无参数的函数。
这里的函数也可以是类重载operator()构成的函数。
举例来说如下形都可以转化为function0<void>
void run(void)
{
}
struct Run
{
void operator()(void) {}
};
只要带参数构造一个thread实例那么就是构建了一个线程,相当的方便快捷。
于是有了我们第一个例子:
例一:
#include <boost/thread.hpp>
#include <iostream>
struct Run
{
void operator()(void)
{
std::cout<<__FUNCTION__<<std::endl;
}
};
void run(void)
{
std::cout<<__FUNCTION__<<std::endl;
}
int main(int argc, char* argv[])
{
Run r;
boost::thread thrd(r);
boost::thread thrdb(run);
return 0;
}
运行后发生了什么?线程起动了,但一闪而过,结果都没能输出全就运行结束了。那该怎么办呢?
答:使用thread::join,当join后的thread在该线程未执行结束会一直处于阻塞状态。
改下例子中主程序main为
{
Run r;
boost::thread thrd(r);
boost::thread thrdb(run);
thrd.join();
thrdb.join();
return 0;
}
看到结果了,但似乎线程有点不同步,呃。。暂时放在一旁吧。
什么?你觉得void(void)的函数连变量入口都没,传值不方便?其实你错了,当你用会了boost::bind,会发现函数有多少参数都不是问题,都可以轻松bind为void(void)形式。我几乎可以说boost::thread最基本的的使用就是boost::thread+boost::function+boost::bind的结合。
++++++++++++++++++++++++++++++++++++++++++++++++++++++++++++++++++++++++++++++++++++++++++++++++2,thread_group
大家一定注意到除了thread还有thread_group,顾名思义,thread_group就是thread的group,看看main主程序有点烦琐,引入thread_group看看效果
先认识下thread_group的成员函数:
thread* create_thread(const boost::function0<void>&); //创建一个线程
void add_thread(thread*); //加入一个已存在的线程
void remove_thread(thread*); //移除一个线程
void join_all(); //全部等待结束
很清晰,改造开始
{
Run r;
boost::thread_group grp;
grp.create_thread(r); //使用create_thread
grp.add_thread(new boost::thread(run)); //使用add_thread
grp.join_all();
return 0;
}
运行,结果完全一样。
注意:当thread_group析构时会自动delete已加入的thread
例
{
boost::thread_group grp;
boost::thread* thrd=grp.create_thread(r);
grp.join_all();
delete thrd;
} //错误, grp在析构时对已删除的thrd再进行删除
若要手动管理,可改为
{
Run r;
boost::thread_group grp;
boost::thread* thrd=grp.create_thread(r);
grp.join_all();
grp.remove_thread(thrd); //把thrd移出grp
delete thrd;
return 0;
}
好了,以上就是thread的最基本的使用方法。
+++++++++++++++++++++++++++++++++++++++++++++++++++++++++++++++++++++++++++++++++++++++
+++++++++++++++++++++++++++++++++++++++++++++++++++++++++++++++++++++++++++++++++++++++
+++++++++++++++++++++++++++++++++++++++++++++++++++++++++++++++++++++++++++++++++++++++
C++ explicit关键字详解
首先, C++中的explicit关键字只能用于修饰只有一个参数的类构造函数, 它的作用是表明该构造函数是显示的, 而非隐式的, 跟它相对应的另一个关键字是implicit, 意思是隐藏的,类构造函数默认情况下即声明为implicit(隐式).
那么显示声明的构造函数和隐式声明的有什么区别呢? 我们来看下面的例子:
那么显示声明的构造函数和隐式声明的有什么区别呢? 我们来看下面的例子:
class CxString // 没有使用explicit关键字的类声明, 即默认为隐式声明
{
public:
char *_pstr;
int _size;
CxString(int size)
{
_size = size; // string的预设大小
_pstr = malloc(size + 1); // 分配string的内存
memset(_pstr, 0, size + 1);
}
CxString(const char *p)
{
int size = strlen(p);
_pstr = malloc(size + 1); // 分配string的内存
strcpy(_pstr, p); // 复制字符串
_size = strlen(_pstr);
}
// 析构函数这里不讨论, 省略...
};
// 下面是调用:
CxString string1(24); // 这样是OK的, 为CxString预分配24字节的大小的内存
CxString string2 = 10; // 这样是OK的, 为CxString预分配10字节的大小的内存
CxString string3; // 这样是不行的, 因为没有默认构造函数, 错误为: “CxString”: 没有合适的默认构造函数可用
CxString string4("aaaa"); // 这样是OK的
CxString string5 = "bbb"; // 这样也是OK的, 调用的是CxString(const char *p)
CxString string6 = 'c'; // 这样也是OK的, 其实调用的是CxString(int size), 且size等于'c'的ascii码
string1 = 2; // 这样也是OK的, 为CxString预分配2字节的大小的内存
string2 = 3; // 这样也是OK的, 为CxString预分配3字节的大小的内存
string3 = string1; // 这样也是OK的, 至少编译是没问题的, 但是如果析构函数里用free释放_pstr内存指针的时候可能会报错, 完整的代码必须重载运算符"=", 并在其中处理内存释放
上面的代码中, "CxString string2 = 10;" 这句为什么是可以的呢? 在C++中, 如果的构造函数只有一个参数时, 那么在编译的时候就会有一个缺省的转换操作:将该构造函数对应数据类型的数据转换为该类对象. 也就是说 "CxString string2 = 10;" 这段代码, 编译器自动将整型转换为CxString类对象, 实际上等同于下面的操作:
CxString string2(10);
或
CxString temp(10);
CxString string2 = temp;
但是, 上面的代码中的_size代表的是字符串内存分配的大小, 那么调用的第二句 "CxString string2 = 10;" 和第六句 "CxString string6 = 'c';" 就显得不伦不类, 而且容易让人疑惑. 有什么办法阻止这种用法呢? 答案就是使用explicit关键字. 我们把上面的代码修改一下, 如下:
class CxString // 使用关键字explicit的类声明, 显示转换
{
public:
char *_pstr;
int _size;
explicit CxString(int size)
{
_size = size;
// 代码同上, 省略...
}
CxString(const char *p)
{
// 代码同上, 省略...
}
};
// 下面是调用:
CxString string1(24); // 这样是OK的
CxString string2 = 10; // 这样是不行的, 因为explicit关键字取消了隐式转换
CxString string3; // 这样是不行的, 因为没有默认构造函数
CxString string4("aaaa"); // 这样是OK的
CxString string5 = "bbb"; // 这样也是OK的, 调用的是CxString(const char *p)
CxString string6 = 'c'; // 这样是不行的, 其实调用的是CxString(int size), 且size等于'c'的ascii码, 但explicit关键字取消了隐式转换
string1 = 2; // 这样也是不行的, 因为取消了隐式转换
string2 = 3; // 这样也是不行的, 因为取消了隐式转换
string3 = string1; // 这样也是不行的, 因为取消了隐式转换, 除非类实现操作符"="的重载
explicit关键字的作用就是防止类构造函数的隐式自动转换.
上面也已经说过了, explicit关键字只对有一个参数的类构造函数有效, 如果类构造函数参数大于或等于两个时, 是不会产生隐式转换的, 所以explicit关键字也就无效了. 例如:
class CxString // explicit关键字在类构造函数参数大于或等于两个时无效
{
public:
char *_pstr;
int _age;
int _size;
explicit CxString(int age, int size)
{
_age = age;
_size = size;
// 代码同上, 省略...
}
CxString(const char *p)
{
// 代码同上, 省略...
}
};
// 这个时候有没有explicit关键字都是一样的
但是, 也有一个例外, 就是当除了第一个参数以外的其他参数都有默认值的时候, explicit关键字依然有效, 此时, 当调用构造函数时只传入一个参数, 等效于只有一个参数的类构造函数, 例子如下:
class CxString // 使用关键字explicit声明
{
public:
int _age;
int _size;
explicit CxString(int age, int size = 0)
{
_age = age;
_size = size;
// 代码同上, 省略...
}
CxString(const char *p)
{
// 代码同上, 省略...
}
};
// 下面是调用:
CxString string1(24); // 这样是OK的
CxString string2 = 10; // 这样是不行的, 因为explicit关键字取消了隐式转换
CxString string3; // 这样是不行的, 因为没有默认构造函数
string1 = 2; // 这样也是不行的, 因为取消了隐式转换
string2 = 3; // 这样也是不行的, 因为取消了隐式转换
string3 = string1; // 这样也是不行的, 因为取消了隐式转换, 除非类实现操作符"="的重载
以上即为C++ explicit关键字的详细介绍.
++++++++++++++++++++++++++++++++++++++++++++++++++++++++++++++++++++++++++++++++++++++++++++++++++++++++++++++++++++++++++++++++++++++++++++++++++++++++++++++++++++++++++++++++++++++++++++++++++++++++++++++++++++++++++++++++++++++++++++++++++++++++++++++++++++++++++++++++++++
C++ boost thread
boost::mutex是最简单的一个,它的使用就像linux下的二进制互斥量。互斥的基本原则是当一个特定的线程拥有资源的时候防止其他线程夺取其所有权,一旦释放,其他的线程可以取得所有权。这将导致线程等待至另一个线程完成处理一些操作,从而相应地释放互斥对象的所有权
下面的示例使用一个类型为 boost::mutex 的simple_mutex全局互斥对象。thread()函数获取此对象的所有权才在 for 循环内使用 lock()方法写入到标准输出流的。一旦信息被写入,使用unlock()方法释放所有权。
testSimpleMutex() 创建两个线程,同时执行thread ()函数。利用 for 循环,每个线程数到5,用一个迭代器写一条消息到标准输出流。然而,标准输出流是一个全局性的被所有线程共享的对象,该标准不提供任何保证 std::cout 可以安全地从多个线程访问。 因此,访问标准输出流必须同步:在任何时候,只有一个线程可以访问 std::cout。
由于两个线程试图在写入标准输出流前获得互斥体,实际上只能保证一次只有一个线程访问 std::cout。不管哪个线程成功调用 lock() 方法,其他所有线程必须等待,直到 unlock() 被调用。
mutex例子
#include <boost/thread.hpp>
#include <boost/thread/mutex.hpp>
#include <iostream>
boost::mutex simple_mutex;
using namespace std;
void wait(int seconds)
{
boost::this_thread::sleep(boost::posix_time::seconds(seconds));
}
void simpleMutex()
{
for (int i = 0; i < 5; i++)
{
wait(1);
simple_mutex.lock();
cout << "Thread" << boost::this_thread::get_id() << " : " << i << endl;
simple_mutex.unlock();
}
}
void testSimpleMutex()
{
boost::thread t1(simpleMutex);
boost::thread t2(simpleMutex);
t1.join();
t2.join();
}
int main(int argc, char* argv[])
{
testSimpleMutex();
return 0;
}
boost::lock_guard,在其内部构造和析构函数分别自动调用lock() 和 unlock() 。 实现获取和释放互斥体的功能。
void thread()
{
for (int i = 0; i < 5; ++i)
{
wait(1);
boost::lock_guard lock(simple_mutex);
std::cout << "Thread " << boost::this_thread::get_id() << ": " << i << std::endl;
}
}
如下例:
boost::timed_mutex time_mutex;
void uniqueLockThread()
{
for (int i = 0; i < 5; ++i)
{
wait(1);
boost::unique_lock<boost::timed_mutex> lock(time_mutex, boost::try_to_lock);
if (!lock.owns_lock())
{
lock.timed_lock(boost::get_system_time() + boost::posix_time::seconds(1));
}
time_mutex.unlock();
std::cout << "Thread " << boost::this_thread::get_id() << ": " << i << endl;
}
}
void testUniqueLockThread()
{
boost::thread t1(uniqueLockThread);
boost::thread t2(uniqueLockThread);
t1.join();
t2.join();
}
TTTTTTTTTTTTTTTTTTTTTTTTTTTTTTTTTTTTTTTTTTTTTTTTTTTTTTTTTTTTTTTTTTT
TTTTTTTTTTTTTTTTTTTTTTTTTTTTTTTTTTTTTTTTTTTTTTTTTTTTTTTTTTTTTTTTTTT
上面的程序向boost::unique_lock 的构造函数的第二个参数传入boost::try_to_lock。然后通过 owns_lock() 可以检查是否可获得互斥体。如果不能, owns_lock() 返回false。这也用到 boost::unique_lock 提供的另外一个函数: timed_lock() 等待一定的时间以获得互斥体。 给定的程序等待长达1秒,应较足够的时间来获取更多的互斥。
三个方法获取一个互斥体:
lock() 会一直等待,直到获得一个互斥体。
try_lock()则不会等待,但如果它只会在互斥体可用的时候才能获得,否则返回 false。
timed_lock()试图获得在一定的时间内获取互斥体。和try_lock()一样,返回bool 类型的值意味着成功是否。
TTTTTTTTTTTTTTTTTTTTTTTTTTTTTTTTTTTTTTTTTTTTTTTTTTTTTTTTTTTTTTTTTTT
TTTTTTTTTTTTTTTTTTTTTTTTTTTTTTTTTTTTTTTTTTTTTTTTTTTTTTTTTTTTTTTTTTT
boost::unique_lock 这个所谓的独占锁意味着一个互斥量同时只能被一个线程获取。其他线程必须等待,直到互斥体再次被释放。
非独占锁。 boost::shared_lock 的类提供了非独占锁,这个类必须和 boost::shared_mutex 型的互斥量一起使用。boost::shared_mutex它允许线程获取多个共享所有权和一个专享所有权,它比mutex的代价高很多。通过lock_shared()或try_lock_shared()获取共享所有权,使用unlock_shared()来释放共享所有权。
读锁定时shared_lock<shared_mutex>,写锁定时使用unique_lock<shared_mutex>。
如下例
#include <boost/thread.hpp>
#include <boost/thread/mutex.hpp>
#include <iostream>
class rw_data
{
private:
int m_x;
boost::shared_mutex rw_mu;
public:
rw_data():m_x(0){}
void write()
{
boost::unique_lock<boost::shared_mutex> ul(rw_mu);
++m_x;
}
void read(int *x)
{
boost::shared_lock<boost::shared_mutex> sl(rw_mu);
*x = m_x;
}
};
void writer(rw_data &d)
{
for (int i = 0; i < 20; ++i)
{
boost::this_thread::sleep(boost::posix_time::seconds(10));
d.write();
cout << "writer:" << i << endl;
}
}
void reader(rw_data &d)
{
int x;
for (int i = 0; i < 10; ++i)
{
boost::this_thread::sleep(boost::posix_time::seconds(5));
d.read(&x);
cout << "reader:" << x << endl;
}
}
void testSharedMutex()
{
rw_data d;
boost::thread_group pool;
pool.create_thread(boost::bind(reader, boost::ref(d)));
pool.create_thread(boost::bind(reader, boost::ref(d)));
pool.create_thread(boost::bind(reader, boost::ref(d)));
pool.create_thread(boost::bind(reader, boost::ref(d)));
pool.create_thread(boost::bind(writer, boost::ref(d)));
pool.create_thread(boost::bind(writer, boost::ref(d)));
pool.join_all();
}
int main(int argc, char* argv[])
{
testSharedMutex();
return 0;
}
TTTTTTTTTTTTTTTTTTTTTTTTTTTTTTTTTTTTTTTTTTTTTTTTTTTTTTTTTTTTTTTTTTTTTTTTTTT
TTTTTTTTTTTTTTTTTTTTTTTTTTTTTTTTTTTTTTTTTTTTTTTTTTTTTTTTTTTTTTTTTTTTTTTTTTTTT
2013-10-02 11:38 by Haippy, 39731 阅读, 评论, 收藏, 编辑
在 《C++11 并发指南三(std::mutex 详解)》一文中我们主要介绍了 C++11 标准中的互斥量(Mutex),并简单介绍了一下两种锁类型。本节将详细介绍一下 C++11 标准的锁类型。
C++11 标准为我们提供了两种基本的锁类型,分别如下:
RAII[1] (Resource Acquisition Is Initialization),也称为“资源获取就是初始化”,是C++语言的一种管理资源、避免泄漏的惯用法。
- std::lock_guard,与 Mutex RAII 相关,方便线程对互斥量上锁。
- std::unique_lock,与 Mutex RAII 相关,方便线程对互斥量上锁,但提供了更好的上锁和解锁控制。
另外还提供了几个与锁类型相关的 Tag 类,分别如下:
std::adopt_lock_t,一个空的标记类,定义如下:
该类型的常量对象adopt_lock(adopt_lock 是一个常量对象,定义如下:
constexpr
adopt_lock_t adopt_lock {};,
|
通常作为参数传入给 unique_lock 或 lock_guard 的构造函数。
std::defer_lock_t,一个空的标记类,定义如下:
该类型的常量对象 defer_lock(defer_lock 是一个常量对象,定义如下:
constexpr
defer_lock_t defer_lock {};,
|
通常作为参数传入给 unique_lock 或 lock_guard 的构造函数。
std::try_to_lock_t,一个空的标记类,定义如下:
该类型的常量对象 try_to_lock(try_to_lock 是一个常量对象,定义如下:
constexpr
try_to_lock_t try_to_lock {};,
|
通常作为参数传入给 unique_lock 或 lock_guard 的构造函数。后面我们会详细介绍以上三种 Tag 类型在配合 lock_gurad 与 unique_lock 使用时的区别。
std::lock_guard 介绍
std::lock_gurad 是 C++11 中定义的模板类。定义如下:
template
<
class
Mutex>
class
lock_guard;
|
lock_guard 对象通常用于管理某个锁(Lock)对象,因此与 Mutex RAII 相关,方便线程对互斥量上锁,即在某个 lock_guard 对象的声明周期内,它所管理的锁对象会一直保持上锁状态;而 lock_guard 的生命周期结束之后,它所管理的锁对象会被解锁(注:类似 shared_ptr 等智能指针管理动态分配的内存资源 )。
模板参数 Mutex 代表互斥量类型,例如 std::mutex 类型,它应该是一个基本的 BasicLockable 类型,标准库中定义几种基本的 BasicLockable 类型,分别 std::mutex, std::recursive_mutex, std::timed_mutex,std::recursive_timed_mutex (以上四种类型均已在上一篇博客中介绍)以及 std::unique_lock(本文后续会介绍 std::unique_lock)。(注:BasicLockable 类型的对象只需满足两种操作,lock 和 unlock,另外还有 Lockable 类型,在 BasicLockable 类型的基础上新增了 try_lock 操作,因此一个满足 Lockable 的对象应支持三种操作:lock,unlock 和 try_lock;最后还有一种 TimedLockable 对象,在 Lockable 类型的基础上又新增了 try_lock_for 和 try_lock_until 两种操作,因此一个满足 TimedLockable 的对象应支持五种操作:lock, unlock, try_lock, try_lock_for, try_lock_until)。
在 lock_guard 对象构造时,传入的 Mutex 对象(即它所管理的 Mutex 对象)会被当前线程锁住。在lock_guard 对象被析构时,它所管理的 Mutex 对象会自动解锁,由于不需要程序员手动调用 lock 和 unlock 对 Mutex 进行上锁和解锁操作,因此这也是最简单安全的上锁和解锁方式,尤其是在程序抛出异常后先前已被上锁的 Mutex 对象可以正确进行解锁操作,极大地简化了程序员编写与 Mutex 相关的异常处理代码。
值得注意的是,lock_guard 对象并不负责管理 Mutex 对象的生命周期,lock_guard 对象只是简化了 Mutex 对象的上锁和解锁操作,方便线程对互斥量上锁,即在某个 lock_guard 对象的声明周期内,它所管理的锁对象会一直保持上锁状态;而 lock_guard 的生命周期结束之后,它所管理的锁对象会被解锁。
std::lock_guard 构造函数
lock_guard 构造函数如下表所示:
| locking (1) | explicit lock_guard (mutex_type& m);
|
|---|
| adopting (2) | lock_guard (mutex_type& m, adopt_lock_t tag);
|
|---|
| copy [deleted](3) | lock_guard (const lock_guard&) = delete; |
|---|
- locking 初始化
- lock_guard 对象管理 Mutex 对象 m,并在构造时对 m 进行上锁(调用 m.lock())。
- adopting初始化
- lock_guard 对象管理 Mutex 对象 m,与 locking 初始化(1) 不同的是, Mutex 对象 m 已被当前线程锁住。
- 拷贝构造
- lock_guard 对象的拷贝构造和移动构造(move construction)均被禁用,因此 lock_guard 对象不可被拷贝构造或移动构造。
我们来看一个简单的例子(参考):
#include <iostream>       // std::cout
#include <thread>         // std::thread
#include <mutex>          // std::mutex, std::lock_guard, std::adopt_lock

std::mutex mtx;           // mutex for critical section

void print_thread_id (int id) {
  mtx.lock();
  std::lock_guard<std::mutex> lck(mtx, std::adopt_lock);
  std::cout << "thread #" << id << '\n';
}

int main ()
{
  std::thread threads[10];
  // spawn 10 threads:
  for (int i=0; i<10; ++i)
    threads[i] = std::thread(print_thread_id,i+1);

  for (auto& th : threads) th.join();

  return 0;
}
在 print_thread_id 中,我们首先对 mtx 进行上锁操作(mtx.lock();),然后用 mtx 对象构造一个 lock_guard 对象(std::lock_guard<std::mutex> lck(mtx, std::adopt_lock);),注意此时 Tag 参数为 std::adopt_lock,表明当前线程已经获得了锁,此后 mtx 对象的解锁操作交由 lock_guard 对象 lck 来管理,在 lck 的生命周期结束之后,mtx 对象会自动解锁。
lock_guard 最大的特点就是安全易于使用,请看下面例子(参考),在异常抛出的时候通过 lock_guard 对象管理的 Mutex 可以得到正确地解锁。
#include <iostream>       // std::cout
#include <thread>         // std::thread
#include <mutex>          // std::mutex, std::lock_guard
#include <stdexcept>      // std::logic_error

std::mutex mtx;

void print_even (int x) {
  if (x%2==0) std::cout << x << " is even\n";
  else throw (std::logic_error("not even"));
}

void print_thread_id (int id) {
  try {
    // using a local lock_guard to lock mtx guarantees unlocking on destruction / exception:
    std::lock_guard<std::mutex> lck (mtx);
    print_even(id);
  }
  catch (std::logic_error&) {
    std::cout << "[exception caught]\n";
  }
}

int main ()
{
  std::thread threads[10];
  // spawn 10 threads:
  for (int i=0; i<10; ++i)
    threads[i] = std::thread(print_thread_id,i+1);

  for (auto& th : threads) th.join();

  return 0;
}
std::unique_lock 介绍
但是 lock_guard 最大的缺点也是简单,没有给程序员提供足够的灵活度,因此,C++11 标准中定义了另外一个与 Mutex RAII 相关类 unique_lock,该类与 lock_guard 类相似,也很方便线程对互斥量上锁,但它提供了更好的上锁和解锁控制。
顾名思义,unique_lock 对象以独占所有权的方式( unique owership)管理 mutex 对象的上锁和解锁操作,所谓独占所有权,就是没有其他的 unique_lock 对象同时拥有某个 mutex 对象的所有权。
在构造(或移动(move)赋值)时,unique_lock 对象需要传递一个 Mutex 对象作为它的参数,新创建的 unique_lock 对象负责传入的 Mutex 对象的上锁和解锁操作。
std::unique_lock 对象也能保证在其自身析构时它所管理的 Mutex 对象能够被正确地解锁(即使没有显式地调用 unlock 函数)。因此,和 lock_guard 一样,这也是一种简单而又安全的上锁和解锁方式,尤其是在程序抛出异常后先前已被上锁的 Mutex 对象可以正确进行解锁操作,极大地简化了程序员编写与 Mutex 相关的异常处理代码。
值得注意的是,unique_lock 对象同样也不负责管理 Mutex 对象的生命周期,unique_lock 对象只是简化了 Mutex 对象的上锁和解锁操作,方便线程对互斥量上锁,即在某个 unique_lock 对象的声明周期内,它所管理的锁对象会一直保持上锁状态;而 unique_lock 的生命周期结束之后,它所管理的锁对象会被解锁,这一点和 lock_guard 类似,但 unique_lock 给程序员提供了更多的自由,我会在下面的内容中给大家介绍 unique_lock 的用法。
另外,与 lock_guard 一样,模板参数 Mutex 代表互斥量类型,例如 std::mutex 类型,它应该是一个基本的 BasicLockable 类型,标准库中定义几种基本的 BasicLockable 类型,分别 std::mutex, std::recursive_mutex, std::timed_mutex,std::recursive_timed_mutex (以上四种类型均已在上一篇博客中介绍)以及 std::unique_lock(本文后续会介绍 std::unique_lock)。(注:BasicLockable 类型的对象只需满足两种操作,lock 和 unlock,另外还有 Lockable 类型,在 BasicLockable 类型的基础上新增了 try_lock 操作,因此一个满足 Lockable 的对象应支持三种操作:lock,unlock 和 try_lock;最后还有一种 TimedLockable 对象,在 Lockable 类型的基础上又新增了 try_lock_for 和 try_lock_until 两种操作,因此一个满足 TimedLockable 的对象应支持五种操作:lock, unlock, try_lock, try_lock_for, try_lock_until)。
std::unique_lock 构造函数
std::unique_lock 的构造函数的数目相对来说比 std::lock_guard 多,其中一方面也是因为 std::unique_lock 更加灵活,从而在构造 std::unique_lock 对象时可以接受额外的参数。总地来说,std::unique_lock 构造函数如下:
| default (1) | unique_lock() noexcept;
|
|---|
| locking (2) | explicit unique_lock(mutex_type& m);
|
|---|
| try-locking (3) | unique_lock(mutex_type& m, try_to_lock_t tag);
|
|---|
| deferred (4) | unique_lock(mutex_type& m, defer_lock_t tag) noexcept;
|
|---|
| adopting (5) | unique_lock(mutex_type& m, adopt_lock_t tag);
|
|---|
| locking for (6) | template <class Rep, class Period>
unique_lock(mutex_type& m, const chrono::duration<Rep,Period>& rel_time);
|
|---|
| locking until (7) | template <class Clock, class Duration>
unique_lock(mutex_type& m, const chrono::time_point<Clock,Duration>& abs_time);
|
|---|
| copy [deleted] (8) | unique_lock(const unique_lock&) = delete;
|
|---|
| move (9) | unique_lock(unique_lock&& x); |
|---|
下面我们来分别介绍以上各个构造函数:
(1) 默认构造函数
-
新创建的 unique_lock 对象不管理任何 Mutex 对象。
(2) locking 初始化
-
新创建的 unique_lock 对象管理 Mutex 对象 m,并尝试调用 m.lock() 对 Mutex 对象进行上锁,如果此时另外某个 unique_lock 对象已经管理了该 Mutex 对象 m,则当前线程将会被阻塞。
(3) try-locking 初始化
-
新创建的 unique_lock 对象管理 Mutex 对象 m,并尝试调用 m.try_lock() 对 Mutex 对象进行上锁,但如果上锁不成功,并不会阻塞当前线程。
(4) deferred 初始化
-
新创建的 unique_lock 对象管理 Mutex 对象 m,但是在初始化的时候并不锁住 Mutex 对象。
m 应该是一个没有当前线程锁住的 Mutex 对象。
(5) adopting 初始化
-
新创建的 unique_lock 对象管理 Mutex 对象 m,
m 应该是一个已经被当前线程锁住的 Mutex 对象。(并且当前新创建的 unique_lock 对象拥有对锁(Lock)的所有权)。
(6) locking 一段时间(duration)
-
新创建的 unique_lock 对象管理 Mutex 对象 m,并试图通过调用 m.try_lock_for(rel_time) 来锁住 Mutex 对象一段时间(rel_time)。
(7) locking 直到某个时间点(time point)
-
新创建的 unique_lock 对象管理 Mutex 对象m,并试图通过调用 m.try_lock_until(abs_time) 来在某个时间点(abs_time)之前锁住 Mutex 对象。
(8) 拷贝构造 [被禁用]
-
unique_lock 对象不能被拷贝构造。
(9) 移动(move)构造
-
新创建的 unique_lock 对象获得了由 x 所管理的 Mutex 对象的所有权(包括当前 Mutex 的状态)。调用 move 构造之后,
x 对象如同通过默认构造函数所创建的,就不再管理任何 Mutex 对象了。
综上所述,由 (2) 和 (5) 创建的 unique_lock 对象通常拥有 Mutex 对象的锁。而通过 (1) 和 (4) 创建的则不会拥有锁。通过 (3),(6) 和 (7) 创建的 unique_lock 对象,则在 lock 成功时获得锁。
关于unique_lock 的构造函数,请看下面例子(参考):
#include <iostream>       // std::cout
#include <thread>         // std::thread
#include <mutex>          // std::mutex, std::lock, std::unique_lock
                          // std::adopt_lock, std::defer_lock
std::mutex foo,bar;

void task_a () {
  std::lock (foo,bar);         // simultaneous lock (prevents deadlock)
  std::unique_lock<std::mutex> lck1 (foo,std::adopt_lock);
  std::unique_lock<std::mutex> lck2 (bar,std::adopt_lock);
  std::cout << "task a\n";
  // (unlocked automatically on destruction of lck1 and lck2)
}

void task_b () {
  // foo.lock(); bar.lock(); // replaced by:
  std::unique_lock<std::mutex> lck1, lck2;
  lck1 = std::unique_lock<std::mutex>(bar,std::defer_lock);
  lck2 = std::unique_lock<std::mutex>(foo,std::defer_lock);
  std::lock (lck1,lck2);       // simultaneous lock (prevents deadlock)
  std::cout << "task b\n";
  // (unlocked automatically on destruction of lck1 and lck2)
}


int main ()
{
  std::thread th1 (task_a);
  std::thread th2 (task_b);

  th1.join();
  th2.join();

  return 0;
}
std::unique_lock 移动(move assign)赋值操作
std::unique_lock 支持移动赋值(move assignment),但是普通的赋值被禁用了,
| move (1) | unique_lock& operator= (unique_lock&& x) noexcept;
|
|---|
| copy [deleted] (2) | unique_lock& operator= (const unique_lock&) = delete; |
|---|
移动赋值(move assignment)之后,由 x 所管理的 Mutex 对象及其状态将会被新的 std::unique_lock 对象取代。
如果被赋值的对象之前已经获得了它所管理的 Mutex 对象的锁,则在移动赋值(move assignment)之前会调用 unlock 函数释放它所占有的锁。
调用移动赋值(move assignment)之后, x 对象如同通过默认构造函数所创建的,也就不再管理任何 Mutex 对象了。请看下面例子(参考):
#include <iostream>       // std::cout
#include <thread>         // std::thread
#include <mutex>          // std::mutex, std::unique_lock

std::mutex mtx;           // mutex for critical section

void print_fifty (char c) {
  std::unique_lock<std::mutex> lck;         // default-constructed
  lck = std::unique_lock<std::mutex>(mtx);  // move-assigned
  for (int i=0; i<50; ++i) { std::cout << c; }
  std::cout << '\n';
}

int main ()
{
  std::thread th1 (print_fifty,'*');
  std::thread th2 (print_fifty,'$');

  th1.join();
  th2.join();

  return 0;
}
std::unique_lock 主要成员函数
本节我们来看看 std::unique_lock 的主要成员函数。由于 std::unique_lock 比 std::lock_guard 操作灵活,因此它提供了更多成员函数。具体分类如下:
- 上锁/解锁操作:lock,try_lock,try_lock_for,try_lock_until和unlock
- 修改操作:移动赋值(move assignment)(前面已经介绍过了),交换(swap)(与另一个 std::unique_lock 对象交换它们所管理的 Mutex 对象的所有权),释放(release)(返回指向它所管理的 Mutex 对象的指针,并释放所有权)
- 获取属性操作:owns_lock(返回当前 std::unique_lock 对象是否获得了锁)、operator bool()(与 owns_lock 功能相同,返回当前 std::unique_lock 对象是否获得了锁)、mutex(返回当前 std::unique_lock 对象所管理的 Mutex 对象的指针)。
std::unique_lock::lock请看下面例子(参考):
上锁操作,调用它所管理的 Mutex 对象的 lock 函数。如果在调用 Mutex 对象的 lock 函数时该 Mutex 对象已被另一线程锁住,则当前线程会被阻塞,直到它获得了锁。
该函数返回时,当前的 unique_lock 对象便拥有了它所管理的 Mutex 对象的锁。如果上锁操作失败,则抛出 system_error 异常。
// unique_lock::lock/unlock
#include <iostream>       // std::cout
#include <thread>         // std::thread
#include <mutex>          // std::mutex, std::unique_lock, std::defer_lock

std::mutex mtx;           // mutex for critical section

void print_thread_id (int id) {
  std::unique_lock<std::mutex> lck (mtx,std::defer_lock);
  // critical section (exclusive access to std::cout signaled by locking lck):
  lck.lock();
  std::cout << "thread #" << id << '\n';
  lck.unlock();
}

int main ()
{
  std::thread threads[10];
  // spawn 10 threads:
  for (int i=0; i<10; ++i)
    threads[i] = std::thread(print_thread_id,i+1);

  for (auto& th : threads) th.join();

  return 0;
}
std::unique_lock::try_lock
上锁操作,调用它所管理的 Mutex 对象的 try_lock 函数,如果上锁成功,则返回 true,否则返回 false。
请看下面例子(参考):
#include <iostream>       // std::cout
#include <vector>         // std::vector
#include <thread>         // std::thread
#include <mutex>          // std::mutex, std::unique_lock, std::defer_lock

std::mutex mtx;           // mutex for critical section

void print_star () {
  std::unique_lock<std::mutex> lck(mtx,std::defer_lock);
  // print '*' if successfully locked, 'x' otherwise:
  if (lck.try_lock())
    std::cout << '*';
  else
    std::cout << 'x';
}

int main ()
{
  std::vector<std::thread> threads;
  for (int i=0; i<500; ++i)
    threads.emplace_back(print_star);

  for (auto& x: threads) x.join();

  return 0;
}
std::unique_lock::try_lock_for
上锁操作,调用它所管理的 Mutex 对象的 try_lock_for 函数,如果上锁成功,则返回 true,否则返回 false。
请看下面例子(参考):
#include <iostream>       // std::cout
#include <chrono>         // std::chrono::milliseconds
#include <thread>         // std::thread
#include <mutex>          // std::timed_mutex, std::unique_lock, std::defer_lock

std::timed_mutex mtx;

void fireworks () {
  std::unique_lock<std::timed_mutex> lck(mtx,std::defer_lock);
  // waiting to get a lock: each thread prints "-" every 200ms:
  while (!lck.try_lock_for(std::chrono::milliseconds(200))) {
    std::cout << "-";
  }
  // got a lock! - wait for 1s, then this thread prints "*"
  std::this_thread::sleep_for(std::chrono::milliseconds(1000));
  std::cout << "*\n";
}

int main ()
{
  std::thread threads[10];
  // spawn 10 threads:
  for (int i=0; i<10; ++i)
    threads[i] = std::thread(fireworks);

  for (auto& th : threads) th.join();

  return 0;
}
std::unique_lock::try_lock_until
上锁操作,调用它所管理的 Mutex 对象的 try_lock_for 函数,如果上锁成功,则返回 true,否则返回 false。
请看下面例子(参考):
#include <iostream>       // std::cout
#include <chrono>         // std::chrono::milliseconds
#include <thread>         // std::thread
#include <mutex>          // std::timed_mutex, std::unique_lock, std::defer_lock

std::timed_mutex mtx;

void fireworks () {
  std::unique_lock<std::timed_mutex> lck(mtx,std::defer_lock);
  // waiting to get a lock: each thread prints "-" every 200ms:
  while (!lck.try_lock_for(std::chrono::milliseconds(200))) {
    std::cout << "-";
  }
  // got a lock! - wait for 1s, then this thread prints "*"
  std::this_thread::sleep_for(std::chrono::milliseconds(1000));
  std::cout << "*\n";
}

int main ()
{
  std::thread threads[10];
  // spawn 10 threads:
  for (int i=0; i<10; ++i)
    threads[i] = std::thread(fireworks);

  for (auto& th : threads) th.join();

  return 0;
}
std::unique_lock::unlock
解锁操作,调用它所管理的 Mutex 对象的 unlock 函数。
请看下面例子(参考):
#include <iostream>       // std::cout
#include <thread>         // std::thread
#include <mutex>          // std::mutex, std::unique_lock, std::defer_lock

std::mutex mtx;           // mutex for critical section

void print_thread_id (int id) {
  std::unique_lock<std::mutex> lck (mtx,std::defer_lock);
  // critical section (exclusive access to std::cout signaled by locking lck):
  lck.lock();
  std::cout << "thread #" << id << '\n';
  lck.unlock();
}

int main ()
{
  std::thread threads[10];
  // spawn 10 threads:
  for (int i=0; i<10; ++i)
    threads[i] = std::thread(print_thread_id,i+1);

  for (auto& th : threads) th.join();

  return 0;
}
std::unique_lock::release
返回指向它所管理的 Mutex 对象的指针,并释放所有权。
请看下面例子(参考):
#include <iostream>       // std::cout
#include <vector>         // std::vector
#include <thread>         // std::thread
#include <mutex>          // std::mutex, std::unique_lock

std::mutex mtx;
int count = 0;

void print_count_and_unlock (std::mutex* p_mtx) {
  std::cout << "count: " << count << '\n';
  p_mtx->unlock();
}

void task() {
  std::unique_lock<std::mutex> lck(mtx);
  ++count;
  print_count_and_unlock(lck.release());
}

int main ()
{
  std::vector<std::thread> threads;
  for (int i=0; i<10; ++i)
    threads.emplace_back(task);

  for (auto& x: threads) x.join();

  return 0;
}
std::unique_lock::owns_lock
返回当前 std::unique_lock 对象是否获得了锁。
请看下面例子(参考):
#include <iostream>       // std::cout
#include <vector>         // std::vector
#include <thread>         // std::thread
#include <mutex>          // std::mutex, std::unique_lock, std::try_to_lock

std::mutex mtx;           // mutex for critical section

void print_star () {
  std::unique_lock<std::mutex> lck(mtx,std::try_to_lock);
  // print '*' if successfully locked, 'x' otherwise:
  if (lck.owns_lock())
    std::cout << '*';
  else
    std::cout << 'x';
}

int main ()
{
  std::vector<std::thread> threads;
  for (int i=0; i<500; ++i)
    threads.emplace_back(print_star);

  for (auto& x: threads) x.join();

  return 0;
}
std::unique_lock::operator bool()
与 owns_lock 功能相同,返回当前 std::unique_lock 对象是否获得了锁。
请看下面例子(参考):
#include <iostream>       // std::cout
#include <vector>         // std::vector
#include <thread>         // std::thread
#include <mutex>          // std::mutex, std::unique_lock, std::try_to_lock

std::mutex mtx;           // mutex for critical section

void print_star () {
  std::unique_lock<std::mutex> lck(mtx,std::try_to_lock);
  // print '*' if successfully locked, 'x' otherwise:
  if (lck)
    std::cout << '*';
  else
    std::cout << 'x';
}

int main ()
{
  std::vector<std::thread> threads;
  for (int i=0; i<500; ++i)
    threads.emplace_back(print_star);

  for (auto& x: threads) x.join();

  return 0;
}
std::unique_lock::mutex
返回当前 std::unique_lock 对象所管理的 Mutex 对象的指针。
请看下面例子(参考):
#include <iostream>       // std::cout
#include <thread>         // std::thread
#include <mutex>          // std::mutex, std::unique_lock, std::defer_lock

class MyMutex : public std::mutex {
  int _id;
public:
  MyMutex (int id) : _id(id) {}
  int id() {return _id;}
};

MyMutex mtx (101);

void print_ids (int id) {
  std::unique_lock<MyMutex> lck (mtx);
  std::cout << "thread #" << id << " locked mutex " << lck.mutex()->id() << '\n';
}

int main ()
{
  std::thread threads[10];
  // spawn 10 threads:
  for (int i=0; i<10; ++i)
    threads[i] = std::thread(print_ids,i+1);

  for (auto& th : threads) th.join();

  return 0;
}
好了,本文先介绍到这里,我们基本上介绍完了 C++11 多线程编程中两种最基本的锁类型,后面我会继续更新有关 C++11 并发编程的博客,希望感兴趣的同学继续关注 ;-)
KKKKKKKKKKKKKKKKKKKKKKKKKKKKKKKKKKKKKKKKKKKKKKKKKKKKKKKKKKKKKKKKKKKKKKKKKKKKKKKKKKKKKKKKKKKKKKKKKKKKKKKKKKKKKKKKKKKKKKKKKKKKKKKKKKKKKKKKKKKKKKKKKKKKKKKKKKKKKKKKKKKKKKKKKKKKKKKKKKKKKKKKKKKKKKKKKKKKKKKKKKKKKKKKKKKKKKKKKKKKKKKKKKKKKKKKKKKKKKKKKKKKKKKKKKKKKKKKKKKKKKKKKKKKKKKKKKKKKKKKKKKKKKKKKKKKKKKKKKKKKKKKKKKKKKKKKKKKKKKKKKKKKKKKKKKKKKKKKKKKKKKKKKKKKKKKKKKKKKKKKKKK
boost真是博大精深呀
这次学习了一下几本的锁和信号量。
其中包含:mutex recursive_mutex lock unique_lock basic_lockable_adpator timed_lockable_adpator,其他的adpator应该也都一样,例如(shared_lockable_adaptor等)
参看:http://www.boost.org/doc/libs/1_60_0/doc/html/thread/synchronization.html
- #include <iostream>
-
- #include <boost/thread/thread.hpp>
- #include <boost/thread/mutex.hpp>
- #include <boost/thread/recursive_mutex.hpp>
- #include <boost/thread/locks.hpp>
- #include <boost/thread/lockable_concepts.hpp>
- #include <boost/thread/lockable_adapter.hpp>
-
- class BankAccount {
- int _balance;
- boost::mutex _mtx;
- public:
- BankAccount(int init = 0): _balance(init){
- }
- void deposit(int amount) {
- boost::lock_guard<boost::mutex> guard(_mtx);
- _balance += amount;
- }
- void withDraw(int amount) {
- boost::lock_guard<boost::mutex> guard(_mtx);
- _balance += amount;
- }
- int getBalance() {
- boost::lock_guard<boost::mutex> guard(_mtx);
- return _balance;
- }
- void lock() {
- _mtx.lock();
- }
- void unlock() {
- _mtx.unlock();
- }
- };
-
- class A : public boost::basic_lockable_adapter<boost::mutex> {
- public:
- int _a;
- A(int a = 10): _a(a){
- }
- void show() {
- std::cout << _a << std::endl;
- }
- };
-
- class B : public boost::basic_lockable_adapter<boost::recursive_mutex> {
- public:
- int _a;
- B(int a = 10): _a(a){
- }
- void show() {
- std::cout << _a << std::endl;
- }
- };
-
- class C : public boost::timed_lockable_adapter<boost::mutex> {
- public:
- int _a;
- C(int a = 10): _a(a){
- }
- void show() {
- std::cout << _a << std::endl;
- }
- };
-
- void ATMWithDraw(BankAccount& account, int amount) {
-
- account.lock();
- account.withDraw(amount);
- account.withDraw(2);
- account.unlock();
- }
- int main () {
- BankAccount wangbing;
- wangbing.deposit(100);
- std::cout << wangbing.getBalance() << std::endl;
- ATMWithDraw(wangbing, 10);
-
- A lockable_a;
- lockable_a.lock();
- lockable_a.show();
- lockable_a.unlock();
-
-
-
-
-
- std::cout << "wangbing" << std::endl;
- }
- g++ lock.cpp -lboost_thread -lboost_system
TTTTTTTTTTTTTTTTTTTTTTTTTTTTTTTTTTTTTTTTTTTTTTTTTTTTTTTTTTTTTTTTTTTTTTTTTTTTTTTTTTTTTTTTTTTTTTTTTTTTTTTTTTTTTTTTTTTTTTTTTTTTTTTTTTTTTTTTTTTTTTTTTTTTTTTTTTTTTTTTTTTTTTTTTTTTTTTTTTTTTTTTTTTTTTTTTTTTTTTTTTTTTTTTTTTTTTTTTTTTTTTTTTTTTTTTTTTTTTTTTTTTTTTTTTTTTTTTTTTTTTTTTTTTTTTTT
C++ 多线程
多线程是多任务处理的一种特殊形式,多任务处理允许让电脑同时运行两个或两个以上的程序。一般情况下,两种类型的多任务处理:基于进程和基于线程。
基于进程的多任务处理是程序的并发执行。
基于线程的多任务处理是同一程序的片段的并发执行。
多线程程序包含可以同时运行的两个或多个部分。这样的程序中的每个部分称为一个线程,每个线程定义了一个单独的执行路径。
本教程假设您使用的是 Linux 操作系统,我们要使用 POSIX 编写多线程 C++ 程序。POSIX Threads 或 Pthreads 提供的 API 可在多种类 Unix POSIX 系统上可用,比如 FreeBSD、NetBSD、GNU/Linux、Mac OS X 和 Solaris。
创建线程
下面的程序,我们可以用它来创建一个 POSIX 线程:
#include <pthread.h>
pthread_create (thread, attr, start_routine, arg)
在这里,pthread_create 创建一个新的线程,并让它可执行。下面是关于参数的说明:
参数 描述
thread 指向线程标识符指针。
attr 一个不透明的属性对象,可以被用来设置线程属性。您可以指定线程属性对象,也可以使用默认值 NULL。
start_routine 线程运行函数起始地址,一旦线程被创建就会执行。
arg 运行函数的参数。它必须通过把引用作为指针强制转换为 void 类型进行传递。如果没有传递参数,则使用 NULL。
创建线程成功时,函数返回 0,若返回值不为 0 则说明创建线程失败。
终止线程
使用下面的程序,我们可以用它来终止一个 POSIX 线程:
#include <pthread.h>
pthread_exit (status)
在这里,pthread_exit 用于显式地退出一个线程。通常情况下,pthread_exit() 函数是在线程完成工作后无需继续存在时被调用。
如果 main() 是在它所创建的线程之前结束,并通过 pthread_exit() 退出,那么其他线程将继续执行。否则,它们将在 main() 结束时自动被终止。
实例
以下简单的实例代码使用 pthread_create() 函数创建了 5 个线程,每个线程输出"Hello Runoob!":
实例
#include <iostream>
// 必须的头文件
#include <pthread.h>
using namespace std;
#define NUM_THREADS 5
// 线程的运行函数
void* say_hello(void* args)
{
cout << "Hello Runoob!" << endl;
return 0;
}
int main()
{
// 定义线程的 id 变量,多个变量使用数组
pthread_t tids[NUM_THREADS];
for(int i = 0; i < NUM_THREADS; ++i)
{
//参数依次是:创建的线程id,线程参数,调用的函数,传入的函数参数
int ret = pthread_create(&tids[i], NULL, say_hello, NULL);
if (ret != 0)
{
cout << "pthread_create error: error_code=" << ret << endl;
}
}
//等各个线程退出后,进程才结束,否则进程强制结束了,线程可能还没反应过来;
pthread_exit(NULL);
}
使用 -lpthread 库编译下面的程序:
$ g++ test.cpp -lpthread -o test.o
现在,执行程序,将产生下列结果:
$ ./test.o
Hello Runoob!
Hello Runoob!
Hello Runoob!
Hello Runoob!
Hello Runoob!
以下简单的实例代码使用 pthread_create() 函数创建了 5 个线程,并接收传入的参数。每个线程打印一个 "Hello Runoob!" 消息,并输出接收的参数,然后调用 pthread_exit() 终止线程。
实例
//文件名:test.cpp
#include <iostream>
#include <cstdlib>
#include <pthread.h>
using namespace std;
#define NUM_THREADS 5
void *PrintHello(void *threadid)
{
// 对传入的参数进行强制类型转换,由无类型指针变为整形数指针,然后再读取
int tid = *((int*)threadid);
cout << "Hello Runoob! 线程 ID, " << tid << endl;
pthread_exit(NULL);
}
int main ()
{
pthread_t threads[NUM_THREADS];
int indexes[NUM_THREADS];// 用数组来保存i的值
int rc;
int i;
for( i=0; i < NUM_THREADS; i++ ){
cout << "main() : 创建线程, " << i << endl;
indexes[i] = i; //先保存i的值
// 传入的时候必须强制转换为void* 类型,即无类型指针
rc = pthread_create(&threads[i], NULL,
PrintHello, (void *)&(indexes[i]));
if (rc){
cout << "Error:无法创建线程," << rc << endl;
exit(-1);
}
}
pthread_exit(NULL);
}
现在编译并执行程序,将产生下列结果:
$ g++ test.cpp -lpthread -o test.o
$ ./test.o
main() : 创建线程, 0
main() : 创建线程, 1
main() : 创建线程, 2
main() : 创建线程, 3
main() : 创建线程, 4
Hello Runoob! 线程 ID, 4
Hello Runoob! 线程 ID, 3
Hello Runoob! 线程 ID, 2
Hello Runoob! 线程 ID, 1
Hello Runoob! 线程 ID, 0
向线程传递参数
这个实例演示了如何通过结构传递多个参数。您可以在线程回调中传递任意的数据类型,因为它指向 void,如下面的实例所示:
实例
#include <iostream>
#include <cstdlib>
#include <pthread.h>
using namespace std;
#define NUM_THREADS 5
struct thread_data{
int thread_id;
char *message;
};
void *PrintHello(void *threadarg)
{
struct thread_data *my_data;
my_data = (struct thread_data *) threadarg;
cout << "Thread ID : " << my_data->thread_id ;
cout << " Message : " << my_data->message << endl;
pthread_exit(NULL);
}
int main ()
{
pthread_t threads[NUM_THREADS];
struct thread_data td[NUM_THREADS];
int rc;
int i;
for( i=0; i < NUM_THREADS; i++ ){
cout <<"main() : creating thread, " << i << endl;
td[i].thread_id = i;
td[i].message = (char*)"This is message";
rc = pthread_create(&threads[i], NULL,
PrintHello, (void *)&td[i]);
if (rc){
cout << "Error:unable to create thread," << rc << endl;
exit(-1);
}
}
pthread_exit(NULL);
}
当上面的代码被编译和执行时,它会产生下列结果:
$ g++ -Wno-write-strings test.cpp -lpthread -o test.o
$ ./test.o
main() : creating thread, 0
main() : creating thread, 1
Thread ID : 0 Message : This is message
main() : creating thread, Thread ID : 21
Message : This is message
main() : creating thread, 3
Thread ID : 2 Message : This is message
main() : creating thread, 4
Thread ID : 3 Message : This is message
Thread ID : 4 Message : This is message
连接和分离线程
我们可以使用以下两个函数来连接或分离线程:
pthread_join (threadid, status)
pthread_detach (threadid)
pthread_join() 子程序阻碍调用程序,直到指定的 threadid 线程终止为止。当创建一个线程时,它的某个属性会定义它是否是可连接的(joinable)或可分离的(detached)。只有创建时定义为可连接的线程才可以被连接。如果线程创建时被定义为可分离的,则它永远也不能被连接。
这个实例演示了如何使用 pthread_join() 函数来等待线程的完成。
实例
#include <iostream>
#include <cstdlib>
#include <pthread.h>
#include <unistd.h>
using namespace std;
#define NUM_THREADS 5
void *wait(void *t)
{
int i;
long tid;
tid = (long)t;
sleep(1);
cout << "Sleeping in thread " << endl;
cout << "Thread with id : " << tid << " ...exiting " << endl;
pthread_exit(NULL);
}
int main ()
{
int rc;
int i;
pthread_t threads[NUM_THREADS];
pthread_attr_t attr;
void *status;
// 初始化并设置线程为可连接的(joinable)
pthread_attr_init(&attr);
pthread_attr_setdetachstate(&attr, PTHREAD_CREATE_JOINABLE);
for( i=0; i < NUM_THREADS; i++ ){
cout << "main() : creating thread, " << i << endl;
rc = pthread_create(&threads[i], NULL, wait, (void *)&i );
if (rc){
cout << "Error:unable to create thread," << rc << endl;
exit(-1);
}
}
// 删除属性,并等待其他线程
pthread_attr_destroy(&attr);
for( i=0; i < NUM_THREADS; i++ ){
rc = pthread_join(threads[i], &status);
if (rc){
cout << "Error:unable to join," << rc << endl;
exit(-1);
}
cout << "Main: completed thread id :" << i ;
cout << " exiting with status :" << status << endl;
}
cout << "Main: program exiting." << endl;
pthread_exit(NULL);
}
当上面的代码被编译和执行时,它会产生下列结果:
main() : creating thread, 0
main() : creating thread, 1
main() : creating thread, 2
main() : creating thread, 3
main() : creating thread, 4
Sleeping in thread
Thread with id : 4 ...exiting
Sleeping in thread
Thread with id : 3 ...exiting
Sleeping in thread
Thread with id : 2 ...exiting
Sleeping in thread
Thread with id : 1 ...exiting
Sleeping in thread
Thread with id : 0 ...exiting
Main: completed thread id :0 exiting with status :0
Main: completed thread id :1 exiting with status :0
Main: completed thread id :2 exiting with status :0
Main: completed thread id :3 exiting with status :0
Main: completed thread id :4 exiting with status :0
Main: program exiting.
更多实例参考:http://www.runoob.com/w3cnote/cpp-multithread-demo.html
C++ 信号处理
C++ Web 编程
笔记列表
ztftrue
ztf***e@gmail.com
参考地址
c++ 11 之后有了标准的线程库:
#include <iostream>
#include <thread>
std::thread::id main_thread_id = std::this_thread::get_id();
void hello()
{
std::cout << "Hello Concurrent World\n";
if (main_thread_id == std::this_thread::get_id())
std::cout << "This is the main thread.\n";
else
std::cout << "This is not the main thread.\n";
}
void pause_thread(int n) {
std::this_thread::sleep_for(std::chrono::seconds(n));
std::cout << "pause of " << n << " seconds ended\n";
}
int main() {
std::thread t(hello);
std::cout << t.hardware_concurrency() << std::endl;//可以并发执行多少个(不准确)
std::cout << "native_handle " << t.native_handle() << std::endl;//可以并发执行多少个(不准确)
t.join();
std::thread a(hello);
a.detach();
std::thread threads[5]; // 默认构造线程
std::cout << "Spawning 5 threads...\n";
for (int i = 0; i < 5; ++i)
threads[i] = std::thread(pause_thread, i + 1); // move-assign threads
std::cout << "Done spawning threads. Now waiting for them to join:\n";
for (auto &thread : threads)
thread.join();
std::cout << "All threads joined!\n";
}
之前一些编译器使用 C++11 的编译参数是 -std=c++11
g++ -std=c++11 test.cpp
TTTTTTTTTTTTTTTTTTTTTTTTTTTTTTTTTTTTTTTTTTTTTTTTTTTTTTTTTTTTTTTTTTTTTTTTTTTTTTTTTTTTTTTTTTTTTTTTTTTTTTTTTTTTTTTTTTTTTTTTTTTTTTTTTTTTTTTTTTTTTTTTTTTTTTTTTTTTTTTTTTTTTTTTTTTTTTTTTTTTTTTTTTTTTTTTTTTTTTTTTTTTTTTTTTTTTTTTTTTTTTTTTTTTTTTTTTTTTTTTTTTTTTTTTTTTTTTTTTTTTTTTTTTTTTTTT
除非是一个分离的线程,否则在线程退出时,它是不会释放它的资源的。
pthread_detach函数将线程分离,它设置线程的内部选项来说明线程退出后,线程的存储空间
可以被重新收回。分离线程退出时不会报告它们的状态。没有分离的线程是可接合的,而且被另
一个线程为它们调用pthread_join或者整个进程退出之前,这些线程不会释放它们所有的资
源。
pthread_join函数会使调用者等待待定的线程退出。为防止内存泄漏,长时间运行的程序
最终应该为每个线程调用pthread_detach或pthread_join。
代码:
| #include<stdio.h>
#include <pthread.h>
pthread_t tid[2];
void * func_1(void*arg)
{
//为函数func_2创建线程
pthread_create(&tid[1],NULL,func_2,NULL);
//tid[0]将自己挂起,等待线程tid[1]的结束
pthread_join(tid[1],NULL);
}
void * func_2(void*arg)
{
//函数内容
}
int main()
{
//为函数func_1创建线程并将其分离
pthread_create(&tid[0],NULL,func_1,NULL);
pthread_detach(tid[0],NULL);
//主进程不退出,但这两个线程的资源都可以释放掉
while(1)
{
sleep(10);
}
return 0;
}
|
使用线程最麻烦的地方就是资源释放不掉,所以大家在创建线程之后,一定要将其分离或
者挂起,否则会内存泄漏,甚至out of memory
WWWWWWWWWWWWWWWWWWWWWWWWWWWWWWWWWWWWWWWWWWWWWWWWWWWWWWWWWWWWWWWWWWWWWWWWWWWWWWWWWWWWWWWWWWWWWWWWWWWWWWWWWWWWWWWWWWWWWWWWWWWWWWWWWWWWWWWWWWWWWWWWWWWWWWWWWWWWWWWWWWWWWWWWWWWWWWWWWWWWWWWWWWWWWWWWWWW
一:关于join
join
join是三种同步线程的方式之一。另外两种分别是互斥锁(mutex)和条件变量(condition variable)。
调用pthread_join()将阻塞自己,一直到要等待加入的线程运行结束。
可以用pthread_join()获取线程的返回值。
一个线程对应一个pthread_join()调用,对同一个线程进行多次pthread_join()调用是逻辑错误。
join or detach
线程分两种:一种可以join,另一种不可以。该属性在创建线程的时候指定。
joinable线程可在创建后,用pthread_detach()显式地分离。但分离后不可以再合并。该操作不可逆。
为了确保移植性,在创建线程时,最好显式指定其join或detach属性。似乎不是所有POSIX实现都是用joinable作默认。
[[[[[[[[[[[[[[[[[[[[[[[[[[[[[[[[[[[[[[[[[[[[[[[[[[[[[[[[[[[[[[[[[[[[[[[[[[[[[[[[[[[[[[[[[[[[[[[[[[[[[[[[[[[[[[[[[[[[[[[[[[[[[[[[[[[[[[[[[[[[[[[[[[[[[[[[[[[[[[[[
pthread_join()函数,以阻塞的方式等待thread指定的线程结束。当函数返回时,被等待线程的资源被收回。如果线程已经结束,那么该函数会立即返回。并且thread指定的线程必须是joinable的。
]]]]]]]]]]]]]]]]]]]]]]]]]]]]]]]]]]]]]]]]]]]]]]]]]]]]]]]]]]]]]]]]]]]]]]]]]]]]]]]]]]]]]]]]]]]]]]]]]]]]]]]]]]]]]]]]]]]]]]]]]]]]]]]]]]]]]]]]]]]]]]]]]]]]]]]]]]]]]]]]]]]
二: pthread_detach
创建一个线程默认的状态是joinable, 如果一个线程结束运行但没有被join,则它的状态类似于进程中的Zombie Process,即还有一部分资源没有被回收(退出状态码),所以创建线程者应该调用pthread_join来等待线程运行结束,并可得到线程的退出代码,回收其资源(类似于wait,waitpid)
但是调用pthread_join(pthread_id)后,如果该线程没有运行结束,调用者会被阻塞,在有些情况下我们并不希望如此,比如在Web服务器中当主线程为每个新来的链接创建一个子线程进行处理的时候,主线程并不希望因为调用pthread_join而阻塞(因为还要继续处理之后到来的链接),这时可以在子线程中加入代码
pthread_detach(pthread_self())
或者父线程调用
pthread_detach(thread_id)(非阻塞,可立即返回)
这将该子线程的状态设置为detached,则该线程运行结束后会自动释放所有资源。
三:pthread_join
调用pthread_join的线程会阻塞,直到指定的线程返回,调用了pthread_exit,或者被取消。
如果线程简单的返回,那么rval_ptr被设置成线程的返回值,参见范例1;如果调用了pthread_exit,则可将一个无类型指针返回,在pthread_join中对其进行访问,参见范例2;如果线程被取消,rval_ptr被设置成PTHREAD_CANCELED。
如果我们不关心线程的返回值,那么我们可以把rval_ptr设置为NULL。
范例1:
#include <pthread.h>
#include <string.h>
void *thr_fn1(void *arg)
{
printf(“thread 1 returning.\n”);
return((void *)1);
}
void *thr_fn2(void *arg)
{
printf(“thread 2 exiting.\n”);
return((void *)2);
}
int main()
{
pthread_t tid1,tid2;
void *tret;
pthread_create(&tid1,NULL,thr_fn1,NULL);
pthread_create(&tid2,NULL,thr_fn2,NULL);
pthread_join(tid1,&tret);
printf(“thread 1 exit code %d\n”,(int)tret);
pthread_join(tid2,&tret);
printf(“thread 2 exit code %d\n”,(int)tret);
exit(0);
}
运行结果:
thread 1 returning.
thread 1 exit code 1.
thread 2 exiting.
thread 2 exit code 2.
范例2:
#include <stdio.h>
#include <pthread.h>
void thread1(char s[])
{
printf("This is a pthread1.\n");
printf("%s\n",s);
pthread_exit("Hello first!"); //结束线程,返回一个值。
}
void thread2(char s[])
{
printf("This is a pthread2.\n");
printf("%s\n",s);
pthread_exit("Hello second!");
}
int main(void)
{
pthread_t id1,id2;
void *a1,*a2;
int i,ret1,ret2;
char s1[]="This is first thread!";
char s2[]="This is second thread!";
ret1=pthread_create(&id1,NULL,(void *) thread1,s1);
ret2=pthread_create(&id2,NULL,(void *) thread2,s2);
if(ret1!=0){
printf ("Create pthread1 error!\n");
exit (1);
}
pthread_join(id1,&a1);
printf("%s\n",(char*)a1);
if(ret2!=0){
printf ("Create pthread2 error!\n");
exit (1);
}
printf("This is the main process.\n");
pthread_join(id2,&a2);
printf("%s\n",(char*)a2);
return (0);
}
运行结果:
[****@XD**** c]$ ./example
This is a pthread1.
This is first thread!
Hello first!
This is the main process.
This is a pthread2.
<参考资料语>
一般情况下,进程中各个线程的运行都是相互独立的,线程的终止并不会通知,也不会影响其他线程,终止的线程所占用的资源也并不会随着线程的终止而得到释 放。正如进程之间可以用wait()系统调用来同步终止并释放资源一样,线程之间也有类似机制,那就是pthread_join()函数
pthread_join()的调用者将挂起并等待th线程终止,retval是pthread_exit()调用者线程(线程ID为th)的返回值,如 果thread_return不为NULL,则*thread_return=retval。需要注意的是一个线程仅允许唯一的一个线程使用 pthread_join()等待它的终止,并且被等待的线程应该处于可join状态,即非DETACHED状态
如果进程中的某个线程执行了pthread_detach(th),则th线程将处于DETACHED状态,这使得th线程在结束运行时自行释放所占用的 内存资源,同时也无法由pthread_join()同步,pthread_detach()执行之后,对th请求pthread_join()将返回错误
一个可join的线程所占用的内存仅当有线程对其执行了pthread_join()后才会释放,因此为了避免内存泄漏,所有线程的终止,要么已设为DETACHED,要么就需要使用pthread_join()来回收
3) 主线程用pthread_exit还是return
用pthread_exit只会使主线程自身退出,产生的子线程继续执行;用return则所有线程退出。
综合以上要想让子线程总能完整执行(不会中途退出),一种方法是在主线程中调用pthread_join对其等待,即pthread_create/pthread_join/pthread_exit或return;一种方法是在主线程退出时使用pthread_exit,这样子线程能继续执行,即pthread_create/pthread_detach/pthread_exit;还有一种是pthread_create/pthread_detach/return,这时就要保证主线程不能退出,至少是子线程完成前不能退出。现在的项目中用的就是第三种方法,主线程是一个死循环,子线程有的是死循环有的不是。
<参考资料语>
理论上说,pthread_exit()和线程宿体函数退出的功能是相同的,函数结束时会在内部自动调用pthread_exit()来清理线程相关的资源。但实际上二者由于编译器的处理有很大的不同。
在进程主函数(main())中调用pthread_exit(),只会使主函数所在的线程(可以说是进程的主线程)退出;而如果是return,编译器将使其调用进程退出的代码(如_exit()),从而导致进程及其所有线程结束运行。
稳定、高效、健壮
HHHHHHHHHHHHHHHHHHHHHHHHHHHHHHHHHHHHHHHHHHHHHHHHHHHHHHHHHHHHHHHHHHHHHHHHHHHHHHHHHHHHHHHHHHHHHHHHHHHHHHHHHHHHHHHHHHHHHHHHHHHHHHHHHHHHHHHHHHHHHHHHHHHHHHHHHHHHHHHHHHHHHHHHHHHHHHHHHHHHHHHHHHHHHHHHHHHHHHHHHHHHHHHHHHHHHHHHHHHHHHHHH
线程状态:
在一个线程的生存期内,可以在多种状态之间转换,不同的操作系统可以实现不同的线程模型,定义许多不同的线程状态,每个状态还可以包含多个子状态,但大体来说,如下几种状态是通用的:
1)就绪:参与调度,等待被执行,一旦被调度选中,立即开始执行
2)运行:占用CPU,正在运行中
3)休眠:暂不参与调度,等待特定事件发生
4)中止:已经运行完毕,等待回收线程资源
线程环境:
线程存在于进程之中,进程内所有全局资源对于内部每个线程都是可见的。
进程内典型全局资源如下:
1)代码区:这意味着当前进程空间内所有的可见的函数代码,对于每个线程来说,也是可见的
2)静态存储区:全局变量,静态空间
3)动态存储区:堆空间
线程内典型的局部资源:
1)本地栈空间:存放本线程的函数调用栈,函数内部的局部变量等
2)部分寄存器变量:线程下一步要执行代码的指针偏移量
一个进程发起后,会首先生成一个缺省的线程,通常称这个线程为主线程,C/C++程序中,主线程就是通过main函数进入的线程,由主线程衍生的线程成为从线程,从线程也可以有自己的入口函数,相当于主线程的main函数,这个函数由用户指定。通过thread构造函数中传入函数指针实现,在指定线程入口函数时,也可以指定入口函数的参数。就像main函数有固定的格式要求一样,线程的入口函数也可以有固定的格式要求,参数通常都是void*类型,返回类型根据协议的不同也不同,pthread中是void*,winapi中是unsigned int,而且都是全局函数。
最常见的线程模型中,除主线程较为特殊之外,其他线程一旦被创建,相互之间就是对等关系,不存在隐含的层次关系。每个进程可创建的最大线程数由具体实现决定。
无论在windows中还是Posix中,主线程和子线程的默认关系是:无论子线程执行完毕与否,一旦主线程执行完毕退出,所有子线程执行都会终止。这时整个进程结束或僵死,部分线程保持一种终止执行但还未销毁的状态,而进程必须在其所有线程销毁后销毁,这时进程处于僵死状态。线程函数执行完毕退出,或以其他非常方式终止,线程进入终止态,但是为线程分配的系统资源不一定释放,可能在系统重启之前,一直都不能释放,终止态的线程,仍旧作为一个线程实体存在于操作系统中,什么时候销毁,取决于线程属性。在这种情况下,主线程和子线程通常定义以下两种关系:
1、可会合(joinable):这种关系下,主线程需要明确执行等待操作,在子线程结束后,主线程的等待操作执行完毕,子线程和主线程会合,这时主线程继续执行等待操作之后的下一步操作。主线程必须会合可会合的子线程。在主线程的线程函数内部调用子线程对象的wait函数实现,即使子线程能够在主线程之前执行完毕,进入终止态,也必须执行会合操作,否则,系统永远不会主动销毁线程,分配给该线程的系统资源也永远不会释放。
2、相分离(detached):表示子线程无需和主线程会合,也就是相分离的,这种情况下,子线程一旦进入终止状态,这种方式常用在线程数较多的情况下,有时让主线程逐个等待子线程结束,或者让主线程安排每个子线程结束的等待顺序,是很困难或不可能的,所以在并发子线程较多的情况下,这种方式也会经常使用。
在任何一个时间点上,线程是可结合(joinable)或者是可分离的(detached),一个可结合的线程能够被其他线程回收资源和杀死,在被其他线程回收之前,它的存储器资源如栈,是不释放的,相反,一个分离的线程是不能被其他线程回收或杀死的,它的存储器资源在它终止时由系统自动释放。
线程的分离状态决定一个线程以什么样的方式来终止自己,在默认的情况下,线程是非分离状态的,这种情况下,原有的线程等待创建的线程结束,只有当pthread_join函数返回时,创建的线程才算终止,释放自己占用的系统紫云啊,而分离线程没有被其他的线程所等待,自己运行结束了,线程也就终止了,马上释放系统资源。
ttttttttttttttttttttttttttttttttttttttttttttttttttttttttttttttttttttttttttttttttttttttttttttttttttttttttttttttttttttttttttttttttttttttttttttttttttttttttttttttttttttttttttttttttttttttttttttttttttttttttttttttttttttttttttttttttttttttttttttttttttttttttttttttttttttttttttttttttttttttttttttttttttttttttttttttttttttttttttttttttttttttttttttttttttttttttttttttttttttttttttttttttttttttttttttttttttttttttttttttttttttttttttttttttttttttttttttttttttttttttttttt
Thread.Join()方法,顾名思义,在一个线程中加入一些东西。
MSDN上解释其作用为:阻塞 “调用线程” 直到某个线程结束。
这个翻译过来的解释有点晦涩。举个例子如下:
static void Main()
{
Thread t=new Thread(new ThreadStart(ThreadMethod));
t.Start();
t.Join();
Console.WriteLine("I am Main Thread");
Console.Read();
}
void ThreadMethod()
{
...
}
从上面的代码中,我们可以看到存在两个线程:主线程和线程t
回到Join,这里所说的调用方就是主线程,主线程调用线程t的Join方法,导致主线程阻塞,直到t线程执行完毕,才返回到主线程中。
简单理解,在主线程中调用t.Join(),也就是在主线程中加入了t线程的代码,必须让t线程执行完毕之后,主线程(调用方)才能正常执行。
代码示例:
static void Main(string[] args)
{
// AutoResetEvent autoEvent = new AutoResetEvent(false);
Thread regularThread = new Thread(new ThreadStart(ThreadMethod));
regularThread.Start();
ThreadPool.QueueUserWorkItem(new WaitCallback(WorkMethod1),regularThread);
Console.WriteLine("i am main thread!");
// regularThread.Join();
Console.WriteLine("i am main thread!");
// autoEvent.WaitOne();
Console.Read();
}
static void ThreadMethod()
{
for (int i = 0; i < 5; i++)
{
Console.WriteLine("ThreadOne 第 {0} 次执行,executing ThreadMethod,is {1} from the thread pool.",i+1, Thread.CurrentThread.IsThreadPoolThread ? "" : "not");
Thread.Sleep(1000);
}
}
static void WorkMethod1(object stateInfo)
{
Console.WriteLine("ThreadTwo,executing WorkMethod,is {0} form the thread pool.", Thread.CurrentThread.IsThreadPoolThread ? "" : "not");
// ((AutoResetEvent)stateInfo).Set();
((Thread)stateInfo).Join();
for (int i = 0; i < 5; i++)
{
Console.WriteLine("ThreadTwo 第 {0}次执行,executing WorkMethod,is {1} form the thread pool.",i+1, Thread.CurrentThread.IsThreadPoolThread ? "" : "not");
}
}
代码中,存在三个线程:主线程、regularThread和线程池中的一个线程。在线程池中的线程中调用了regularThread.Join()方法;
执行结果:
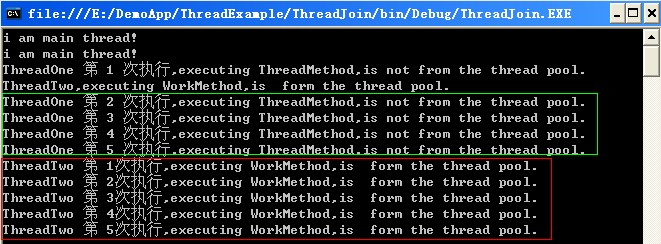
SBSBSBSBSBBBBBBBBBBBBBBBBBBBBBBBBBBBBBBBBBBBBBBBBBBBBBBBBBBBBBBBBBBBBBBBBBBBBBBBBBBBBBBBBBBBBBBBBBBBBBBBBBBBBBBBBBBBBBBBBBBBBBBBBBBBBBBBBBBBBBBBBBBBBBBBBBBBBBBBBBBBBBBBBBBBBBBBBBBBBBBBBBBBBBBBBBBBBBBBBBBBBBBBBBBBBBBBBBBBBBBBBBBBBBBBBBBBBBBBBBBBBBBBBBBBBBBBBBBBBBBBBBBBBBBBBBBBBBBBBBBBBBBBBBBBBBBBBBBBBBBBBBBBBBBBBBBBBBBBBBBBBBBB
(一)与C++11多线程相关的头文件
C++11 新标准中引入了四个头文件来支持多线程编程,他们分别是< atomic> ,< thread>,< mutex>,< condition_variable>和< future>。
?< atomic>:该头文主要声明了两个类, std::atomic 和 std::atomic_flag,另外还声明了一套 C 风格的原子类型和与 C 兼容的原子操作的函数。
?< thread>:该头文件主要声明了 std::thread 类,另外 std::this_thread 命名空间也在该头文件中。
?< mutex>:该头文件主要声明了与互斥量(mutex)相关的类,包括 std::mutex 系列类,std::lock_guard, std::unique_lock, 以及其他的类型和函数。
?< condition_variable>:该头文件主要声明了与条件变量相关的类,包括 std::condition_variable 和 std::condition_variable_any。
?< future>:该头文件主要声明了 std::promise, std::package_task 两个 Provider 类,以及 std::future 和 std::shared_future 两个 Future 类,另外还有一些与之相关的类型和函数,std::async() 函数就声明在此头文件中。
(二)std::thread
0
0.1 线程状态
在一个线程的生存期内,可以在多种状态之间转换,不同的操作系统可以实现不同的线程模型,定义许多不同的线程状态,每个状态还可以包含多个子状态,但大体来说,如下几种状态是通用的:
1)就绪:参与调度,等待被执行,一旦被调度选中,立即开始执行
2)运行:占用CPU,正在运行中
3)休眠:暂不参与调度,等待特定事件发生
4)中止:已经运行完毕,等待回收线程资源
0.2 线程环境
线程存在于进程之中,进程内所有全局资源对于内部每个线程都是可见的。
进程内典型全局资源如下:
1)代码区:这意味着当前进程空间内所有的可见的函数代码,对于每个线程来说,也是可见的
2)静态存储区:全局变量,静态空间
3)动态存储区:堆空间
线程内典型的局部资源:
1)本地栈空间:存放本线程的函数调用栈,函数内部的局部变量等
2)部分寄存器变量:线程下一步要执行代码的指针偏移量
1 构造、赋值和拷贝
1.1 构造函数
(1)default :thread() noexcept;
(2)initialization :template < class Fn, class… Args> explicit thread (Fn&& fn, Args&&… args);
(3)copy [deleted] :thread (const thread&) = delete;
(4)move :thread (thread&& x) noexcept;
默认构造函数,创建一个空的 thread 执行对象。 初始化构造函数,创建一个 thread对象,该 thread对象可被joinable,新产生的线程会调用 fn 函数,该函数的参数由 args 给出。 拷贝构造函数(被禁用),意味着 thread 不可被拷贝构造。 move 构造函数,调用成功之后 x 不代表任何 thread 执行对象。
注意:可被 joinable 的 thread 对象必须在他们销毁之前被主线程 join 或者将其设置为 detached。
栗子:
|
1
2
3
4
5
6
7
8
9
10
11
12
13
14
15
16
17
18
19
20
21
22
23
24
25
26
27
28
29
30
31
32
33
34
35
36
|
#include <iostream>
#include <utility>
#include <thread>
#include <chrono>
#include <functional>
#include
void
f1(
int
n)
{
for
(
int
i =
0
; i <
5
; ++i)
{
std::cout <<
"Thread "
<< n <<
" executing\n"
;
std::this_thread::sleep_for(std::chrono::milliseconds(
10
));
}
}
void
f2(
int
& n)
{
for
(
int
i =
0
; i <
5
; ++i) {
std::cout <<
"Thread 2 executing\n"
;
++n;
std::this_thread::sleep_for(std::chrono::milliseconds(
10
));
}
}
int
main()
{
int
n =
0
;
std::thread t1;
std::thread t2(f1, n +
1
);
std::thread t3(f2, std::ref(n));
std::thread t4(std::move(t3));
t2.join();
t4.join();
std::cout <<
"Final value of n is "
<< n <<
'\n'
;
}</atomic></functional></chrono></thread></utility></iostream>
|
Possible output:
|
1
2
3
4
5
6
7
8
9
10
11
|
Thread
1
executing
Thread
2
executing
Thread
1
executing
Thread
2
executing
Thread
1
executing
Thread
2
executing
Thread
1
executing
Thread
2
executing
Thread
2
executing
Thread
1
executing
Final value of n is
5
|
1.2 MOVE赋值操作
move (1):thread& operator= (thread&& rhs) noexcept;
copy [deleted] (2):thread& operator= (const thread&) = delete;
move 赋值操作,如果当前对象不可 joinable,需要传递一个右值引用(rhs)给 move 赋值操作;如果当前对象可被 joinable,则 terminate() 报错。
|
1
2
3
4
5
6
7
8
9
10
11
12
13
14
15
16
17
18
19
20
21
22
23
24
25
26
27
28
29
30
31
32
33
34
35
36
37
|
#include <chrono>
#include <iostream>
#include <thread>
void
thread_task(
int
n) {
std::this_thread::sleep_for(std::chrono::seconds(n));
std::cout <<
"hello thread "
<< std::this_thread::get_id()
<<
" paused "
<< n <<
" seconds"
<< std::endl;
}
int
main(
int
argc,
const
char
*argv[])
{
std::thread threads[
5
];
std::cout <<
"Spawning 5 threads...\n"
;
for
(
int
i =
0
; i <
5
; i++) {
threads[i] = std::thread(thread_task, i +
1
);
/******copy********/
}
std::cout <<
"Done spawning threads! Now wait for them to join\n"
;
for
(auto& t : threads) {
t.join();
}
std::cout <<
"All threads joined.\n"
;
system(
"pause"
);
return
EXIT_SUCCESS;
}
</thread></iostream></chrono></stdlib.h></stdio.h>
|
2 其他成员函数
2.1 get_id :获取线程 ID。
参数:none
返回值:An object of member type thread::id that uniquely identifies the thread (if joinable), or default-constructed (if not joinable)
Returns the thread id.
If the thread object is joinable, the function returns a value that uniquely identifies the thread.
If the thread object is not joinable, the function returns a default-constructed object of member type thread::id.
栗子:
|
1
2
3
4
5
6
7
8
9
10
11
12
13
14
15
16
17
18
19
20
21
|
#include <iostream>
#include <thread>
#include <chrono>
std::thread::id main_thread_id = std::this_thread::get_id();
void
is_main_thread() {
if
( main_thread_id == std::this_thread::get_id() )
std::cout <<
"This is the main thread.\n"
;
else
std::cout <<
"This is not the main thread.\n"
;
}
int
main()
{
is_main_thread();
std::thread th (is_main_thread);
th.join();
}
</chrono></thread></iostream>
|
output:
|
1
2
|
This is the main thread.
This is not the main thread.
|
2.2 joinable :检查线程是否可被 join。
返回值:false、true
参数:none
Returns whether the thread object is joinable.
A thread object is joinable if it represents a thread of execution.
A thread object is not joinable in any of these cases:
?if it was default-constructed.
?if it has been moved from (either constructing another thread object, or assigning to it).
?if either of its members join or detach has been called.
栗子:
|
1
2
3
4
5
6
7
8
9
10
11
12
13
14
15
16
17
18
19
20
21
22
23
24
25
26
27
28
|
#include <iostream>
#include <thread>
void
mythread()
{
}
int
main()
{
std::thread foo;
std::thread bar(mythread);
std::cout <<
"Joinable after construction:\n"
<< std::boolalpha;
std::cout <<
"foo: "
<< foo.joinable() <<
'\n'
;
std::cout <<
"bar: "
<< bar.joinable() <<
'\n'
;
if
(foo.joinable()) foo.join();
if
(bar.joinable()) bar.join();
std::cout <<
"Joinable after joining:\n"
<< std::boolalpha;
std::cout <<
"foo: "
<< foo.joinable() <<
'\n'
;
std::cout <<
"bar: "
<< bar.joinable() <<
'\n'
;
return
0
;
}
</thread></iostream>
|
Output (after 3 seconds):
|
1
2
3
4
5
6
|
Joinable after construction:
foo:
false
bar:
true
Joinable after joining:
foo:
false
bar:
false
|
2.3 join:Join 线程。
参数:none
返回值:none
The function returns when the thread execution has completed.
直到线程函数被执行完毕,join才返回。This synchronizes the moment this function returns with the completion of all the operations in the thread: This blocks the execution of the thread that calls this function until the function called on construction returns (if it hasn’t yet).
After a call to this function, the thread object becomes non-joinable and can be destroyed safely.
栗子:
|
1
2
3
4
5
6
7
8
9
10
11
12
13
14
15
16
17
18
19
20
21
22
23
24
25
26
|
#include <iostream>
#include <thread>
#include <chrono>
void
pause_thread(
int
n)
{
std::this_thread::sleep_for (std::chrono::seconds(n));
std::cout <<
"pause of "
<< n <<
" seconds ended\n"
;
}
int
main()
{
std::cout <<
"Spawning 3 threads...\n"
;
std::thread t1 (pause_thread,
1
);
std::thread t2 (pause_thread,
2
);
std::thread t3 (pause_thread,
3
);
std::cout <<
"Done spawning threads. Now waiting for them to join:\n"
;
t1.join();
t2.join();
t3.join();
std::cout <<
"All threads joined!\n"
;
return
0
;
}
</chrono></thread></iostream>
|
Output (after 3 seconds):
|
1
2
3
4
5
6
|
Spawning
3
threads...
Done spawning threads. Now waiting
for
them to join:
pause of
1
seconds ended
pause of
2
seconds ended
pause of
3
seconds ended
All threads joined!
|
2.4 detach:Detach 线程
参数:none
返回值:none
Detaches the thread represented by the object from the calling thread, allowing them to execute independently from each other.
Both threads continue without blocking nor synchronizing in any way. Note that when either one ends execution, its resources are released.
After a call to this function, the thread object becomes non-joinable and can be destroyed safely.
栗子:
|
1
2
3
4
5
6
7
8
9
10
11
12
13
14
15
16
17
18
19
20
21
22
23
24
|
#include <iostream>
#include <thread>
#include <chrono>
void
pause_thread(
int
n)
{
std::this_thread::sleep_for (std::chrono::seconds(n));
std::cout <<
"pause of "
<< n <<
" seconds ended\n"
;
}
int
main()
{
std::cout <<
"Spawning and detaching 3 threads...\n"
;
std::thread (pause_thread,
1
).detach();
std::thread (pause_thread,
2
).detach();
std::thread (pause_thread,
3
).detach();
std::cout <<
"Done spawning threads.\n"
;
std::cout <<
"(the main thread will now pause for 5 seconds)\n"
;
pause_thread(
5
);
return
0
;
}
</chrono></thread></iostream>
|
Output (after 5 seconds):
|
1
2
3
4
5
6
7
|
Spawning and detaching
3
threads...
Done spawning threads.
(the main thread will now pause
for
5
seconds)
pause of
1
seconds ended
pause of
2
seconds ended
pause of
3
seconds ended
pause of
5
seconds ended
|
detach调用之后,目标线程就成为了守护线程,驻留后台运行,与之关联的std::thread对象失去对目标线程的关联,无法再通过std::thread对象取得该线程的控制权。当线程主函数执行完之后,线程就结束了,运行时库负责清理与该线程相关的资源。
当一个thread对象到达生命期终点而关联线程还没有结束时,则thread对象取消与线程之间的关联,目标线程线程则变为分离线程继续运行搜索。
当调用join函数时,调用线程阻塞等待目标线程终止,然后回收目标线程的资源。
2.5 swap:Swap 线程 。
参数:the thread to swap with
返回值:none
Exchanges the underlying handles of two thread objects
栗子
|
1
2
3
4
5
6
7
8
9
10
11
12
13
14
15
16
17
18
19
20
21
22
23
24
25
26
27
28
29
30
31
32
33
34
35
36
37
|
#include <iostream>
#include <thread>
#include <chrono>
void
foo()
{
std::this_thread::sleep_for(std::chrono::seconds(
1
));
}
void
bar()
{
std::this_thread::sleep_for(std::chrono::seconds(
1
));
}
int
main()
{
std::thread t1(foo);
std::thread t2(bar);
std::cout <<
"thread 1 id: "
<< t1.get_id() << std::endl;
std::cout <<
"thread 2 id: "
<< t2.get_id() << std::endl;
std::swap(t1, t2);
std::cout <<
"after std::swap(t1, t2):"
<< std::endl;
std::cout <<
"thread 1 id: "
<< t1.get_id() << std::endl;
std::cout <<
"thread 2 id: "
<< t2.get_id() << std::endl;
t1.swap(t2);
std::cout <<
"after t1.swap(t2):"
<< std::endl;
std::cout <<
"thread 1 id: "
<< t1.get_id() << std::endl;
std::cout <<
"thread 2 id: "
<< t2.get_id() << std::endl;
t1.join();
t2.join();
}</chrono></thread></iostream>
|
Possible output:
|
1
2
3
4
5
6
7
8
|
thread
1
id:
1892
thread
2
id:
2584
after std::swap(t1, t2):
thread
1
id:
2584
thread
2
id:
1892
after t1.swap(t2):
thread
1
id:
1892
thread
2
id:
2584
|
另外:void std::swap( thread &lhs, thread &rhs );
说明:不是成员函数。只是重载了std::swap函数。
用法:std::swap(thread1,thread2);
栗子:
|
1
2
3
4
5
6
7
8
9
10
11
12
13
14
15
16
17
18
19
20
21
22
23
24
25
26
27
28
29
30
31
32
33
34
35
36
37
|
#include <iostream>
#include <thread>
#include <chrono>
void
foo()
{
std::this_thread::sleep_for(std::chrono::seconds(
1
));
}
void
bar()
{
std::this_thread::sleep_for(std::chrono::seconds(
1
));
}
int
main()
{
std::thread t1(foo);
std::thread t2(bar);
std::cout <<
"thread 1 id: "
<< t1.get_id() << std::endl;
std::cout <<
"thread 2 id: "
<< t2.get_id() << std::endl;
std::swap(t1, t2);
std::cout <<
"after std::swap(t1, t2):"
<< std::endl;
std::cout <<
"thread 1 id: "
<< t1.get_id() << std::endl;
std::cout <<
"thread 2 id: "
<< t2.get_id() << std::endl;
t1.swap(t2);
std::cout <<
"after t1.swap(t2):"
<< std::endl;
std::cout <<
"thread 1 id: "
<< t1.get_id() << std::endl;
std::cout <<
"thread 2 id: "
<< t2.get_id() << std::endl;
t1.join();
t2.join();
}</chrono></thread></iostream>
|
输出:
|
1
2
3
4
5
6
7
8
|
thread
1
id:
1892
thread
2
id:
2584
after std::swap(t1, t2):
thread
1
id:
2584
thread
2
id:
1892
after t1.swap(t2):
thread
1
id:
1892
thread
2
id:
2584
|
2.6 native_handle:返回 native handle。
2.7 hardware_concurrency [static]:检测硬件并发特性。
2.8 总结
|
1
2
3
4
5
6
7
8
9
10
11
12
13
14
15
16
17
|
std::thread m_thrSend;
bool m_sending{
false
};
bool startSend()
{
if
(m_sending)
return
false
;
m_sending =
true
;
m_thrSend = std::thread([
this
](){
this
->thrSend(); });
return
true
;
}
void
stopSend()
{
m_sending =
false
;
std::this_thread::sleep_for(std::chrono::milliseconds(
50
));
if
(m_thrSend.joinable())
m_thrSend.join();
}
|


 1060
1060

 被折叠的 条评论
为什么被折叠?
被折叠的 条评论
为什么被折叠?
 到【灌水乐园】发言


