


【0】README
0.0)本文部分文字描述转自:“深入剖析tomcat”,旨在学习 tomcat(5)servlet容器 的基础知识;
0.1)intro to servlet容器:servlet容器是用来处理请求servlet资源,并为web客户端填充response 对象的模块;
0.2)补充:吃个饭过来,真心没想到这么多人围观,再次对文章重新排版(并不是博主我不给力,是CSDN编辑器时不时吊链子啊,oh),并添加了测试用例的程序流程图(共3张)[1604111947];
0.3)for complete source code, please visit https://github.com/pacosonTang/HowTomcatWorks/tree/master/chapter5
0.4)
温馨建议:建议阅读本文之前,已阅读过 tomcat(1~4)的系列文章,因为它们是环环相扣的;
1)intro to servlet容器:servlet容器是用来处理请求servlet资源,并为web客户端填充response 对象的模块;
1.1)servlet容器:是 org.apache.catalina.Container接口的实例;
1.2)在Tomcat中,共有四种容器(types):
t1)Engine;
t2)Host;
t3)Context;
t4)Wrapper;
【1】Container接口
1)在Tomcat中,共有四种容器(types):(干货——Tomcat中共有4种容器)
![]()
![]()
![]()

【6】Context应用程序
t1)Engine:表示整个Catalina servlet 引擎;
t2)Host:表示包含有一个或多个 Context容器的虚拟主机;
t3)Context:表示一个web 应用程序,一个Context 可以有多个 Wrapper;
t4)Wrapper:表示一个独立的servlet;
2)以上4种容器都是 org.apache.catalina包下的接口:分别为Engine,Host, Context, Wrapper,他们都继承自Container接口。这4个接口的标准实现是 StandardEngine类,StandardHost类,StandardContext类,StandardWrapper类,他们都在 org.apache.catalina.core 包内;
Attention)
A1)所有的实现类都继承自抽象类 ContainerBase ;
A2)Container接口的设计满足以下条件:在部署应用时,Tomcat管理员可以通过编辑配置文件(server.xml)来决定使用哪种容器。这是通过引入容器中的管道(pipeline)和阀(valve)的集合实现的;(干货——引入了容器中的管道和阀)
【2】管道任务
1)本节旨在说明: 当连接器调用了servlet容器的invoke方法后会发生什么事情,并讨论org.apache.catalina 包中的4个相关接口,Pipeline, Valve, ValveContext 和 Contained;
2)管道和阀:(干货——注意管道和阀的定义)
2.1)管道:包含该servlet容器将要调用的任务;
2.2)一个阀:表示一个具体的任务。
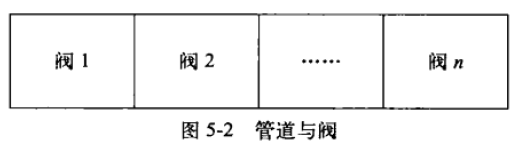
2.3)在servlet容器的管道中,有一个基础阀,但是,可以添加任意数量的阀。阀的数量指的是额外添加的阀数量,即,不包括基础阀。有意思的是, 可以通过编辑tomcat 的 配置文件(server.xml)来动态地添加阀;
2.4)一条管道和阀的示意图如下:
Attention)
A1)管道就想过滤器链条一样,而阀则好似过滤器;
A2)当一个阀执行完成后,会调用下一个阀继续执行。基础阀总是最后一个执行;(干货——当一个阀执行完成后,会调用下一个阀继续执行。基础阀总是最后一个执行)
3)管道的invoke方法:一个servlet容器可以有一条管道,当调用了容器的invoke方法后,容器会将处理工作交由管道完成,而管道会调用其中的第一个阀开始处理。当第一个阀处理完后,它会调用后续的阀继续执行任务,直到管道中所有的阀都处理完成。
 public void invoke(Request request, Response response) //SimplePipeline.invoke()方法
    throws IOException, ServletException {
    // Invoke the first Valve in this pipeline for this request
    (new SimplePipelineValveContext()).invokeNext(request, response);
  }

  public void removeValve(Valve valve) {
  }

  // this class is copied from org.apache.catalina.core.StandardPipeline class's
  // StandardPipelineValveContext inner class.
  protected class SimplePipelineValveContext implements ValveContext {

    protected int stage = 0;

    public String getInfo() {
      return null;
    }

    public void invokeNext(Request request, Response response)
      throws IOException, ServletException {
      int subscript = stage; // init stage == 0.
      stage = stage + 1;
      // Invoke the requested Valve for the current request thread
      if (subscript < valves.length) {
        valves[subscript].invoke(request, response, this); // 若非基础阀是 ClientIPLoggerValve
      }
      else if ((subscript == valves.length) && (basic != null)) {
        basic.invoke(request, response, this); // this line, 直到基础阀才停止遍历非基础阀
      }
      else {
        throw new ServletException("No valve");
      }
    }
  } // end of inner class
public class ClientIPLoggerValve implements Valve, Contained {
protected Container container;
public void invoke(Request request, Response response, ValveContext valveContext)
throws IOException, ServletException {
// Pass this request on to the next valve in our pipeline
valveContext.invokeNext(request, response); // 继续回调 SimplePipeline.invokeNext(),直到基础阀
System.out.println("Client IP Logger Valve");
ServletRequest sreq = request.getRequest();
System.out.println(sreq.getRemoteAddr()); // this line outputs ip addr to the console.
System.out.println("------------------------------------");
}
4)实现阀的遍历:Tomcat引入接口 org.apache.catalina.ValveContext 来实现阀的遍历执行;
4.1)管道必须保证添加到其中的所有阀和基础阀都被调用一次:这是通过调用一个 ValveContext接口实例来实现的。
4.2)ValveContext接口中最重要的方法是 invokeNext方法:在创建了ValveContext实例后,管道会调用ValveContext实例的 invokeNext方法。ValveContext实例会首先调用管道中的 第一个阀,第一个阀执行完后,会调用后面的阀继续执行。ValveContext实例会将自身传给每个阀,因此,每个阀都可以调用 ValveContext实例的 invokeNext方法;
5)org.apache.catalina.core.StandardPipeline类: 是所有servlet容器中的Pipeline接口的实现,Tomcat4中有一个实现了ValveContext接口的内部类,名为StandardPipelineValveContext;
6)Tomcat5 从 StandardPipeline类中移除了 StandardPipelineValveContext类:却使用 org.apache.catalina.core.StandardValveContext类来调用阀;
【2.1】Pipeline接口
1)对于Pipeline接口:首先要提到的一个方法是 invoke方法,servlet容器调用invoke方法来开始调用管道中的阀和基础阀;
2)getBasic和setBasic:setBasic方法将基础阀设置到管道中,getBasic获取基础阀;(干货——管道中可以指定基础阀)
3)addValve和removeValve:新增阀和删除阀;(干货——在管道中可以新增和删除非基础阀)(请注意:SimplePipe.addValve()下面的 System.arraycopy 方法)
public final class Bootstrap1 {
  public static void main(String[] args) {

/* call by using http://localhost:8080/ModernServlet,
   but could be invoked by any name */

    HttpConnector connector = new HttpConnector();
    Wrapper wrapper = new SimpleWrapper();
    wrapper.setServletClass("servlet.ModernServlet"); // 设置servlet的相对路径

    Loader loader = new SimpleLoader(); // 类加载器
    Valve valve1 = new HeaderLoggerValve(); // 把请求头信息output到 console
    Valve valve2 = new ClientIPLoggerValve();// 用来将client的IP 地址输出到控制台上

    wrapper.setLoader(loader);
    ((Pipeline) wrapper).addValve(valve1); // 新增阀 ,key line
    ((Pipeline) wrapper).addValve(valve2); // 新增阀, key line

    connector.setContainer(wrapper);

    try {
      connector.initialize(); // 创建服务器套接字
      connector.start(); //

      // make the application wait until we press a key.
      System.in.read();
    }
    catch (Exception e) {
      e.printStackTrace();
    }
  }
}
public synchronized void addValve(Valve valve) { // SimpleWrapper.addValve()
pipeline.addValve(valve);
}public void addValve(Valve valve) { // SimplePipeline.addValve()
if (valve instanceof Contained)
((Contained) valve).setContainer(this.container);
synchronized (valves) {
Valve results[] = new Valve[valves.length +1];
System.arraycopy(valves, 0, results, 0, valves.length);
results[valves.length] = valve;
valves = results;
}
}
【2.2】Valve接口
1)阀是Valve接口的实例,用来处理接收到的请求,有两个方法:invoke方法和getinfo方法;
public interface Valve {
public String getInfo();
public void invoke(Request request, Response response,
                       ValveContext context)
        throws IOException, ServletException;
}
【2.3.】ValveContext接口
1)有两个方法:invokeNext方法和 getInfo方法;
public interface ValveContext {
public String getInfo();
public void invokeNext(Request request, Response response)
        throws IOException, ServletException;
}
【2.4】Contained接口
public interface Contained {
public Container getContainer();
public void setContainer(Container container);
}
【3】Wrapper接口
1)intro to Wrapper:Wrapper级的servlet容器是一个 org.apache.catalina.Wrapper接口的实例,表示一个独立的servlet定义。Wrapper接口继承自 Container接口,又添加了一些额外的方法。
2)Wrapper接口的实现类:要负责管理继承servlet类的servlet生命周期,即,调用 servlet的 init(), service(), destroy()方法;
3)由于Wrapper已经是最低级的容器了,不能再向其中添加子容器;(干货——Wrapper已经是最低级的servlet容器)
4)Wrapper接口有两个方法:load方法 和 allocate方法;
4.1)load方法:载入并初始化servlet类;
4.2)allocate方法:会分配一个已经初始化的servlet实例;
 public Servlet allocate() throws ServletException { // SimpleWrapper.allocate() method.
    // Load and initialize our instance if necessary
    if (instance==null) {
      try {
        instance = loadServlet(); // this line
      }
      catch (ServletException e) {
        throw e;
      }
      catch (Throwable e) {
        throw new ServletException("Cannot allocate a servlet instance", e);
      }
    }
    return instance;
  }

  private Servlet loadServlet() throws ServletException { // this line
    if (instance!=null)
      return instance;

    Servlet servlet = null;
    String actualClass = servletClass;
    if (actualClass == null) {
      throw new ServletException("servlet class has not been specified");
    }

    Loader loader = getLoader(); // this line
    // Acquire an instance of the class loader to be used
    if (loader==null) {
      throw new ServletException("No loader.");
    }
    ClassLoader classLoader = loader.getClassLoader(); // this line

    // Load the specified servlet class from the appropriate class loader
    Class classClass = null;
    try {
      if (classLoader!=null) {
        classClass = classLoader.loadClass(actualClass);
      }
    }
    catch (ClassNotFoundException e) {
      throw new ServletException("Servlet class not found");
    }
    // Instantiate and initialize an instance of the servlet class itself
    try {
      servlet = (Servlet) classClass.newInstance();
    }
    catch (Throwable e) {
      throw new ServletException("Failed to instantiate servlet");
    }

    // Call the initialization method of this servlet
    try {
      servlet.init(null);
    }
    catch (Throwable f) {
      throw new ServletException("Failed initialize servlet.");
    }
    return servlet;
  }
  public Loader getLoader() { // this  line
    if (loader != null)
      return (loader);
    if (parent != null)
      return (parent.getLoader());
    return (null);
  }
【4】Context接口
1)intro to Context:Context接口是一个web 应用程序,一个Context实例可以有一个或多个Wrapper实例作为其子容器;
2)比较重要的方法: addWrapper() and createWrapper();
【5】Wrapper 应用程序(demonstrate how to build a smallest servlet container)
1)SimpleWrapper类:该类实现了Wrapper接口,包含一个Pipeline实例,并使用Loader实例载入servlet类。Pipeline实例包含一个基础阀和两个额外的阀。
【5.1】SimpleLoader类
1)SimpleLoader:负责完成类的载入工作,它知道servlet类的位置,通过调用其getClassLoader可以返回一个 java.lang.ClassLoader实例,可以用来搜索servlet类的位置;
2)SimpleLoader的构造函数:会初始化类加载器,供 SimpleWrapper实例使用;
public class SimpleLoader implements Loader { // return class loader

  public static final String WEB_ROOT =
    System.getProperty("user.dir") + File.separator  + "webroot";

  ClassLoader classLoader = null;
  Container container = null;

  public SimpleLoader() {
    try {
      URL[] urls = new URL[1];
      URLStreamHandler streamHandler = null;
      File classPath = new File(WEB_ROOT);
      String repository = (new URL("file", null, classPath.getCanonicalPath() + File.separator)).toString() ;
      urls[0] = new URL(null, repository, streamHandler);
      classLoader = new URLClassLoader(urls);
    }
    catch (IOException e) {
      System.out.println(e.toString() );
    }
  }

  public ClassLoader getClassLoader() {
    return classLoader;
  }
【5.2】SimplePipeline类
1)该类最重要的方法是 invoke方法;
public class SimplePipeline implements Pipeline {

  public SimplePipeline(Container container) {
    setContainer(container);
  }
  protected Valve basic = null;
  protected Container container = null;
  protected Valve valves[] = new Valve[0];

  public void setContainer(Container container) {
    this.container = container;
  }

  public Valve getBasic() {
    return basic;
  }

  public void setBasic(Valve valve) {
    this.basic = valve;
    ((Contained) valve).setContainer(container);
  }

  public void addValve(Valve valve) {
    if (valve instanceof Contained)
      ((Contained) valve).setContainer(this.container);

    synchronized (valves) {
      Valve results[] = new Valve[valves.length +1];
      System.arraycopy(valves, 0, results, 0, valves.length);
      results[valves.length] = valve;
      valves = results;
    }
  }
  public void invoke(Request request, Response response)
    throws IOException, ServletException {
    // Invoke the first Valve in this pipeline for this request
    (new SimplePipelineValveContext()).invokeNext(request, response);
  }
  protected class SimplePipelineValveContext implements ValveContext {

    protected int stage = 0;

    public String getInfo() {
      return null;
    }

    public void invokeNext(Request request, Response response)
      throws IOException, ServletException {
      int subscript = stage; // init stage == 0.
      stage = stage + 1;
      // Invoke the requested Valve for the current request thread
      if (subscript < valves.length) {
        valves[subscript].invoke(request, response, this);
      }
      else if ((subscript == valves.length) && (basic != null)) {
        basic.invoke(request, response, this);
      }
      else {
        throw new ServletException("No valve");
      }
    }
  } // end of inner class
【5.3】SimpleWrapper类
1)该类实现了Wrapper接口:并提供了 allocate 和 load 方法的实现;
2)getLoader()方法:该方法返回一个用于载入servlet 类的载入器。若Wrapper实例已经关联了一个载入器,则直接将其返回;否则,它将返回父容器的载入器。若没有父容器,getLoader方法会返回null;
public Servlet allocate() throws ServletException {
    // Load and initialize our instance if necessary
    if (instance==null) {
      try {
        instance = loadServlet();
      }
      catch (ServletException e) {
        throw e;
      }
      catch (Throwable e) {
        throw new ServletException("Cannot allocate a servlet instance", e);
      }
    }
    return instance;
  }

  private Servlet loadServlet() throws ServletException {
    if (instance!=null)
      return instance;

    Servlet servlet = null;
    String actualClass = servletClass;
    if (actualClass == null) {
      throw new ServletException("servlet class has not been specified");
    }

    Loader loader = getLoader();
    // Acquire an instance of the class loader to be used
    if (loader==null) {
      throw new ServletException("No loader.");
    }
    ClassLoader classLoader = loader.getClassLoader();

    // Load the specified servlet class from the appropriate class loader
    Class classClass = null;
    try {
      if (classLoader!=null) {
        classClass = classLoader.loadClass(actualClass);
      }
    }
    catch (ClassNotFoundException e) {
      throw new ServletException("Servlet class not found");
    }
    // Instantiate and initialize an instance of the servlet class itself
    try {
      servlet = (Servlet) classClass.newInstance();
    }
    catch (Throwable e) {
      throw new ServletException("Failed to instantiate servlet");
    }

    // Call the initialization method of this servlet
    try {
      servlet.init(null);
    }
    catch (Throwable f) {
      throw new ServletException("Failed initialize servlet.");
    }
    return servlet;
  }
3)SimpleWrapper类有一个Pipeline实例:并该为Pipeline实例设置基础阀;
【5.4】SimpleWrapperValve类
1)SimpleWrapperValve是一个基础阀:用于处理对SimpleWrapper类的请求,其最主要的方法是 invoke方法;
public class SimpleWrapperValve implements Valve, Contained {

  protected Container container;

  public void invoke(Request request, Response response, ValveContext valveContext)
    throws IOException, ServletException {

    SimpleWrapper wrapper = (SimpleWrapper) getContainer();
    ServletRequest sreq = request.getRequest();
    ServletResponse sres = response.getResponse();
    Servlet servlet = null;
    HttpServletRequest hreq = null;
    if (sreq instanceof HttpServletRequest)
      hreq = (HttpServletRequest) sreq;
    HttpServletResponse hres = null;
    if (sres instanceof HttpServletResponse)
      hres = (HttpServletResponse) sres;

    // Allocate a servlet instance to process this request
    try {
      servlet = wrapper.allocate();
      if (hres!=null && hreq!=null) {
        servlet.service(hreq, hres);
      }
      else {
        servlet.service(sreq, sres);
      }
    }
    catch (ServletException e) {
    }  }
【5.5】ClientIPLoggerValve类
1)ClientIPLoggerValve类所表示的阀:用来将client的IP 地址输出到控制台上;
2)注意其invoke方法:它先调用方法参数 valveContext的 invokeNext方法来调用管道中的下一个阀。然后,它会把几行字符串output到 console;
【5.6】HeaderLoggerValve类
1)HeaderLoggerValve类作用:会把请求头信息output到 console;
2)注意其invoke方法:它先调用方法参数 valveContext的 invokeNext方法来调用管道中的下一个阀。
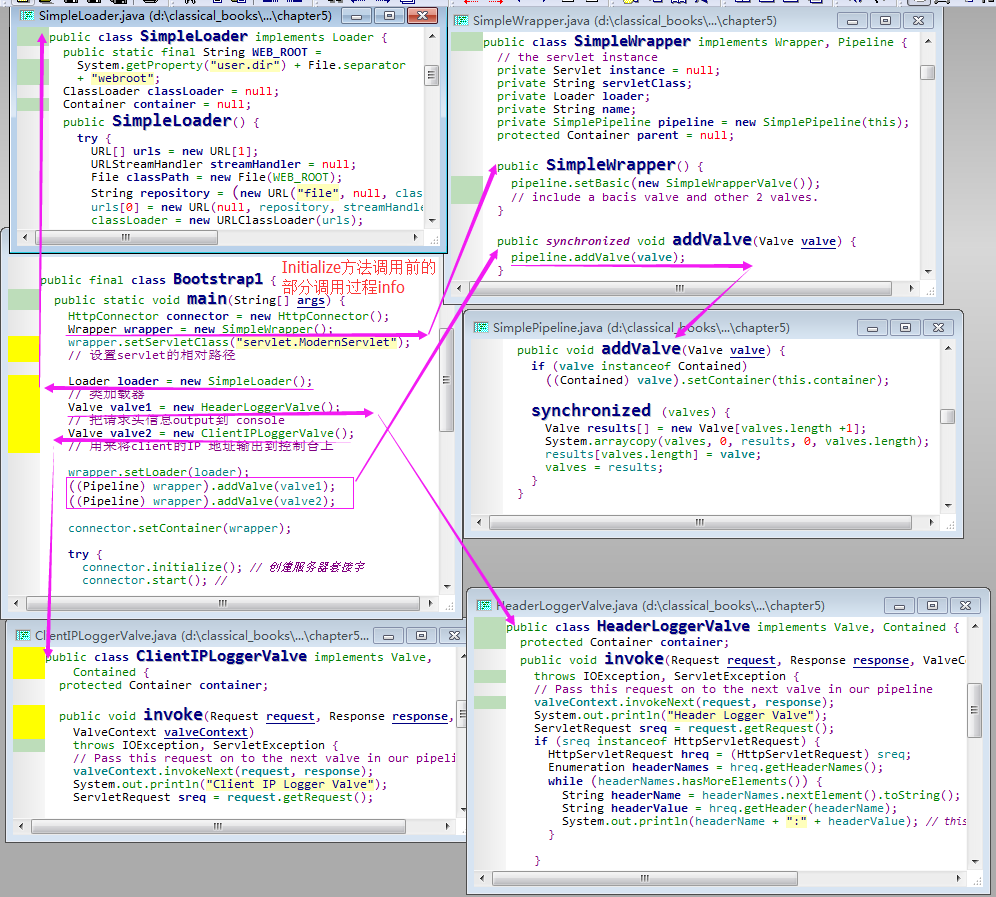
【5.7】Bootstrap1
step1)创建 HttpConnector 和 SimpleWrapper实例,并将需要加载的 servlet name 赋值给 Wrapper实例;
step2)创建一个载入器和两个阀,将载入器设置到Wrapper实例中 ;
step3)将上述创建的两个阀添加到 Wrapper的管道中;
step4)将Wrapper 实例设置为 连接器的servlet容器,并初始化并启动连接器
public final class Bootstrap1 {
  public static void main(String[] args) {

/* call by using http://localhost:8080/ModernServlet,
   but could be invoked by any name */

    HttpConnector connector = new HttpConnector();
    Wrapper wrapper = new SimpleWrapper();
    wrapper.setServletClass("servlet.ModernServlet"); // 设置servlet的相对路径

    Loader loader = new SimpleLoader(); // 类加载器
    Valve valve1 = new HeaderLoggerValve(); // 把请求头信息output到 console
    Valve valve2 = new ClientIPLoggerValve();// 用来将client的IP 地址输出到控制台上

    wrapper.setLoader(loader);
    ((Pipeline) wrapper).addValve(valve1); // 新增阀
    ((Pipeline) wrapper).addValve(valve2); // 新增阀

    connector.setContainer(wrapper);

    try {
      connector.initialize(); // 创建服务器套接字
      connector.start(); //

      // make the application wait until we press a key.
      System.in.read();
    }
    catch (Exception e) {
      e.printStackTrace();
    }  }}
Attention)我这里总结了该测试用例的调用流程图(共3张)
【5.8】运行应用程序
1)运行参数
E:\bench-cluster\cloud-data-preprocess\HowTomcatWorks\src>java -cp .;lib/servlet.jar;lib/catalina_4_1_24.jar;E:\bench-cluster\cloud-data-preprocess\HowTomcatWorks\webroot com.tomcat.chapter5.startup/B ootstrap1
HttpConnector Opening server socket on all host IP addresses
HttpConnector[8080] Starting background thread
ModernServlet -- init
Client IP Logger Valve
127.0.0.1
------------------------------------
Header Logger Valve
host:localhost:8080
connection:keep-alive
accept:text/html,application/xhtml+xml,application/xml;q=0.9,image/webp,*/*;q=0.8
user-agent:Mozilla/5.0 (Windows NT 6.1; WOW64) AppleWebKit/537.36 (KHTML, like Gecko) Chrome/39.0.2171.71 Safari/537.36
accept-encoding:gzip, deflate, sdch
accept-language:zh-CN,zh;q=0.8,en;q=0.6
------------------------------------
2)运行结果
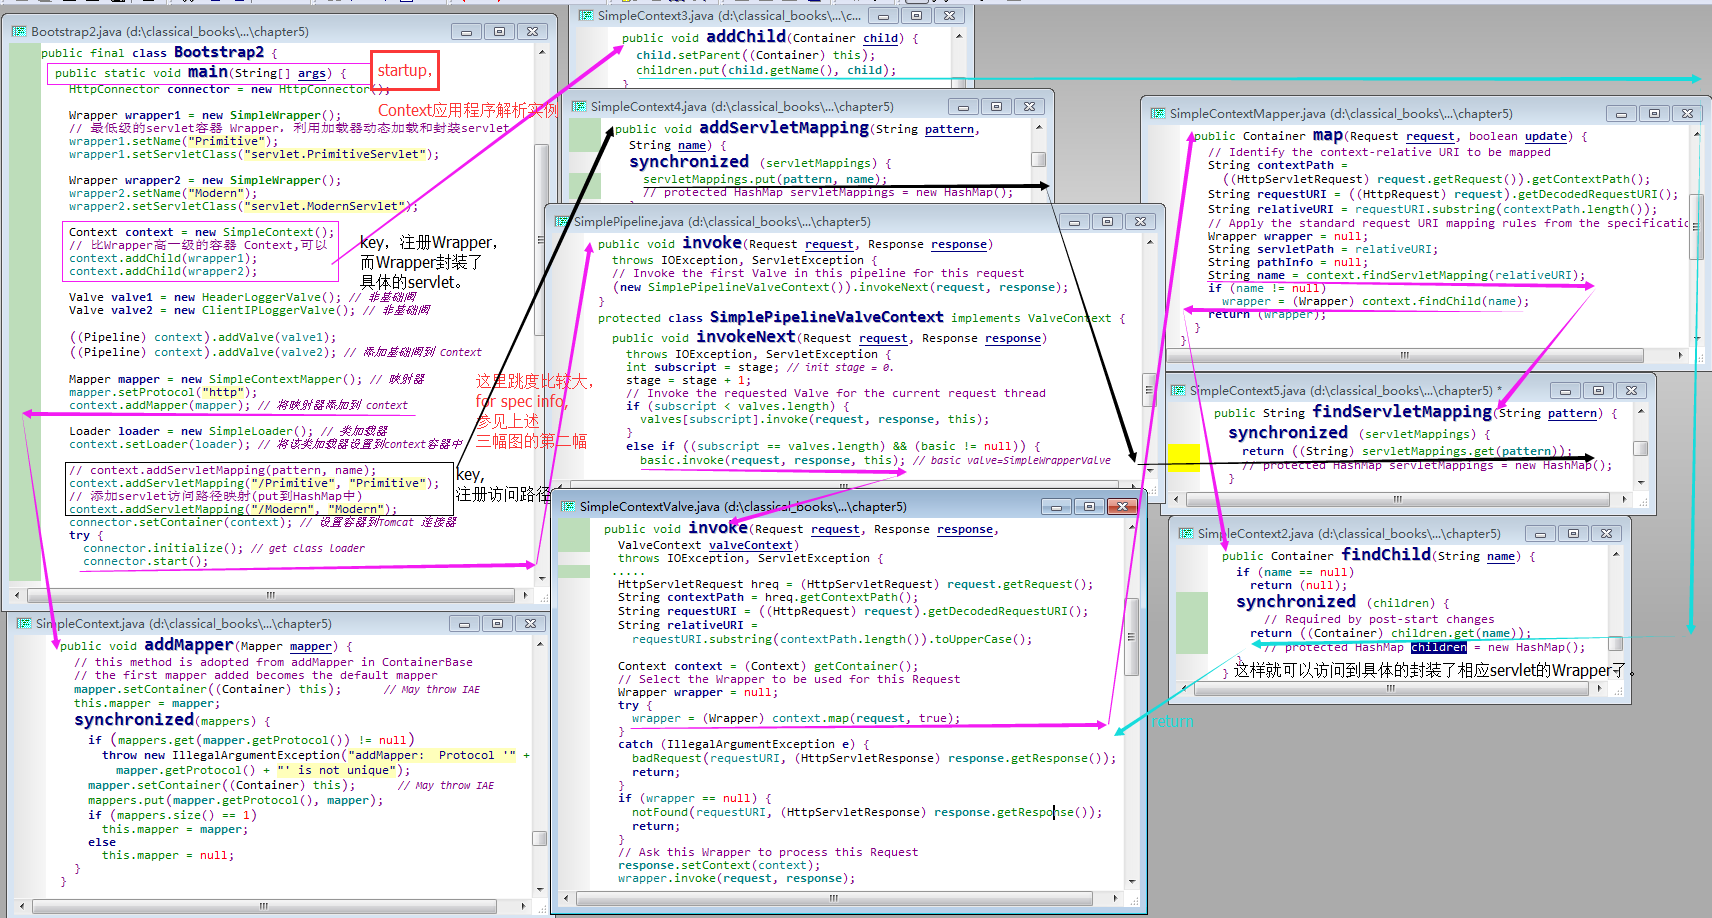
【6】Context应用程序
0)intro to Context app:本app 展示了如何使用一个包含了两个Wrapper实例的Context实例来构建web app, 这两个Wrapper 实例包装了两个servlet类,当应用程序有多个 Wrapper实例时,需要使用一个 映射器。映射器是组件,帮助servlet容器(Context实例)选择一个子容器来处理某个指定的请求;
1)虽然有些应用程序只需要一个servlet,但大部分web app 是需要多个servlet合作的。这些应用程序中,需要的servlet容器是Context,不是Wrapper;
2)本应用程序的映射器:是SimpleContextMapper类的实例,该类实现类Mapper接口,servlet容器可以使用多个 映射器来支持不同的协议。
public interface Mapper {
        public Container getContainer(); // 返回与该映射器相关联的servlet容器的实例;
        public void setContainer(Container container); // 设置与该映射器相关联的servlet容器;
        public String getProtocol(); // 返回该映射器负责处理的协议
        public void setProtocol(String protocol);    //指定该映射器负责处理哪种协议
        public Container map(Request request, boolean update); // 返回要处理某个特定请求的子容器的实例;
}
3)SimpleContext类:是Context容器的一个实例,它使用了SimpleContextMapper 类的实例作为其映射器,将SimpleContextValve 的实例作为基础阀;(干货——SimpleContextValve 的实例作为基础阀,基础阀非常重要)
4)Context容器中额外添加了两个阀:ClinetIPLoggerValve 和 HeaderLoggerValve,并包含两个 Wrapper 实例作为其子容器,二者都是 SimpleWrapper 实例;这两个Wrapper实例使用 SimpleWrapperValve 实例作为其基础阀,不再添加其他阀;(干货——非基础阀,如何在管道中遍历基础阀和非基础阀遍历,我想我已经说的狗明白了,不明白的朋友,看本文章节【2】的管道任务的文字描述)
5)剩下的内容包括:
step1)容器包含一个管道,容器的invoke方法会调用管道的invoke方法;
step2)管道的invoke方法会调用所有添加到其容器中的阀,然后再调用其基础阀的invoke方法;
step3)在Wrapper实例中, 基础阀负责载入相关联的servlet类,并对请求进行响应;
step4)在包含子容器的 Context实例中, 基础阀使用映射器来查找一个子容器,该子容器负责处理接收到的请求。若找到了相应的子容器,则调用其invoke方法,转到step1继续执行;
6)下面对上述的steps 做 detailed intro
step1)SimpleContext类的invoke方法调用管道的invoke方法:
step2)管道SimplePipeline的invoke如下:
public void invoke(Request request, Response response)
    throws IOException, ServletException {
    // Invoke the first Valve in this pipeline for this request
    (new SimplePipelineValveContext()).invokeNext(request, response); // 会调用所有添加到Context 实例中的阀,然后再调用基础阀的invoke方法;
  }
step3)SimpleContext类中,基础阀是 SimpleContextValve类的实例。在SimpleContextValve类的 invoke方法中, SimpleContextValve实例使用了 Context实例的映射器来查找 Wrapper容器;
public class SimpleContextValve implements Valve, Contained {
  protected Container container;
  public void invoke(Request request, Response response, ValveContext valveContext)
    throws IOException, ServletException {
    // Validate the request and response object types
    if (!(request.getRequest() instanceof HttpServletRequest) ||
      !(response.getResponse() instanceof HttpServletResponse)) {
      return;     // NOTE - Not much else we can do generically
    }

    // Disallow any direct access to resources under WEB-INF or META-INF
    HttpServletRequest hreq = (HttpServletRequest) request.getRequest();
    String contextPath = hreq.getContextPath();
    String requestURI = ((HttpRequest) request).getDecodedRequestURI();
    String relativeURI =
      requestURI.substring(contextPath.length()).toUpperCase();

    Context context = (Context) getContainer();
    // Select the Wrapper to be used for this Request
    Wrapper wrapper = null;
    try {
      wrapper = (Wrapper) context.map(request, true); // the core line, <span style="font-family: SimSun; font-size: 18px; line-height: 24px;">使用了 Context实例的映射器来查找 Wrapper容器</span>
    }
public Container map(Request request, boolean update) { // SimpleContextMapper.map()
// Identify the context-relative URI to be mapped
String contextPath =
((HttpServletRequest) request.getRequest()).getContextPath();
String requestURI = ((HttpRequest) request).getDecodedRequestURI();
String relativeURI = requestURI.substring(contextPath.length());
// Apply the standard request URI mapping rules from the specification
Wrapper wrapper = null;
String servletPath = relativeURI;
String pathInfo = null;
String name = context.findServletMapping(relativeURI); // this line
if (name != null)
wrapper = (Wrapper) context.findChild(name); // and this line
return (wrapper);
}
}public String findServletMapping(String pattern) { // SimpleContext.findServletMapping()
synchronized (servletMappings) {
return ((String) servletMappings.get(pattern));
// protected HashMap servletMappings = new HashMap();
}
}
public Container findChild(String name) { // SimpleContext.findChild()
    if (name == null)
      return (null);
    synchronized (children) {
		// Required by post-start changes
      return ((Container) children.get(name));
		// protected HashMap children = new HashMap();
    }
  }
Attention)
A1)Wrapper实例的管道会调用 SimpleWrapperValve类的 invoke方法,它会分配servlet实例,并调用其 service方法;
A2)Wrapper实例中:并没有与载入器相关联,但是Context 实例关联了类载入器,因此,SimpleWrapper类的 getLoader() 方法会返回父容器的载入器;
【6.1】SimpleContextValve类
1)该类是 SimleContext的基础阀,最重要的方法是invoke方法;
【6.2】SimpleContextMapper类
1)map方法需要两个参数:一个request对象和一个布尔变量。
2)在本app中, 忽略了第2个参数。map() 方法会从request对象中解析出请求的上下文路径,并调用 Conetext 实例的findServletMapping() 方法 来获取一个与该路径相关联的名称,如果找到了这个名称,则它调用 Context实例的findChild方法获取一个 Wrapper 实例;
【6.3】SimpleContext类
1)intro to SimpleContext:该类是 Context容器 的实例,是与连接器相关联的主容器;
2)本应用程序有两种URL模式:用来调用两个 Wrapper实例,如/Primitive 和 /Modern 模式;当然,也可以将多个 URL模式映射到一个Wrapper实例上。只需要添加这些模式即可;
3)SimpleContext类必须实现 Container 和 Context接口,实现的方法包括以下几个(methods):
method1)addServletMapping():添加一个 URL模式 / Wrapper实例的名称对;通过给定的名称添加用于调用Wrapper实例的每种模式;
method2)findServletMapping():通过URL模式 查找对应的Wrapper 实例名称;该方法用来查找某个特殊URL 模式对应的Wrapper实例;
method3)addMapper():在Context容器中添加一个映射器。SimpleContext类声明有两个变量: mapper and mappers 。mapper表示程序使用的默认映射器,mappers包含SimpleContext 实例中所有可用的映射器。第一个被添加到 Context容器中的映射器称为默认映射器;
method4)findMapper():找到正确的映射器,在 SimpleContext类中,它返回默认映射器;
method5)map():返回负责处理当前请求的 Wrapper实例;
public class SimpleContext implements Context, Pipeline {

  public SimpleContext() {
    pipeline.setBasic(new SimpleContextValve());
  }

  protected HashMap children = new HashMap();
  protected Loader loader = null;
  protected SimplePipeline pipeline = new SimplePipeline(this);
  protected HashMap servletMappings = new HashMap();
  protected Mapper mapper = null;
  protected HashMap mappers = new HashMap();
  private Container parent = null;

public void addServletMapping(String pattern, String name) {
    synchronized (servletMappings) {
      servletMappings.put(pattern, name);
    }
  }

 public String findServletMapping(String pattern) {
    synchronized (servletMappings) {
      return ((String) servletMappings.get(pattern));
    }
  }

public Loader getLoader() {
    if (loader != null)
      return (loader);
    if (parent != null)
      return (parent.getLoader());
    return (null);
  }

 public void addChild(Container child) {
    child.setParent((Container) this);
    children.put(child.getName(), child);
  }

public void addMapper(Mapper mapper) {
    // this method is adopted from addMapper in ContainerBase
    // the first mapper added becomes the default mapper
    mapper.setContainer((Container) this);      // May throw IAE
    this.mapper = mapper;
    synchronized(mappers) {
      if (mappers.get(mapper.getProtocol()) != null)
        throw new IllegalArgumentException("addMapper:  Protocol '" +
          mapper.getProtocol() + "' is not unique");
      mapper.setContainer((Container) this);      // May throw IAE
      mappers.put(mapper.getProtocol(), mapper);
      if (mappers.size() == 1)
        this.mapper = mapper;
      else
        this.mapper = null;
    }
  }

public Container findChild(String name) {
    if (name == null)
      return (null);
    synchronized (children) {       // Required by post-start changes
      return ((Container) children.get(name));
    }
  }

  public Container[] findChildren() {
    synchronized (children) {
      Container results[] = new Container[children.size()];
      return ((Container[]) children.values().toArray(results));
    }
  }

  public ContainerListener[] findContainerListeners() {
    return null;
  }

  public Mapper findMapper(String protocol) {
    // the default mapper will always be returned, if any,
    // regardless the value of protocol
    if (mapper != null)
      return (mapper);
    else
      synchronized (mappers) {
        return ((Mapper) mappers.get(protocol));
      }
  }

public void invoke(Request request, Response response)
    throws IOException, ServletException {
    pipeline.invoke(request, response);
  }

  public Container map(Request request, boolean update) {
    //this method is taken from the map method in org.apache.cataline.core.ContainerBase
    //the findMapper method always returns the default mapper, if any, regardless the
    //request's protocol
    Mapper mapper = findMapper(request.getRequest().getProtocol());
    if (mapper == null)
      return (null);

    // Use this Mapper to perform this mapping
    return (mapper.map(request, update));
  }
【6.4】BootStrap2
step1)首先实例化Tomcat的默认连接器,创建两个Wrapper实例,并指定名称。
step2)main() 方法创建一个 SimpleContext实例,并将 wrapper1 和 wrapper2 作为子容器添加到 SimpleContext 实例中。此外,它还会实例化两个阀:ClientIPLoggerValve 和 HeaderLoggerValve,并将它们添加到 SimpleContext实例中:
step3)接下来,它会从SimpleMapper类创建一个映射器对象,将其添加到 SimpleContext 实例中。映射器负责查找Context 实例中的子容器来处理 HTTP请求
step4)要载入servlet类,还需要一个载入器。并将其添加到 Context实例中。Wrapper实例可以通过 其 getLoader方法来获取载入器,因为Wrapper实例是 Context实例的子容器:
step5)添加servlet映射。为 两个Wrapper 实例添加两种模式:
step6)将Context容器与 连接器相关联,并初始化连接器,调用其 start方法;
public final class Bootstrap2 {
  public static void main(String[] args) {
    HttpConnector connector = new HttpConnector();
    Wrapper wrapper1 = new SimpleWrapper();  // 最低级的servlet容器 Wrapper,利用加载器动态加载和封装servlet
    wrapper1.setName("Primitive");
    wrapper1.setServletClass("servlet.PrimitiveServlet");

    Wrapper wrapper2 = new SimpleWrapper();
    wrapper2.setName("Modern");
    wrapper2.setServletClass("servlet.ModernServlet");

    Context context = new SimpleContext(); // 比Wrapper高一级的容器 Context,可以
    context.addChild(wrapper1);
    context.addChild(wrapper2);

    Valve valve1 = new HeaderLoggerValve(); // 非基础阀
    Valve valve2 = new ClientIPLoggerValve(); // 非基础阀

    ((Pipeline) context).addValve(valve1);
    ((Pipeline) context).addValve(valve2); // 添加基础阀到 Context

    Mapper mapper = new SimpleContextMapper(); // 映射器
    mapper.setProtocol("http");
    context.addMapper(mapper); // 将映射器添加到 context

    Loader loader = new SimpleLoader(); // 类加载器
    context.setLoader(loader); // 将该类加载器设置到context容器中

    // context.addServletMapping(pattern, name);
    context.addServletMapping("/Primitive", "Primitive"); // 添加servlet访问路径映射(put到HashMap中)
    context.addServletMapping("/Modern", "Modern");
    connector.setContainer(context); // 设置容器到Tomcat 连接器
    try {
      connector.initialize();
      connector.start();

      // make the application wait until we press a key.
      System.in.read();
    }
    catch (Exception e) {
      e.printStackTrace();
    }
  }
}
Attention)我这里还是总结了一张 Context应用程序的流程图(本图跨度比较大,请结合上述的3张流程图的调用过程来看)
protected HashMap children = new HashMap(); // servlet资源名称 和 具体servlet资源URI(类加载器加载路径) 的映射集合。
protected HashMap servletMappings = new HashMap();// 访问路径和servlet资源名称的映射集合
 protected HashMap mappers = new HashMap(); // 映射器集合(一个Context容器可以有多个映射器)
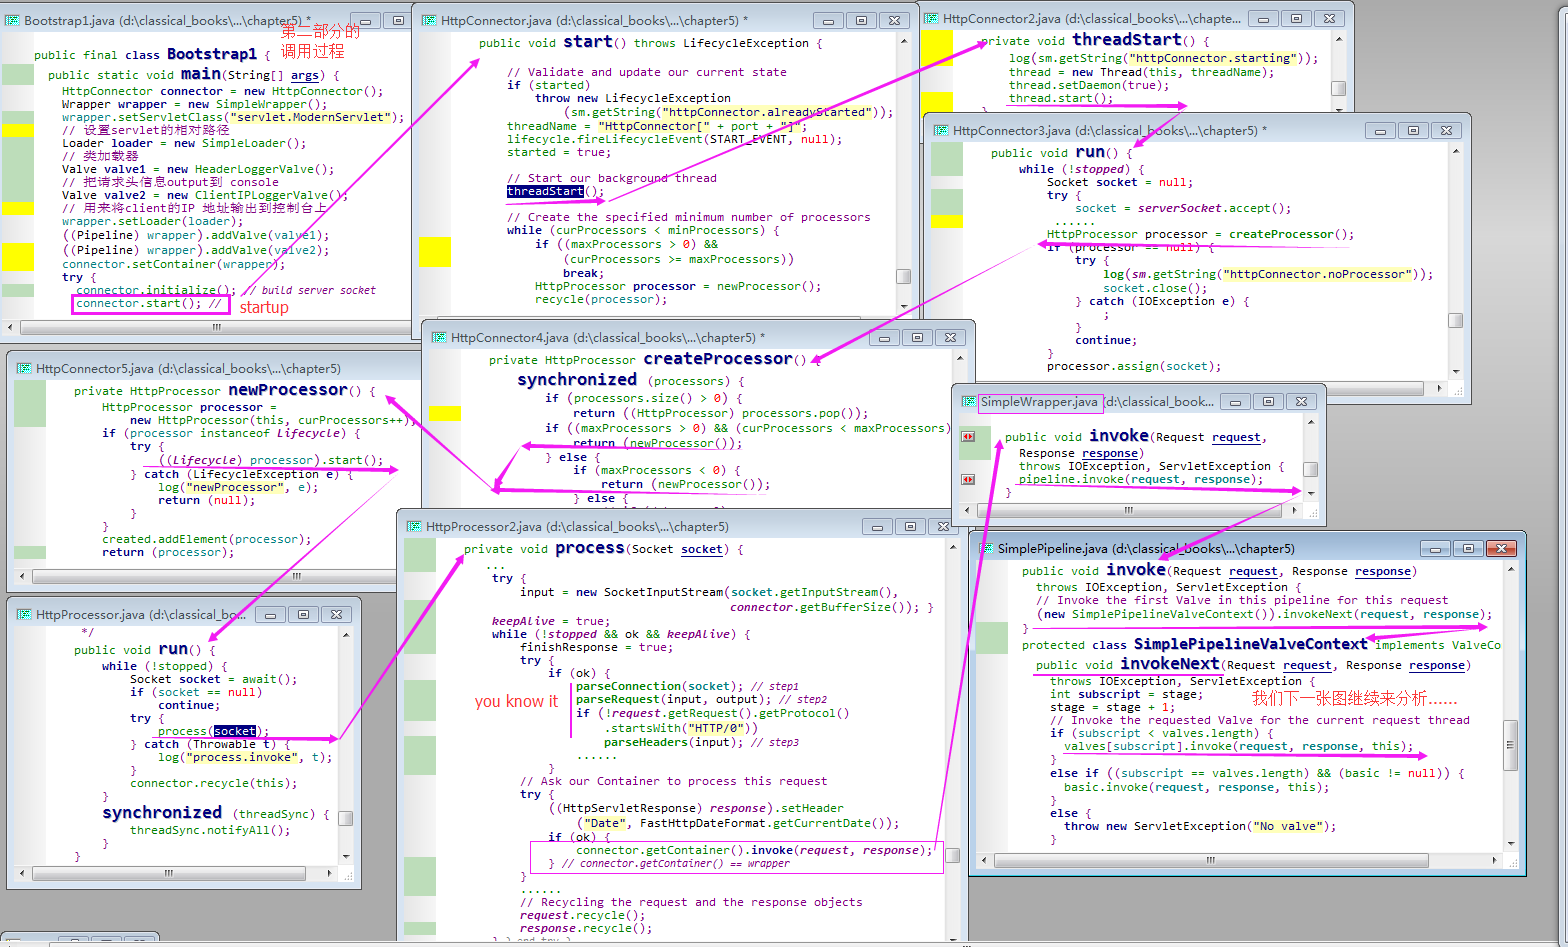
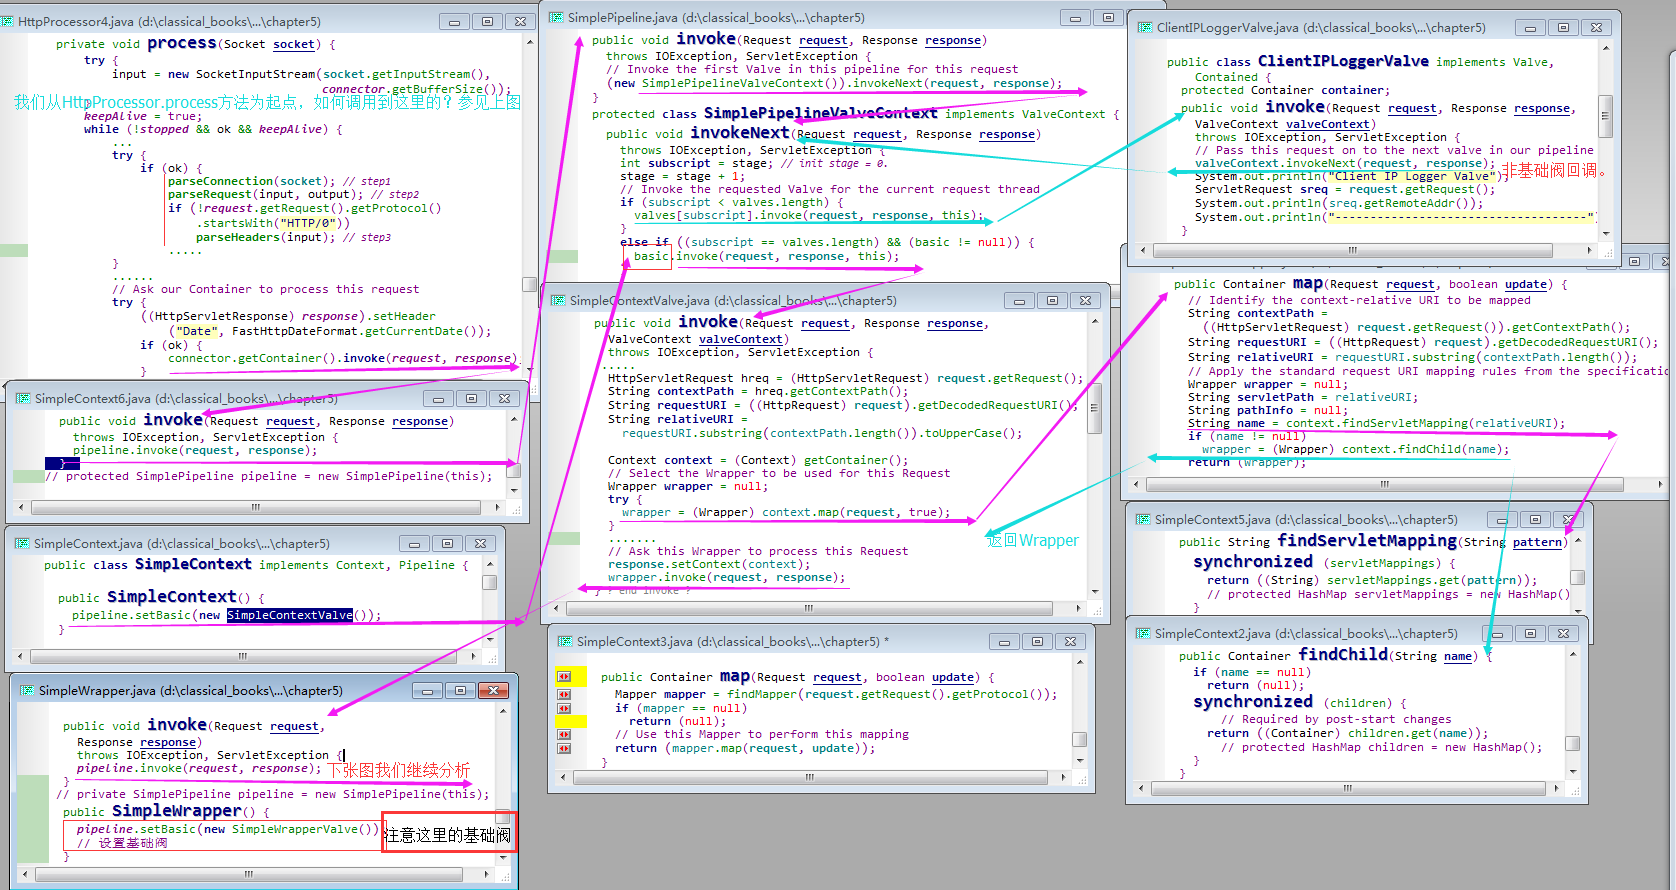
step1)HttpConnector类的大致工作:
step1.1)initialize方法:调用该类的open方法创建服务器套接字;
step1.2)start方法:开启一个线程,该线程中有一个while循环,不断接收client发送的HTTP连接请求,接着调用其类的createProcessor方法;
step1.3)createProcessor方法:调用其类的 newProcessor方法;
step1.4)newProcessor方法:创建HttpProcessor(HTTP连接器的支持类,HTTP请求处理器),利用HttpProcessor实例开启一个线程,调用 HttpProcessor.run()方法;(转向HttpProcessor类的run方法)(干货中的干货——也即当clients 发出http 连接请求后,HttpConnector 在while循环中创建HttpConnector的支持类 HttpProcessor,Http处理器类,并调用该类的start方法,开启线程,即while循环为每一个client 请求 开启一个线程进行处理,多么巧妙)
step2)HttpProcessor类的大致工作:
step2.1)run方法:传入套接字参数,并调用process方法;
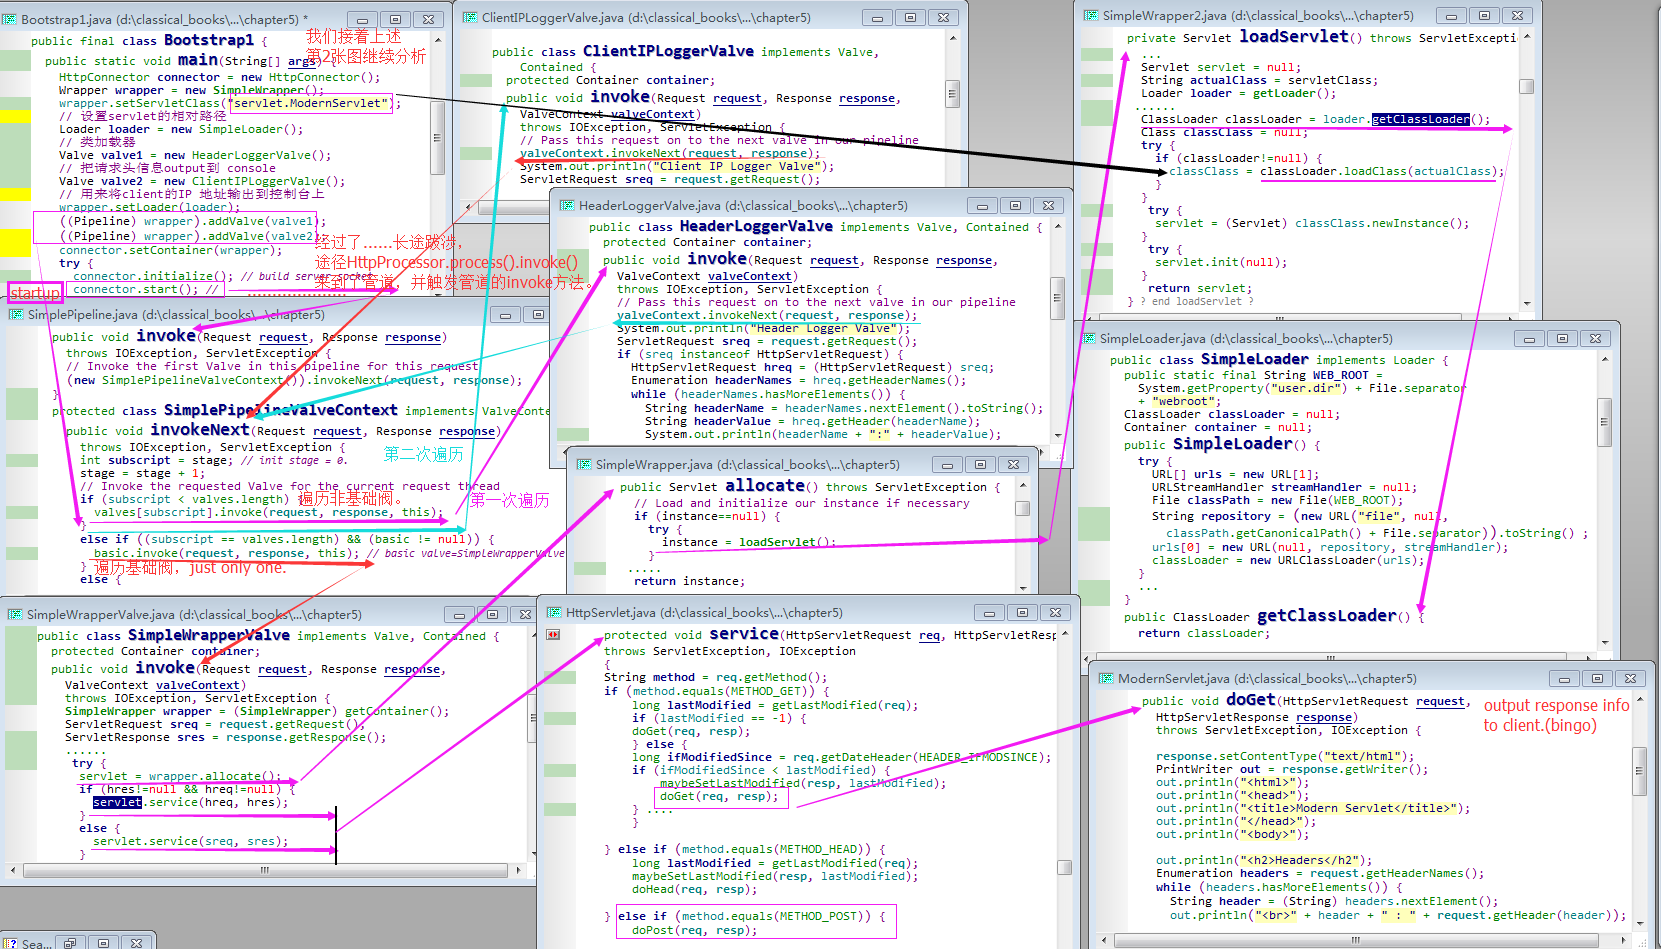
step2.2)process方法:依次调用 parseConnection()方法, parseRequest()方法, parseHeader() 方法;调用上述三个方法后,会调用连接器HttpConnector实例的关联容器的invoke方法;(转向container的invoke方法)注意:本程序的container是SimpleContext类,下面转向SimpleContext.invoke() 方法;
step3)SimpleContext.invoke() 方法(注意SimpleContext中的构造器设置了其关联管道的基础阀是SimpleContextValve,基础阀非常重要):调用 pipeline.invoke方法;
step3.1)pipeline.invoke()方法:会遍历非基础阀(非基础阀集合就是一个阀数组),直到遍历到基础阀(SimpleContextValve),调用基础阀SimpleContextValve 的 invoke方法;
step3.2)SimpleContextValve.invoke()方法:调用map 查询到请求URI对应的Wrapper并返回,返回SimpleWrapper,并调用SimpleWrapper.invoke方法;
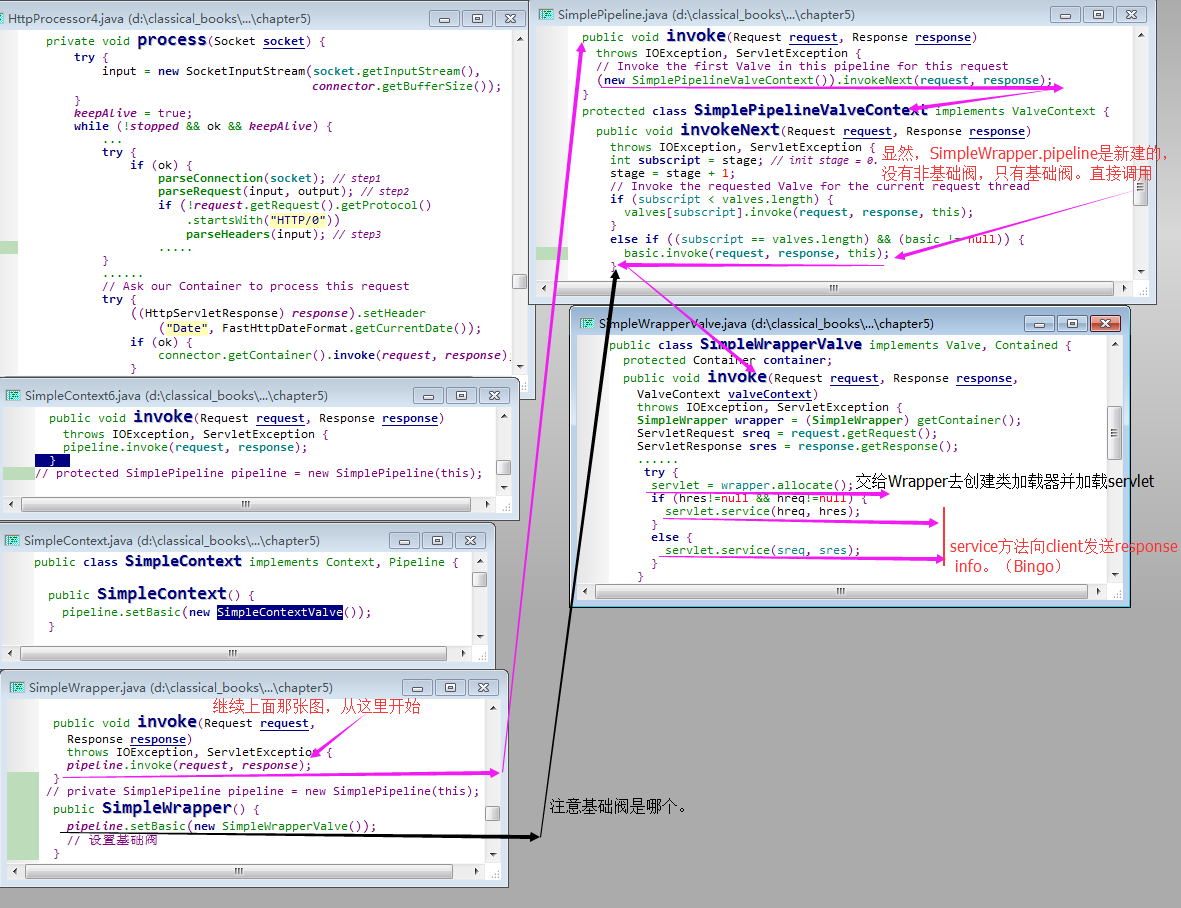
step4)SimpleWrapper.invoke()方法(注意SimpleWrapper中的构造器设置了其关联管道的基础阀是SimpleWrapperValve,基础阀非常重要):
step4.1)pipeline.invoke()方法:会遍历非基础阀(SimpleWrapper关联管道中根本就没有非基础阀,只有基础阀SimpleWrapperValve),直到遍历到基础阀(SimpleContextValve),调用基础阀SimpleWrapperValve 的 invoke方法;
step4.2)非基础阀SimpleWrapperValve.invoke方法:调用其关联wrapper(SimpleWrapper)的allocate方法,该方法就是返回请求的servlet实例,返回实例后,调用该servlet实例的 service方法;
SimpleWrapper.allocate方法的补充)该方法先创建一个类加载器,然后根据HttpProcessor.parseRequest 解析出的 URI 来加载对应的 servlet实例,并返回该实例;
为什么我说Container容器是这个类,Wrapper容器是那个类?因为启动程序Bootstrap2.main 方法中对变量的定义已经把它们的关系说的很明白了,在接下来的【6.5】章节我再次po出 Bootstrap2.java 的源代码。
Attention)关于基础阀
A1)基础阀是非常重要的东西,是管道遍历阀(基础阀和非基础阀)的终点;
A2)需要区分的是:SimpleContext设置其关联管道的基础阀是 SimpleContextValve,而SimpleWrapper设置其关联管道的基础阀是 SimpleWrapperValve,不要一根筋的认为所有容器关联的管道的基础阀都是一样的,定要万分留意;
补充)调用map 查询到请求URI对应的Wrapper(在映射器中查找与URI对应的 Wrapper的steps):
step1)SimpleContextMapper.map方法: 先调用context.findServletMapping方法,传入parseRequest解析出的请求路径中的URI 到 servletMappings查找该URI对应的servlet名称;
step2)查找到servlet名称后,调用context.findChild()方法,传入servlet名称 到 children中查找对应的Wrapper容器,要知道Wrapper容器封装了具体的servlet容器(Wrapper);
【6.5】运行应用程序
0)Bootstrap2.java 源代码
public final class Bootstrap2 {
  public static void main(String[] args) {
    HttpConnector connector = new HttpConnector();

    Wrapper wrapper1 = new SimpleWrapper();  // 最低级的servlet容器 Wrapper,利用加载器动态加载和封装servlet
    wrapper1.setName("Primitive");
    wrapper1.setServletClass("servlet.PrimitiveServlet");

    Wrapper wrapper2 = new SimpleWrapper();
    wrapper2.setName("Modern");
    wrapper2.setServletClass("servlet.ModernServlet");

    Context context = new SimpleContext(); // 比Wrapper高一级的容器 Context,可以
    context.addChild(wrapper1);
    context.addChild(wrapper2);

    Valve valve1 = new HeaderLoggerValve(); // 非基础阀
    Valve valve2 = new ClientIPLoggerValve(); // 非基础阀

    ((Pipeline) context).addValve(valve1);
    ((Pipeline) context).addValve(valve2); // 添加非基础阀到 Context

    Mapper mapper = new SimpleContextMapper(); // 映射器
    mapper.setProtocol("http");
    context.addMapper(mapper); // 将映射器添加到 context

    Loader loader = new SimpleLoader(); // 类加载器
    context.setLoader(loader); // 将该类加载器设置到context容器中

    // context.addServletMapping(pattern, name);
    context.addServletMapping("/Primitive", "Primitive"); // 添加servlet访问路径映射(put到HashMap中)
    context.addServletMapping("/Modern", "Modern");
    connector.setContainer(context); // 设置容器到Tomcat 连接器
    try {
      connector.initialize();
      connector.start();

      // make the application wait until we press a key.
      System.in.read();
    }
    catch (Exception e) {
      e.printStackTrace();
    }
  }
}
1)运行参数
E:\bench-cluster\cloud-data-preprocess\HowTomcatWorks\src>java -cp .;lib/servlet.jar;lib/catalina_4_1_24.jar;E:\bench-cluster\cloud-data-preprocess\HowTomcatWorks\webroot  com.tomcat.chapter5.startup.
Bootstrap2
HttpConnector Opening server socket on all host IP addresses
HttpConnector[8080] Starting background thread
Client IP Logger Valve
127.0.0.1
------------------------------------
Header Logger Valve
host:localhost:8080
connection:keep-alive
accept:text/html,application/xhtml+xml,application/xml;q=0.9,image/webp,*/*;q=0.8
user-agent:Mozilla/5.0 (Windows NT 6.1; WOW64) AppleWebKit/537.36 (KHTML, like Gecko) Chrome/39.0.2171.71 Safari/537.36
accept-encoding:gzip, deflate, sdch
accept-language:zh-CN,zh;q=0.8,en;q=0.6
------------------------------------
init
from service
Client IP Logger Valve
127.0.0.1
------------------------------------
2)运行结果


 3万+
3万+

 被折叠的 条评论
为什么被折叠?
被折叠的 条评论
为什么被折叠?
 到【灌水乐园】发言


