


碎片的简单用法
left_fragment.xml
<?xml version="1.0" encoding="utf-8"?>
<LinearLayout xmlns:android="http://schemas.android.com/apk/res/android"
    android:layout_width="match_parent"
    android:layout_height="match_parent"
    android:orientation="vertical" >
   <Button
       android:layout_width="wrap_content"
       android:layout_height="wrap_content"
       android:layout_gravity="center_horizontal"
       android:text="Button"/>

</LinearLayout>
right_fragment.xml
<?xml version="1.0" encoding="utf-8"?>
<LinearLayout xmlns:android="http://schemas.android.com/apk/res/android"
    android:layout_width="match_parent"
    android:layout_height="match_parent"
    android:orientation="vertical"
    android:background="#55ff0000" >
    <TextView
        android:layout_width="wrap_content"
        android:layout_height="wrap_content"
        android:layout_gravity="center_horizontal"
        android:textSize="20sp"
        android:text="This is right fragment"/>

</LinearLayout>
activity_main.xml
<LinearLayout xmlns:android="http://schemas.android.com/apk/res/android"
    xmlns:tools="http://schemas.android.com/tools"
    android:layout_width="match_parent"
    android:layout_height="match_parent"
    android:orientation="horizontal" >

    <fragment
        android:id="@+id/left_fragment"
        android:name="com.test.myfragment.LeftFragment"
        android:layout_width="0dp"
        android:layout_height="match_parent"
        android:layout_weight="1"/>
    <fragment
        android:id="@+id/right_fragment"
        android:name="com.test.myfragment.RightFragment"
        android:layout_width="0dp"
        android:layout_height="match_parent"
        android:layout_weight="1"/>

</LinearLayout>
LeftFragment
package com.test.myfragment;

import com.test.qqdialog.R;

import android.app.Fragment;
import android.os.Bundle;
import android.view.LayoutInflater;
import android.view.View;
import android.view.ViewGroup;

public class LeftFragment  extends Fragment{
    @Override
    public View onCreateView(LayoutInflater inflater, ViewGroup container, Bundle savedInstanceState) {
        View view = inflater.inflate(R.layout.left_fragment, null);
        return view;
    }
}
RightFragment
package com.test.myfragment;

import com.test.qqdialog.R;

import android.app.Fragment;
import android.os.Bundle;
import android.view.LayoutInflater;
import android.view.View;
import android.view.ViewGroup;

public class RightFragment extends Fragment {
    @Override
    public View onCreateView(LayoutInflater inflater, ViewGroup container, Bundle savedInstanceState) {
        // TODO Auto-generated method stub
        View view = inflater.inflate(R.layout.right_fragment, null);

        return view;
    }
}
MainActivity
package com.test.myfragment;

import android.support.v7.app.ActionBarActivity;

import com.test.qqdialog.R;

import android.os.Bundle;
import android.view.Menu;
import android.view.MenuItem;

public class MainActivity extends ActionBarActivity {

    @Override
    protected void onCreate(Bundle savedInstanceState) {
        super.onCreate(savedInstanceState);
        setContentView(R.layout.activity_main);
    }

}
动态添加碎片
在上面的基础上新建一个(another_right_fragment.xml)文件
<?xml version="1.0" encoding="utf-8"?>
<LinearLayout xmlns:android="http://schemas.android.com/apk/res/android"
    android:layout_width="match_parent"
    android:layout_height="match_parent"
    android:orientation="vertical" >
    <TextView
        android:layout_width="wrap_content"
        android:layout_height="wrap_content"
        android:layout_gravity="center_horizontal"
        android:textSize="20sp"
        android:text="This  is another right fragment"/>

</LinearLayout>
新建AnotherRightFragment
package com.test.myfragment;

import com.test.qqdialog.R;

import android.app.Fragment;
import android.os.Bundle;
import android.view.LayoutInflater;
import android.view.View;
import android.view.ViewGroup;

public class AnotherRightFragment extends Fragment {
    @Override
    public View onCreateView(LayoutInflater inflater, ViewGroup container, Bundle savedInstanceState) {
        View view = inflater.inflate(R.layout.another_right_fragment, null);
        return view;
    }
}
修改activity_main.xml文件
<LinearLayout xmlns:android="http://schemas.android.com/apk/res/android"
    xmlns:tools="http://schemas.android.com/tools"
    android:layout_width="match_parent"
    android:layout_height="match_parent"
    android:orientation="horizontal" >

    <fragment
        android:id="@+id/left_fragment"
        android:name="com.test.myfragment.LeftFragment"
        android:layout_width="0dp"
        android:layout_height="match_parent"
        android:layout_weight="1"/>
    <FrameLayout
       android:id="@+id/right_layout"
       android:layout_width="0dp"
       android:layout_height="match_parent"
       android:layout_weight="1">
    <fragment
        android:id="@+id/right_fragment"
        android:name="com.test.myfragment.RightFragment"
        android:layout_width="0dp"
        android:layout_height="match_parent"
        android:layout_weight="1"/>
    </FrameLayout>
</LinearLayout>
修改主程序
package com.test.myfragment;
import com.test.qqdialog.R;
import android.annotation.TargetApi;
import android.app.Activity;
import android.app.FragmentManager;
import android.app.FragmentTransaction;
import android.os.Build;
import android.os.Bundle;
import android.view.Menu;
import android.view.MenuItem;
import android.view.View;
import android.view.View.OnClickListener;
import android.widget.Button;

@TargetApi(Build.VERSION_CODES.HONEYCOMB)
public class MainActivity extends Activity implements OnClickListener{

    @Override
    protected void onCreate(Bundle savedInstanceState) {
        super.onCreate(savedInstanceState);
        setContentView(R.layout.activity_main);
        Button button=(Button) findViewById(R.id.button);
        button.setOnClickListener(this);
    }

    @Override
    public void onClick(View v) {
        switch(v.getId()){
        case R.id.button:
            //通过这里选择要加载的Fragment
            AnotherRightFragment fragment = new AnotherRightFragment();
            FragmentManager fragmentManager=getFragmentManager();
            FragmentTransaction transaction = fragmentManager.beginTransaction();
            transaction.replace(R.id.right_layout, fragment);
            //将程序放回到返回栈中,按返回后返回上一个界面,不会退出程序
            transaction.addToBackStack(null);
            transaction.commit();
            break;
        }

    }

}
动态添加碎片步骤总结
- 创建带添加的碎片实例
- 获取到FragmentManger,在活动中可以直接调用getFragmentManaer()方法得到
- 开启一个事务,通过调用beginTranszction()方法开启
- 向容器内加入碎片,一般使用replace()方法实现,需要传入容器的id和待添加的碎片实例。
- 提交事务,调用commit()方法来完成。
碎片和活动间的通信
为了方便碎片和活动见的通信,FragmentManager提供了一个类似于findViewById()的方法,专门用于获取碎片的实例例如:
>
RightFragment rightFragment = (RightFragment) getFragmentManager().findFragmentById(R.id.right_fragment);
可以在活动中得到相应碎片的实例,然后就能轻松的使用碎片里的方法了。
在碎片中条用活动里的方法
在每个碎片中都可以通过调用getActivity()方法来得到和当前碎片相关联的活动实例
MainActivity activity = (MainActivity)getActivity();有了活动的实例以后,调用活动里的方法就轻而易举了。另外当碎片中需要使用Context对象时,可以使用getActivity()方法,因为获取到的活动本身就是一个Context对象了。
碎片和碎片间的通信
基本思路,首先在一个碎片中可以得到与它相关联的活动,然后再通过这个活动去获取另一个碎片的实例,这样就实现了不同碎片间的通信。
碎片间通信的实例
主布局activity_main.xml
<RelativeLayout xmlns:android="http://schemas.android.com/apk/res/android"
    xmlns:tools="http://schemas.android.com/tools" android:layout_width="match_parent"
    android:layout_height="match_parent"
  >
    <!--<fragment-->
    <!-- -->
        <!--class="com.test.dukang.myfragment.fragment.MyFirstFragment"-->
        <!--android:layout_width="wrap_content"-->
        <!--android:layout_height="wrap_content"/>-->
    <FrameLayout
        android:id="@+id/container"
        android:layout_width="wrap_content"
        android:layout_height="wrap_content"></FrameLayout>
    <LinearLayout
        android:id="@+id/right_layout"
        android:layout_width="match_parent"
        android:layout_height="wrap_content"
        android:layout_alignParentBottom="true"
        android:gravity="center">
        <Button
            android:id="@+id/button1"
            android:layout_width="wrap_content"
            android:layout_height="wrap_content"
            android:text="按钮1"/>
        <Button
            android:id="@+id/button2"
            android:layout_width="wrap_content"
            android:layout_height="wrap_content"
            android:text="按钮2"/>
        <Button
            android:id="@+id/button3"
            android:layout_width="wrap_content"
            android:layout_height="wrap_content"
            android:text="按钮3"/>
    </LinearLayout>

</RelativeLayout>
fragment_test.xml
<?xml version="1.0" encoding="utf-8"?>
<LinearLayout xmlns:android="http://schemas.android.com/apk/res/android"
    android:layout_width="match_parent" android:layout_height="match_parent">
<Button
    android:id="@+id/button"
    android:layout_width="wrap_content"
    android:layout_height="wrap_content" />
</LinearLayout>
fragment_second.xml
<?xml version="1.0" encoding="utf-8"?>
<LinearLayout xmlns:android="http://schemas.android.com/apk/res/android"
    android:layout_width="match_parent" android:layout_height="match_parent">
    <TextView
        android:id="@+id/textView"
        android:layout_width="wrap_content"
        android:layout_height="wrap_content"
        android:text="你好吗?"
        android:textSize="24sp"/>
</LinearLayout>
fragment_thrid.xml
<?xml version="1.0" encoding="utf-8"?>
<LinearLayout xmlns:android="http://schemas.android.com/apk/res/android"
    android:layout_width="match_parent" android:layout_height="match_parent">
    <EditText
        android:id="@+id/editText"
        android:layout_width="wrap_content"
        android:layout_height="wrap_content"
        android:text="你好啊,好啊"/>
</LinearLayout>
主活动MainActivity
package com.test.dukang.myfragment;

import android.support.v4.app.Fragment;
import android.support.v4.app.FragmentActivity;
import android.support.v4.app.FragmentManager;
import android.support.v4.app.FragmentTransaction;
import android.support.v7.app.AppCompatActivity;
import android.os.Bundle;
import android.view.Menu;
import android.view.MenuItem;
import android.view.View;
import android.widget.Button;

import com.test.dukang.myfragment.fragment.MyFirstFragment;
import com.test.dukang.myfragment.fragment.MySecondFragment;
import com.test.dukang.myfragment.fragment.MyThridFragment;

public class MainActivity extends FragmentActivity implements View.OnClickListener {

    private FragmentManager mFragmentManager;
    private Button mButton1;
    private Button mButton2;
    private Button mButton3;
    //得到碎片的事务
    private FragmentTransaction transaction;
    //得到自定义的碎片
    private MySecondFragment fragment2;
    private MyFirstFragment fragment;
    private MyThridFragment fragment3;

    @Override
    protected void onCreate(Bundle savedInstanceState) {
        super.onCreate(savedInstanceState);
        setContentView(R.layout.activity_main);
        mButton1 = (Button) findViewById(R.id.button1);
        mButton1.setOnClickListener(this);
        mButton2 = (Button) findViewById(R.id.button2);
        mButton2.setOnClickListener(this);
        mButton3 = (Button) findViewById(R.id.button3);
        mButton3.setOnClickListener(this);
        mFragmentManager = getSupportFragmentManager();

        fragment = new MyFirstFragment();
        fragment2 = new MySecondFragment();
        fragment3 = new MyThridFragment();
        transaction = mFragmentManager.beginTransaction();
        transaction.add(R.id.container,fragment);
        transaction.add(R.id.container,fragment2);
        transaction.add(R.id.container,fragment3);
        transaction.hide(fragment);
        transaction.hide(fragment2);
        transaction.commit();
    }


    @Override
    public void onClick(View v) {
        switch (v.getId()) {
            case R.id.button1:
                //初始化事务,开始事务
                transaction = mFragmentManager.beginTransaction();
                transaction.hide(fragment2);
                transaction.hide(fragment3);
                transaction.show(fragment);
                //事务的提交
                transaction.commit();
                break;
            case R.id.button2:
                transaction = mFragmentManager.beginTransaction();
                fragment2.setmTextView( fragment3.getText());
                transaction.hide(fragment3);
                transaction.hide(fragment);
                transaction.show(fragment2);
                transaction.commit();
                break;
            case R.id.button3:
                transaction = mFragmentManager.beginTransaction();
                transaction.hide(fragment);
                transaction.hide(fragment2);
                transaction.show(fragment3);
                transaction.commit();
                break;
            default:
                break;
        }
    }
}
第一个MyFirstFragment
package com.test.dukang.myfragment.fragment;

import android.os.Bundle;
import android.support.annotation.Nullable;
import android.support.v4.app.Fragment;
import android.view.LayoutInflater;
import android.view.View;
import android.view.ViewGroup;
import android.widget.Button;
import android.widget.Toast;

import com.test.dukang.myfragment.R;

/**
 * Created by Administrator on 2015/9/6.
 */
 "****这是重点**"
//导入support.v4的包,注意这是重点
public class MyFirstFragment extends Fragment {
    private Button button;
    @Nullable
    @Override
    public View onCreateView(LayoutInflater inflater, ViewGroup container, Bundle savedInstanceState) {
        View view=inflater.inflate(R.layout.fragment_test,null);
        button= (Button) view.findViewById(R.id.button);
        button.setOnClickListener(new View.OnClickListener() {
            @Override
            public void onClick(View v) {
                Toast.makeText(getActivity(),"你好",Toast.LENGTH_SHORT).show();
            }
        });
        return view;
    }
}
第二个MySecondFragment
package com.test.dukang.myfragment.fragment;

import android.os.Bundle;
import android.support.annotation.Nullable;
import android.support.v4.app.Fragment;
import android.view.LayoutInflater;
import android.view.View;
import android.view.ViewGroup;
import android.widget.Button;
import android.widget.TextView;
import android.widget.Toast;

import com.test.dukang.myfragment.R;

/**
 * Created by Administrator on 2015/9/6.
 */
public class MySecondFragment extends Fragment {
    private TextView mTextView;
    @Nullable
    @Override
    public View onCreateView(LayoutInflater inflater, ViewGroup container, Bundle savedInstanceState) {
        View view=inflater.inflate(R.layout.fragment_second,null);
        mTextView= (TextView) view.findViewById(R.id.textView);

        return view;
    }
    //添加方法来对类内部的参数进行修改
    public void setmTextView(String text){
        this.mTextView.setText(text);
    }
}
第三个MyThridFragment
package com.test.dukang.myfragment.fragment;

import android.os.Bundle;
import android.support.annotation.Nullable;
import android.support.v4.app.Fragment;
import android.view.LayoutInflater;
import android.view.View;
import android.view.ViewGroup;
import android.widget.Button;
import android.widget.EditText;
import android.widget.Toast;

import com.test.dukang.myfragment.R;

/**
 * Created by Administrator on 2015/9/6.
 */
public class MyThridFragment  extends Fragment {
    private EditText mEditText;
    @Nullable
    @Override
    public View onCreateView(LayoutInflater inflater, ViewGroup container, Bundle savedInstanceState) {
        View view=inflater.inflate(R.layout.fragment_thrid,null);
        mEditText= (EditText) view.findViewById(R.id.editText);
        return view;
    }
    public String getText(){
        String s=null;
        if(mEditText!=null){
            s=mEditText.getText().toString();

        }
        return s;
    }
}
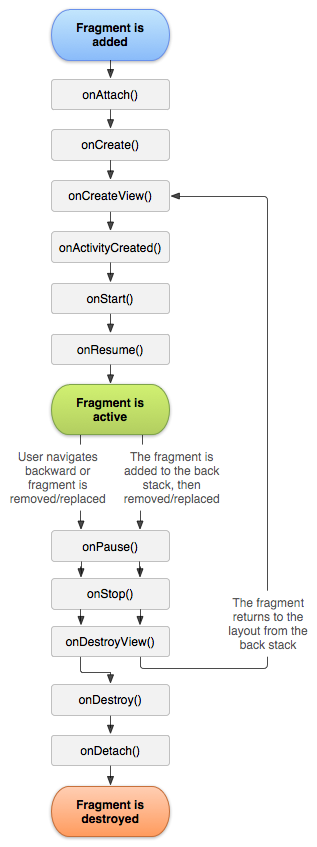
碎片的生命周期
运行状态
当一个碎片是可见的,并且它所关联的活动正处于运行状态时,该碎片也处于运行状态暂停状态
当一个活动进入暂停状态时(由于另一个未占满屏幕的活动被添加到栈顶),与它相关联的可见碎片就会进入到暂停状态停止状态
当一个活动进入停止状态时,与他相关联的碎片就会进入到停止状态。或者通过调用FragmentTransaction的remove()、replace()方法将碎片从活动中移除,但有在事务提交之前调用addToBackStack()方法,这时的碎片也会进入到停止状态。总的来说,进入停止状态的碎片对用户来说是可以完全不可见的,有可能会被系统回收。销毁状态
碎片总是依附于活动而存在的,因此当活动被销毁时,与它相关联的碎片就会进入到销毁状态。或者通过调用FragmentTransaction的remove()、replace()方法将碎片从活动中移除,但在事务提交之前并没有调用addToBackStack()方法,这时的碎片也会进入到销毁状态。
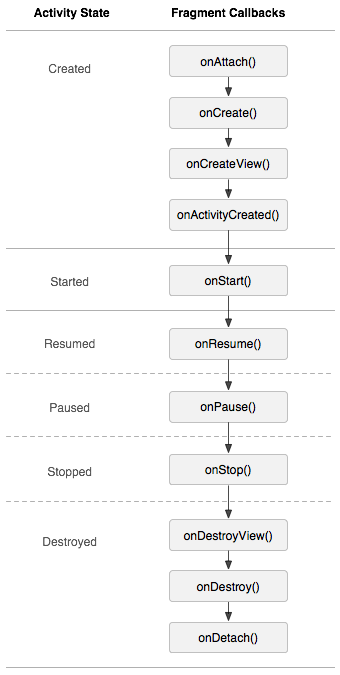
重要的回调方法
- onAttach()
当碎片和活动建立关联的时候调用。 - onCreatView()
为碎片创建视图(加载布局)时调用。 - onActivityCreated()
确保与碎片相关联的活动一定已经创建完毕的时候调用。 - onDestroyView()
当与碎片关联的视图被移除的时候调用。 - onDetach()
当碎片和活动解除关联的时候调用
#
当RightFragment第一次被加载到屏幕上时,会依次执行onAttach()、onCreate()、onCreateView()、onActivityCreated()、onStart()和onResume()方法。
当AnontherRightFragment替换了RightFragment,此时RightFragment进入了停止状态,因此onPause()、onStop()和onDestroy()方法会得到执行。当然如果在替换的时候没有调用addToBackStack()方法,此时的RightFragment就会进入销毁状态,onDestory()和onDetach()方法会执行。
按下Back键,RightFragment就会重新回到屏幕,由于RightFragment重新回到了运行状态,因此onActivityCreated()、onStart()和onResume()方法会得到执行,注意onCreate()和onCreateView()方法不会执行因为我们调用了addToBackStack()方法使得RightFragment和它的视图并没有销毁。
- 再次按下Back键退出时,依次会执行onPause()、onStop()、onDestroyView()、onDestroy()和onDetach()方法,最终将活动和碎片一同销毁。
借鉴
细分生命周期
5.另外值得一提的是,在碎片中你也可以通过onSaveInstanceState()方法来保存数据,因为进入停止状态的碎片有可能在系统内存不足的时候回收,保存下来的数据在onCreate()、onCreateView()和onActivityCreated()这三个方法中得到,它们都含有一个Bundle类型的savedInstanceState参数。场景演示 : 切换到该Fragment
11-29 14:26:35.095: D/AppListFragment(7649): onAttach
11-29 14:26:35.095: D/AppListFragment(7649): onCreate
11-29 14:26:35.095: D/AppListFragment(7649): onCreateView
11-29 14:26:35.100: D/AppListFragment(7649): onActivityCreated
11-29 14:26:35.120: D/AppListFragment(7649): onStart
11-29 14:26:35.120: D/AppListFragment(7649): onResume
屏幕灭掉:
11-29 14:27:35.185: D/AppListFragment(7649): onPause
11-29 14:27:35.205: D/AppListFragment(7649): onSaveInstanceState
11-29 14:27:35.205: D/AppListFragment(7649): onStop
屏幕解锁
11-29 14:33:13.240: D/AppListFragment(7649): onStart
11-29 14:33:13.275: D/AppListFragment(7649): onResume
切换到其他Fragment:
11-29 14:33:33.655: D/AppListFragment(7649): onPause
11-29 14:33:33.655: D/AppListFragment(7649): onStop
11-29 14:33:33.660: D/AppListFragment(7649): onDestroyView
切换回本身的Fragment:
11-29 14:33:55.820: D/AppListFragment(7649): onCreateView
11-29 14:33:55.825: D/AppListFragment(7649): onActivityCreated
11-29 14:33:55.825: D/AppListFragment(7649): onStart
11-29 14:33:55.825: D/AppListFragment(7649): onResume
回到桌面
11-29 14:34:26.590: D/AppListFragment(7649): onPause
11-29 14:34:26.880: D/AppListFragment(7649): onSaveInstanceState
11-29 14:34:26.880: D/AppListFragment(7649): onStop
回到应用
11-29 14:36:51.940: D/AppListFragment(7649): onStart
11-29 14:36:51.940: D/AppListFragment(7649): onResume
退出应用
11-29 14:37:03.020: D/AppListFragment(7649): onPause
11-29 14:37:03.155: D/AppListFragment(7649): onStop
11-29 14:37:03.155: D/AppListFragment(7649): onDestroyView
11-29 14:37:03.165: D/AppListFragment(7649): onDestroy
11-29 14:37:03.165: D/AppListFragment(7649): onDetach
比Activity多了一些生命周期,完整和Activity对接上,大家好好利用。限定符
| 屏幕特征 | 限定符 | 描述 |
|---|---|---|
| 大小 | small | 提供给小屏幕设备的资源 |
| normal | 提供给中等屏幕设备的资源 | |
| large | 提供给大屏幕设备的资源 | |
| xlarge | 提供给超大屏幕设备的资源 | |
| 分辨率 | ||
| 方向 | land | 提供给横屏设备的资源 |
| port | 提供给竖屏设备的资源 |
large需要设定最小宽度限定符,例如在res目录下新建layout-sw600dp文件夹,就意味着只有在宽度大于600dp时才会加载其中的布局文件。


 3204
3204

 被折叠的 条评论
为什么被折叠?
被折叠的 条评论
为什么被折叠?
 到【灌水乐园】发言


