首先,我们先来看本地如何生成图片验证码的,再来写输出到网页的验证码如何实现。
先来看最简单的—实现的功能是,将一个字符串变成图片写入到文件中
实现代码:
package cn.hncu.img;

import java.awt.Graphics;
import java.awt.image.BufferedImage;
import java.io.FileNotFoundException;
import java.io.FileOutputStream;
import java.io.IOException;

import javax.imageio.ImageIO;
//该类包含一些用来查找 ImageReader 和 ImageWriter 以及执行简单编码和解码的静态便捷方法。

import org.junit.Test;

public class ImgDemo {

    //学习如何把一个字符串变成图片写到一个文件
    @Test
    public void ImgDemo1() throws FileNotFoundException, IOException{
        BufferedImage img = new BufferedImage(60, 30, BufferedImage.TYPE_INT_RGB);
        //  表示一个图像,它具有合成整数像素的 8 位 RGB 颜色分量。
        Graphics g = img.getGraphics();
        g.drawString("Hello",10,20);
        //使用此图形上下文的当前字体和颜色绘制由指定 string 给定的文本。最左侧字符的基线位于此图形上下文坐标系的 (x, y) 位置处。
        g.dispose();类似于流中的close()带动flush()---把数据刷到img对象当中
        //释放此图形的上下文以及它使用的所有系统资源。调用 dispose 之后,就不能再使用 Graphics 对象。
        ImageIO.write(img, "JPG", new FileOutputStream("img/a.jpg"));
        //使用支持给定格式的任意 ImageWriter 将一个图像写入 File。
    }

}
结果:
上面那个很简单,对不对,我们看到的验证码都不是这样的,那好,我们给它加点干扰线,背景色,字符和y坐标随机生成。
有干扰线、背景色的验证码-写入文件
演示代码:
package cn.hncu.img;

import java.awt.Color;
import java.awt.Font;
import java.awt.Graphics;
import java.awt.image.BufferedImage;
import java.io.FileNotFoundException;
import java.io.FileOutputStream;
import java.io.IOException;
import java.util.Date;
import java.util.Random;

import javax.imageio.ImageIO;
//该类包含一些用来查找 ImageReader 和 ImageWriter 以及执行简单编码和解码的静态便捷方法。

import org.junit.Test;

public class ImgDemo {
    //把上面的字符串改成我们平时用的验证码---生成几个随机数字,有背景色和干扰线
    @Test
    public void ImgDemo2() throws FileNotFoundException, IOException{
        int width = 80;
        int height= 40;
        int lines = 10;
        BufferedImage img = new BufferedImage(width, height, BufferedImage.TYPE_INT_RGB);

        Graphics g = img.getGraphics();

        //设置背景色
        g.setColor(Color.white);
        g.fillRect(0, 0, width, height);//画背景
        //填充指定的矩形。使用图形上下文的当前颜色填充该矩形

        //设置字体
        g.setFont(new Font("宋体", Font.BOLD, 18));

        //随机数字
        Date d = new Date();
        //System.out.println(d.getTime());
        Random r = new Random(d.getTime());
        for(int i=0;i<4;i++){
            int a = r.nextInt(10);//取10以内的整数[0,9]
            int y = 10+r.nextInt(20); //10~30范围内的一个整数,作为y坐标
            Color c = new Color(r.nextInt(255), r.nextInt(255), r.nextInt(255));
            g.setColor(c);
            g.drawString(""+a, 5+i*width/4, y);
        }
        //干扰线
        for(int i=0;i<lines;i++){
            Color c = new Color(r.nextInt(255), r.nextInt(255), r.nextInt(255));
            g.setColor(c);
            g.drawLine(r.nextInt(width), r.nextInt(height), r.nextInt(width), r.nextInt(height));
        }

        g.dispose();//类似于流中的close()带动flush()---把数据刷到img对象当中
        ImageIO.write(img, "JPG", new FileOutputStream("img/b.jpg"));

    }


}
演示结果:
最后来看一个可以旋转和放缩的验证码-写到图片本地文件中
演示代码:
package cn.hncu.img;

import java.awt.Color;
import java.awt.Font;
import java.awt.Graphics;
import java.awt.Graphics2D;
import java.awt.geom.AffineTransform;
import java.awt.image.BufferedImage;
import java.io.FileNotFoundException;
import java.io.FileOutputStream;
import java.io.IOException;
import java.util.Date;
import java.util.Random;

import javax.imageio.ImageIO;
//该类包含一些用来查找 ImageReader 和 ImageWriter 以及执行简单编码和解码的静态便捷方法。

import org.junit.Test;

public class ImgDemo {
    @Test//可以旋转和放缩的验证码
    public void ImgDemo3() throws FileNotFoundException, IOException{
        int width = 80;
        int height = 40;
        int lines = 10;
        BufferedImage img = new BufferedImage(width, height, BufferedImage.TYPE_INT_RGB);
        Graphics2D g2d = (Graphics2D)img.getGraphics();

        g2d.setFont(new Font("宋体", Font.BOLD, 20));


        Random r = new Random(new Date().getTime());

        //设置背景色
        g2d.setColor(new Color(r.nextInt(255), r.nextInt(255), r.nextInt(255)));
        g2d.drawRect(0, 0, width, height);//绘制指定矩形的边框。
        g2d.setColor(new Color(r.nextInt(255), r.nextInt(255), r.nextInt(255)));
        g2d.fillRect(0, 0, width, height);//填充指定的矩形。

        for(int i=0;i<4;i++){
            String str = ""+r.nextInt(10);

            //处理旋转
            AffineTransform Tx = new AffineTransform();
            Tx.rotate(Math.random(), 5+i*15, height-5);
            //用弧度测量的旋转角度,旋转锚点的 X 坐标,旋转锚点的 Y 坐标
            //Tx.scale(0.7+Math.random(), 0.7+Math.random());
            //x坐标方向的缩放倍数,y坐标方向的缩放倍数
            g2d.setTransform(Tx);
            Color c = new Color(r.nextInt(255), r.nextInt(255), r.nextInt(255));
            g2d.setColor(c);
            g2d.drawString(str, 2+i*width/4, height-13);
        }

        //干扰线
        for(int i=0;i<lines;i++){
            Color c = new Color(r.nextInt(255), r.nextInt(255), r.nextInt(255));
            g2d.setColor(c);
            g2d.drawLine(r.nextInt(width), r.nextInt(height), r.nextInt(width), r.nextInt(height));
        }

        g2d.dispose();

        ImageIO.write(img, "JPG", new FileOutputStream("img/c.jpg"));
    }
}
演示结果:
下面就要开始演示前台的图片验证技术了。
前台的图片验证技术
这个项目的结构图:
index.jsp:
<%@ page language="java" import="java.util.*" pageEncoding="utf-8"%>

<!DOCTYPE HTML PUBLIC "-//W3C//DTD HTML 4.01 Transitional//EN">
<html>
  <head>
    <script type="text/javascript">
        function changImg(){
            var img = document.getElementById("servletImg");
            var d = new Date();
            var time = d.getTime();//如果没有这个
            //下面这一句不会起作用,因为浏览器的缓存技术,图片并不会刷新
            //img.src="/myHelloWeb/servlet/ImageServlet";
            img.src="/myHelloWeb/servlet/ImageServlet?"+time;
            //?号后面的东西是通过get方式传递的
        }

    </script>
  </head>

  <body>
    这是我的手动主页!
    <br/>
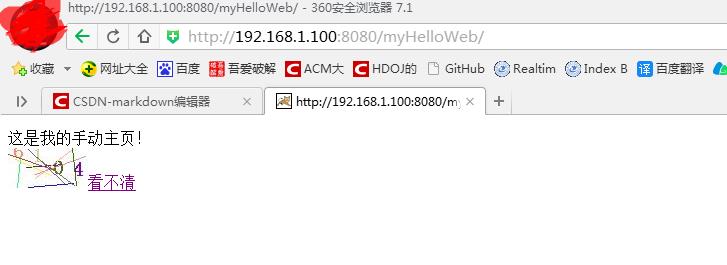
    <img id="servletImg" src="/myHelloWeb/servlet/ImageServlet" /><a href="javascript:changImg()">看不清</a>
  </body>
</html>
web.xml:
<?xml version="1.0" encoding="UTF-8"?>
<web-app version="3.0"
    xmlns="http://java.sun.com/xml/ns/javaee"
    xmlns:xsi="http://www.w3.org/2001/XMLSchema-instance"
    xsi:schemaLocation="http://java.sun.com/xml/ns/javaee
    http://java.sun.com/xml/ns/javaee/web-app_3_0.xsd">
  <display-name></display-name>
  <servlet>
    <description>This is the description of my J2EE component</description>
    <display-name>This is the display name of my J2EE component</display-name>
    <servlet-name>ImageServlet</servlet-name>
    <servlet-class>cn.hncu.img.ImageServlet</servlet-class>
  </servlet>

  <servlet-mapping>
    <servlet-name>ImageServlet</servlet-name>
    <url-pattern>/servlet/ImageServlet</url-pattern>
  </servlet-mapping>
  <welcome-file-list>
    <welcome-file>index.jsp</welcome-file>
  </welcome-file-list>
</web-app>
ImageServlet.java
package cn.hncu.img;

import java.awt.Color;
import java.awt.Font;
import java.awt.Graphics;
import java.awt.image.BufferedImage;
import java.io.IOException;
import java.io.PrintWriter;
import java.util.Date;
import java.util.Random;

import javax.imageio.ImageIO;
import javax.servlet.ServletException;
import javax.servlet.http.HttpServlet;
import javax.servlet.http.HttpServletRequest;
import javax.servlet.http.HttpServletResponse;

public class ImageServlet extends HttpServlet {

    public void doGet(HttpServletRequest request, HttpServletResponse response)
            throws ServletException, IOException {
        doPost(request, response);
    }

    public void doPost(HttpServletRequest request, HttpServletResponse response)
            throws ServletException, IOException {
        //告诉客户端,输出的格式
        response.setContentType("image/jpeg");

        int width = 80;
        int height = 40;
        int lines = 10;
        BufferedImage img = new BufferedImage(width, height, BufferedImage.TYPE_INT_RGB);

        Graphics g = img.getGraphics();

        //设置背景色
        g.setColor(Color.WHITE);
        g.fillRect(0, 0, width, height);

        //设置字体
        g.setFont(new Font("宋体", Font.BOLD, 20));

        //随机数字
        Random r = new Random(new Date().getTime());
        for(int i=0;i<4;i++){
            int a = r.nextInt(10);
            int y = 10+r.nextInt(20);//10~30范围内的一个整数,作为y坐标

            Color c = new Color(r.nextInt(255),r.nextInt(255),r.nextInt(255));
            g.setColor(c);

            g.drawString(""+a, 5+i*width/4, y);
        }

        //干扰线
        for(int i=0;i<lines;i++){
            Color c = new Color(r.nextInt(255),r.nextInt(255),r.nextInt(255));
            g.setColor(c);
            g.drawLine(r.nextInt(width), r.nextInt(height), r.nextInt(width), r.nextInt(height));
        }

        g.dispose();//类似于流中的close()带动flush()---把数据刷到img对象当中

        ImageIO.write(img, "JPG", response.getOutputStream());
    }

}
演示结果:
下面这个是在index.jsp中:
如果是用这句:
img.src=”/myHelloWeb/servlet/ImageServlet”;
大家可以看看响应头:

再看看用这句的响应头:
img.src=”/myHelloWeb/servlet/ImageServlet?”+time;
多了个Date响应!
因为时间一直在变,所以每次点看不清,都会再向服务器请求一次,而不会因为浏览器的缓存,而不去请求了。
验证码就先到这里结束啦。


 6157
6157


 被折叠的 条评论
为什么被折叠?


