


刚开始接触TensorFlow,实践个小项目,也参考了一下其他博主的文章,希望大家提出宝贵意见。
文章中的代码和图片已上传到GitHub(https://github.com/Quanfita/Neural-Style)。
什么是图像风格迁移?
以下每一张图都是一种不同的艺术风格。从直观上我们很难找出这些不同风格的图片有什么可以用准确的语言来描述的去别和联系。如何要把一个图像的风格变成另一种风格更是难以定义的问题。作为程序员,又应该如何去用代码去实现?
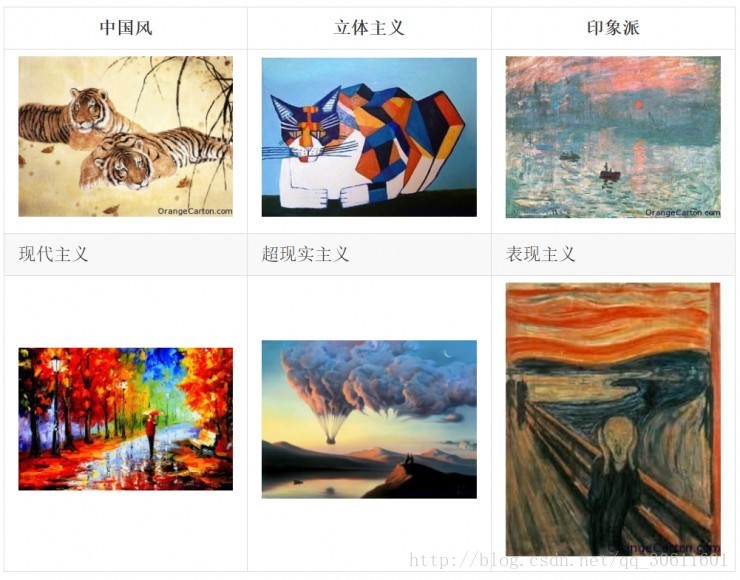
(图片来自https://zhuanlan.zhihu.com/p/26746283)
在神经网络出现之后,Gatys的几篇论文中提出了一些解决方法,让机器能够理解风格这样模糊的概念:[Texture Synthesis Using Convolutional Neural Networks(1505.07376)](https://arxiv.org/abs/1505.07376.pdf),[A Neural Algorithm of Artistic Style(1508.06576)](https://arxiv.org/abs/1508.06576.pdf),[Preserving Color in Neural Artistic Style Transfer(1606.05897v1)](https://arxiv.org/abs/1606.05897v1.pdf)。
Neural Style成为了一个非常有意思的深度学习应用:输入一张代表内容的图片和一张代表风格的图片,深度学习网络会输出一张融合了这个风格和内容的新作品。 TensorFlow是Google开源的最流行的深度学习框架。在GitHub上有开源的TensorFlow实现的Neural Style代码(地址)。
我们还是先看一下Neural Style这篇论文介绍了怎样的方法来解决这个问题的吧。(以下为论文中的主要内容)
论文内容
首先,有几个概念:
卷积神经网络(CNN)
一张输入的图片,会在卷积神经网的各层以一系列过滤后的图像表示。随着层级的一层一层处理,过滤后的图片会通过向下取样的方式不断减小(比如通过池化层)。这使得每层神经网的神经元数量会原来越小。(也就是层越深,因为经过了池化层,单个feature map会越来越小,于是每层中的神经元数量也会越来越少)。
内容重塑
在只知道该层的输出结果,通过重塑输入图像,可以看到CNN不同阶段的图像信息。在原始的VGG-Network上的5个层级:conv1_1,conv1_2,conv1_3,conv1_4,conv1_5上重塑了输入的图像。
输入的图像是上图中的一排房子,5个层级分别是a,b,c,d,e。在较低层的图像重构(abc)非常完美;在较高层(de),详细的像素信息丢失了。也就是说,这样做提取出了图片的内容,但是抛弃了像素。
风格重塑
在原始的CNN表征之上(feature map),建立了一个新的特征空间(feature space),这个特征空间捕获了输入图像的风格。风格的表征计算了在CNN的不同层级间不用特征之间的相似性。通过在CNN隐层的不同的子集上建立起来的风格的表征,我们重构输入图像的风格。如此,便创造了与输入图像一致的风格而丢弃了全局的内容。
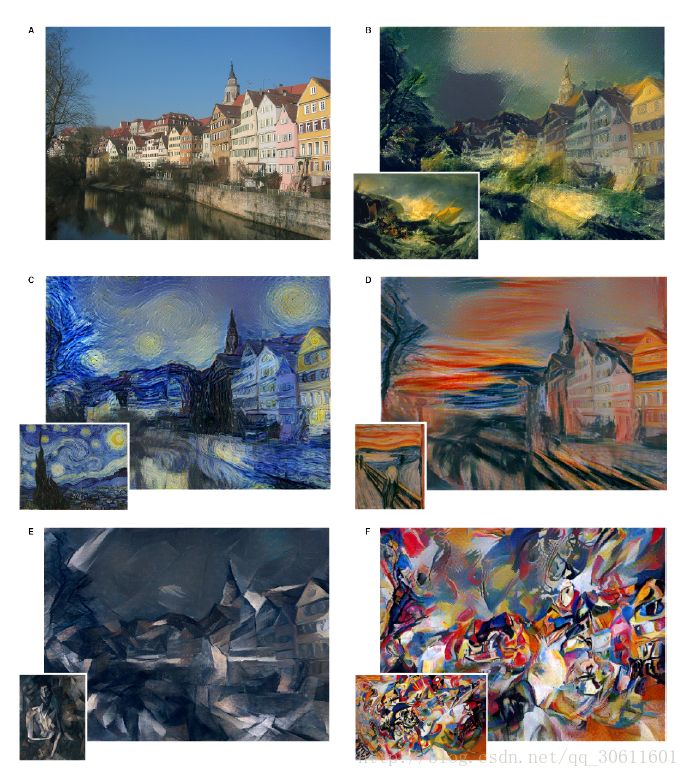
这篇论文的关键是对于内容和风格的表征在CNN中是可以分开的。可以独立地操作两个表征来产生新的,可感知意义的图像。论文中生成一个图片,混合了来自两个不同图片的内容和风格表征。
一张图片,它同时符合照片的内容表征,和艺术画的风格表征。原始照片的整体布局被保留了,而颜色和局部的结构却由艺术画提供。
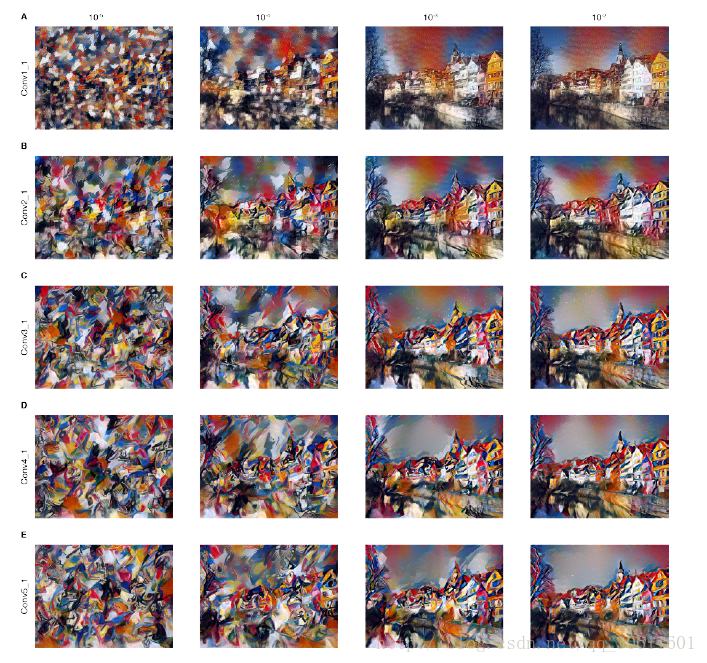
风格表征是一个多尺度的表征,包括了神经网络的多层。在图2中看到的图像,风格的表征包含了整个神经网络的层级。而风格也可以只包含一小部分较低的层级。(见下面的图,第一行是卷基层1,第5行是卷基层5的输出)。若符合了较高层级中的风格表征,局部的图像结构会大规模地增加,从而使得图像在视觉上更平滑与连贯。
简言之,作者直接把局部特征看做近似的图片内容,这样就得到了一个把图片内容和图片风格(说白了就是纹理)分开的系统,剩下的就是把一个图片的内容和另一个图片的风格合起来。
图像的内容和风格并不能被完全地分解开。当风格与内容来自不同的两个图像时,这个被合成的新图像并不存在在同一时刻完美地符合了两个约束。但是,在图像合成中最小化的损失函数分别包括了内容与风格两者,它们被很好地分开了。所以,我们可以平滑地将重点既放在内容上又放在风格上

方法:
假设某一层得到的响应是 Fl∈RNl×Ml F l ∈ R N l × M l ,其中 Nl N l 为 l l 层filter的个数,为filter的大小。 Flij F i j l 表示的是第 l l 层第个filter在位置j的输出。
p⃗ p → 代表提供Content的图像, x⃗ x → 表示生成的图像,Pl和Fl分别代表它们对于 l l 层的响应,因此l层的Content Loss:
上面我们提到了,某一层的Style可以用 Gl∈RNl×Nl G l ∈ R N l × N l 来表示,其中 ,即不同filter响应的内积。
a⃗ a → 代表提供Style的图像, x⃗ x → 表示生成的图像,Al和Gl分别代表它们对于 l l 层的Style,因此l层的Style Loss:
文章中作者使用了多层来表达Style,所以总的Style Loss为:
定义好了两个Loss之后,就利用优化方法来最小化总的Loss:
其中的 α α 和分别代表了对Content和Style的侧重,文中作者也对 α/β α / β 取值的效果进行了实验。
最终迭代出来的 x⃗ x → 既具有 p⃗ p → 的Content,同时也具有 a⃗ a → 的Style。实验结果也证明了作者文中方法的有效性。
α α 和分别是内容和风格在图像重构中的权重因子。 α α 和分别是内容和风格两个损失的权重。 α+β=1 α + β = 1 .如果 α α 比较大,那么输出后的新图会更多地倾向于内容上的吻合,如果较大,那么输出的新图会更倾向于与风格的吻合。这两个参数是一个trade-off,可以根据自己需求去调整最好的平衡。论文的作者给出了它调整参数的不同结果,如下图,从左到右四列分别是 α/β=10−5,10−4,10−3,10−2 α / β = 10 − 5 , 10 − 4 , 10 − 3 , 10 − 2 .也就是 α α <script type="math/tex" id="MathJax-Element-33">α</script>越来越大,的确图像也越来越清晰地呈现出了照片的内容。
代码实现
环境介绍
- Python3.6
- TensorFlow 1.2
- VGG19
- CPU i5-6200U(笔记本)
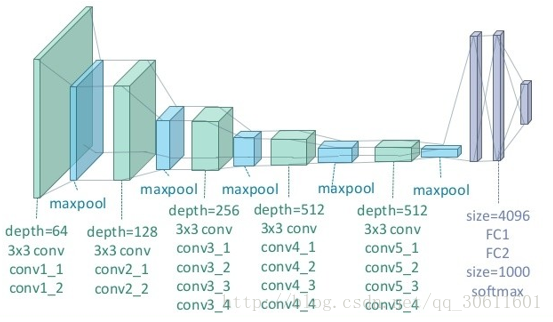
下面,简单介绍以下VGG19网络:
VGG19 网络结构
每一层神经网络都会利用上一层的输出来进一步提取更加复杂的特征,直到复杂到能被用来识别物体为止,所以每一层都可以被看做很多个局部特征的提取器。VGG19 在物体识别方面的精度甩了之前的算法一大截,之后的物体识别系统也基本都改用深度学习了。VGG19结构如下:
(图片来自https://zhuanlan.zhihu.com/p/26746283)
代码详解:
TensorFlow版本的源码主要包含了三个文件:neural_style.py, stylize.py和 vgg.py。
neural_style.py:外部接口函数,定义了函数的主要参数以及部分参数的默认值,包含对图像的读取和存贮,对输入图像进行resize,权值分配等操作,并将参数以及resize的图片传入stylize.py中。
stylize.py:核心代码,包含了训练、优化等过程。
vgg.py:定义了网络模型以及相关的运算。
我们可以使用下面的代码vgg.py读取VGG-19神经网络,用于构造Neural Style模型。
import tensorflow as tf
import numpy as np
import scipy.io

#需要使用神经网络层
VGG19_LAYERS = (
    'conv1_1', 'relu1_1', 'conv1_2', 'relu1_2', 'pool1',

    'conv2_1', 'relu2_1', 'conv2_2', 'relu2_2', 'pool2',

    'conv3_1', 'relu3_1', 'conv3_2', 'relu3_2', 'conv3_3',
    'relu3_3', 'conv3_4', 'relu3_4', 'pool3',

    'conv4_1', 'relu4_1', 'conv4_2', 'relu4_2', 'conv4_3',
    'relu4_3', 'conv4_4', 'relu4_4', 'pool4',

    'conv5_1', 'relu5_1', 'conv5_2', 'relu5_2', 'conv5_3',
    'relu5_3', 'conv5_4', 'relu5_4'
)

##我们需要的信息是每层神经网络的kernels和bias
def load_net(data_path):
    data = scipy.io.loadmat(data_path)
    if not all(i in data for i in ('layers', 'classes', 'normalization')):
        raise ValueError("You're using the wrong VGG19 data. Please follow the instructions in the README to download the correct data.")
    mean = data['normalization'][0][0][0]
    mean_pixel = np.mean(mean, axis=(0, 1))
    weights = data['layers'][0]
    return weights, mean_pixel

def net_preloaded(weights, input_image, pooling):
    net = {}
    current = input_image
    for i, name in enumerate(VGG19_LAYERS):
        kind = name[:4]
        if kind == 'conv':
            kernels, bias = weights[i][0][0][0][0]
            kernels = np.transpose(kernels, (1, 0, 2, 3))
            bias = bias.reshape(-1)
            current = _conv_layer(current, kernels, bias)
        elif kind == 'relu':
            current = tf.nn.relu(current)
        elif kind == 'pool':
            current = _pool_layer(current, pooling)
        net[name] = current

    assert len(net) == len(VGG19_LAYERS)
    return net

def _conv_layer(input, weights, bias):
    conv = tf.nn.conv2d(input, tf.constant(weights), strides=(1, 1, 1, 1),
            padding='SAME')
    return tf.nn.bias_add(conv, bias)


def _pool_layer(input, pooling):
    if pooling == 'avg':
        return tf.nn.avg_pool(input, ksize=(1, 2, 2, 1), strides=(1, 2, 2, 1),
                padding='SAME')
    else:
        return tf.nn.max_pool(input, ksize=(1, 2, 2, 1), strides=(1, 2, 2, 1),
                padding='SAME')

def preprocess(image, mean_pixel):
    return image - mean_pixel


def unprocess(image, mean_pixel):
    return image + mean_pixel
在neural_style.py中我们可以看到,定义了非常长多的参数和外部接口。
import os

import numpy as np
import scipy.misc

from stylize import stylize

import math
from argparse import ArgumentParser

from PIL import Image

# default arguments
CONTENT_WEIGHT = 5e0
CONTENT_WEIGHT_BLEND = 1
STYLE_WEIGHT = 5e2
TV_WEIGHT = 1e2
STYLE_LAYER_WEIGHT_EXP = 1
LEARNING_RATE = 1e1
BETA1 = 0.9
BETA2 = 0.999
EPSILON = 1e-08
STYLE_SCALE = 1.0
ITERATIONS = 1000
VGG_PATH = 'imagenet-vgg-verydeep-19.mat'
POOLING = 'max'

def build_parser():
    parser = ArgumentParser()
    parser.add_argument('--content',
            dest='content', help='content image',
            metavar='CONTENT', required=True)
    parser.add_argument('--styles',
            dest='styles',
            nargs='+', help='one or more style images',
            metavar='STYLE', required=True)
    parser.add_argument('--output',
            dest='output', help='output path',
            metavar='OUTPUT', required=True)
    parser.add_argument('--iterations', type=int,
            dest='iterations', help='iterations (default %(default)s)',
            metavar='ITERATIONS', default=ITERATIONS)
    parser.add_argument('--print-iterations', type=int,
            dest='print_iterations', help='statistics printing frequency',
            metavar='PRINT_ITERATIONS')
    parser.add_argument('--checkpoint-output',
            dest='checkpoint_output', help='checkpoint output format, e.g. output%%s.jpg',
            metavar='OUTPUT')
    parser.add_argument('--checkpoint-iterations', type=int,
            dest='checkpoint_iterations', help='checkpoint frequency',
            metavar='CHECKPOINT_ITERATIONS')
    parser.add_argument('--width', type=int,
            dest='width', help='output width',
            metavar='WIDTH')
    parser.add_argument('--style-scales', type=float,
            dest='style_scales',
            nargs='+', help='one or more style scales',
            metavar='STYLE_SCALE')
    parser.add_argument('--network',
            dest='network', help='path to network parameters (default %(default)s)',
            metavar='VGG_PATH', default=VGG_PATH)
    parser.add_argument('--content-weight-blend', type=float,
            dest='content_weight_blend', help='content weight blend, conv4_2 * blend + conv5_2 * (1-blend) (default %(default)s)',
            metavar='CONTENT_WEIGHT_BLEND', default=CONTENT_WEIGHT_BLEND)
    parser.add_argument('--content-weight', type=float,
            dest='content_weight', help='content weight (default %(default)s)',
            metavar='CONTENT_WEIGHT', default=CONTENT_WEIGHT)
    parser.add_argument('--style-weight', type=float,
            dest='style_weight', help='style weight (default %(default)s)',
            metavar='STYLE_WEIGHT', default=STYLE_WEIGHT)
    parser.add_argument('--style-layer-weight-exp', type=float,
            dest='style_layer_weight_exp', help='style layer weight exponentional increase - weight(layer<n+1>) = weight_exp*weight(layer<n>) (default %(default)s)',
            metavar='STYLE_LAYER_WEIGHT_EXP', default=STYLE_LAYER_WEIGHT_EXP)
    parser.add_argument('--style-blend-weights', type=float,
            dest='style_blend_weights', help='style blending weights',
            nargs='+', metavar='STYLE_BLEND_WEIGHT')
    parser.add_argument('--tv-weight', type=float,
            dest='tv_weight', help='total variation regularization weight (default %(default)s)',
            metavar='TV_WEIGHT', default=TV_WEIGHT)
    parser.add_argument('--learning-rate', type=float,
            dest='learning_rate', help='learning rate (default %(default)s)',
            metavar='LEARNING_RATE', default=LEARNING_RATE)
    parser.add_argument('--beta1', type=float,
            dest='beta1', help='Adam: beta1 parameter (default %(default)s)',
            metavar='BETA1', default=BETA1)
    parser.add_argument('--beta2', type=float,
            dest='beta2', help='Adam: beta2 parameter (default %(default)s)',
            metavar='BETA2', default=BETA2)
    parser.add_argument('--eps', type=float,
            dest='epsilon', help='Adam: epsilon parameter (default %(default)s)',
            metavar='EPSILON', default=EPSILON)
    parser.add_argument('--initial',
            dest='initial', help='initial image',
            metavar='INITIAL')
    parser.add_argument('--initial-noiseblend', type=float,
            dest='initial_noiseblend', help='ratio of blending initial image with normalized noise (if no initial image specified, content image is used) (default %(default)s)',
            metavar='INITIAL_NOISEBLEND')
    parser.add_argument('--preserve-colors', action='store_true',
            dest='preserve_colors', help='style-only transfer (preserving colors) - if color transfer is not needed')
    parser.add_argument('--pooling',
            dest='pooling', help='pooling layer configuration: max or avg (default %(default)s)',
            metavar='POOLING', default=POOLING)
    return parser


def main():
    parser = build_parser()
    options = parser.parse_args()

    if not os.path.isfile(options.network):
        parser.error("Network %s does not exist. (Did you forget to download it?)" % options.network)

    content_image = imread(options.content)
    style_images = [imread(style) for style in options.styles]

    width = options.width
    if width is not None:
        new_shape = (int(math.floor(float(content_image.shape[0]) /
                content_image.shape[1] * width)), width)
        content_image = scipy.misc.imresize(content_image, new_shape)
    target_shape = content_image.shape
    for i in range(len(style_images)):
        style_scale = STYLE_SCALE
        if options.style_scales is not None:
            style_scale = options.style_scales[i]
        style_images[i] = scipy.misc.imresize(style_images[i], style_scale *
                target_shape[1] / style_images[i].shape[1])

    style_blend_weights = options.style_blend_weights
    if style_blend_weights is None:
        # default is equal weights
        style_blend_weights = [1.0/len(style_images) for _ in style_images]
    else:
        total_blend_weight = sum(style_blend_weights)
        style_blend_weights = [weight/total_blend_weight
                               for weight in style_blend_weights]

    initial = options.initial
    if initial is not None:
        initial = scipy.misc.imresize(imread(initial), content_image.shape[:2])
        # Initial guess is specified, but not noiseblend - no noise should be blended
        if options.initial_noiseblend is None:
            options.initial_noiseblend = 0.0
    else:
        # Neither inital, nor noiseblend is provided, falling back to random generated initial guess
        if options.initial_noiseblend is None:
            options.initial_noiseblend = 1.0
        if options.initial_noiseblend < 1.0:
            initial = content_image

    if options.checkpoint_output and "%s" not in options.checkpoint_output:
        parser.error("To save intermediate images, the checkpoint output "
                     "parameter must contain `%s` (e.g. `foo%s.jpg`)")

    for iteration, image in stylize(
        network=options.network,
        initial=initial,
        initial_noiseblend=options.initial_noiseblend,
        content=content_image,
        styles=style_images,
        preserve_colors=options.preserve_colors,
        iterations=options.iterations,
        content_weight=options.content_weight,
        content_weight_blend=options.content_weight_blend,
        style_weight=options.style_weight,
        style_layer_weight_exp=options.style_layer_weight_exp,
        style_blend_weights=style_blend_weights,
        tv_weight=options.tv_weight,
        learning_rate=options.learning_rate,
        beta1=options.beta1,
        beta2=options.beta2,
        epsilon=options.epsilon,
        pooling=options.pooling,
        print_iterations=options.print_iterations,
        checkpoint_iterations=options.checkpoint_iterations
    ):
        output_file = None
        combined_rgb = image
        if iteration is not None:
            if options.checkpoint_output:
                output_file = options.checkpoint_output % iteration
        else:
            output_file = options.output
        if output_file:
            imsave(output_file, combined_rgb)


def imread(path):
    img = scipy.misc.imread(path).astype(np.float)
    if len(img.shape) == 2:
        # grayscale
        img = np.dstack((img,img,img))
    elif img.shape[2] == 4:
        # PNG with alpha channel
        img = img[:,:,:3]
    return img


def imsave(path, img):
    img = np.clip(img, 0, 255).astype(np.uint8)
    Image.fromarray(img).save(path, quality=95)

if __name__ == '__main__':
    main()
核心代码stylize.py,详解如下:
# Copyright (c) 2015-2017 Anish Athalye. Released under GPLv3.

import vgg

import tensorflow as tf
import numpy as np

from sys import stderr

from PIL import Image

CONTENT_LAYERS = ('relu4_2', 'relu5_2')
STYLE_LAYERS = ('relu1_1', 'relu2_1', 'relu3_1', 'relu4_1', 'relu5_1')

try:
    reduce
except NameError:
    from functools import reduce


def stylize(network, initial, initial_noiseblend, content, styles, preserve_colors, iterations,
        content_weight, content_weight_blend, style_weight, style_layer_weight_exp, style_blend_weights, tv_weight,
        learning_rate, beta1, beta2, epsilon, pooling,
        print_iterations=None, checkpoint_iterations=None):
    """
    Stylize images.

    This function yields tuples (iteration, image); `iteration` is None
    if this is the final image (the last iteration).  Other tuples are yielded
    every `checkpoint_iterations` iterations.

    :rtype: iterator[tuple[int|None,image]]
    """
    #content.shape是三维(height, width, channel),这里将维度变成(1, height, width, channel)为了与后面保持一致。
    shape = (1,) + content.shape
    style_shapes = [(1,) + style.shape for style in styles]
    content_features = {}
    style_features = [{} for _ in styles]

    vgg_weights, vgg_mean_pixel = vgg.load_net(network)

    layer_weight = 1.0
    style_layers_weights = {}
    for style_layer in STYLE_LAYERS:
        style_layers_weights[style_layer] = layer_weight
        layer_weight *= style_layer_weight_exp

    # normalize style layer weights
    layer_weights_sum = 0
    for style_layer in STYLE_LAYERS:
        layer_weights_sum += style_layers_weights[style_layer]
    for style_layer in STYLE_LAYERS:
        style_layers_weights[style_layer] /= layer_weights_sum
    #首先创建一个image的占位符,然后通过eval()的feed_dict将content_pre传给image,启动net的运算过程,得到了content的feature maps
    # compute content features in feedforward mode
    g = tf.Graph()
    with g.as_default(), g.device('/cpu:0'), tf.Session() as sess:
        image = tf.placeholder('float', shape=shape)
        net = vgg.net_preloaded(vgg_weights, image, pooling)
        content_pre = np.array([vgg.preprocess(content, vgg_mean_pixel)])
        for layer in CONTENT_LAYERS:
            content_features[layer] = net[layer].eval(feed_dict={image: content_pre})

    # compute style features in feedforward mode
    for i in range(len(styles)):
        g = tf.Graph()
        with g.as_default(), g.device('/cpu:0'), tf.Session() as sess:
            image = tf.placeholder('float', shape=style_shapes[i])
            net = vgg.net_preloaded(vgg_weights, image, pooling)
            style_pre = np.array([vgg.preprocess(styles[i], vgg_mean_pixel)])
            for layer in STYLE_LAYERS:
                features = net[layer].eval(feed_dict={image: style_pre})
                features = np.reshape(features, (-1, features.shape[3]))
                gram = np.matmul(features.T, features) / features.size
                style_features[i][layer] = gram

    initial_content_noise_coeff = 1.0 - initial_noiseblend

    # make stylized image using backpropogation
    with tf.Graph().as_default():
        if initial is None:
            noise = np.random.normal(size=shape, scale=np.std(content) * 0.1)
            initial = tf.random_normal(shape) * 0.256
        else:
            initial = np.array([vgg.preprocess(initial, vgg_mean_pixel)])
            initial = initial.astype('float32')
            noise = np.random.normal(size=shape, scale=np.std(content) * 0.1)
            initial = (initial) * initial_content_noise_coeff + (tf.random_normal(shape) * 0.256) * (1.0 - initial_content_noise_coeff)
        '''
        image = tf.Variable(initial)初始化了一个TensorFlow的变量,即为我们需要训练的对象。注意这里我们训练的对象是一张图像,而不是weight和bias。
        '''
        image = tf.Variable(initial)
        net = vgg.net_preloaded(vgg_weights, image, pooling)

        # content loss
        content_layers_weights = {}
        content_layers_weights['relu4_2'] = content_weight_blend
        content_layers_weights['relu5_2'] = 1.0 - content_weight_blend

        content_loss = 0
        content_losses = []
        for content_layer in CONTENT_LAYERS:
            content_losses.append(content_layers_weights[content_layer] * content_weight * (2 * tf.nn.l2_loss(
                    net[content_layer] - content_features[content_layer]) /
                    content_features[content_layer].size))
        content_loss += reduce(tf.add, content_losses)

        # style loss
        style_loss = 0
        '''
        由于style图像可以输入多幅,这里使用for循环。同样的,将style_pre传给image占位符,启动net运算,得到了style的feature maps,由于style为不同filter响应的内积,因此在这里增加了一步:gram = np.matmul(features.T, features) / features.size,即为style的feature。
    '''
        for i in range(len(styles)):
            style_losses = []
            for style_layer in STYLE_LAYERS:
                layer = net[style_layer]
                _, height, width, number = map(lambda i: i.value, layer.get_shape())
                size = height * width * number
                feats = tf.reshape(layer, (-1, number))
                gram = tf.matmul(tf.transpose(feats), feats) / size
                style_gram = style_features[i][style_layer]
                style_losses.append(style_layers_weights[style_layer] * 2 * tf.nn.l2_loss(gram - style_gram) / style_gram.size)
            style_loss += style_weight * style_blend_weights[i] * reduce(tf.add, style_losses)

        # total variation denoising
        tv_y_size = _tensor_size(image[:,1:,:,:])
        tv_x_size = _tensor_size(image[:,:,1:,:])
        tv_loss = tv_weight * 2 * (
                (tf.nn.l2_loss(image[:,1:,:,:] - image[:,:shape[1]-1,:,:]) /
                    tv_y_size) +
                (tf.nn.l2_loss(image[:,:,1:,:] - image[:,:,:shape[2]-1,:]) /
                    tv_x_size))
        # overall loss
        '''
        接下来定义了Content Loss和Style Loss,结合文中的公式很容易看懂,在代码中,还增加了total variation denoising,因此总的loss = content_loss + style_loss + tv_loss
        '''
        loss = content_loss + style_loss + tv_loss

        # optimizer setup
        #创建train_step,使用Adam优化器,优化对象是上面的loss
        #优化过程,通过迭代使用train_step来最小化loss,最终得到一个best,即为训练优化的结果
        train_step = tf.train.AdamOptimizer(learning_rate, beta1, beta2, epsilon).minimize(loss)

        def print_progress():
            stderr.write('  content loss: %g\n' % content_loss.eval())
            stderr.write('    style loss: %g\n' % style_loss.eval())
            stderr.write('       tv loss: %g\n' % tv_loss.eval())
            stderr.write('    total loss: %g\n' % loss.eval())

        # optimization
        best_loss = float('inf')
        best = None
        with tf.Session() as sess:
            sess.run(tf.global_variables_initializer())
            stderr.write('Optimization started...\n')
            if (print_iterations and print_iterations != 0):
                print_progress()
            for i in range(iterations):
                stderr.write('Iteration %4d/%4d\n' % (i + 1, iterations))
                train_step.run()

                last_step = (i == iterations - 1)
                if last_step or (print_iterations and i % print_iterations == 0):
                    print_progress()

                if (checkpoint_iterations and i % checkpoint_iterations == 0) or last_step:
                    this_loss = loss.eval()
                    if this_loss < best_loss:
                        best_loss = this_loss
                        best = image.eval()

                    img_out = vgg.unprocess(best.reshape(shape[1:]), vgg_mean_pixel)

                    if preserve_colors and preserve_colors == True:
                        original_image = np.clip(content, 0, 255)
                        styled_image = np.clip(img_out, 0, 255)

                        # Luminosity transfer steps:
                        # 1. Convert stylized RGB->grayscale accoriding to Rec.601 luma (0.299, 0.587, 0.114)
                        # 2. Convert stylized grayscale into YUV (YCbCr)
                        # 3. Convert original image into YUV (YCbCr)
                        # 4. Recombine (stylizedYUV.Y, originalYUV.U, originalYUV.V)
                        # 5. Convert recombined image from YUV back to RGB

                        # 1
                        styled_grayscale = rgb2gray(styled_image)
                        styled_grayscale_rgb = gray2rgb(styled_grayscale)

                        # 2
                        styled_grayscale_yuv = np.array(Image.fromarray(styled_grayscale_rgb.astype(np.uint8)).convert('YCbCr'))

                        # 3
                        original_yuv = np.array(Image.fromarray(original_image.astype(np.uint8)).convert('YCbCr'))

                        # 4
                        w, h, _ = original_image.shape
                        combined_yuv = np.empty((w, h, 3), dtype=np.uint8)
                        combined_yuv[..., 0] = styled_grayscale_yuv[..., 0]
                        combined_yuv[..., 1] = original_yuv[..., 1]
                        combined_yuv[..., 2] = original_yuv[..., 2]

                        # 5
                        img_out = np.array(Image.fromarray(combined_yuv, 'YCbCr').convert('RGB'))


                    yield (
                        (None if last_step else i),
                        img_out
                    )


def _tensor_size(tensor):
    from operator import mul
    return reduce(mul, (d.value for d in tensor.get_shape()), 1)

def rgb2gray(rgb):
    return np.dot(rgb[...,:3], [0.299, 0.587, 0.114])

def gray2rgb(gray):
    w, h = gray.shape
    rgb = np.empty((w, h, 3), dtype=np.float32)
    rgb[:, :, 2] = rgb[:, :, 1] = rgb[:, :, 0] = gray
    return rgb
实现效果
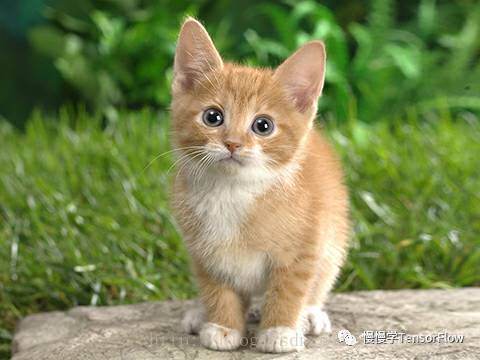
我们的原图是这样的:
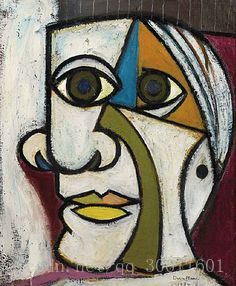
风格是这样的:
我们在cmd命令行中打入下面代码(我的图片都放在examples/下):
python neural_style.py –content examples/cat.jpg –styles examples/2-style1.jpg –output y-output.jpg

然后我们看到计算机已经开始进行风格转移:
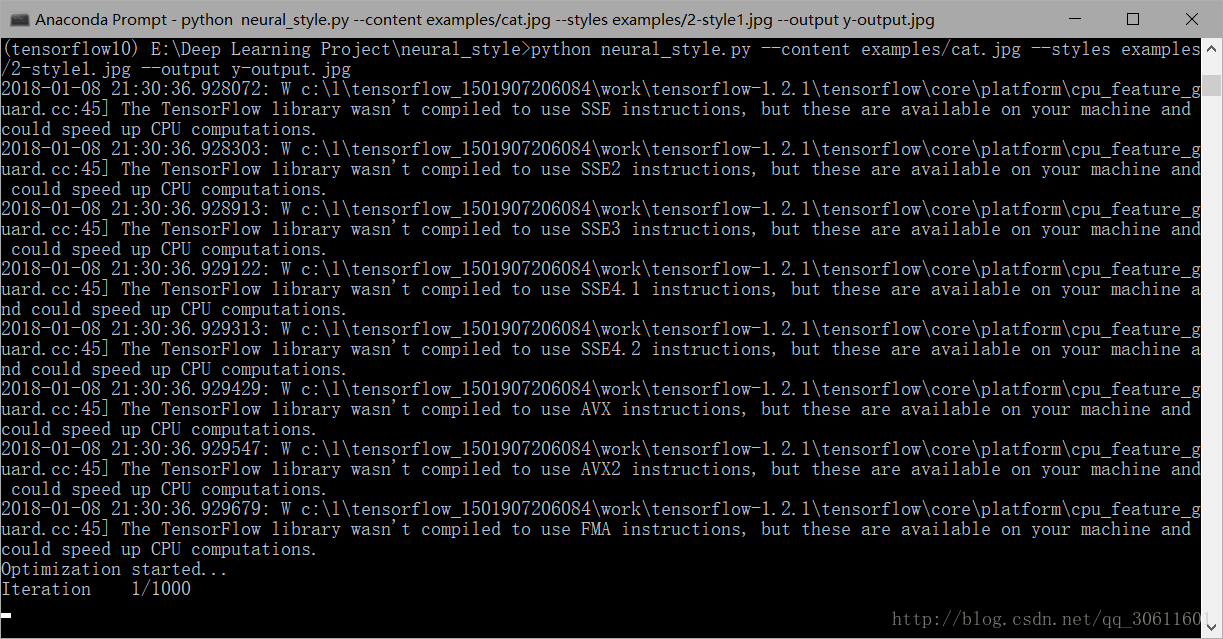
(ps:我可怜的笔记本不停地跑了两个小时)
转移结束后我们可以看到输出的图片是这样的:
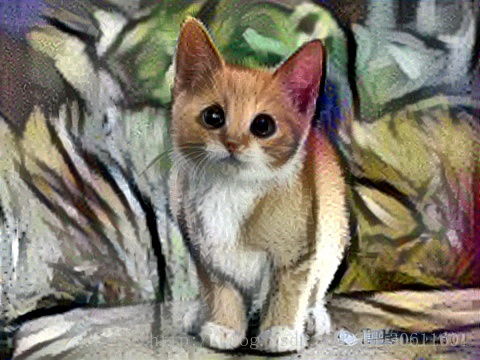
Neural Style很有趣,我们可以通过改变参数去做很多风格的测试,会有不一样的效果。
个人博客:Quanfita的博客
参考资料
1


 1万+
1万+


 被折叠的 条评论
为什么被折叠?
被折叠的 条评论
为什么被折叠?
 到【灌水乐园】发言


