


代码地址:https://code.csdn.net/ranky2009/pythonsmallproject
在本项目中要运用CGI,我的理解CGI就是可以使用脚本语言生成html返回给客户端。
介绍两种搭建服务器并使用CGI的方式。
1. 使用Apache服务器
由于我的运行环境是win7,所以下载windows版本的Apache,下载win7版本Apache Lounge的网页是http://www.apachelounge.com/download/VC11/,选则64位。
下载后解压文件,将Apache24放置于电脑C盘中。Apache目录下cgi-bin用来放置CGI文件,htdocs放置html文件。
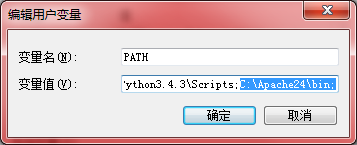
将C:\Apache24\bin添加到电脑的环境变量path中
启动服务:httpd.exe
安装服务:httpd.exe -k install
2. 使用python自带Web服务器
python版本3.4.3,在桌面上创建一个文件夹testcgi,启动cmd,在cmd中进入testcgi目录,然后在cmd中输入命令python –m http.server开启服务器,在testcgi目录中新建一个index.html页面,写入hello,然后在浏览器中输入http://localhost:8000/,看到浏览器中也显示hello字符,那么就说明web服务器启动正常。正常启动后,在testcgi中创建一个cgi-bin文件夹用来存储CGI文件。
按照书本内容,略作修改,以适应当前的python版本。
代码如下:
1. index.html:
<html>
    <head>
        <title>File Editor</title>
    </head>
    <body>
        <form action='/cgi-bin/edit.cgi' method='POST'>
            <b>File name:</b><br />
            <input type='text' name='filename' />
            <input type='submit' value='Open' />
        </form>
    </body>
</html>
2. edit.cgi:
cgi文件的第一行需要加上python的运行路径,windows环境下如本示例代码。
在unix在面,python的运行路径也需要添加,只是路径格式与windows不一样,例如:#!/usr/bin/env python
<p>#!D:\Program Files (x86)\Python3.4.3\python.exe</p><p>print('Content-type:text/html\n')</p><p>from os.path import join, abspath, exists, isfile
import cgi, sys</p><p>BASE_DIR = abspath('data')</p><p>form = cgi.FieldStorage()</p><p>filename = form.getvalue('filename')
if not filename:
    print('Please enter a file name')
    sys.exit()
filePath = join(BASE_DIR, filename)
if not exists(filePath):
    print("%s not exist" % filePath)
    sys.exit()
if not isfile(filePath):
    print("%s is not file" % filePath)
    sys.exit()</p><p>text = open(filePath).read()</p><p>print("""
<html>
    <head>
    <title>Editing...</title>
    </head>
    <body>
        <form action='save.cgi' method='POST'>
        <b>File:</b> %s<br />
        <input type='hidden' value='%s' name='filename' />
        <b>Password:</b> <br />
        <input name='password' type='password' /><br />
        <b>Text:</b><br />
        <textarea name='text' colso='40' rows='20'>%s</textarea><br />
        <input type='submit' value='Save' />
        </form>
    </body>
    </html>
""" % (filename, filename, text))</p>
3. save.cgi:
#!D:\Program Files (x86)\Python3.4.3\python.exe

print('Content-type:text/html\n')

from os.path import join, abspath
import cgi, sys, hashlib

BASE_DIR = abspath('data')

form = cgi.FieldStorage()
text = form.getvalue('text')
filename = form.getvalue('filename')
password = form.getvalue('password')

print(BASE_DIR)
print(filename)
print(text)

#判断文件名,内容,密码是否为空
if not (filename and text and password):
    print('Invalid parameters')
    sys.exit()

if hashlib.sha1(password).hexdigest() != '7c4a8d09ca3762af61e59520943dc26494f8941b':
    #123456的sha1是'7c4a8d09ca3762af61e59520943dc26494f8941b',判断密码是否正确
    print('Invalid password.')
    sys.exit()

f = open(join(BASE_DIR, filename), 'w')
f.write(text)
f.close()

print('The file has been saved.')注意:需要在cgi-bin目录下手动创建data目录,并在data目录下创建一个空文件,该文件名为输入的filename.
例如我创建的文件为testcgi.txt,密码为123456,密码检验在代码中为硬编码。


 1126
1126

 被折叠的 条评论
为什么被折叠?
被折叠的 条评论
为什么被折叠?
 到【灌水乐园】发言


