


前一篇已经将MainActivity编写好了,其中主页面的ViewPager控件嵌入的是两个fragment,分别是VideoListFragment 和 AudioListFragment。今天主要理一下视频这一模块,包括:
通过ContentProvider获取视频列表数据(使用AsyncQueryHandler异步获取)
自定义播放页面
播放页面逻辑处理(播放、暂停、切换、音量等)
效果图

结构图
获取视频列表数据
分析:
观察视频列表,我们需要这些数据:视频名称(TITLE),视频时长(DURATION),视频大小(SIZE),当然每一个视频都有一个唯一的路径(DATA),这个也需要。
那么就可以将这些视频共有的属性封装成一个JavaBean。这里用游标cursor去查视频数据,适配器就继承CursorAdapter,它是BaseAdapter的子类。在newView()方法里,加载每一项的布局文件;在bindView()方法中,如果view不为空,设置数据,否则会先调用newView()方法生成一个View。
public class VideoListAdapter extends CursorAdapter {

    public VideoListAdapter(Context context, Cursor c, boolean autoRequery) {
        super(context, c, autoRequery);
    }

    @Override
    public View newView(Context context, Cursor cursor, ViewGroup parent) {
        return View.inflate(context, R.layout.item_video_list, null);
    }

    @Override
    public void bindView(View view, Context context, Cursor cursor) {
        ViewHolder holder = getHolder(view);
        VideoItem videoItem = VideoItem.fromCursor(cursor);

        holder.tvName.setText(videoItem.getTitle());
        holder.tvDuration.setText(StringUtil.formatVideoDuration(videoItem.getDuration()));
        holder.tvSize.setText(Formatter.formatFileSize(context, videoItem.getSize()));
    }

    private ViewHolder getHolder(View view) {
        ViewHolder holder = (ViewHolder) view.getTag();
        if (holder == null) {
            holder = new ViewHolder(view);
            view.setTag(holder);
        }
        return holder;
    }

    private static class ViewHolder {
        private TextView tvName, tvDuration, tvSize;

        public ViewHolder(View view) {
            tvName = (TextView) view.findViewById(R.id.tv_name);
            tvDuration = (TextView) view.findViewById(R.id.tv_duration);
            tvSize = (TextView) view.findViewById(R.id.tv_size);
        }
    }
}
说明:bindView()方法中通过cursor获取数据的方法封装到VideoItem的JavaBean中了,主要是为代码整洁,具体代码如下:
    public static VideoItem fromCursor(Cursor cursor) {
        VideoItem videoItem = new VideoItem();
        videoItem.setDuration(cursor.getLong(cursor.getColumnIndex(Media.DURATION)));
        videoItem.setPath(cursor.getString(cursor.getColumnIndex(Media.DATA)));
        videoItem.setSize(cursor.getLong(cursor.getColumnIndex(Media.SIZE)));
        videoItem.setTitle(cursor.getString(cursor.getColumnIndex(Media.TITLE)));
        return videoItem;
    }
- 视频列表的适配器写好了,如何获取数据呢?想一想,如果视频很多的话,能在主线程操作吗?显然不能,android给我们提供了这样一个类:AsyncQueryHandler,它是个抽象类,我们需要写一个类去继承它。(它给我们提供了一个查询完成的回调方法,我们可以在这个方法里更新listview)
    class SimpleQueryHandler extends AsyncQueryHandler{

        public SimpleQueryHandler(ContentResolver cr) {
            super(cr);
        }

        /**
         * token: 查询的标识
         */
        @Override
        protected void onQueryComplete(int token, Object cookie, Cursor cursor) {
            super.onQueryComplete(token, cookie, cursor);
            if(cookie!=null && cookie instanceof CursorAdapter){
                CursorAdapter adapter = (CursorAdapter) cookie;
                adapter.changeCursor(cursor);//相当于notifyDatasetChange
                CursorUtil.printCursor(cursor);
            }
        }
}- 获取数据的方法如下:(罗列出要查询的列后,通过我们自己写的queryHandler的startQuery()就行了,就这么简单)
@Override
protected void initData() {
adapter = new VideoListAdapter(getActivity(), null, false);
lv.setAdapter(adapter);
queryHandler = new SimpleQueryHandler(getActivity().getContentResolver());
String[] projection = { Media._ID, Media.TITLE, Media.SIZE,
Media.DURATION, Media.DATA };
queryHandler.startQuery(0, adapter, Media.EXTERNAL_CONTENT_URI,
projection, null, null, null);
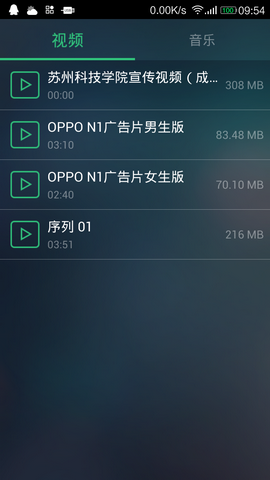
}至此,就可实现上面视频列表的效果图的样子了。
自定义播放页面
接来下实现播放视频的Activity。
- 视频为什么能播放?肯定是在点击listview的一个item传了数据过来了呀,是传当前视频的信息吗?进一步想想,播放视频的页面是可以切换上一个下一个视频的啊,所以传过来的不能只是一个视频信息,得是所有视频信息的一个集合。还得传一个当前视频的position来作为要播放的一个标记。
    @Override
    protected void initListener() {
        lv.setOnItemClickListener(new AdapterView.OnItemClickListener() {
            @Override
            public void onItemClick(AdapterView<?> parent, View view, int position, long id) {
                Cursor cursor = (Cursor) adapter.getItem(position);
                ArrayList<VideoItem> videoList = cursorToList(cursor);
                Bundle bundle = new Bundle();
                bundle.putInt("currentPosition", position);
                bundle.putSerializable("videoList", videoList);
                enterActivity(VitamioVideoPlayerActivity.class, bundle);
            }
        });
    }

    /**
     * 将cursor中的所有记录转为对象放入集合中
     * @param cursor
     * @return
     */
    private ArrayList<VideoItem> cursorToList(Cursor cursor){
        cursor.moveToPosition(-1);
        ArrayList<VideoItem> list = new ArrayList<VideoItem>();
        while(cursor.moveToNext()){
            list.add(VideoItem.fromCursor(cursor));
        }
        return list;
    }
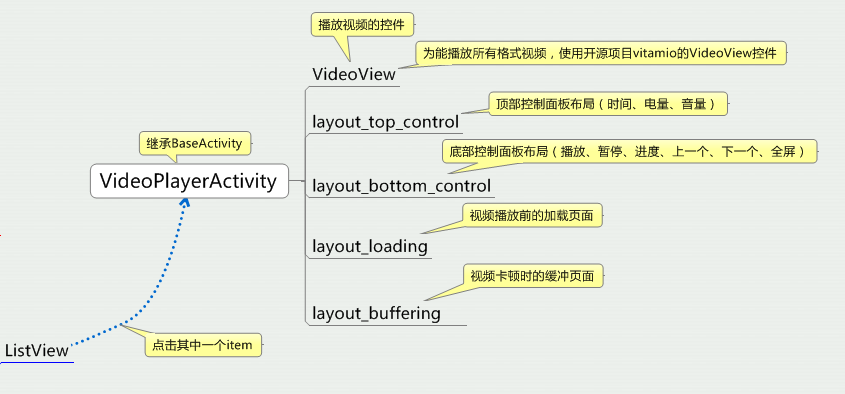
数据是传过来了,别忙处理,先将VideoPlayerActivity的布局分析一下(开头的结构图已经列出该页面的布局了。这里再讲一下具体的布局方法)
- 首先,像这种层叠式布局用RelativeLayout或者FrameLayout都可以,这里用RelativeLayout,它更灵活些。
- 里面首先是个VideoView,宽高都是铺满屏幕,但是系统提供的这个视频控件只能支持部分格式的视频,我们知道视频有很多格式,如果你这个播放器不能支持绝大多数,那肯定没人会用,所以,这里使用一个开源的框架vitamio,支持所有格式视频。
- 其次,上下的布局文件可分别写在不同文件中,最后include进来。
- 为增加用户体验,可在增加一个正在加载的页面和一个播放卡顿时的缓冲页面。
<RelativeLayout xmlns:android="http://schemas.android.com/apk/res/android"
    xmlns:tools="http://schemas.android.com/tools"
    android:layout_width="match_parent"
    android:layout_height="match_parent"
    android:background="@color/black">

    <io.vov.vitamio.widget.VideoView
        android:id="@+id/vv"
        android:layout_width="match_parent"
        android:layout_height="match_parent"
        android:layout_centerHorizontal="true" />

    <include
        android:id="@+id/layout_top_control"
        layout="@layout/layout_top_control" />

    <LinearLayout
        android:layout_width="match_parent"
        android:layout_height="wrap_content"
        android:layout_alignParentBottom="true">

        <include
            android:id="@+id/layout_bottom_control"
            layout="@layout/layout_bottom_control" />
    </LinearLayout>

    <LinearLayout
        android:id="@+id/ll_loading"
        android:layout_width="match_parent"
        android:layout_height="match_parent"
        android:background="@drawable/bg_player_loading_background"
        android:gravity="center"
        android:orientation="horizontal">

        <ProgressBar
            android:layout_width="20dp"
            android:layout_height="20dp" />

        <TextView
            android:layout_width="wrap_content"
            android:layout_height="wrap_content"
            android:layout_marginLeft="8dp"
            android:singleLine="true"
            android:text="正在加载中..."
            android:textColor="@color/white"
            android:textSize="16sp" />
    </LinearLayout>

    <LinearLayout
        android:id="@+id/ll_buffering"
        android:layout_width="match_parent"
        android:layout_height="match_parent"
        android:gravity="center"
        android:visibility="gone">

        <ProgressBar
            android:layout_width="20dp"
            android:layout_height="20dp" />
    </LinearLayout>

</RelativeLayout>
头部控制面板的布局:
<?xml version="1.0" encoding="utf-8"?>
<LinearLayout xmlns:android="http://schemas.android.com/apk/res/android"
    android:layout_width="match_parent"
    android:layout_height="wrap_content"
    android:orientation="vertical">

    <LinearLayout
        android:layout_width="match_parent"
        android:layout_height="wrap_content"
        android:background="@drawable/bg_player_status"
        android:gravity="center_vertical"
        android:orientation="horizontal"
        android:paddingLeft="5dp"
        android:paddingRight="5dp">

        <TextView
            android:id="@+id/tv_name"
            android:layout_width="0dp"
            android:layout_height="wrap_content"
            android:layout_weight="1"
            android:text="视频名称"
            android:textColor="@color/white"
            android:textSize="14sp" />

        <ImageView
            android:id="@+id/iv_battery"
            android:layout_width="wrap_content"
            android:layout_height="wrap_content"
            android:background="@mipmap/ic_battery_0" />

        <TextView
            android:id="@+id/tv_system_time"
            android:layout_width="wrap_content"
            android:layout_height="wrap_content"
            android:layout_marginLeft="5dp"
            android:text="系统时间"
            android:textColor="@color/white"
            android:textSize="14sp" />

    </LinearLayout>

    <LinearLayout
        android:layout_width="match_parent"
        android:layout_height="wrap_content"
        android:background="@drawable/bg_player_top_control"
        android:gravity="center_vertical"
        android:orientation="horizontal">

        <ImageView
            android:id="@+id/iv_voice"
            android:layout_width="wrap_content"
            android:layout_height="wrap_content"
            android:background="@drawable/selector_btn_voice" />

        <SeekBar
            android:id="@+id/sb_volume"
            android:layout_width="match_parent"
            android:layout_height="wrap_content"
            android:layout_marginRight="25dp"
            android:maxHeight="6dp"
            android:minHeight="6dp"
            android:progressDrawable="@drawable/video_progress_drawable"
            android:thumb="@mipmap/progress_thumb" />
    </LinearLayout>

</LinearLayout>
底部控制面板布局:
<?xml version="1.0" encoding="utf-8"?>
<LinearLayout xmlns:android="http://schemas.android.com/apk/res/android"
    android:layout_width="match_parent"
    android:layout_height="wrap_content"
    android:orientation="vertical">

    <LinearLayout
        android:layout_width="match_parent"
        android:layout_height="wrap_content"
        android:background="@drawable/bg_player_bottom_seekbar"
        android:gravity="center_vertical"
        android:orientation="horizontal"
        android:paddingLeft="5dp"
        android:paddingRight="5dp">

        <TextView
            android:id="@+id/tv_current_time"
            android:layout_width="wrap_content"
            android:layout_height="wrap_content"
            android:text="00:00"
            android:textColor="@color/white"
            android:textSize="14sp" />

        <SeekBar
            android:id="@+id/sb_Video"
            android:layout_width="0dp"
            android:layout_height="wrap_content"
            android:layout_marginLeft="5dp"
            android:layout_marginRight="5dp"
            android:layout_weight="1"
            android:maxHeight="6dp"
            android:minHeight="6dp"
            android:progressDrawable="@drawable/video_progress_drawable"
            android:thumb="@mipmap/progress_thumb" />

        <TextView
            android:id="@+id/tv_total_time"
            android:layout_width="wrap_content"
            android:layout_height="wrap_content"
            android:text="总时间"
            android:textColor="@color/white"
            android:textSize="14sp" />
    </LinearLayout>


    <LinearLayout
        android:layout_width="match_parent"
        android:layout_height="wrap_content"
        android:background="@drawable/bg_player_bottom_control"
        android:gravity="center"
        android:orientation="horizontal">

        <RelativeLayout
            android:layout_width="0dp"
            android:layout_height="wrap_content"
            android:layout_weight="1">

            <ImageView
                android:id="@+id/iv_exit"
                android:layout_width="wrap_content"
                android:layout_height="wrap_content"
                android:layout_centerInParent="true"
                android:background="@drawable/selector_btn_exit" />
        </RelativeLayout>

        <RelativeLayout
            android:layout_width="0dp"
            android:layout_height="wrap_content"
            android:layout_weight="1">

            <ImageView
                android:id="@+id/iv_pre"
                android:layout_width="wrap_content"
                android:layout_height="wrap_content"
                android:layout_centerInParent="true"
                android:background="@drawable/selector_btn_pre" />
        </RelativeLayout>

        <RelativeLayout
            android:layout_width="0dp"
            android:layout_height="wrap_content"
            android:layout_weight="1">

            <ImageView
                android:id="@+id/iv_play"
                android:layout_width="wrap_content"
                android:layout_height="wrap_content"
                android:layout_centerInParent="true"
                android:background="@drawable/selector_btn_pause" />
        </RelativeLayout>

        <RelativeLayout
            android:layout_width="0dp"
            android:layout_height="wrap_content"
            android:layout_weight="1">

            <ImageView
                android:id="@+id/iv_next"
                android:layout_width="wrap_content"
                android:layout_height="wrap_content"
                android:layout_centerInParent="true"
                android:background="@drawable/selector_btn_next" />

        </RelativeLayout>

        <RelativeLayout
            android:layout_width="0dp"
            android:layout_height="wrap_content"
            android:layout_weight="1">

            <ImageView
                android:id="@+id/iv_screen"
                android:layout_width="wrap_content"
                android:layout_height="wrap_content"
                android:layout_centerInParent="true"
                android:background="@drawable/selector_btn_fullscreen" />
        </RelativeLayout>
    </LinearLayout>

</LinearLayout>
至此,视频播放器页面自定义的布局就弄好了。
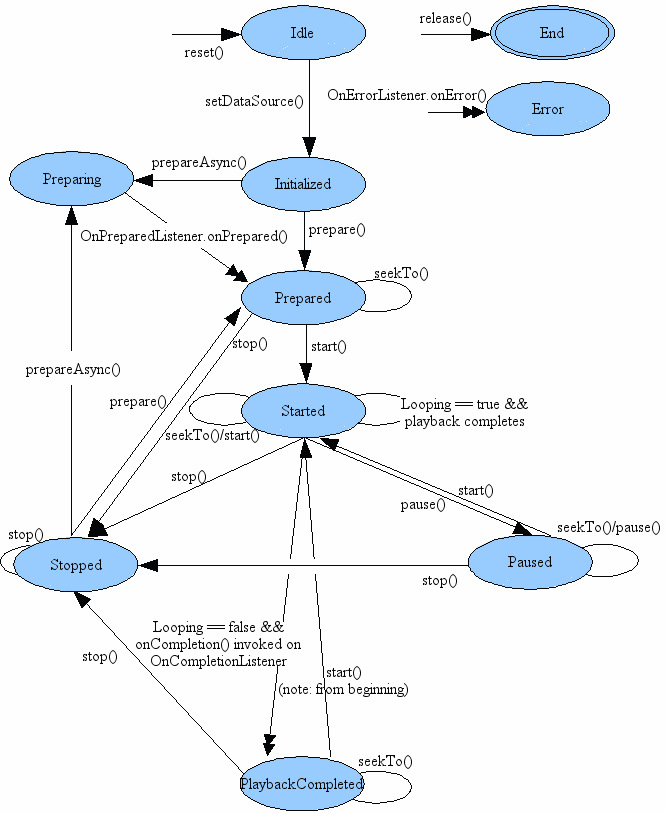
至于播放页面逻辑,有很多很多,准备在下一篇博文中在去整理。先放一张MediaPlayer的类图:了解一下音视频在播放前中后各个方法的调用。
补充
引入库工程
android studio在导入外部库工程的时候,网上有很多方法,我是这样做的:就以vitamio为例,将下载好的压缩解压,找到vitamio文件夹,然后整体复制到android studio的工作区间中,clean一下project,这个资源库会报错,应该是编译版本的问题,打开vitamio的build.gradle,修改里面的编译的sdk版本,就可以了,附张图吧
引用.9图片
在上面很长很长的布局文件中,如果仔细看的话,会发现在引用资源图片时,有的是@mipmap,有的是@drawable,是这样的:在android studio下引用的 .9 图片放在mipmap文件夹下面不能被引用,我的做法是,新建了一个drawable-xhdpi文件夹,将.9图片放进去,就能正常引用了。自定义SeekBar样式:

        <SeekBar
            android:id="@+id/sb_volume"
            android:layout_width="match_parent"
            android:layout_height="wrap_content"
            android:layout_marginRight="25dp"
            android:maxHeight="6dp"
            android:minHeight="6dp"
            android:progressDrawable="@drawable/video_progress_drawable"
            android:thumb="@mipmap/progress_thumb" />
thumb就是进度条上的那个小圆点的图片
video_progress_drawable代码如下:
<?xml version="1.0" encoding="utf-8"?>
<layer-list xmlns:android="http://schemas.android.com/apk/res/android">
    <!--SeekBar的背景-->
    <item
        android:id="@android:id/background"
        android:drawable="@drawable/progress_background">
    </item>
    <!--SeekBar第二级进度的样式-->
    <item android:id="@android:id/secondaryProgress">
        <clip>
            <shape>
                <corners android:radius="5dip" />
                <solid android:color="#666" />
            </shape>
        </clip>
    </item>
    <!--SeekBar进度的样式-->
    <item
        android:id="@android:id/progress"
        android:drawable="@mipmap/video_progress">
    </item>

</layer-list>


 2937
2937

 被折叠的 条评论
为什么被折叠?
被折叠的 条评论
为什么被折叠?
 到【灌水乐园】发言


