


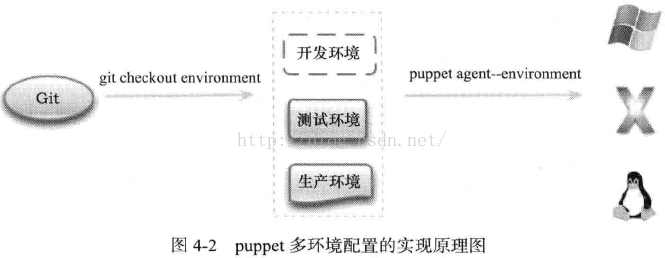
一、Puppet运行环境
在运维工作中需要同时处理开发、测试和生产等多套运行环境时,可以使用Puppet的环境配置选项{environment},并结合指定自定义的变量配置。
- 修改puppet.conf增加环境的配置
Puppet默认是以生产环境运行的(即main),可以按需进行重新定义一种或几种运行环境。
在配置环境变量时,还可以自定义site.pp的位置、模块目录能主文件目录,以区分几种运行环境。
例如:
$vim /etc/puppet/puppet.conf
[master]
environment = testing,production
[testing]
manifest = /etc/puppet/manifests/testing/site.pp
modulepath = /etc/puppet/modules/testing
fileserverconfig = /etc/puppet/fileserver.conf.testing

[production]
manifest = /etc/puppet/manifests/production/site.pp
modulepath = /etc/puppet/modules/production
fileserverconfig = /etc/puppet/fileserver.conf.production
重启Puppet以使配置生效:
service puppetmaster restart
- 客户端的运行环境配置
方法一:修改配置文件puppet.conf,增加选项
[agent]
environment = testing
方法二:使用命令行参数
$puppet agent --test --noop --environment testing
二、使用git配合Puppet实现多环境的配置操作
1、安装git
安装git,创建项目目录puppet.git。
采用daemon方式启动git。
在/tmp下创建git管理目录puppet。
采用git管理/etc/puppet目录。
#yum -y install git git-daemon
创建puppet repo目录:
#mkdir -p /tmp/puppet_repo/puppet.git
创建git仓库:
#cd /tmp/puppet_repo/puppet.git
#
git --bare init
设置目录访问权限:
# chown -R daemon.daemon /tmp/puppet_repo/
采用git daemon的方式启动服务:
# git daemon --base-path=/tmp/puppet_repo/ --detach --user=daemon --listen=127.0.0.1 --group=daemon --export-all --enable=receive-pack --enable=upload-pack --enable=upload-archive
2、将/etc/puppet划归git管理
首先在/tmp中创建puppet的临时仓库:
#cd /tmp
#
git clone git://127.0.0.1/puppet.git puppet
将puppet配置文件复制到临时仓库:
[root@puppet tmp]# cp -r /etc/puppet/* /tmp/puppet
将puppet添加到仓库:
[root@puppet tmp]# cd /tmp/puppet
[root@puppet puppet]#
git add -A
配置commit添加:
[root@puppet puppet]# git commit -m "Add Puppet to Git."
[master (root-commit) 64f23a3] Add Puppet to Git.
Committer: root <root@puppet.jrtoo.com>
 9 files changed, 219 insertions(+), 0 deletions(-)
create mode 100644 auth.conf
create mode 100644 environments/example_env/README.environment
create mode 100644 fileserver.conf
create mode 100644 manifests/nodes/compute5.jrtoo.com.pp
create mode 100644 manifests/site.pp
create mode 100644 modules/httpd/manifests/init.pp
create mode 100644 modules/test/manifests/init.pp
create mode 100644 modules/test/templates/test.erb
create mode 100644 puppet.conf
提交至版本库主分支:
[root@puppet puppet]# git push origin master
Counting objects: 21, done.
Delta compression using up to 4 threads.
Compressing objects: 100% (13/13), done.
Writing objects: 100% (21/21), 4.30 KiB, done.
Total 21 (delta 0), reused 0 (delta 0)
To git://127.0.0.1/puppet.git
* [new branch]      master -> master
删除Master节点的/etc/puppet目录,并使用git克隆下来:
[root@puppet puppet]# rm -rf /etc/puppet
[root@puppet puppet]# cd /etc
[root@puppet etc]# git clone git://127.0.0.1/puppet.git
Initialized empty Git repository in /etc/puppet/.git/
remote: Counting objects: 21, done.
remote: Compressing objects: 100% (13/13), done.
remote: Total 21 (delta 0), reused 0 (delta 0)
Receiving objects: 100% (21/21), 4.30 KiB, done.
[root@puppet etc]# ls puppet/
auth.conf  environments  fileserver.conf  manifests  modules  puppet.conf
git branch 查看当前分支
创建并切换至testing分支:
git checkout -b testing
修改httpd类并增加File资源:
vim /etc/puppet/modules/httpd/manifests/init.pp
file { "/tmp/puppettesting.txt" : content => "Hello,Puppet environments testing."; }
自动检查应该commit什么文件:
git commit -a 'hello,testing puppet enviironments.'
提交到origin这个远端树的testing分支:
git push origin testing
使用puppet客户端验证以上配置是否有效:
puppet agent --test --noop --environment testing --server puppet.jrtoo.com
注:在使用puppet3.8.4进行以上测试时,发现puppet.conf文件中创建自定义的运行环境参数的做法已经被废弃,不建议使用。但是上文中涉及到的使用git创建版本库管理puppet配置的方法是完全正确且可用的。
Reference from 《Puppet in action》


 272
272


 被折叠的 条评论
为什么被折叠?
被折叠的 条评论
为什么被折叠?
 到【灌水乐园】发言


