


IOS 入门开发之创建第一个应用程序
具体创建项目的方法与开发语言相关知识请阅读我之前的文章【Objective-C 语法锦集】 本系列文章将着重讨论iPhone与iPad 应用程序入门的开发。
创建一个iPhone项目
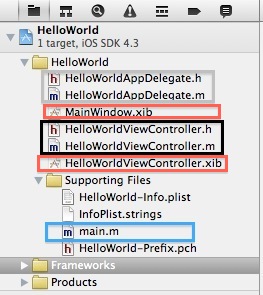
名称为HelloWorld,如图所示彩色矩形标示的为一些项目中比较重要的组成部分。
HelloWorldAppDelegate:监听应用程序的周期,比如程序的启动,程序内存的警告,程序挂起后在恢复等等。
HelloWorldViewController: 控制应用程序的显示,跟视图有关的东西都在这里。
MainWindows.xib与HelloWorldViewController.xib: 可视化界面的布局,方便界面的设计,一会儿介绍它的使用方法。
main:最重要的一个类,iPhone程序的入口类。
接下来介绍这几各类重要的一些方法。
打开main.m这个入口类
UIApplicationMain函数:这个函数是iPhone应用开发的入口,在这里实例化应用程序,通知HelloWorldAppDelegate启动应用程序。
#import <UIKit/UIKit.h>

int main(int argc, char *argv[])
{
    NSAutoreleasePool *pool = [[NSAutoreleasePool alloc] init];
    int retVal = UIApplicationMain(argc, argv, nil, nil);
    [pool release];
    return retVal;
}
HelloWorldAppDelegate.m
应用程序启动后进入这个方法,在这里创建程序的窗口,启动结束以后HelloWorldAppDelegate就不会在发挥作用 ,除非程序出现特殊情况,比如内存警告,程序的挂起与恢复 等等 正常情况下 程序会启动视图控制器,通知HelloWorldViewController去显示这个应用程序。
- (BOOL)application:(UIApplication *)application didFinishLaunchingWithOptions:(NSDictionary *)launchOptions
{
    // Override point for customization after application launch.

    self.window.rootViewController = self.viewController;
    [self.window makeKeyAndVisible];
    return YES;
}
HelloWorldViewController.m
程序界面显示之前调用,用于初始化显示内容。
// Implement viewDidLoad to do additional setup after loading the view, typically from a nib.
- (void)viewDidLoad
{
    [super viewDidLoad];
}
下面构建第一个HelloWorld项目
首先打开 HelloWorldViewController.xib显示控制器,这时候IDE出现一个可视化编辑视图。
视图控件栏中存在很多控件 可以拖放使用,举个例子拖动右侧Lable控件至可视化编辑视图中,可放置任意位置,编辑Lable控件显示内容。

在编辑框中写入HelloWorld后保存,一行代码都不用添加直接运行程序。HelloWorld映入眼帘,简单吧 哇咔咔。

下面用代码来添加Lable控件
HelloWorldViewController.m
- (void)viewDidLoad
{
    [super viewDidLoad];

    //创建label视图
    UILabel *label = [[UILabel alloc] initWithFrame:CGRectMake(0, 100, 200, 30)];
    //设置显示内容
    label.text = @"雨松MOMO的程序世界";
    //设置背景颜色
    label.backgroundColor = [UIColor blueColor];
    //设置文字颜色
    label.textColor = [UIColor whiteColor];
    //设置显示位置居中
    label.textAlignment = UITextAlignmentCenter;
    //设置字体大小
    label.font = [UIFont fontWithName:[[UIFont familyNames] objectAtIndex:10] size:20];
    //将label添加到显示视图中
    [self.view addSubview:label];

    //释放对象
    [label release];
}
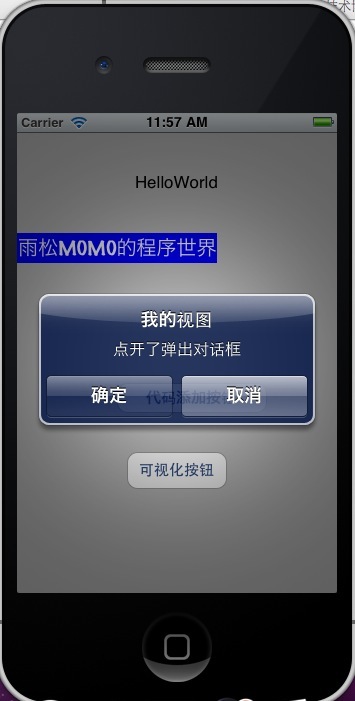
运行程序 如图所示 使用视图添加的文本内容 与使用代码添加的文本内容都出现在了屏幕当中。

使用可视化布局添加一个按钮
    #import <UIKit/UIKit.h>

    @interface HelloWorldViewController : UIViewController
    {
        //定义了一个按钮buttonA
        IBOutlet UIButton *buttonA;
        //定义了一个按钮buttonB
        UIButton *buttonB;

    }
    //声明A按钮被按下的一个方法(IBAction) 相当于(void)
    -(IBAction)bttonPressed:(id)obj;


    -(void)showDialog;
    @end
在右侧栏中点中 鼠标 New Referencing Outlet 拉出一条线到左侧箭头指示方块上松开鼠标 这是会显示上面定义的IBOutlet UIButton ,选中这个buttonA 标示这个拖动的button控件和buttonA 绑定在了一起,然后鼠标点击右侧Touch up inside 同样拉出一条线到左侧箭头指示方块上松开鼠标 这时候会显示上面定义的方法buttonPressed 选中后 则标示 这个按钮点击后程序执行buttonPressed方法。

将按钮的事件绑定后在代码中去实现这个方法,点击后调用showDialog 方法弹出一个dialog框。
    - (void)bttonPressed:(id)obj
    {
        [self showDialog];

    }

    -(void)showDialog
    {

        //这里说一下nil  这个东西就好比java 语言中的 null
        UIAlertView * alertA= [[UIAlertView alloc] initWithTitle:@"我的视图" message:@"点开了弹出对话框" delegate:self cancelButtonTitle:@"确定" otherButtonTitles: nil];
        //objectiveC开发中调用方法是用"[]" 例如: [alertA addButtonWithTitle:@"取消"];
        //如果是为方法赋值则类似java 对象.成员 例如 :textFieldA.text
        //添加了一个取消按钮
        [alertA addButtonWithTitle:@"取消"];
        //将这个UIAlerView 显示出来
        [alertA show];
        //objective-C 不像java 有自己的垃圾回收机制 所以我们在编写程序中一定要注意释放内存 从一开始就养成良好习惯
        [alertA release];
} 
同样的道理,使用可视化编辑器可以添加一个按钮响应,同样在代码中也可以添加这个响应。addTarget方法中设置按钮点击后响应的方法为showDialg方法。和上面一样弹出一个dialog框。
- (void)viewDidLoad
{
    [super viewDidLoad];


    //创建按钮
    buttonB = [UIButton buttonWithType:1];
    //设置按钮范围
    buttonB.frame = CGRectMake(100, 250, 150, 30);
    //设置按钮显示内容
    [buttonB setTitle:@"代码添加按钮" forState:UIControlStateNormal];
    //设置按钮改变后 绑定响应方法
    [buttonB addTarget:self action:@selector(showDialog) forControlEvents:UIControlEventTouchUpInside];

    //将label添加到显示视图中
    [self.view addSubview:buttonB];

} 
这个方法为view视图在销毁的时候调用,所以在这里释放按钮对象。
完整代码
    - (void)viewDidUnload
    {
        [super viewDidUnload];
        // Release any retained subviews of the main view.
        // e.g. self.myOutlet = nil;

        //在这里将按钮对象释放掉
        [buttonA release];
        [buttonB release];

    }
完整代码
//
//  HelloWorldViewController.m
//  HelloWorld
//
//  Created by  雨松MOMO on 11-9-30.
//  Copyright 2011年 __MyCompanyName__. All rights reserved.
//

#import "HelloWorldViewController.h"

@implementation HelloWorldViewController

- (void)didReceiveMemoryWarning
{
    // Releases the view if it doesn't have a superview.
    [super didReceiveMemoryWarning];

    // Release any cached data, images, etc that aren't in use.
}

#pragma mark - View lifecycle


// Implement viewDidLoad to do additional setup after loading the view, typically from a nib.
- (void)viewDidLoad
{
    [super viewDidLoad];

    //创建label视图
    UILabel *label = [[UILabel alloc] initWithFrame:CGRectMake(0, 100, 200, 30)];
    //设置显示内容
    label.text = @"雨松MOMO的程序世界";
    //设置背景颜色
    label.backgroundColor = [UIColor blueColor];
    //设置文字颜色
    label.textColor = [UIColor whiteColor];
    //设置显示位置居中
    label.textAlignment = UITextAlignmentCenter;
    //设置字体大小
    label.font = [UIFont fontWithName:[[UIFont familyNames] objectAtIndex:10] size:20];
    //将label添加到显示视图中
    [self.view addSubview:label];

    //释放对象
    [label release];

    //创建按钮
    buttonB = [UIButton buttonWithType:1];
    //设置按钮范围
    buttonB.frame = CGRectMake(100, 250, 150, 30);
    //设置按钮显示内容
    [buttonB setTitle:@"代码添加按钮" forState:UIControlStateNormal];
    //设置按钮改变后 绑定响应方法
    [buttonB addTarget:self action:@selector(showDialog) forControlEvents:UIControlEventTouchUpInside];

    //将label添加到显示视图中
    [self.view addSubview:buttonB];

}


- (void)viewDidUnload
{
    [super viewDidUnload];
    // Release any retained subviews of the main view.
    // e.g. self.myOutlet = nil;

    //在这里将按钮对象释放掉
    [buttonA release];
    [buttonB release];

}

- (BOOL)shouldAutorotateToInterfaceOrientation:(UIInterfaceOrientation)interfaceOrientation
{
    // Return YES for supported orientations
    return (interfaceOrientation == UIInterfaceOrientationPortrait);
}


- (void)bttonPressed:(id)obj
{
    [self showDialog];

}

-(void)showDialog
{

    //这里说一下nil  这个东西就好比java 语言中的 null
    UIAlertView * alertA= [[UIAlertView alloc] initWithTitle:@"我的视图" message:@"点开了弹出对话框" delegate:self cancelButtonTitle:@"确定" otherButtonTitles: nil];
    //objectiveC开发中调用方法是用"[]" 例如: [alertA addButtonWithTitle:@"取消"];
    //如果是为方法赋值则类似java 对象.成员 例如 :textFieldA.text
    //添加了一个取消按钮
    [alertA addButtonWithTitle:@"取消"];
    //将这个UIAlerView 显示出来
    [alertA show];
    //objective-C 不像java 有自己的垃圾回收机制 所以我们在编写程序中一定要注意释放内存 从一开始就养成良好习惯
    [alertA release];
}

@end
最后如果你还是觉得我写的不够详细 看的不够爽 不要紧我把源代码的下载地址贴出来 欢迎大家一起讨论学习雨松MOMO希望可以和大家一起进步。


 673
673


 被折叠的 条评论
为什么被折叠?
被折叠的 条评论
为什么被折叠?
 到【灌水乐园】发言


