


PendingIntent,顾名思义,延迟的Intent。那么肯定会产生一个疑问,那就是PendingIntent究竟和Intent的区别在哪里呢?
其实PendingIntent其实就是对Intent的一个封装,不过Intent是立即触发效果,就像我们常用的这样:
        Intent intent = new Intent(MainActivity.this,DemoActivity1.class);
        startActivity(intent);
而PendingIntent触发的时间点不太一样,一般是触发效果的地点不在函数中,而是在其他方法处被调用,所以看起来就像被延迟了一样。
PendingIntent的声明
我们可以知道PendingIntent可以支持三种意图:启动Activity,启动Service,启动Broadcast。我们取出其中一个场景来讨论,其他两个场景是类似的。
上一章中,有如下这段:
PendingIntent pendingIntent = PendingIntent.getActivity(this,
                    0, intent, PendingIntent.FLAG_UPDATE_CURRENT);
这一段就是PendingIntent的声明,调用PendingIntent中的getActivity()的方法返回实例。
下面是getActivity的源码:
    public static PendingIntent getActivity(Context context, int requestCode,
            Intent intent, @Flags int flags) {
        return getActivity(context, requestCode, intent, flags, null);
    }
这里又调用了:
public static PendingIntent getActivity(Context context, int requestCode,
            @NonNull Intent intent, @Flags int flags, @Nullable Bundle options) {
        String packageName = context.getPackageName();
        String resolvedType = intent != null ? intent.resolveTypeIfNeeded(
                context.getContentResolver()) : null;
        try {
            intent.migrateExtraStreamToClipData();
            intent.prepareToLeaveProcess();
            IIntentSender target =
                ActivityManagerNative.getDefault().getIntentSender(
                    ActivityManager.INTENT_SENDER_ACTIVITY, packageName,
                    null, null, requestCode, new Intent[] { intent },
                    resolvedType != null ? new String[] { resolvedType } : null,
                    flags, options, UserHandle.myUserId());
            return target != null ? new PendingIntent(target) : null;
        } catch (RemoteException e) {
        }
        return null;
    }
其中核心代码:
IIntentSender target =
                ActivityManagerNative.getDefault().getIntentSender(
                    ActivityManager.INTENT_SENDER_ACTIVITY, packageName,
                    null, null, requestCode, new Intent[] { intent },
                    resolvedType != null ? new String[] { resolvedType } : null,
                    flags, options, UserHandle.myUserId());
            return target != null ? new PendingIntent(target) : null;
而这里ActivityManagerNative.getDefault()是指的是AMS(ActivityManagerService)这个类,这个类可以说是贯穿了Android整个应用层的结构。它在Android系统中,四大组件的行为和它密切相关。
而AMS是属于原进程之外,那么我们就必须完成进程间通讯的动作。而同时Activity是继承了Binder实现了IActivityManager的接口。之前的讲述Binder的时候也说过了,在Android的进程间通讯,Binder起到了至关重要的作用。
于此同时,也要说明一下IIntentSender这个类其实是继承了IInterface抽象类的接口。
public interface IIntentSender extends android.os.IInterface
AMS中PendingIntent的工作
我们下去AMS的getIntentSender()看看这个函数的究竟。
  @Override
    public IIntentSender getIntentSender(int type,
            String packageName, IBinder token, String resultWho,
            int requestCode, Intent[] intents, String[] resolvedTypes,
            int flags, Bundle options, int userId) {

....//获取Intent对象,存入数组并且对非法的intent做出处理

        synchronized(this) {
            int callingUid = Binder.getCallingUid();
            int origUserId = userId;
            userId = handleIncomingUser(Binder.getCallingPid(), callingUid, userId,
                    type == ActivityManager.INTENT_SENDER_BROADCAST,
                    ALLOW_NON_FULL, "getIntentSender", null);
            if (origUserId == UserHandle.USER_CURRENT) {
                // We don't want to evaluate this until the pending intent is
                // actually executed.  However, we do want to always do the
                // security checking for it above.
                userId = UserHandle.USER_CURRENT;
            }
            try {
                if (callingUid != 0 && callingUid != Process.SYSTEM_UID) {
                    int uid = AppGlobals.getPackageManager()
                            .getPackageUid(packageName, UserHandle.getUserId(callingUid));
                    if (!UserHandle.isSameApp(callingUid, uid)) {
                        String msg = "Permission Denial: getIntentSender() from pid="
                            + Binder.getCallingPid()
                            + ", uid=" + Binder.getCallingUid()
                            + ", (need uid=" + uid + ")"
                            + " is not allowed to send as package " + packageName;
                        Slog.w(TAG, msg);
                        throw new SecurityException(msg);
                    }
                }

                return getIntentSenderLocked(type, packageName, callingUid, userId,
                        token, resultWho, requestCode, intents, resolvedTypes, flags, options);

            } catch (RemoteException e) {
                throw new SecurityException(e);
            }
        }
    }
我们主要看这一段线程同步的代码,最后你会发现获取完uid之类的信息之后就会回调函数getIntentSenderLocked(type, packageName, callingUid, userId,
token, resultWho, requestCode, intents, resolvedTypes, flags, options);这个才是真正处理问题的函数。
IIntentSender getIntentSenderLocked(int type, String packageName,
            int callingUid, int userId, IBinder token, String resultWho,
            int requestCode, Intent[] intents, String[] resolvedTypes, int flags,
            Bundle options) {
        if (DEBUG_MU)
            Slog.v(TAG_MU, "getIntentSenderLocked(): uid=" + callingUid);
        ActivityRecord activity = null;
        if (type == ActivityManager.INTENT_SENDER_ACTIVITY_RESULT) {
            activity = ActivityRecord.isInStackLocked(token);
            if (activity == null) {
                return null;
            }
            if (activity.finishing) {
                return null;
            }
        }

        final boolean noCreate = (flags&PendingIntent.FLAG_NO_CREATE) != 0;
        final boolean cancelCurrent = (flags&PendingIntent.FLAG_CANCEL_CURRENT) != 0;
        final boolean updateCurrent = (flags&PendingIntent.FLAG_UPDATE_CURRENT) != 0;
        flags &= ~(PendingIntent.FLAG_NO_CREATE|PendingIntent.FLAG_CANCEL_CURRENT
                |PendingIntent.FLAG_UPDATE_CURRENT);

        PendingIntentRecord.Key key = new PendingIntentRecord.Key(
                type, packageName, activity, resultWho,
                requestCode, intents, resolvedTypes, flags, options, userId);
        WeakReference<PendingIntentRecord> ref;
        ref = mIntentSenderRecords.get(key);
        PendingIntentRecord rec = ref != null ? ref.get() : null;
        if (rec != null) {
            if (!cancelCurrent) {
                if (updateCurrent) {
                    if (rec.key.requestIntent != null) {
                        rec.key.requestIntent.replaceExtras(intents != null ?
                                intents[intents.length - 1] : null);
                    }
                    if (intents != null) {
                        intents[intents.length-1] = rec.key.requestIntent;
                        rec.key.allIntents = intents;
                        rec.key.allResolvedTypes = resolvedTypes;
                    } else {
                        rec.key.allIntents = null;
                        rec.key.allResolvedTypes = null;
                    }
                }
                return rec;
            }
            rec.canceled = true;
            mIntentSenderRecords.remove(key);
        }
        if (noCreate) {
            return rec;
        }
        rec = new PendingIntentRecord(this, key, callingUid);
        mIntentSenderRecords.put(key, rec.ref);
        if (type == ActivityManager.INTENT_SENDER_ACTIVITY_RESULT) {
            if (activity.pendingResults == null) {
                activity.pendingResults
                        = new HashSet<WeakReference<PendingIntentRecord>>();
            }
            activity.pendingResults.add(rec.ref);
        }
        return rec;
    }
这一段做的工作有一下几点:
1.假若flags是type == ActivityManager.INTENT_SENDER_ACTIVITY_RESULT。则说明是从Activity应答的PendingIntent,我们不做讨论。
2.假如PendingIntentRecord不为空,根据PendingIntent的标志位,Intent数组的做出调整来达到PendingIntent的效果。
这里先说一下PendingIntent,有四个标志位:
1)FLAG_ONE_SHOT :当前描述的PendingIntent只能被使用一次,然后它就会调用cancel删除。如果还有后续相同的PendingIntent,那么他们的send方法将会调用失败。
对于通知栏而言,采用此标志位,同类通知只能使用一次,后续点击通知会无效。
2)FLAG_NO_CREATE:当前描述的PendingIntent不会主动创建,如果当前PendingIntent之前不存在,则所有的getActivity,getService,getBroadcast返回null,获取PendingIntent失败。这个很少用,暂时不讨论。
3)FLAG_CANCEL_CURRENT:当前描述的PendingIntent已经存在了,那么他们会被cancel,然后系统创建一个新的PendingIntent。对于通知栏而言,被cancel后的消息单击无效。
4)FLAG_UPDATE_CURRENT:如果当前的PendingIntent已经存在,则它们都会被更新,即里面的PendingIntent都换为最新。
3.假如PendingIntentRecord为空则创建一个新的PendingIntentRecord。并且存入Activity中PendingIntentRecord的HashSet中。最后返回PendingIntentRecord。
这个时候,我们发现返回了PendingIntentRecord,说明这个类正是实现了IIntentSender。让我们看看这个类是怎么回事吧。
final class PendingIntentRecord extends IIntentSender.Stub看到了吧,这个类正是实现了IIntentSender.Stub的类。
final class PendingIntentRecord extends IIntentSender.Stub
是不是觉得和眼熟呢?没错就是我们之前分析的AIDL,在这个过程AMS相当于中转器,就像设计模式中的中介者一样。将函数转移到远程端的实现。这种思想在探索四大组件的时候经常会用到。
PendingIntentRecord中工作
在这个类中完成的事情只有一件,那就是将数据存储进来。
PendingIntentRecord(ActivityManagerService _owner, Key _k, int _u) {
        owner = _owner;
        key = _k;
        uid = _u;
        ref = new WeakReference<PendingIntentRecord>(this);
    }

//内部类key的定义
     Key(int _t, String _p, ActivityRecord _a, String _w,
                int _r, Intent[] _i, String[] _it, int _f, Bundle _o, int _userId) {
            type = _t;
            packageName = _p;
            activity = _a;
            who = _w;
            requestCode = _r;
            requestIntent = _i != null ? _i[_i.length-1] : null;
            requestResolvedType = _it != null ? _it[_it.length-1] : null;
            allIntents = _i;
            allResolvedTypes = _it;
            flags = _f;
            options = _o;
            userId = _userId;

            int hash = 23;
            hash = (ODD_PRIME_NUMBER*hash) + _f;
            hash = (ODD_PRIME_NUMBER*hash) + _r;
            hash = (ODD_PRIME_NUMBER*hash) + _userId;
            if (_w != null) {
                hash = (ODD_PRIME_NUMBER*hash) + _w.hashCode();
            }
            if (_a != null) {
                hash = (ODD_PRIME_NUMBER*hash) + _a.hashCode();
            }
            if (requestIntent != null) {
                hash = (ODD_PRIME_NUMBER*hash) + requestIntent.filterHashCode();
            }
            if (requestResolvedType != null) {
                hash = (ODD_PRIME_NUMBER*hash) + requestResolvedType.hashCode();
            }
            hash = (ODD_PRIME_NUMBER*hash) + _p.hashCode();
            hash = (ODD_PRIME_NUMBER*hash) + _t;
            hashCode = hash;
            //Slog.i(ActivityManagerService.TAG, this + " hashCode=0x"
            //        + Integer.toHexString(hashCode));
        }
在这一段代码中,很好的解释了为什么我们在声明PendingIntent的时候,请求码一般为0,在上面hashcode的数值和请求码requestCode进行相加的运算获得新的请求码。假如请求码变动了,hashcode也变动了,那么在AMS中建立的HashSet的检索策略不同了就会造成寻找到的Intent不同,对错误的Intent处理了错误标志位。
到这里,PendingIntent已经存储,完毕正在等待用户的调度。
NotificationManager的调用
我们这里分析Notification中PendingIntent的情况,其实在AppWidget中调用PendingIntent的情景也是十分类似。
我们在制作通知的时候,最后会声明一个NotificationManager的notify去唤醒PendingIntent并且执行。
让我们去NotificationManager中看看,notify方法吧。
我们可以知道, public void notify(int id, Notification notification)又会调用 public void notify(String tag, int id, Notification notification)
 public void notify(String tag, int id, Notification notification)
    {
        int[] idOut = new int[1];
        INotificationManager service = getService();
        String pkg = mContext.getPackageName();
        if (notification.sound != null) {
            notification.sound = notification.sound.getCanonicalUri();
            if (StrictMode.vmFileUriExposureEnabled()) {
                notification.sound.checkFileUriExposed("Notification.sound");
            }
        }
        if (localLOGV) Log.v(TAG, pkg + ": notify(" + id + ", " + notification + ")");
        Notification stripped = notification.clone();
        Builder.stripForDelivery(stripped);
        try {
            service.enqueueNotificationWithTag(pkg, mContext.getOpPackageName(), tag, id,
                    stripped, idOut, UserHandle.myUserId());
            if (id != idOut[0]) {
                Log.w(TAG, "notify: id corrupted: sent " + id + ", got back " + idOut[0]);
            }
        } catch (RemoteException e) {
        }
    }
在这一段中,我们只用注意这个函数service.enqueueNotificationWithTag(pkg, mContext.getOpPack-ageName(), tag, id,stripped, idOut, UserHandle.myUserId());
这个函数也是进程间的通讯,透过INotificationManager这个AIDL实现的类,远程调用NotificationManagerService中方法。这个过程也是AIDL实现的Binder弯完成的。
NotificationManagerService中的工作流程
在这里,声明了一个IBinder来实现Stub:
private final IBinder mService = new INotificationManager.Stub() 而函数enqueueNotificationWithTag又会调用:
void enqueueNotificationInternal(final String pkg, final String opPkg, final int callingUid,
            final int callingPid, final String tag, final int id, final Notification notification,
            int[] idOut, int incomingUserId) {
            ...
            //从NotificationList中获取通知存入NotificationRecord,以及对Notification中
            //的一些非法额度参数进行异常处理
            mHandler.post(new Runnable() {
            @Override
            public void run() {

                synchronized (mNotificationList) {

                    // === Scoring ===

                    // 0. Sanitize inputs
                    notification.priority = clamp(notification.priority, Notification.PRIORITY_MIN,
                            Notification.PRIORITY_MAX);
                    // Migrate notification flags to scores
                    if (0 != (notification.flags & Notification.FLAG_HIGH_PRIORITY)) {
                        if (notification.priority < Notification.PRIORITY_MAX) {
                            notification.priority = Notification.PRIORITY_MAX;
                        }
                    } else if (SCORE_ONGOING_HIGHER &&
                            0 != (notification.flags & Notification.FLAG_ONGOING_EVENT)) {
                        if (notification.priority < Notification.PRIORITY_HIGH) {
                            notification.priority = Notification.PRIORITY_HIGH;
                        }
                    }

                    // 1. initial score: buckets of 10, around the app [-20..20]
                    final int score = notification.priority * NOTIFICATION_PRIORITY_MULTIPLIER;

                    // 2. extract ranking signals from the notification data
                    final StatusBarNotification n = new StatusBarNotification(
                            pkg, opPkg, id, tag, callingUid, callingPid, score, notification,
                            user);
                    NotificationRecord r = new NotificationRecord(n, score);
                    NotificationRecord old = mNotificationsByKey.get(n.getKey());
                    if (old != null) {
                        // Retain ranking information from previous record
                        r.copyRankingInformation(old);
                    }
                    mRankingHelper.extractSignals(r);

                    // 3. Apply local rules

                    // blocked apps
                    if (ENABLE_BLOCKED_NOTIFICATIONS && !noteNotificationOp(pkg, callingUid)) {
                        if (!isSystemNotification) {
                            r.score = JUNK_SCORE;
                            Slog.e(TAG, "Suppressing notification from package " + pkg
                                    + " by user request.");
                        }
                    }

                    if (r.score < SCORE_DISPLAY_THRESHOLD) {
                        // Notification will be blocked because the score is too low.
                        return;
                    }

                    // Clear out group children of the old notification if the update causes the
                    // group summary to go away. This happens when the old notification was a
                    // summary and the new one isn't, or when the old notification was a summary
                    // and its group key changed.
                    if (old != null && old.getNotification().isGroupSummary() &&
                            (!notification.isGroupSummary() ||
                                    !old.getGroupKey().equals(r.getGroupKey()))) {
                        cancelGroupChildrenLocked(old, callingUid, callingPid, null);
                    }

                    int index = indexOfNotificationLocked(n.getKey());
                    if (index < 0) {
                        mNotificationList.add(r);
                        mUsageStats.registerPostedByApp(r);
                    } else {
                        old = mNotificationList.get(index);
                        mNotificationList.set(index, r);
                        mUsageStats.registerUpdatedByApp(r, old);
                        // Make sure we don't lose the foreground service state.
                        notification.flags |=
                                old.getNotification().flags & Notification.FLAG_FOREGROUND_SERVICE;
                        r.isUpdate = true;
                    }

                    mNotificationsByKey.put(n.getKey(), r);

                    // Ensure if this is a foreground service that the proper additional
                    // flags are set.
                    if ((notification.flags & Notification.FLAG_FOREGROUND_SERVICE) != 0) {
                        notification.flags |= Notification.FLAG_ONGOING_EVENT
                                | Notification.FLAG_NO_CLEAR;
                    }

                    applyZenModeLocked(r);
                    mRankingHelper.sort(mNotificationList);

                    if (notification.icon != 0) {
                        StatusBarNotification oldSbn = (old != null) ? old.sbn : null;
                        mListeners.notifyPostedLocked(n, oldSbn);
                    } else {
                        Slog.e(TAG, "Not posting notification with icon==0: " + notification);
                        if (old != null && !old.isCanceled) {
                            mListeners.notifyRemovedLocked(n);
                        }
                        // ATTENTION: in a future release we will bail out here
                        // so that we do not play sounds, show lights, etc. for invalid
                        // notifications
                        Slog.e(TAG, "WARNING: In a future release this will crash the app: "
                                + n.getPackageName());
                    }

                    buzzBeepBlinkLocked(r);
                }
            }
        });

        idOut[0] = id;
我们主要看Handler.post方法中的Runnable方法。
这么最主要的工作就是这个函数:
if (old != null && old.getNotification().isGroupSummary() &&
                            (!notification.isGroupSummary() ||
                                    !old.getGroupKey().equals(r.getGroupKey()))) {
                        cancelGroupChildrenLocked(old, callingUid, callingPid, null);
                    }
这一段的意思就是清掉前一个通知,如果更新而导致数组的大小出现了变化的话。这个发生在过去的通知是个所有的通知的集合,或者当过去的通知是一个集合但是他的key发生了改变。
而函数cancelGroupChildrenLocked中做了一个动作那就是去除尾部的通知同时执行尾部的通知,接下来又调用了cancelNotificationLocked(childR, false, REASON_GROUP_SUMMARY_CANCELED);
 private void cancelNotificationLocked(NotificationRecord r, boolean sendDelete, int reason) {
  if (sendDelete) {
            if (r.getNotification().deleteIntent != null) {
                try {
                    r.getNotification().deleteIntent.send();
                } catch (PendingIntent.CanceledException ex) {
                    // do nothing - there's no relevant way to recover, and
                    //     no reason to let this propagate
                    Slog.w(TAG, "canceled PendingIntent for " + r.sbn.getPackageName(), ex);
                }
            }
        }
        ....
   }
我们只需要注重上面那一段通过Notification的deleteIntent(上面在显示Notification的时候已经显示了deleteIntent是PendingIntent)的send方法,执行了PendingIntent。
PendingIntent的send
我们接着看PendingIntent的send的方法,在这里send被重载了好几种方法,最终会到这个send执行:
 public void send(Context context, int code, Intent intent,
            OnFinished onFinished, Handler handler, String requiredPermission)
            throws CanceledException {
        try {
            String resolvedType = intent != null ?
                    intent.resolveTypeIfNeeded(context.getContentResolver())
                    : null;
            int res = mTarget.send(code, intent, resolvedType,
                    onFinished != null
                            ? new FinishedDispatcher(this, onFinished, handler)
                            : null,
                    requiredPermission);
            if (res < 0) {
                throw new CanceledException();
            }
        } catch (RemoteException e) {
            throw new CanceledException(e);
        }
    }
最终会由mTarget.send调用,而mTarget则是IInterSender,这时又会回到PendingIntentRecord。这个时候就可以调用之前存进来的PendingIntent了。
最后由函数sendInner完成:
int sendInner(int code, Intent intent, String resolvedType,
            IIntentReceiver finishedReceiver, String requiredPermission,
            IBinder resultTo, String resultWho, int requestCode,
            int flagsMask, int flagsValues, Bundle options, IActivityContainer container) {
        synchronized(owner) {
            if (!canceled) {
                sent = true;
                if ((key.flags&PendingIntent.FLAG_ONE_SHOT) != 0) {
                    owner.cancelIntentSenderLocked(this, true);
                    canceled = true;
                }
                Intent finalIntent = key.requestIntent != null
                        ? new Intent(key.requestIntent) : new Intent();
                if (intent != null) {
                    int changes = finalIntent.fillIn(intent, key.flags);
                    if ((changes&Intent.FILL_IN_DATA) == 0) {
                        resolvedType = key.requestResolvedType;
                    }
                } else {
                    resolvedType = key.requestResolvedType;
                }
                flagsMask &= ~Intent.IMMUTABLE_FLAGS;
                flagsValues &= flagsMask;
                finalIntent.setFlags((finalIntent.getFlags()&~flagsMask) | flagsValues);

                final long origId = Binder.clearCallingIdentity();

                boolean sendFinish = finishedReceiver != null;
                int userId = key.userId;
                if (userId == UserHandle.USER_CURRENT) {
                    userId = owner.getCurrentUserIdLocked();
                }
                switch (key.type) {
                    case ActivityManager.INTENT_SENDER_ACTIVITY:
                        if (options == null) {
                            options = key.options;
                        } else if (key.options != null) {
                            Bundle opts = new Bundle(key.options);
                            opts.putAll(options);
                            options = opts;
                        }
                        try {
                            if (key.allIntents != null && key.allIntents.length > 1) {
                                Intent[] allIntents = new Intent[key.allIntents.length];
                                String[] allResolvedTypes = new String[key.allIntents.length];
                                System.arraycopy(key.allIntents, 0, allIntents, 0,
                                        key.allIntents.length);
                                if (key.allResolvedTypes != null) {
                                    System.arraycopy(key.allResolvedTypes, 0, allResolvedTypes, 0,
                                            key.allResolvedTypes.length);
                                }
                                allIntents[allIntents.length-1] = finalIntent;
                                allResolvedTypes[allResolvedTypes.length-1] = resolvedType;
                                owner.startActivitiesInPackage(uid, key.packageName, allIntents,
                                        allResolvedTypes, resultTo, options, userId);
                            } else {
                                owner.startActivityInPackage(uid, key.packageName, finalIntent,
                                        resolvedType, resultTo, resultWho, requestCode, 0,
                                        options, userId, container, null);
                            }
                        } catch (RuntimeException e) {
                            Slog.w(ActivityManagerService.TAG,
                                    "Unable to send startActivity intent", e);
                        }
                        break;
                    case ActivityManager.INTENT_SENDER_ACTIVITY_RESULT:
                        key.activity.task.stack.sendActivityResultLocked(-1, key.activity,
                                key.who, key.requestCode, code, finalIntent);
                        break;
                    case ActivityManager.INTENT_SENDER_BROADCAST:
                        try {
                            // If a completion callback has been requested, require
                            // that the broadcast be delivered synchronously
                            owner.broadcastIntentInPackage(key.packageName, uid,
                                    finalIntent, resolvedType,
                                    finishedReceiver, code, null, null,
                                requiredPermission, (finishedReceiver != null), false, userId);
                            sendFinish = false;
                        } catch (RuntimeException e) {
                            Slog.w(ActivityManagerService.TAG,
                                    "Unable to send startActivity intent", e);
                        }
                        break;
                    case ActivityManager.INTENT_SENDER_SERVICE:
                        try {
                            owner.startServiceInPackage(uid,
                                    finalIntent, resolvedType, userId);
                        } catch (RuntimeException e) {
                            Slog.w(ActivityManagerService.TAG,
                                    "Unable to send startService intent", e);
                        }
                        break;
                }

                if (sendFinish) {
                    try {
                        finishedReceiver.performReceive(new Intent(finalIntent), 0,
                                null, null, false, false, key.userId);
                    } catch (RemoteException e) {
                    }
                }

                Binder.restoreCallingIdentity(origId);

                return 0;
            }
        }
        return ActivityManager.START_CANCELED;
    }
其实写的这么长,我们最终只有这么一句有用:
owner.startActivityInPackage(uid, key.packageName, finalIntent,
                                        resolvedType, resultTo, resultWho, requestCode, 0,
                                        options, userId, container, null);
这里的owner又是指AMS,我们回到AMS去看看,又是调用了什么:
final int startActivityInPackage(int uid, String callingPackage,
            Intent intent, String resolvedType, IBinder resultTo,
            String resultWho, int requestCode, int startFlags, Bundle options, int userId,
            IActivityContainer container, TaskRecord inTask) {

        userId = handleIncomingUser(Binder.getCallingPid(), Binder.getCallingUid(), userId,
                false, ALLOW_FULL_ONLY, "startActivityInPackage", null);

        // TODO: Switch to user app stacks here.
        int ret = mStackSupervisor.startActivityMayWait(null, uid, callingPackage, intent,
                resolvedType, null, null, resultTo, resultWho, requestCode, startFlags,
                null, null, null, options, userId, container, inTask);
        return ret;
    }
看到 mStackSupervisor.startActivityMayWait(null, uid, callingPackage, intent,resolvedType, null, null, resultTo, resultWho, requestCode, startFlags,null, null, null, options, userId, container, inTask);
这个函数,我,恍然大悟,这不就是Activity启动流程中的一部分吗,通过Activity监听器来执行在Activity在任务栈中启动过程。
至此PendingIntent是如何启动四大组件的Activity就分析完毕了。
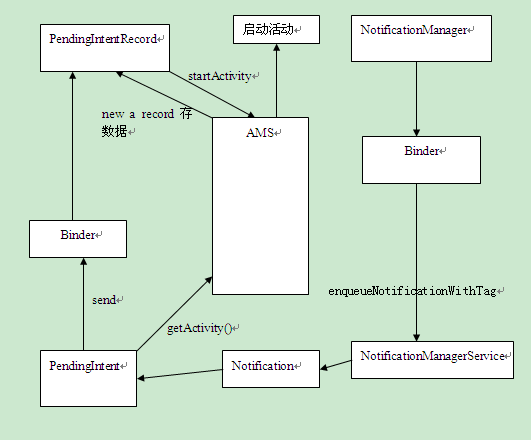
流程图
感谢任玉刚大神的android开发探索艺术,以及下面这位大神
PendingIntent的工作原理


 1万+
1万+

 被折叠的 条评论
为什么被折叠?
被折叠的 条评论
为什么被折叠?
 到【灌水乐园】发言


