


一、Activity中的基础视图组成:
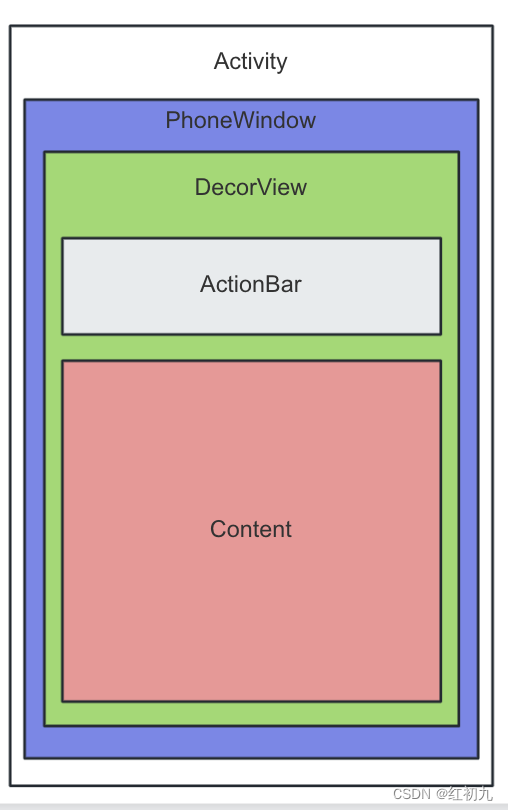
PhoneWindow是Android系统中最基本的窗口系统,每个Activity在attach的时候都会创建一个PhoneWindow对象。
final void attach(Context context, ActivityThread aThread,
           Instrumentation instr, IBinder token, int ident,
           Application application, Intent intent, ActivityInfo info,
           CharSequence title, Activity parent, String id,
           NonConfigurationInstances lastNonConfigurationInstances,
           Configuration config, String referrer, IVoiceInteractor voiceInteractor,
           Window window, ActivityConfigCallback activityConfigCallback) {
       attachBaseContext(context);

       mFragments.attachHost(null /*parent*/);

       mWindow = new PhoneWindow(this, window, activityConfigCallback);
       mWindow.setWindowControllerCallback(this);
       mWindow.setCallback(this);
       mWindow.setOnWindowDismissedCallback(this);
       mWindow.getLayoutInflater().setPrivateFactory(this);
       if (info.softInputMode != WindowManager.LayoutParams.SOFT_INPUT_STATE_UNSPECIFIED) {
           mWindow.setSoftInputMode(info.softInputMode);
       }
二、Layout添加逻辑:
下面从setContentLayout来说起:当调用Activity的setContentView方法的时候,把View或者resId传递给当前Activity绑定的Window对象进行加载。
public class Activity extends ContextThemeWrapper
        implements LayoutInflater.Factory2,
        Window.Callback, KeyEvent.Callback,
        OnCreateContextMenuListener, ComponentCallbacks2,
        Window.OnWindowDismissedCallback, WindowControllerCallback,
        AutofillManager.AutofillClient {
    ...
    ...


    public void setContentView(@LayoutRes int layoutResID) {
        getWindow().setContentView(layoutResID);
    }

    public void setContentView(View view) {
        getWindow().setContentView(view);
    }
}
看看PhoneWindow的setContentView中做了什么:每个Window中又有一个DecorView extend FrameLayout,可以理解为DecorView就是视图真正的根容器了。
public class PhoneWindow extends Window implements MenuBuilder.Callback {


    ......


    @Override
    public void setContentView(int layoutResID) {
        if (mContentParent == null) {
            installDecor();
        } else if (!hasFeature(FEATURE_CONTENT_TRANSITIONS)) {
            mContentParent.removeAllViews();
        }
        if (hasFeature(FEATURE_CONTENT_TRANSITIONS)) {
            final Scene newScene = Scene.getSceneForLayout(mContentParent, layoutResID,
                    getContext());
            transitionTo(newScene);
        } else {
            mLayoutInflater.inflate(layoutResID, mContentParent);
        }
        mContentParent.requestApplyInsets();
        final Callback cb = getCallback();
        if (cb != null && !isDestroyed()) {
            cb.onContentChanged();
        }
        mContentParentExplicitlySet = true;
    }
}
PhoneWindow在setContentView之前,会先check并创建DecorView和mContentParent,如果之前有缓存,会进行重新绑定Window与DecorView之间的关系。mDecor和mContentParent的关系可从上面的视图中看出来
private void installDecor() {
    mForceDecorInstall = false;
    if (mDecor == null) {
        mDecor = generateDecor(-1);
        mDecor.setDescendantFocusability(ViewGroup.FOCUS_AFTER_DESCENDANTS);
        mDecor.setIsRootNamespace(true);
        if (!mInvalidatePanelMenuPosted && mInvalidatePanelMenuFeatures != 0) {
            mDecor.postOnAnimation(mInvalidatePanelMenuRunnable);
        }
    } else {
        mDecor.setWindow(this);
    }
    if (mContentParent == null) {
        mContentParent = generateLayout(mDecor);
        ...
    }
    ......
}
根据style等属性创建基础布局,并且绑定ID_ANDROID_CONTENT容器到mContentParent
    protected ViewGroup generateLayout(DecorView decor) {

        ......//省略部分代码
        int layoutResource;
        int features = getLocalFeatures();
        // System.out.println("Features: 0x" + Integer.toHexString(features));
        if ((features & (1 << FEATURE_SWIPE_TO_DISMISS)) != 0) {
            layoutResource = R.layout.screen_swipe_dismiss;
            setCloseOnSwipeEnabled(true);
            ......//省略部分代码
        } else if ((features & (1 << FEATURE_ACTION_MODE_OVERLAY)) != 0) {
            layoutResource = R.layout.screen_simple_overlay_action_mode;
        } else {
            // Embedded, so no decoration is needed.
            layoutResource = R.layout.screen_simple;
            // System.out.println("Simple!");
        }
        mDecor.startChanging();
        mDecor.onResourcesLoaded(mLayoutInflater, layoutResource);
        ViewGroup contentParent = (ViewGroup)findViewById(ID_ANDROID_CONTENT);
        if (contentParent == null) {
            throw new RuntimeException("Window couldn't find content container view");
        }
        ......//省略部分代码
        mDecor.finishChanging();
        return contentParent;
    }
DecorView中主要是对PhoneWindow中确定的基础Layout进行加载添加到当前视图中
public class DecorView extends FrameLayout implements RootViewSurfaceTaker, WindowCallbacks {

    ......//省略部分代码
    void onResourcesLoaded(LayoutInflater inflater, int layoutResource) {
        ......//省略部分代码

        mDecorCaptionView = createDecorCaptionView(inflater);
        final View root = inflater.inflate(layoutResource, null);
        if (mDecorCaptionView != null) {
            if (mDecorCaptionView.getParent() == null) {
               addView(mDecorCaptionView,
                    new ViewGroup.LayoutParams(MATCH_PARENT, MATCH_PARENT));
            }
            mDecorCaptionView.addView(root,
                new ViewGroup.MarginLayoutParams(MATCH_PARENT, MATCH_PARENT));
        } else {

        // Put it below the color views.
            addView(root, 0, new ViewGroup.LayoutParams(MATCH_PARENT, MATCH_PARENT));
        }
        mContentRoot = (ViewGroup) root;
        initializeElevation();
    }

    ......//省略部分代码

}
在PhoneWindow中主要干了这几件事:
1.创建DecorView并和Window进行绑定
2.清空缓存
3.解析当前activity的主题风格相关属性并确定基础layout-resourceId
4.通知DecorView对确定的基础Layout进行Inflate
5.找出基础Layout中对应ID为ID_ANDROID_CONTENT的ViewGroup作为APP自定
义Layout区域mContentParent
6.Inflate设定的layout,并且add到mContentParent中完成视图的加载
每个系统基础Layout中都有一个id为@android:id/content的ViewGroup。
三、视图的测量、布局、绘制
ViewRootImpl是桥梁,其任务非常重要,首先看一下ViewRootImpl的创建。
@Override
public void handleResumeActivity(IBinder token, boolean finalStateRequest, boolean isForward,
        String reason) {
    //.........省略部分代码

    final Activity a = r.activity;

    if (localLOGV) {
        Slog.v(TAG, "Resume " + r + " started activity: " + a.mStartedActivity
                + ", hideForNow: " + r.hideForNow + ", finished: " + a.mFinished);
    }

    final int forwardBit = isForward
            ? WindowManager.LayoutParams.SOFT_INPUT_IS_FORWARD_NAVIGATION : 0;

    // If the window hasn't yet been added to the window manager,
    // and this guy didn't finish itself or start another activity,
    // then go ahead and add the window.
    boolean willBeVisible = !a.mStartedActivity;
    if (!willBeVisible) {
        try {
            willBeVisible = ActivityManager.getService().willActivityBeVisible(
                    a.getActivityToken());
        } catch (RemoteException e) {
            throw e.rethrowFromSystemServer();
        }
    }
    if (r.window == null && !a.mFinished && willBeVisible) {
        r.window = r.activity.getWindow();
        View decor = r.window.getDecorView();
        decor.setVisibility(View.INVISIBLE);
        ViewManager wm = a.getWindowManager();
        WindowManager.LayoutParams l = r.window.getAttributes();
        a.mDecor = decor;
        l.type = WindowManager.LayoutParams.TYPE_BASE_APPLICATION;
        l.softInputMode |= forwardBit;
        if (r.mPreserveWindow) {
            a.mWindowAdded = true;
            r.mPreserveWindow = false;
            // Normally the ViewRoot sets up callbacks with the Activity
            // in addView->ViewRootImpl#setView. If we are instead reusing
            // the decor view we have to notify the view root that the
            // callbacks may have changed.
            ViewRootImpl impl = decor.getViewRootImpl();
            if (impl != null) {
                impl.notifyChildRebuilt();
            }
        }
        if (a.mVisibleFromClient) {
            if (!a.mWindowAdded) {
                a.mWindowAdded = true;
                wm.addView(decor, l);
            } else {
                // The activity will get a callback for this {@link LayoutParams} change
                // earlier. However, at that time the decor will not be set (this is set
                // in this method), so no action will be taken. This call ensures the
                // callback occurs with the decor set.
                a.onWindowAttributesChanged(l);
            }
        }

        // If the window has already been added, but during resume
        // we started another activity, then don't yet make the
        // window visible.
    } else if (!willBeVisible) {
        if (localLOGV) Slog.v(TAG, "Launch " + r + " mStartedActivity set");
        r.hideForNow = true;
    }
    //.........省略部分代码
}
其中主要部分是 wm.addView(decor, l);addView方法最终在WindowManagerImpl中实现:
//WindowManagerImpl.java
@Override
public void addView(@NonNull View view, @NonNull ViewGroup.LayoutParams params) {
    applyDefaultToken(params);
    mGlobal.addView(view, params, mContext.getDisplay(), mParentWindow);
}
最终是调用了WindowManagerGlobal中的addView方法:
/**
*WindowManagerGlobal.java
*/
public void addView(View view, ViewGroup.LayoutParams params,
        Display display, Window parentWindow) {
   //.......省略部分代码

    ViewRootImpl root;
    View panelParentView = null;

     //.......省略部分代码

        root = new ViewRootImpl(view.getContext(), display);

        view.setLayoutParams(wparams);

        mViews.add(view);
        mRoots.add(root);
        mParams.add(wparams);

        // do this last because it fires off messages to start doing things
        try {
            root.setView(view, wparams, panelParentView);
        } catch (RuntimeException e) {
            // BadTokenException or InvalidDisplayException, clean up.
            if (index >= 0) {
                removeViewLocked(index, true);
            }
            throw e;
        }
    }
}
最终创建了ViewRootImpl并且和传进来的View(看ActivityThread中的addView,其实就是activity的DecorView)进行了绑定。
下面,将由ViewRootImpl来启动视图的measure,layout,draw流程:
大致流程如下:
scheduleTraversals-->TraversalRunnable-->doTraversal-->performTraversals(performMeasure(),performLayout(),performDraw())
//ViewRootImpl.java
void scheduleTraversals() {
    if (!mTraversalScheduled) {
        mTraversalScheduled = true;
        mTraversalBarrier = mHandler.getLooper().getQueue().postSyncBarrier();
        mChoreographer.postCallback(
                Choreographer.CALLBACK_TRAVERSAL, mTraversalRunnable, null);
        if (!mUnbufferedInputDispatch) {
            scheduleConsumeBatchedInput();
        }
        notifyRendererOfFramePending();
        pokeDrawLockIfNeeded();
    }
}
scheduleTraversals的调用时机一般是setLayoutParams,Visibility状态改变,requestLayout,invalidate等涉及measure,layout,draw改变的场景下触发。
private void performTraversals() {
    //省略部分代码
    int childWidthMeasureSpec = getRootMeasureSpec(mWidth, lp.width);
    int childHeightMeasureSpec = getRootMeasureSpec(mHeight, lp.height);
    performMeasure(childWidthMeasureSpec, childHeightMeasureSpec);
    //省略部分代码
    performLayout(lp, mWidth, mHeight);
    //省略部分代码
    performDraw();
    //省略部分代码
}
四、总结一下名词
Activity:一个Activity是一个应用程序组件,提供一个屏幕,用户可以用来交互为了完成某项任务,例如拨号、拍照、发送email……。
View:作为所有图形的基类。
ViewGroup:对View继承扩展为视图容器类。
Window:它概括了Android窗口的基本属性和基本功能。(抽象类)
PhoneWindow:Window的子类。
DecorView:界面的根View,PhoneWindow的内部类。
ViewRootImpl:ViewRoot是GUI管理系统与GUI呈现系统之间的桥梁。
WindowManangerService:简称WMS,它的作用是管理所有应用程序中的窗口,并用于管理用户与这些窗口发生的的各种交互。


 845
845


 被折叠的 条评论
为什么被折叠?
被折叠的 条评论
为什么被折叠?
 到【灌水乐园】发言


