


目录
一、环形队列的概念及定义
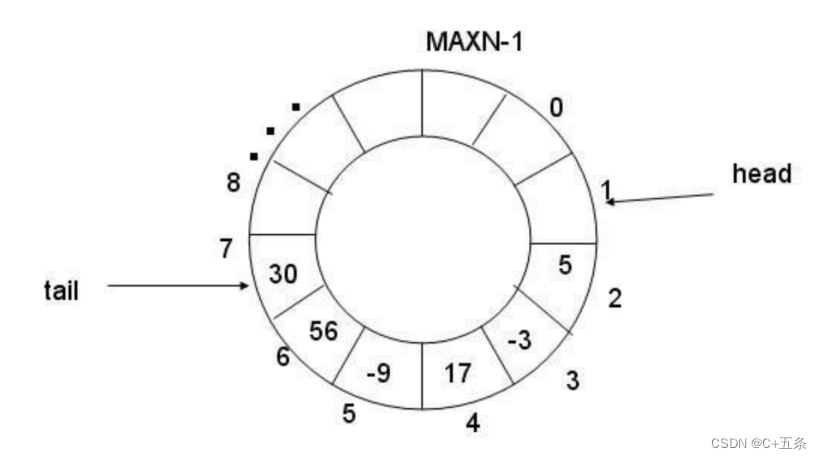
此处的环形队列并不是一个真正意义上的环,而是通过对容量的取模操作来实现环状,消费者和生产者除了此队列为空或为满,其余情况下生产者和消费者都不会相遇,生产者一定会比消费者先走,因为初始时队列为空,消费者没有消费对象,所以一定是生产者进行生产。
此时环形队列遵循两个原则:
1.生产者不能将消费者套一个圈。
2.消费者不能超过生产者。
所以当consumer和productor处在同一位置时,只可能是以下两种情况:队列为空或者队列为满,
环形结构起始状态和结束状态都是一样的,不好判断为空或者为满,所以可以通过加计数器或者标记位来判断满或者空。另外也可以预留一个空的位置,作为满的状态。
二、POSIX信号量
POSIX信号量和SystemV信号量作用相同,都是用于同步操作,达到无冲突的访问共享资源目的。 但POSIX可以用于 线程间同步。
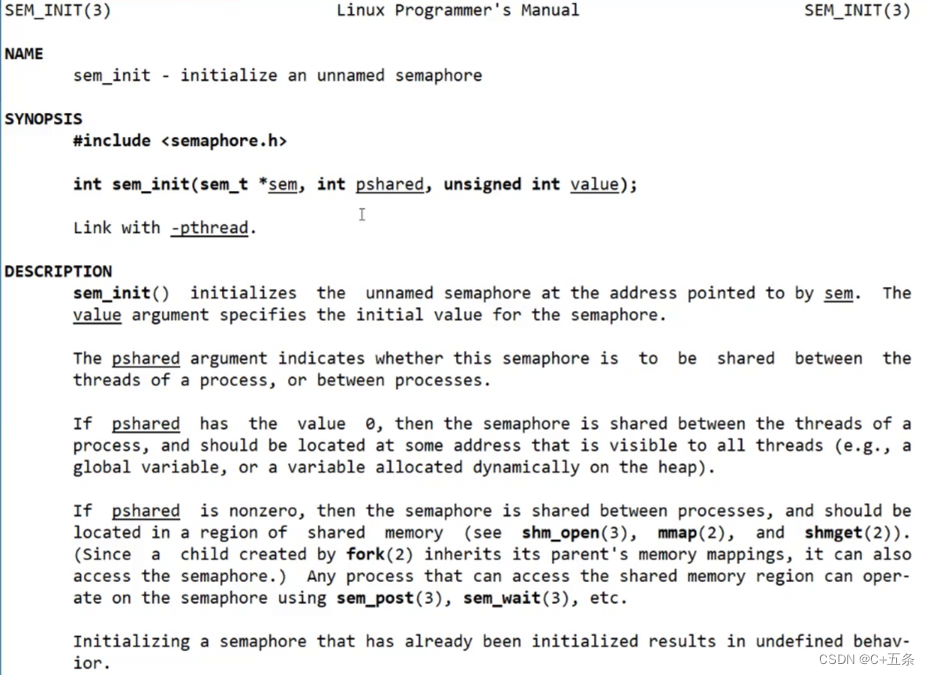
#include <semaphore.h>
int sem_init(sem_t *sem, int pshared, unsigned int value);
参数:
 pshared:值为0表示线程间共享,非零表示进程间共享
 value:信号量初始值
我们可以将其理解为一个计数器,value是初始值,对sem做初始化。
销毁信号量
int sem_destroy(sem_t *sem); 等待信号量
功能:等待信号量,会将信号量的值减1
int sem_wait(sem_t *sem); //P()
发布信号量
功能:发布信号量,表示资源使用完毕,可以归还资源了。将信号量值加1。
int sem_post(sem_t *sem);//V()
三、RingQueue的实现方式
3.1RingQueue.hpp的构建
将和环形队列相关的控制方法进行封装,通过模板传入Thread模板之中,之后每个线程都能看到环形队列的相关方法及规则,从而更好的对所有的线程进行管理,依旧是遵循Linux中的先描述,再组织。
#pragma once

#include <iostream>
#include <string>
#include <vector>
#include <pthread.h>
#include <semaphore.h>

// 单生产,单消费
// 多生产,多消费
// "321":
// 3: 三种关系
// a: 生产和消费互斥和同步
// b: 生产者之间:
// c: 消费者之间:
// 解决方案:加锁
// 1. 需要几把锁?2把
//一把锁维护消费者和消费者之间的关系,另一把维护生产者和生产者之间的关系
//而生产者和消费者之间的关系则可以通过信号量来进行协调
template<typename T>
class RingQueue
{
private:
    void P(sem_t &sem)
    {
        //等待信号量,将该信号量-1
        sem_wait(&sem);
    }
    void V(sem_t &sem)
    {
        //发布信号量,将该信号量+1
        sem_post(&sem);
    }
    void Lock(pthread_mutex_t &mutex)
    {
        pthread_mutex_lock(&mutex);
    }
    void Unlock(pthread_mutex_t &mutex)
    {
        pthread_mutex_unlock(&mutex);
    }
public:
    RingQueue(int cap):
    _ring_queue(cap),
    _cap(cap),
    _productor_step(0),
    _consumer_step(0)
    {
        sem_init(&_room_sem,0,_cap);//刚开始生产者可生产空间为_cap
        sem_init(&_data_sem,0,0);


        pthread_mutex_init(&_productor_mutex,nullptr);
        pthread_mutex_init(&_consumer_mutex,nullptr);
    }

    //生产
    void Enqueue(const T &in)
    {
        //生产行为
        P(_room_sem);//生产者可用空间--
        Lock(_productor_mutex);

        //一定有空间
        _ring_queue[_productor_step++]=in;
        _productor_step%=_cap;
        Unlock(_productor_mutex);
        V(_data_sem);//消费者可消费data++,去通知此时在_data_sem等待的消费者,信号量不为0就会进行唤醒
    }

    //消费
    void Pop(T* out)
    {
        //消费行为
        P(_data_sem);//在竞争锁之前先申请信号量,
        Lock(_consumer_mutex);
        *out=_ring_queue[_consumer_step++];//拿到队列中的任务
        _consumer_step %= _cap;
        Unlock(_consumer_mutex);
        V(_room_sem);

    }
    ~RingQueue()
    {
        sem_destroy(&_room_sem);
        sem_destroy(&_data_sem);

        pthread_mutex_destroy(&_productor_mutex);
        pthread_mutex_destroy(&_consumer_mutex);
    }
private:
    //1.构造环形队列
    std::vector<T> _ring_queue;
    int _cap;//环形队列的容量上限

    //2.生产消费者的下标
    int _productor_step;
    int _consumer_step;

    //3.定义信号量
    sem_t _room_sem;//生产者关心
    sem_t _data_sem;//消费者关心

    //4.定义锁 维护多生产多消费之间的互斥关系
    pthread_mutex_t _productor_mutex;
    pthread_mutex_t _consumer_mutex;
};
3.2Thread.hpp
Thread.hpp的详细实现方式已经在之前的博客中做过详细解读和解析。
#ifndef __THREAD_HPP__
#define __THREAD_HPP__

#include <iostream>
#include <string>
#include <unistd.h>
#include <functional>
#include <pthread.h>

namespace ThreadModule
{
    template<typename T>
    using func_t=std::function<void(T&,std::string name)>;

    template<typename T>
    class Thread
    {
    public:
    void Excute()
    {
        _func(_data,_threadname);
    }
    public:
    Thread(func_t<T> func,T&data,const std::string& name="none-name")
    :_func(func),_data(data),_threadname(name),_stop(true)
    {}
    static void* threadroutine(void* args)//static成员函数没有this
    {
        Thread<T> *self = static_cast<Thread<T> *>(args);
        self->Excute();
        return nullptr;
    }
    bool Start()
    {
        int n=pthread_create(&_tid,nullptr,threadroutine,this);//把this传给threadroutine让其完成调用
        if(!n)
        {
            _stop=false;
            return true;
        }
        else
        {
            return false;
        }
    }
    void Detach()
    {
        if(!_stop)
        {
            pthread_detach(_tid);
        }
    }
    void Join()
    {
        if(!_stop)
        {
            pthread_join(_tid,nullptr);
        }
    }
    std::string name()
    {
        return _threadname;
    }
    void Stop()
    {
        _stop = true;
    }
    ~Thread()
    {}
    private:
    pthread_t _tid;
    std::string _threadname;
    T& _data;//要传入所执行函数的参数
    func_t<T> _func;//线程要执行的函数
    bool _stop;
    };
}
#endif
3.3Main.cc主函数的编写
在main函数中,使用了三层封装,更加清晰的梳理了环形队列的使用过程和对生产消费者两方的控制,以及对ringqueue.hpp和thread.hpp的调用和联动。
#include "RingQueue.hpp"
#include "Thread.hpp"
#include "Task.hpp"
#include <string>
#include <vector>
#include <unistd.h>
#include <ctime>


//我们需要的是向队列中投递任务
using namespace ThreadModule;
using ringqueue_t=RingQueue<Task>;


void Consumer(ringqueue_t &rq,std::string name)
{
    while(true)
    {
        sleep(2);
        //1 消费任务
        Task t;
        rq.Pop(&t);
        //t拿到队列中的任务
        std::cout<<"Consumer handler task: "<<"["<<name<<"]"<<std::endl;
        //2处理任务
        t();
    }
}

void Productor(ringqueue_t &rq,std::string name)
{
    //srand(time(nullptr)^pthread_self());

    while(true)
    {
        rq.Enqueue(Download);
        std::cout<<"Productor: "<<"["<<name<<"]"<<std::endl;
    }
}

void InitComm(std::vector<Thread<ringqueue_t>> *threads,int num,ringqueue_t &rq,func_t<ringqueue_t> func,const std::string &who)
{
    for(int i=0;i<num;i++)
    {
        std::string name="thread-"+std::to_string(i+1)+"-"+who;
        threads->emplace_back(func,rq,name);
        //threads->back()->Start();
        //为什么不直接start:
        //1.直接start会转到thread中去调用pthread_create
    }
}
void InitConsumer(std::vector<Thread<ringqueue_t>> *threads, int num, ringqueue_t &rq)
{
    InitComm(threads, num, rq, Consumer, "consumer");
}

void InitProductor(std::vector<Thread<ringqueue_t>> *threads, int num, ringqueue_t &rq)
{
    InitComm(threads, num, rq, Productor, "productor");
}

void WaitAllThread(std::vector<Thread<ringqueue_t>> &threads)
{
    for(auto &thread:threads)
    {
        thread.Join();
    }
}
void StartAll(std::vector<Thread<ringqueue_t>> &threads)
{
    for(auto &thread:threads)
    {
        std::cout<<"start: "<<thread.name()<<std::endl;
        thread.Start();
    }
}
int main()
{
    ringqueue_t *rq=new ringqueue_t(10);
    std::vector<Thread<ringqueue_t>> threads;

    InitProductor(&threads,1,*rq);
    InitConsumer(&threads,1,*rq);

    StartAll(threads);

    WaitAllThread(threads);
    return 0;
}
3.4Task.hpp function包装器的使用
Task是一个function<void()>的类型,也就是说用Task实例化出的模板可以接收任意类型的函数方法(也就是生产消费者模型中的任务)这样就最大的实现了来什么执行什么,大大提高了代码的灵活性可拓展性。
#pragma

#include <iostream>
#include <functional>

using Task=std::function<void()>;


void Download()
{
    std::cout<<"this is adownload task"<<std::endl;
}


 3628
3628

 被折叠的 条评论
为什么被折叠?
被折叠的 条评论
为什么被折叠?
 到【灌水乐园】发言


