


keepalived+nginx集群项目手册(个人配置)
文章目录
项目目标
利用keepalived集群nginx,形成高可用冗余,达到服务连续性的目的
这是我根据我当前所学到的技术和自己的理解,做的一个小小的项目,才疏学浅
拓扑图
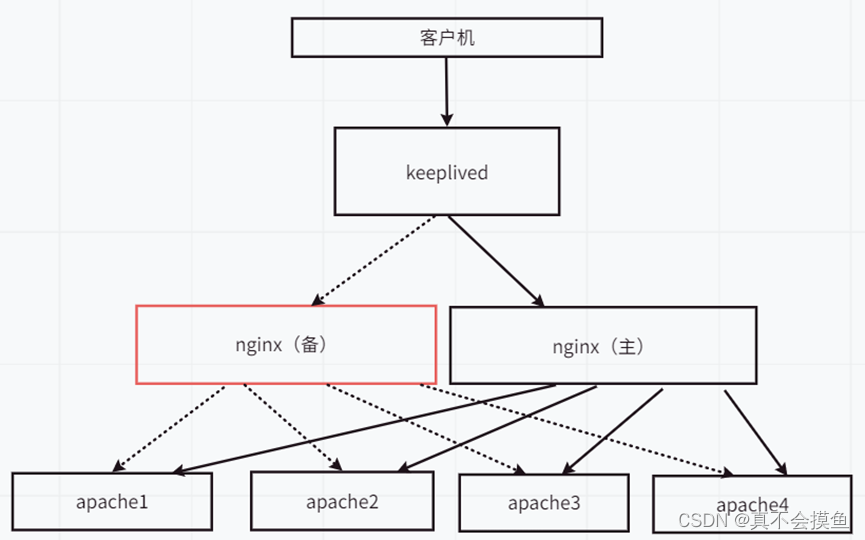
IP配置
| 主机 | IP |
|---|---|
| keepalived | vip-10.10.10.66 |
| nginx——主 | 10.10.10.134 |
| nginx——备 | 10.10.10.135 |
| apache1 | 10.10.10.136 |
| apache2 | 10.10.10.137 |
| apache3 | 10.10.10.111 |
| apache4 | 10.10.10.112 |
配置apache
apache1
[root@localhost ~]# yum install -y httpd #安装apache
已加载插件:fastestmirror
Loading mirror speeds from cached hostfile
epel/x86_64/metalink | 6.6 kB 00:00:00
* base: mirrors.tuna.tsinghua.edu.cn
* epel: mirrors.tuna.tsinghua.edu.cn
* extras: mirrors.aliyun.com
* updates: mirrors.aliyun.com
epel | 4.7 kB 00:00:00
(1/3): epel/x86_64/group_gz | 99 kB 00:00:00
(2/3): epel/x86_64/updateinfo | 1.0 MB 00:00:00
(3/3): epel/x86_64/primary_db | 7.0 MB 00:00:00
························································································
已安装:
httpd.x86_64 0:2.4.6-99.el7.centos.1
作为依赖被安装:
apr.x86_64 0:1.4.8-7.el7 apr-util.x86_64 0:1.5.2-6.el7_9.1 httpd-tools.x86_64 0:2.4.6-99.el7.centos.1 mailcap.noarch 0:2.1.41-2.el7
完毕!
[root@localhost ~]# systemctl start httpd #启动apache
[root@localhost ~]# mv /etc/httpd/conf.d/welcome.conf /etc/httpd/conf.d/welcome.conf.bak #备份默认主页面
[root@localhost ~]# echo 'apache1 -10.10.10.136' >/var/www/html/index.html #自己编写默认页面,分辨不同apache
[root@localhost ~]# systemctl restart httpd.service #重启服务
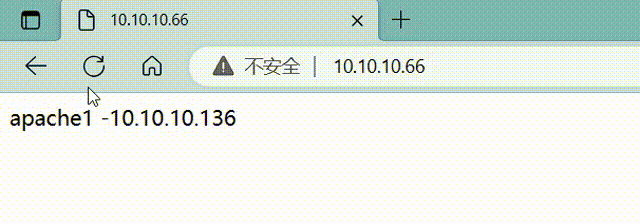
[root@localhost ~]# curl http://10.10.10.136 #访问验证
apache1 -10.10.10.136
apache2
[root@localhost ~]# yum install -y httpd   #安装apache
已加载插件:fastestmirror
Loading mirror speeds from cached hostfile
epel/x86_64/metalink                                                                                                                                                                      | 6.6 kB  00:00:00
 * base: mirrors.tuna.tsinghua.edu.cn
 * epel: mirrors.tuna.tsinghua.edu.cn
 * extras: mirrors.aliyun.com
 * updates: mirrors.aliyun.com
epel                                                                                                                                                                                      | 4.7 kB  00:00:00
(1/3): epel/x86_64/group_gz                                                                                                                                                               |  99 kB  00:00:00
(2/3): epel/x86_64/updateinfo                                                                                                                                                             | 1.0 MB  00:00:00
(3/3): epel/x86_64/primary_db                                                                                                                                                             | 7.0 MB  00:00:00
························································································
已安装:
  httpd.x86_64 0:2.4.6-99.el7.centos.1

作为依赖被安装:
  apr.x86_64 0:1.4.8-7.el7                    apr-util.x86_64 0:1.5.2-6.el7_9.1                    httpd-tools.x86_64 0:2.4.6-99.el7.centos.1                    mailcap.noarch 0:2.1.41-2.el7

完毕!
[root@localhost ~]# systemctl start httpd    #启动apache
[root@localhost ~]# mv /etc/httpd/conf.d/welcome.conf /etc/httpd/conf.d/welcome.conf.bak  #备份默认主页面
[root@localhost ~]# echo 'apache2 -10.10.10.137' >/var/www/html/index.html  #自己编写默认页面,分辨不同apache
[root@localhost ~]# systemctl restart httpd.service 		#重启服务
[root@localhost ~]# curl http://10.10.10.137				#访问验证
apache2 -10.10.10.137
apache3(基于虚拟ip)
[root@localhost ~]# vim /etc/httpd/conf.d/vhost.conf		#编写配置文件

  1 <VirtualHost 10.10.10.111:80>			#指定IP地址、端口号、资源目录
  2 DocumentRoot /var/www/apache3
  3 ServerName www.apache3.com
  4 <Directory "/var/www/apache3">
  5   AllowOverride None
  6   Require all granted
  7 </Directory>
  8 </VirtualHost>


[root@localhost ~]# mkdir -p /var/www/apache3 			#创建资源目录
[root@localhost ~]# echo 'apache3 -10.10.10.111' > /var/www/apache3/		#写入以分辨不同apache
[root@localhost ~]# ip a add 10.10.10.111 dev ens33:1     #添加虚拟ip
[root@localhost ~]# ip a								#查看虚拟ip是否创建成功
1: lo: <LOOPBACK,UP,LOWER_UP> mtu 65536 qdisc noqueue state UNKNOWN group default qlen 1000
    link/loopback 00:00:00:00:00:00 brd 00:00:00:00:00:00
    inet 127.0.0.1/8 scope host lo
       valid_lft forever preferred_lft forever
    inet6 ::1/128 scope host
       valid_lft forever preferred_lft forever
2: ens33: <BROADCAST,MULTICAST,UP,LOWER_UP> mtu 1500 qdisc pfifo_fast state UP group default qlen 1000
    link/ether 00:0c:29:c6:1e:95 brd ff:ff:ff:ff:ff:ff
    inet 10.10.10.136/24 brd 10.10.10.255 scope global noprefixroute dynamic ens33
       valid_lft 1054sec preferred_lft 1054sec
    inet 10.10.10.111/32 scope global ens33
       valid_lft forever preferred_lft forever
    inet6 fe80::f93d:8ea1:7c34:6298/64 scope link tentative noprefixroute dadfailed
       valid_lft forever preferred_lft forever
    inet6 fe80::326b:97eb:8b57:251f/64 scope link tentative noprefixroute dadfailed
       valid_lft forever preferred_lft forever
    inet6 fe80::2305:7587:e8cf:11f3/64 scope link tentative noprefixroute dadfailed
       valid_lft forever preferred_lft forever

[root@localhost ~]# systemctl restart httpd.service 	#重启apache服务
[root@localhost ~]# curl http://10.10.10.111    		#访问验证
### apache3 -10.10.10.111
apache 4 (基于虚拟ip)
  [root@localhost ~]# vim /etc/httpd/conf.d/vhost.conf    #编写自定义配置文件

  1 <VirtualHost 10.10.10.112:80>			#指定自定义资源目录、IP地址
  2 DocumentRoot /var/www/apache4
  3 ServerName www.apache4.com
  4 <Directory "/var/www/apache4">
  5   AllowOverride None
  6   Require all granted
  7 </Directory>
  8 </VirtualHost>
[root@localhost ~]# mkdir  -p /var/www/apache4  	#创建自定义资源目录
[root@localhost ~]# echo 'apache4 -10.10.10.112' > /var/www/apache4/index.html  #写入默认页面以区别不同apache
[root@localhost ~]# ip a add dev ens33:1 10.10.10.112   #创建虚拟ip
[root@localhost ~]# systemctl restart httpd.service 	#重启服务
[root@localhost ~]# curl http://10.10.10.112			#访问验证
apache4 -10.10.10.112
Nginx(主)
创建用户
[root@nginx1 ~]# ls				#上传nginxtar包
anaconda-ks.cfg  nginx-1.25.1.tar.gz  yum.sh
[root@nginx1 ~]# useradd -M -s /sbin/nologin nginx 		#创建nginx用户运行服务,不需要授权登录
解压资源包
[root@nginx1 ~]# tar -xf nginx-1.25.1.tar.gz 	#解压资源包
[root@nginx1 ~]# ls
anaconda-ks.cfg  nginx-1.25.1  nginx-1.25.1.tar.gz  yum.sh
安装依赖环境
[root@nginx1 ~]# yum -y install zlib zlib-devel openssl openssl-devel pcre pcre-devel   gcc gcc-c++ make cmake
..........................................
已安装:
  cmake.x86_64 0:2.8.12.2-2.el7   gcc.x86_64 0:4.8.5-44.el7   gcc-c++.x86_64 0:4.8.5-44.el7   openssl-devel.x86_64 1:1.0.2k-26.el7_9   pcre-devel.x86_64 0:8.32-17.el7   zlib-devel.x86_64 0:1.2.7-21.el7_9

作为依赖被安装:
  cpp.x86_64 0:4.8.5-44.el7             glibc-devel.x86_64 0:2.17-326.el7_9  glibc-headers.x86_64 0:2.17-326.el7_9    kernel-headers.x86_64 0:3.10.0-1160.92.1.el7  keyutils-libs-devel.x86_64 0:1.5.8-3.el7
  krb5-devel.x86_64 0:1.15.1-55.el7_9   libarchive.x86_64 0:3.1.2-14.el7_7   libcom_err-devel.x86_64 0:1.42.9-19.el7  libkadm5.x86_64 0:1.15.1-55.el7_9             libmpc.x86_64 0:1.0.1-3.el7
  libselinux-devel.x86_64 0:2.5-15.el7  libsepol-devel.x86_64 0:2.5-10.el7   libstdc++-devel.x86_64 0:4.8.5-44.el7    libverto-devel.x86_64 0:0.2.5-4.el7           mpfr.x86_64 0:3.1.1-4.el7

更新完毕:
  openssl.x86_64 1:1.0.2k-26.el7_9                                                                          zlib.x86_64 0:1.2.7-21.el7_9

作为依赖被升级:
  glibc.x86_64 0:2.17-326.el7_9                  glibc-common.x86_64 0:2.17-326.el7_9                  krb5-libs.x86_64 0:1.15.1-55.el7_9                  openssl-libs.x86_64 1:1.0.2k-26.el7_9

完毕!
切换到nginx目录,编译安装
[root@nginx1 nginx-1.25.1]# ./configure --prefix=/usr/local/nginx --user=nginx --group=nginx --with-http_stub_status_module  --with-http_ssl_module
checking for OS
 + Linux 3.10.0-1160.el7.x86_64 x86_64
checking for C compiler ... found
 + using GNU C compiler
 + gcc version: 4.8.5 20150623 (Red Hat 4.8.5-44) (GCC)
checking for gcc -pipe switch ... found
checking for -Wl,-E switch ... found
checking for gcc builtin atomic operations ... found
checking for C99 variadic macros ... found
checking for gcc variadic macros ... found
checking for gcc builtin 64 bit byteswap ... found
checking for unistd.h ... found
.......................................
Configuration summary
  + using system PCRE library
  + using system OpenSSL library
  + using system zlib library

  nginx path prefix: "/usr/local/nginx"
  nginx binary file: "/usr/local/nginx/sbin/nginx"
  nginx modules path: "/usr/local/nginx/modules"
  nginx configuration prefix: "/usr/local/nginx/conf"
  nginx configuration file: "/usr/local/nginx/conf/nginx.conf"
  nginx pid file: "/usr/local/nginx/logs/nginx.pid"
  nginx error log file: "/usr/local/nginx/logs/error.log"
  nginx http access log file: "/usr/local/nginx/logs/access.log"
  nginx http client request body temporary files: "client_body_temp"
  nginx http proxy temporary files: "proxy_temp"
  nginx http fastcgi temporary files: "fastcgi_temp"
  nginx http uwsgi temporary files: "uwsgi_temp"
  nginx http scgi temporary files: "scgi_temp"


[root@nginx1 nginx-1.25.1]#  make && make install
make -f objs/Makefile
make[1]: 进入目录“/root/nginx-1.25.1”
cc -c -pipe  -O -W -Wall -Wpointer-arith -Wno-unused-parameter -Werror -g  -I src/core -I src/event -I src/event/modules -I src/event/quic -I src/os/unix -I objs \
	-o objs/src/core/nginx.o \
	src/core/nginx.c
cc -c -pipe  -O -W -Wall -Wpointer-arith -Wno-unused-parameter -Werror -g  -I src/core -I src/event -I src/event/modules -I src/event/quic -I src/os/unix -I objs \
	-o objs/src/core/ngx_log.o \
	src/core/ngx_log.c
....................................
cp conf/nginx.conf '/usr/local/nginx/conf/nginx.conf.default'
test -d '/usr/local/nginx/logs' \
	|| mkdir -p '/usr/local/nginx/logs'
test -d '/usr/local/nginx/logs' \
	|| mkdir -p '/usr/local/nginx/logs'
test -d '/usr/local/nginx/html' \
	|| cp -R html '/usr/local/nginx'
test -d '/usr/local/nginx/logs' \
	|| mkdir -p '/usr/local/nginx/logs'
make[1]: 离开目录“/root/nginx-1.25.1”
启动nginx
[root@nginx1 nginx-1.25.1]# cd /usr/local/nginx/sbin/		#切换到nginx的/sbin下
[root@nginx1 sbin]# ./nginx  								#启动nginx
[root@nginx1 sbin]# ss -tunlp | grep ng
tcp    LISTEN     0      128       *:80                    *:*                   users:(("nginx",pid=14518,fd=6),("nginx",pid=14517,fd=6))


[root@nginx1 sbin]# curl http://10.10.10.134				#访问验证
<!DOCTYPE html>
<html>
<head>
<title>Welcome to nginx!</title>
<style>
html { color-scheme: light dark; }
body { width: 35em; margin: 0 auto;
font-family: Tahoma, Verdana, Arial, sans-serif; }
</style>
</head>
<body>
<h1>Welcome to nginx!</h1>
<p>If you see this page, the nginx web server is successfully installed and
working. Further configuration is required.</p>

<p>For online documentation and support please refer to
<a href="http://nginx.org/">nginx.org</a>.<br/>
Commercial support is available at
<a href="http://nginx.com/">nginx.com</a>.</p>

<p><em>Thank you for using nginx.</em></p>
</body>
</html>
配置反向代理
[root@nginx1 sbin]# vim /usr/local/nginx/conf/nginx.conf
17 http {
 18     include       mime.types;
 19     default_type  application/octet-stream;
 20         upstream http{
 21                 server 10.10.10.136;
 22                 server 10.10.10.137;
 23                 server 10.10.10.111;
 24                 server 10.10.10.112;
 25 }

 49         location / {
 50             root   html;
 51             index  index.html index.htm;
 52                 proxy_pass http://http;
 53         }
[root@nginx1 sbin]# ./nginx -s reload  #重启nginx
访问验证
[root@nginx1 sbin]# curl http://10.10.10.134
apache1 -10.10.10.136
[root@nginx1 sbin]# curl http://10.10.10.134
apache2 -10.10.10.137
[root@nginx1 sbin]# curl http://10.10.10.134
apache3 -10.10.10.111
[root@nginx1 sbin]# curl http://10.10.10.134
apache4 -10.10.10.112
Nginx(备)
配置过程参考
Nginx(主)
访问验证
[root@nginx2 sbin]# curl http://10.10.10.135
apache1 -10.10.10.136
[root@nginx2 sbin]# curl http://10.10.10.135
apache2 -10.10.10.137
[root@nginx2 sbin]# curl http://10.10.10.135
apache3 -10.10.10.111
[root@nginx2 sbin]# curl http://10.10.10.135
apache4 -10.10.10.112
使用的是默认的轮询模式,可按需求调整为其他模式,如ip_hash
keepalived集群
主端
[root@nginx1 sbin]# yum install -y keepalived          #安装keepalived
已加载插件:fastestmirror
Loading mirror speeds from cached hostfile
 * base: mirrors.tuna.tsinghua.edu.cn
 * epel: mirrors.tuna.tsinghua.edu.cn
 * extras: mirrors.aliyun.com
 * updates: mirrors.aliyun.com
正在解决依赖关系
--> 正在检查事务
---> 软件包 keepalived.x86_64.0.1.3.5-19.el7 将被 安装
--> 正在处理依赖关系 libnetsnmpmibs.so.31()(64bit),它被软件包 keepalived-1.3.5-19.el7.x86_64 需要
--> 正在处理依赖关系 libnetsnmpagent.so.31()(64bit),它被软件包 keepalived-1.3.5-19.el7.x86_64 需要
--> 正在处理依赖关系 libnetsnmp.so.31()(64bit),它被软件包 keepalived-1.3.5-19.el7.x86_64 需要
--> 正在检查事务
---> 软件包 net-snmp-agent-libs.x86_64.1.5.7.2-49.el7_9.2 将被 安装
--> 正在处理依赖关系 libsensors.so.4()(64bit),它被软件包 1:net-snmp-agent-libs-5.7.2-49.el7_9.2.x86_64 需要
---> 软件包 net-snmp-libs.x86_64.1.5.7.2-49.el7_9.2 将被 安装
--> 正在检查事务
---> 软件包 lm_sensors-libs.x86_64.0.3.4.0-8.20160601gitf9185e5.el7 将被 安装
--> 解决依赖关系完成
...............................
已安装:
  keepalived.x86_64 0:1.3.5-19.el7

作为依赖被安装:
  lm_sensors-libs.x86_64 0:3.4.0-8.20160601gitf9185e5.el7
  net-snmp-agent-libs.x86_64 1:5.7.2-49.el7_9.2
  net-snmp-libs.x86_64 1:5.7.2-49.el7_9.2

完毕!

[root@nginx1 sbin]#cp/etc/keepalived/keepalived.conf/etc/keepalived/keepalived.conf.bak  	#备份默认配置文件
[root@nginx1 sbin]# vim /etc/keepalived/keepalived.conf

  7     vrrp_gna_interval 0
  8 }
  9
 10 #第一台keepalived服务器
 11 vrrp_instance router1 {
 12     state MASTER
 13     interface ens33
 14     virtual_router_id 51
 15     priority 100
 16     advert_int 1
 17
 18     authentication {
 19         auth_type PASS
 20         auth_pass 12345678
 21     }
 22
 23     virtual_ipaddress {
 24        10.10.10.66/24 dev ens33
 25
 26     }
 27
 28 }
 29
[root@nginx1 sbin]# systemctl restart keepalived.service 		#重启
[root@nginx1 sbin]# iptables  -D INPUT  1			#删除防火墙规则
客户机访问验证
[root@kehuji ~]# curl http://10.10.10.134
apache2 -10.10.10.137
[root@kehuji ~]# curl http://10.10.10.134
apache4 -10.10.10.112
[root@kehuji ~]# curl http://10.10.10.134
apache3 -10.10.10.111
[root@kehuji ~]# curl http://10.10.10.134
apache1 -10.10.10.136
备份端
[root@nginx2 sbin]# yum install -y keepalived  	#安装keepalived
已加载插件:fastestmirror
Loading mirror speeds from cached hostfile
 * base: mirrors.tuna.tsinghua.edu.cn
 * epel: mirrors.tuna.tsinghua.edu.cn
 * extras: mirrors.aliyun.com
 * updates: mirrors.aliyun.com
正在解决依赖关系
--> 正在检查事务
---> 软件包 keepalived.x86_64.0.1.3.5-19.el7 将被 安装
--> 正在处理依赖关系 libnetsnmpmibs.so.31()(64bit),它被软件包 keepalived-1.3.5-19.el7.x86_64 需要
--> 正在处理依赖关系 libnetsnmpagent.so.31()(64bit),它被软件包 keepalived-1.3.5-19.el7.x86_64 需要
--> 正在处理依赖关系 libnetsnmp.so.31()(64bit),它被软件包 keepalived-1.3.5-19.el7.x86_64 需要
--> 正在检查事务
---> 软件包 net-snmp-agent-libs.x86_64.1.5.7.2-49.el7_9.2 将被 安装
--> 正在处理依赖关系 libsensors.so.4()(64bit),它被软件包 1:net-snmp-agent-libs-5.7.2-49.el7_9.2.x86_64 需要
---> 软件包 net-snmp-libs.x86_64.1.5.7.2-49.el7_9.2 将被 安装
--> 正在检查事务
---> 软件包 lm_sensors-libs.x86_64.0.3.4.0-8.20160601gitf9185e5.el7 将被 安装
--> 解决依赖关系完成
[root@nginx2 sbin]# cp /etc/keepalived/keepalived.conf /etc/keepalived/keepalived.conf.bak		#备份默认配置文件
[root@nginx2 sbin]# vim /etc/keepalived/keepalived.conf  		#配置文件更改
 1 global_defs {
  2     router_id  nginx-slave
  3     vrrp_skip_check_adv_addr
  4     #vrrp_iptables
  5     vrrp_strict
  6     vrrp_garp_interval 0
  7     vrrp_gna_interval 0
  8 }
  9 #第二台keepalived服务器
 10 vrrp_instance router1 {
 11     state BACKUP
 12     interface ens33
 13     virtual_router_id 51
 14     priority 80
 15     advert_int 1
 16
 17     authentication {
 18         auth_type PASS
 19         auth_pass 12345678
 20     }
 21
 22     virtual_ipaddress {
 23         10.10.10.66/24 dev ens33
 24
 25     }
 26
 27 }
~
[root@nginx2 sbin]# systemctl restart keepalived.service 		#重启
[root@nginx2 sbin]# iptables  -D INPUT  1					#删除防火墙规则
验证(备节点)
[root@nginx1 sbin]# systemctl stop keepalived.service   关闭服务
[root@kehuji ~]# curl http://10.10.10.134				#客户机访问vip,依然可以访问
apache4 -10.10.10.112
[root@kehuji ~]# curl http://10.10.10.134
apache3 -10.10.10.111
[root@kehuji ~]# curl http://10.10.10.134
apache1 -10.10.10.136
[root@kehuji ~]# curl http://10.10.10.134
apache2 -10.10.10.137
完成效果展示


 293
293


 被折叠的 条评论
为什么被折叠?
被折叠的 条评论
为什么被折叠?
 到【灌水乐园】发言


