


1、定时器用法
System.windows.Forms.Timer 占用主线程(常用)
System.Timers.Timer 占用子线程(常用)
System.Threading.Timer 占用子线程
System.windows.Forms.Timer用法
private void timer1_Tick(object sender, EventArgs e)
{
//获得时间,并把时间显示在lab上
string s = DateTime.Now.ToString(); //当前时间转为字符串
this.lb_ShowTimeNow.Text = s; //赋值给显示时间的lab的text属性
}
System.Timers.Timer 用法
1. 首先,在你的代码中引入 System.Timers 命名空间
using System.Timers;
2. 创建一个 System.Timers.Timer 对象,并设置其间隔时间(以毫秒为单位)
System.Timers.Timer timer = new System.Timers.Timer();
timer.Interval = 1000; // 设置为每秒触发一次
3. 定义一个事件处理方法,该方法将在定时器触发时执行(子线程执行)
private void Timer_Elapsed(object sender, ElapsedEventArgs e)
{
// 在这里编写定时器触发时要执行的代码
}
4、 将事件处理方法与定时器的 Elapsed 事件关联起来
timer.Elapsed += Timer_Elapsed;
5、启动定时器
timer.Start();
6. 如果需要停止定时器,可以使用 Stop 方法:
timer.Stop();
2、日志用法封装
控件:listview(存放日志)
属性:
View: Details(细节显示)HeadStyle不能为None 如果想隐藏 把HeadStyle改成None
SmallImageList:选择添加哪个imagelist组件
Columns:添加列成员 FullRowSelect(是否支持当前选中行)
public void AddLog(int index, string log1) //(新建方法)参数:索引号(图片索引),日志内容
{
if (lv_Log.InvokeRequired) //返回值为true就是在不同线程创建
{
Invoke(new Action(() =>
{
ListViewItem lvi = new ListViewItem(DateTime.Now.ToString(), index); //第1列日志时间显示,附带图标index
lvi.SubItems.Add(log1); //第2列添加日志内容
//lvi.SubItems.Add(log2); //如果日志显示3列,在这里写后一列再次新增一列,参数加一个日志内容 log2
lvi.ForeColor = GetColorByIndex(index); //根据图片索引改变颜色
lv_Log.Items.Insert(0, lvi); //在listview插入日志信息,每次插入在第一行
}));
}
else
{
ListViewItem lvi = new ListViewItem(DateTime.Now.ToString(), index); //第1列日志时间显示,附带图标index
lvi.SubItems.Add(log1); //第2列添加日志内容
//lvi.SubItems.Add(log2); //如果日志显示3列,在这里写后一列再次新增一列,参数加一个日志内容 log2
lvi.ForeColor = GetColorByIndex(index); //根据图片索引改变颜色
lv_Log.Items.Insert(0, lvi); //在listview插入日志信息,每次插入在第一行
}
}
public Color GetColorByIndex(int index) //根据图片索引改变颜色
{
switch (index)
{
case 0:
return Color.Black;
case 1:
return Color.Red;
default:
return Color.White;
}
}
//在日志找某个内容并删除
//foreach (ListViewItem item in lv_Log.Items) //判断item是否在lv_Log这个日志里
//{
// if (item.SubItems[1].Text=="串口通讯被加载") //第2列有没有这个内容
// {
// MessageBox.Show("找到"); //显示消息窗口 提示找到了
// lv_Log.Items.Remove(item); //移除这行消息
// }
//}
// 清空日志
private void button5_Click(object sender, EventArgs e)
{
lv_Log.Items.Clear();
}
3、子窗体显示方法
子窗体在主窗体里面
private void ShowChaildForm(Form fr) //封装子窗体方法,参数是子窗体的对象
{
pl_Parent.Controls.Clear(); //打开这个控件前先清除里面内容
fr.TopLevel = false; //是否将窗体设为顶层窗口
fr.Parent = this.pl_Parent; //设置TCP窗口的父容器
fr.Dock = DockStyle.Fill; //设置停靠位置充满
//this.pl_Parent.SetBounds(0, 0, tcpWindowsForm.Width, tcpWindowsForm.Height);
fr.Show(); //最后显示窗体
}
打开新的子窗体
Form2 form2=new Form2(); //成员new一个子窗体对象
form2.Show(); //点击控件显示
4、关闭窗体
private void button1_Click(object sender, EventArgs e) //按钮点击时退出窗体
{
if (MessageBox.Show("是否确定退出", "提示", MessageBoxButtons.OKCancel, MessageBoxIcon.Question) == DialogResult.OK)
{
this.Close(); //或者写下一个
Process.GetCurrentProcess().Kill();
this.Hide(); 隐藏窗口
}
}
5、移动无框窗体
字段:
private bool isDown = false; //鼠标是否按下
private Point pointMouse;
#region 按下鼠标 //在控件的 MouseDown 事件中写代码
private void lb_Title_MouseDown(object sender, MouseEventArgs e)
{
if (!isDown)
{
pointMouse = new Point(-e.X, -e.Y); //获取窗体移动距离
isDown = true;
}
}
#endregion
#region 松开鼠标 //在控件的 MouseUp 事件中写代码
private void lb_Title_MouseUp(object sender, MouseEventArgs e)
{
if (isDown)
{
isDown = false;
}
}
#endregion
#region 移动鼠标 //在控件的 MouseMove 事件中写代码
private void lb_Title_MouseMove(object sender, MouseEventArgs e)
{
if (isDown)
{
Point CurrentPoint = Control.MousePosition; //移动后位置
CurrentPoint.Offset(pointMouse);
this.Location = CurrentPoint; //窗体位置设为移动后位置
}
}
#endregion
6、循环展示图片
控件:Timer(enabled使能为ture) pictureBox
准备一个图片文件夹放在bin文件夹里面
字段:
string[] imageUrl; //定义一个图片的数组
int index = 0; //索引全局变量:用来迭代下一张,如果到了最后一张,就从第一张开始
构造函数写代码:
//获取指定文件夹下的所有图片集合,
imageUrl = System.IO.Directory.GetFiles("./autobahn");
//指定显示第一张图片
this.pictureBox1.ImageLocation = imageUrl[index];
private void timer1_Tick(object sender, EventArgs e) //定时器Tick事件
{
if (index < imageUrl.Length) //判断是否达到最大值,没有继续下一张
{
this.pictureBox1.ImageLocation = imageUrl[index++];
}
else
{
index = 0;
this.pictureBox1.ImageLocation = imageUrl[index++];
}
}
7、一个窗体展示完展示下一个窗体
比如,一个进度条窗体,进度条加载完(this.DialogResult = DialogResult.OK),展示登录窗体,点击登录,登录成功展示主窗体
主程序mian方法里代码
LoadForm loadForm = new LoadForm(); //加载窗体
if (loadForm.ShowDialog() == DialogResult.OK) //如果窗体返回值是OK
{
//登录窗体
LoginForm loginForm = new LoginForm();
if (loginForm.ShowDialog() == DialogResult.OK)
{
//主窗体
Application.Run(new MainForm());
}
}
进度条窗体:两个panel容器,一个label显示 ''加载中...'',两个timer计时器(enabled使能为ture)
private void timer1_Tick(object sender, EventArgs e) //计时器1判断进度条
{
this.panel2.Width += 10; //叠加进度条
//判断达到最大值,就停止计时器
if (this.panel2.Width > this.panel1.Width)
{
this.DialogResult= DialogResult.OK;
this.timer1.Stop();
}
}
//叠加次数
int count = 0;
private void timer2_Tick(object sender, EventArgs e) //计时器2循环加.
{
this.label3.Text += ".";
count++;
if (count>=6) //判断次数大于6次,回原继续
{
this.label3.Text = "下载中";
count=0;
}
if (this.DialogResult==DialogResult.OK)
{
this.label3.Text = "加载成功";
this.timer2.Stop();
}
}
登录窗口:
private void button1_Click(object sender, EventArgs e) //登录按钮
{
//这里写判断账号代码
this.DialogResult = DialogResult.OK; //窗体返回值(确定)
}
private void pictureBox2_Click(object sender, EventArgs e) //取消按钮
{
this.DialogResult = DialogResult.Cancel; //窗体返回值(取消)
}
8、获取随机颜色方法
static Color[] allColor = { Color.Pink, Color.Black, Color.Gray, Color.Brown, Color.Red, Color.LightCoral, Color.OrangeRed, Color.Sienna, Color.Peru, Color.Orange, Color.DarkOrange, Color.Olive, Color.Yellow, Color.OliveDrab, Color.DarkOliveGreen, Color.Green, Color.ForestGreen, Color.Lime, Color.DarkGreen, Color.SpringGreen, Color.LightSeaGreen, Color.Teal, Color.Cyan, Color.Blue, Color.Indigo, Color.DeepPink, Color.Crimson };
public static Color RandonColor()
{
Random rnd = new Random();
int colorNum = rnd.Next(0, 27);
return allColor[colorNum];
}
9、CRC-16校验--返回一个字节数组(两个字节)
用法:
接收校验:接收字节 byte[] byte=[01 03 04 02 c8 01 BA 20] 验证CRC校验位前的数据 (01 03 04 02 c8 01)
收到一个字节数组byte,验证前面7位返回的字节是不是和校验位一样
byte[] crc16 = Crc16(byte,7)
if(crc16[0]==byte[lenth-2]&&crc16[1]==byte[lenth-1]) --如果位true则校验通过
发送校验:发送字节 byte[] byte=[01 03 04 02 c8 01 ]
byte[] crc16 = Crc16(byte,byte.Lenth) 获取校验位值
把byte和crc16放到一个集合再转数组发送
private static readonly byte[] aucCRCHi = {
0x00, 0xC1, 0x81, 0x40, 0x01, 0xC0, 0x80, 0x41, 0x01, 0xC0, 0x80, 0x41,
0x00, 0xC1, 0x81, 0x40, 0x01, 0xC0, 0x80, 0x41, 0x00, 0xC1, 0x81, 0x40,
0x00, 0xC1, 0x81, 0x40, 0x01, 0xC0, 0x80, 0x41, 0x01, 0xC0, 0x80, 0x41,
0x00, 0xC1, 0x81, 0x40, 0x00, 0xC1, 0x81, 0x40, 0x01, 0xC0, 0x80, 0x41,
0x00, 0xC1, 0x81, 0x40, 0x01, 0xC0, 0x80, 0x41, 0x01, 0xC0, 0x80, 0x41,
0x00, 0xC1, 0x81, 0x40, 0x01, 0xC0, 0x80, 0x41, 0x00, 0xC1, 0x81, 0x40,
0x00, 0xC1, 0x81, 0x40, 0x01, 0xC0, 0x80, 0x41, 0x00, 0xC1, 0x81, 0x40,
0x01, 0xC0, 0x80, 0x41, 0x01, 0xC0, 0x80, 0x41, 0x00, 0xC1, 0x81, 0x40,
0x00, 0xC1, 0x81, 0x40, 0x01, 0xC0, 0x80, 0x41, 0x01, 0xC0, 0x80, 0x41,
0x00, 0xC1, 0x81, 0x40, 0x01, 0xC0, 0x80, 0x41, 0x00, 0xC1, 0x81, 0x40,
0x00, 0xC1, 0x81, 0x40, 0x01, 0xC0, 0x80, 0x41, 0x01, 0xC0, 0x80, 0x41,
0x00, 0xC1, 0x81, 0x40, 0x00, 0xC1, 0x81, 0x40, 0x01, 0xC0, 0x80, 0x41,
0x00, 0xC1, 0x81, 0x40, 0x01, 0xC0, 0x80, 0x41, 0x01, 0xC0, 0x80, 0x41,
0x00, 0xC1, 0x81, 0x40, 0x00, 0xC1, 0x81, 0x40, 0x01, 0xC0, 0x80, 0x41,
0x01, 0xC0, 0x80, 0x41, 0x00, 0xC1, 0x81, 0x40, 0x01, 0xC0, 0x80, 0x41,
0x00, 0xC1, 0x81, 0x40, 0x00, 0xC1, 0x81, 0x40, 0x01, 0xC0, 0x80, 0x41,
0x00, 0xC1, 0x81, 0x40, 0x01, 0xC0, 0x80, 0x41, 0x01, 0xC0, 0x80, 0x41,
0x00, 0xC1, 0x81, 0x40, 0x01, 0xC0, 0x80, 0x41, 0x00, 0xC1, 0x81, 0x40,
0x00, 0xC1, 0x81, 0x40, 0x01, 0xC0, 0x80, 0x41, 0x01, 0xC0, 0x80, 0x41,
0x00, 0xC1, 0x81, 0x40, 0x00, 0xC1, 0x81, 0x40, 0x01, 0xC0, 0x80, 0x41,
0x00, 0xC1, 0x81, 0x40, 0x01, 0xC0, 0x80, 0x41, 0x01, 0xC0, 0x80, 0x41,
0x00, 0xC1, 0x81, 0x40
};
private static readonly byte[] aucCRCLo = {
0x00, 0xC0, 0xC1, 0x01, 0xC3, 0x03, 0x02, 0xC2, 0xC6, 0x06, 0x07, 0xC7,
0x05, 0xC5, 0xC4, 0x04, 0xCC, 0x0C, 0x0D, 0xCD, 0x0F, 0xCF, 0xCE, 0x0E,
0x0A, 0xCA, 0xCB, 0x0B, 0xC9, 0x09, 0x08, 0xC8, 0xD8, 0x18, 0x19, 0xD9,
0x1B, 0xDB, 0xDA, 0x1A, 0x1E, 0xDE, 0xDF, 0x1F, 0xDD, 0x1D, 0x1C, 0xDC,
0x14, 0xD4, 0xD5, 0x15, 0xD7, 0x17, 0x16, 0xD6, 0xD2, 0x12, 0x13, 0xD3,
0x11, 0xD1, 0xD0, 0x10, 0xF0, 0x30, 0x31, 0xF1, 0x33, 0xF3, 0xF2, 0x32,
0x36, 0xF6, 0xF7, 0x37, 0xF5, 0x35, 0x34, 0xF4, 0x3C, 0xFC, 0xFD, 0x3D,
0xFF, 0x3F, 0x3E, 0xFE, 0xFA, 0x3A, 0x3B, 0xFB, 0x39, 0xF9, 0xF8, 0x38,
0x28, 0xE8, 0xE9, 0x29, 0xEB, 0x2B, 0x2A, 0xEA, 0xEE, 0x2E, 0x2F, 0xEF,
0x2D, 0xED, 0xEC, 0x2C, 0xE4, 0x24, 0x25, 0xE5, 0x27, 0xE7, 0xE6, 0x26,
0x22, 0xE2, 0xE3, 0x23, 0xE1, 0x21, 0x20, 0xE0, 0xA0, 0x60, 0x61, 0xA1,
0x63, 0xA3, 0xA2, 0x62, 0x66, 0xA6, 0xA7, 0x67, 0xA5, 0x65, 0x64, 0xA4,
0x6C, 0xAC, 0xAD, 0x6D, 0xAF, 0x6F, 0x6E, 0xAE, 0xAA, 0x6A, 0x6B, 0xAB,
0x69, 0xA9, 0xA8, 0x68, 0x78, 0xB8, 0xB9, 0x79, 0xBB, 0x7B, 0x7A, 0xBA,
0xBE, 0x7E, 0x7F, 0xBF, 0x7D, 0xBD, 0xBC, 0x7C, 0xB4, 0x74, 0x75, 0xB5,
0x77, 0xB7, 0xB6, 0x76, 0x72, 0xB2, 0xB3, 0x73, 0xB1, 0x71, 0x70, 0xB0,
0x50, 0x90, 0x91, 0x51, 0x93, 0x53, 0x52, 0x92, 0x96, 0x56, 0x57, 0x97,
0x55, 0x95, 0x94, 0x54, 0x9C, 0x5C, 0x5D, 0x9D, 0x5F, 0x9F, 0x9E, 0x5E,
0x5A, 0x9A, 0x9B, 0x5B, 0x99, 0x59, 0x58, 0x98, 0x88, 0x48, 0x49, 0x89,
0x4B, 0x8B, 0x8A, 0x4A, 0x4E, 0x8E, 0x8F, 0x4F, 0x8D, 0x4D, 0x4C, 0x8C,
0x44, 0x84, 0x85, 0x45, 0x87, 0x47, 0x46, 0x86, 0x82, 0x42, 0x43, 0x83,
0x41, 0x81, 0x80, 0x40
};
private byte[] Crc16(byte[] pucFrame, int usLen)
{
int i = 0;
byte[] res = new byte[2] { 0xFF, 0xFF };
UInt16 iIndex = 0x0000;
while (usLen-- > 0)
{
iIndex = (UInt16)(res[0] ^ pucFrame[i++]);
res[0] = (byte)(res[1] ^ aucCRCHi[iIndex]);
res[1] = aucCRCLo[iIndex];
}
return res;
}
10、工厂反射用法
一般用法是写一个接口类抽象实现相机的基础功能,再写具体的相机类继承接口类实现功能,工厂类静态方法返回接口类对象(实际返回的子对象,也就是具体的相机类对象),对象调用接口方法实现不同相机的具体功能
//返回配置文件对应的value值
using System.Reflection;
using System.Configuration;
添加引用---选程序集--添加System.Configuration
static string assName = ConfigurationManager.AppSettings["assName"]; //程序集名
static string className = ConfigurationManager.AppSettings["className"]; //命名空间.类名
public static ICam CreatrICam()
{
return (ICam )Assembly.Load(assName).CreateInstance(className); //通过程序集名和类名,返回对应实例对象
//Assembly.LoadForm(assName).CreateInstance(className); //LoadForm(),加载程序集路径,也可以使用
}
<appSettings>
<add key="assName" value="CameraDo"/> //可以写绝对路径
<add key="className" value="CameraDo.MVCamera"/>
</appSettings>
11、保存
// 检查是否有图像可保存
if (ho_BImageBGR1 == null)
{
MessageBox.Show("没有可保存的图像");
return;
}
// 选择保存文件的路径和文件名
SaveFileDialog saveFileDialog = new SaveFileDialog(); //路径
saveFileDialog.Filter = "JPEG图像|*.jpg"; //文件名
if (saveFileDialog.ShowDialog() == DialogResult.OK)
{
// 保存图像
HOperatorSet.WriteImage(ho_BImageBGR1, "jpeg", 0, saveFileDialog.FileName);
MessageBox.Show("图像保存成功");
}
12、最大化最小化
#region 最大化
private void btn_WindowMax_Click(object sender, EventArgs e)
{
if (this.WindowState == FormWindowState.Normal) //如果窗口是默认大小窗口
{
this.WindowState = FormWindowState.Maximized; //最大化窗口
btn_WindowMax.BackgroundImage = 四轴贴合机604.Properties.Resources.最大化; //更换图标
btn_WindowMax.BackgroundImageLayout = ImageLayout.Zoom;
imagepss.OpenWindow(pb_ImageShow.Width, pb_ImageShow.Height, pb_ImageShow.Handle); //打开窗口
}
else
{
this.WindowState = FormWindowState.Normal; //默认大小窗口
btn_WindowMax.BackgroundImage = 四轴贴合机604.Properties.Resources.最大化__1_; //更换图标
btn_WindowMax.BackgroundImageLayout = ImageLayout.Zoom;
imagepss.OpenWindow(pb_ImageShow.Width, pb_ImageShow.Height, pb_ImageShow.Handle); //打开窗口
}
}
#endregion
#region 最小化
private void btn_MinWindow_Click(object sender, EventArgs e)
{
this.WindowState = FormWindowState.Minimized; //最小化窗口
}
#endregion
13、保存页面参数
第三方工具放一个类
把读参数和写参数封装起来
#region 读入配置文件
private void ReadIniFile()
{
if (!File.Exists("13.ini"))
{
AddLog(0, "配置文件不存在 ");
return;
}
txt_StartSpeed.Text = IniFileConfigHelper.ReadIniData("运动参数", "初始速度", "", Application.StartupPath + "\\13.ini");
txt_MaxSpeed.Text = IniFileConfigHelper.ReadIniData("运动参数", "最大速度", "", Application.StartupPath + "\\13.ini");
txt_Dec.Text = IniFileConfigHelper.ReadIniData("运动参数", "加减时间", "", Application.StartupPath + "\\13.ini");
}
#endregion
#region 写入配置文件
public void SaveIniFile()
{
if (!File.Exists("13.ini"))
{
FileStream fs = new FileStream("13.ini", FileMode.Create);
fs.Close();
}
//要确保你有这个文件(ini)
bool res = true; // Application.StartupPath(获得exe文件的根目录)
res &= IniFileConfigHelper.WriteIniData("运动参数", "初始速度", txt_StartSpeed.Text, Application.StartupPath + "\\13.ini");
res &= IniFileConfigHelper.WriteIniData("运动参数", "最大速度", txt_MaxSpeed.Text, Application.StartupPath + "\\13.ini");
res &= IniFileConfigHelper.WriteIniData("运动参数", "加减时间", txt_Dec.Text, Application.StartupPath + "\\13.ini");
res &= IniFileConfigHelper.WriteIniData("报警参数", "初始速度", "500", Application.StartupPath + "\\13.ini");
res &= IniFileConfigHelper.WriteIniData("报警参数", "最大速度", "1000", Application.StartupPath + "\\13.ini");
res &= IniFileConfigHelper.WriteIniData("报警参数", "加减时间", "500", Application.StartupPath + "\\13.ini");
}
#endregion
分别在窗体关闭时调用(SaveIniFile() 写入配置文件),构造函数调用(ReadIniFile()读入配置文件)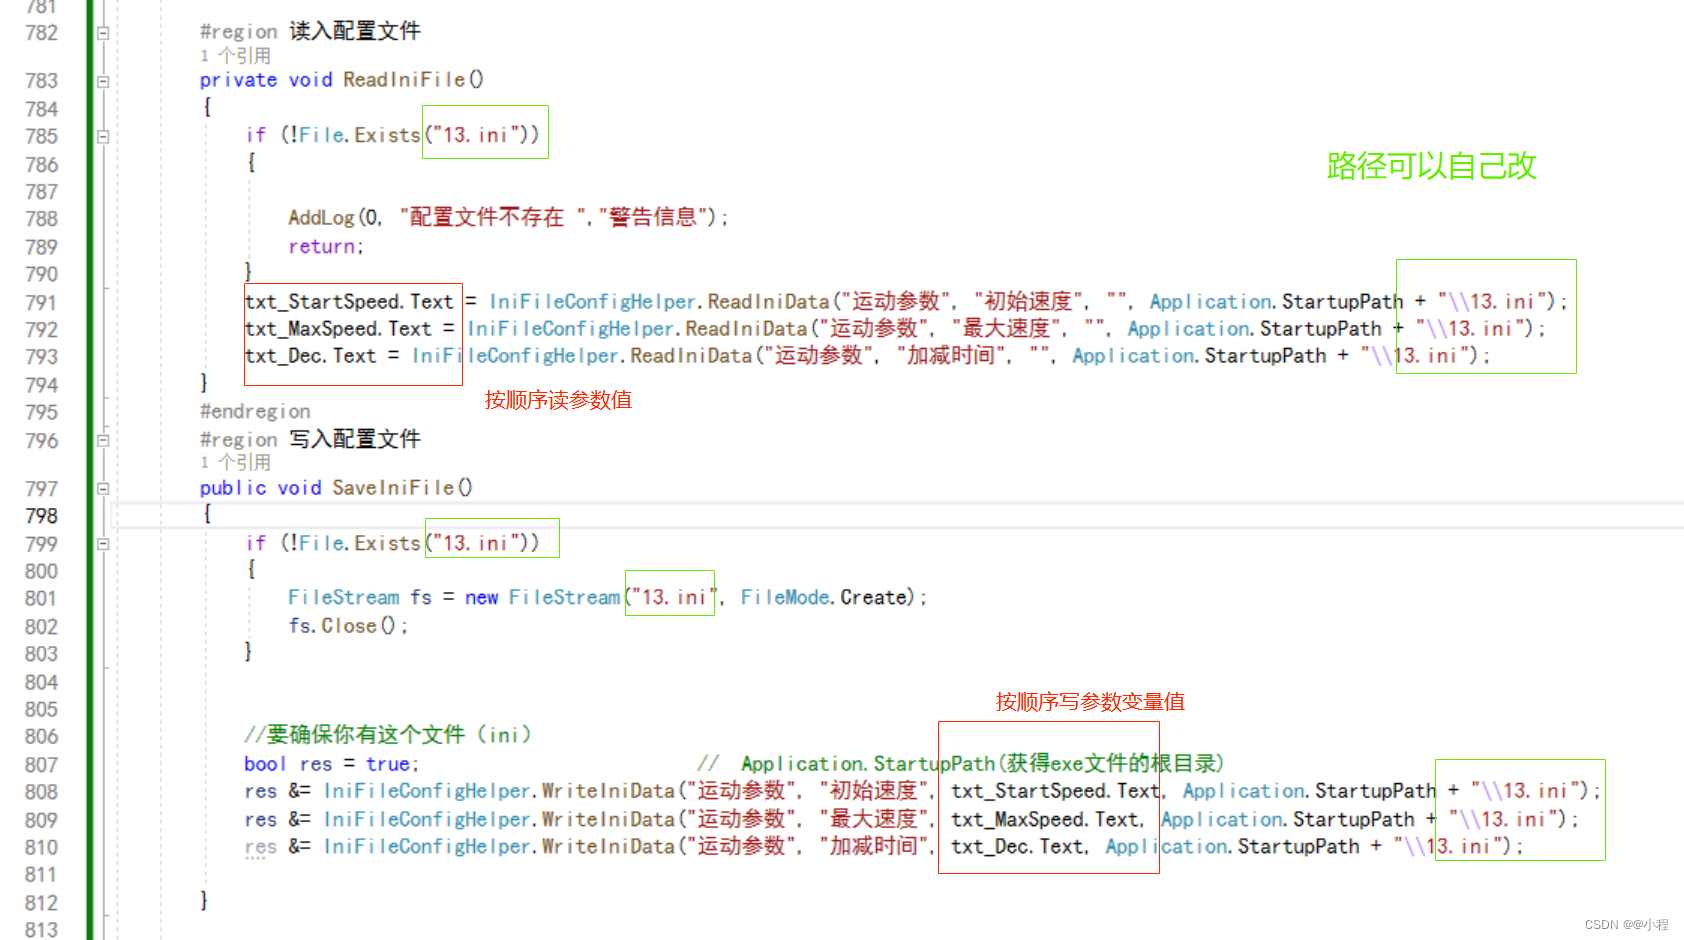
14、日志溯源
资料位置:D:\日志溯源dll库
1、拷贝dll库bin下 并且添加引用log4net.dll
2、添加 log4net.config文件到你的工程目录下 (直接赋值到项目下面) 设置成始终复制(右键-属性-设置为始终复制) 在bin下要有这个文件,没有复制一份
3、AssemblyInfo.cs文件中(在Properties) 增加一句
[assembly: log4net.Config.XmlConfigurator(ConfigFile = "log4net.config", ConfigFileExtension = "config", Watch = true)]
4、添加一个类(LogHelper.cs)到你的工程目录下
前面四步已经在通用框架封装好了,直接调用第5步就行
5、在打印日志方法后面调用 LogHelper.Info("正确日志") LogHelper.Error("错误日志")
日志文件夹生成在bin--debug文件夹下
15、PictureBox组件和hWindowControl组件显示图像区别
PictureBox组件需要先打开窗口设置为图片宽高和句柄,再显示
cam.GrabImage(out image, cam.SureCamHandle(0)); //采图
imagepss.OpenWindow(pb_ImageShow.Width, pb_ImageShow.Height,pb_ImageShow.Handle); //打开窗口
imagepss.ShowImage(image); //显示图像
hWindowControl组件只需要填组件句柄,不需要打开新窗口
cam.GrabImage(out image, cam.GetCam(0)); //相机采图
impro.ImageShow(image, hWindowControl1.HalconWindow); //显示图片
16、验证字符串格式
public static bool TryParse(string s, out Int32 result);
用法:
int a= 0;
if (int.TryParse(s, out a)==false) //将字符串s的值解析为整数。如果解析失败,返回false
{
错误提示
}
一般int,double类型用的比较多
17、标定常用技巧
平移旋转缩放补偿
触发条件:标定位和拍照位不在同一位置,在标定位九点标定
1、只发生平移
先算出标定位到拍照位的平移矩阵,再用拍照位识别出mark点的实际坐标*这个矩阵得到新的坐标
10 10 0 0 标定位
20 20 0 0 拍照位 拍照位实际坐标Qx,Qy
hom_mat2d_identity (HomMat2DIdentity) //生成一个空矩阵
hom_mat2d_translate (HomMat2DRotate, 20-10, 20-10,HomMat2DTranslate) //平移矩阵
affine_trans_point_2d (HomMat2DTranslate, Qx, Qy, Qxnew, Qynew) //实际坐标*矩阵
Qxnew, Qynew发给机器人
2、只发生旋转
先算出标定位到拍照位的旋转矩阵,再用拍照位识别出mark点的实际坐标*这个矩阵得到新的坐标
10 10 0 50 标定位
10 10 0 80 拍照位 拍照位实际坐标Qx,Qy
hom_mat2d_identity (HomMat2DIdentity)
hom_mat2d_rotate (HomMat2DIdentity,80-50,10 ,10, HomMat2DRotate)
affine_trans_point_2d (HomMat2DRotate, Qx, Qy, Qxnew, Qynew)
3、旋转+平移
先算出标定位到拍照位的旋转平移矩阵,再用拍照位识别出mark点的实际坐标*这个矩阵得到新的坐标
10 10 0 50 标定位
20 20 0 80 拍照位 拍照位实际坐标Qx,Qy
矩阵先旋转再平移,这是旋转中心是标定位(常用)
hom_mat2d_identity (HomMat2DIdentity)
hom_mat2d_rotate (HomMat2DIdentity,80-50,10 ,10, HomMat2DRotate)//旋转矩阵
hom_mat2d_translate (HomMat2DRotate, 20-10, 20-10, HomMat2DTranslate)//平移矩阵
affine_trans_point_2d (HomMat2DTranslate, Qx, Qy, Qxnew, Qynew)
矩阵先平移再旋转,这是旋转中心是拍照位
hom_mat2d_identity (HomMat2DIdentity)
hom_mat2d_translate (HomMat2DRotate, 20-10, 20-10, HomMat2DTranslate)//平移矩阵
hom_mat2d_rotate (HomMat2DIdentity,80-50,20 ,20, HomMat2DRotate)//旋转矩阵
affine_trans_point_2d (HomMat2DTranslate, Qx, Qy, Qxnew, Qynew)
高度变化补偿
触发条件:标定位和拍照位不在同一高度,在标定位九点标定
标定位高度10mm,拍照位高度变化
1、先求出标定位mark点像素坐标 Row1 Column1
2、再求出拍照位mark点像素坐标 Row2 Column2
3、计算拍照位mark点到标定位mark点仿射变换矩阵
vector_to_hom_mat2d (Row2 , Column2, Row1 , Column1, HomMat2DGo)
4、在拍照位拍照后先把像素点变换到标定位的位置,再用标定位的九点矩阵,这样就不用加偏差了
18、斜拍
1、首先斜着标定,标定第一张图片标定板坐标系要是正的
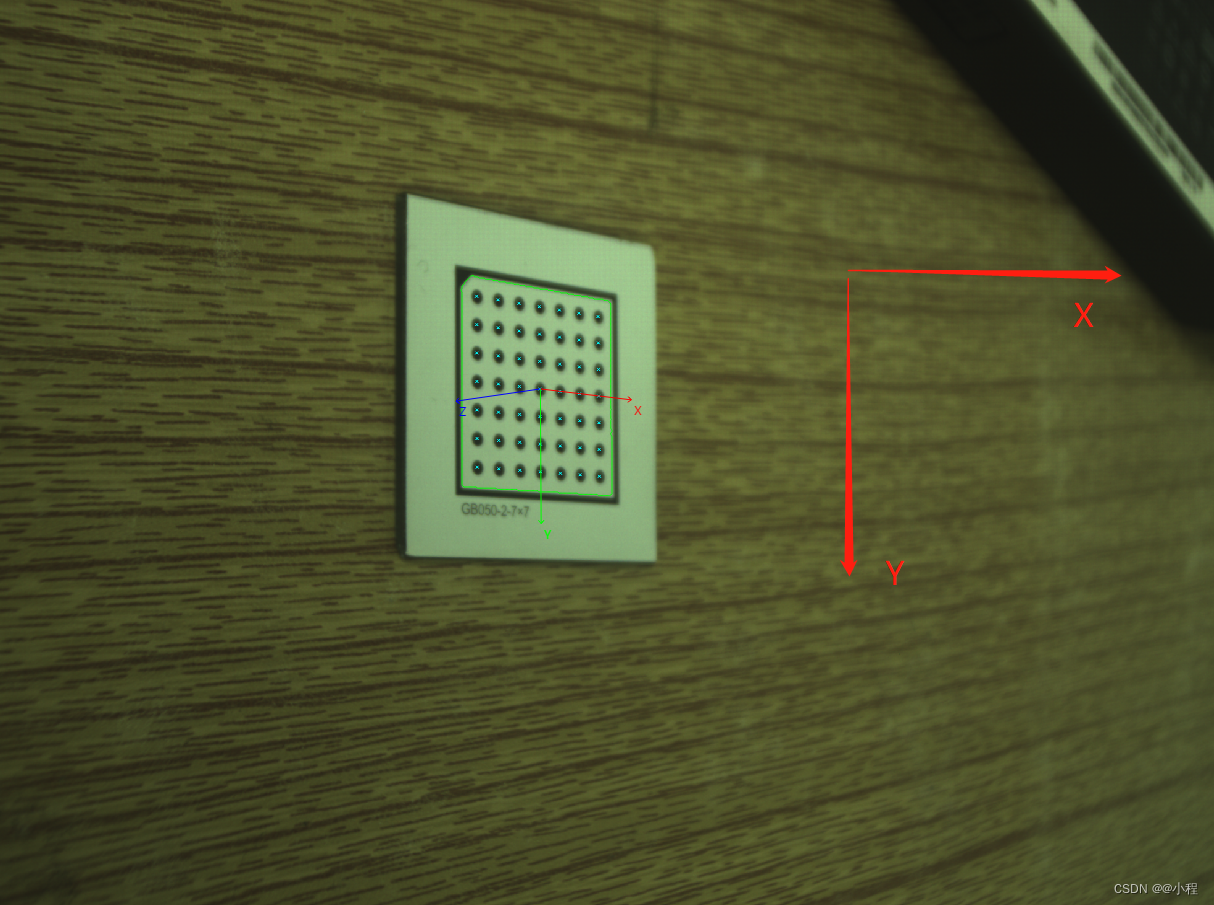
然后标定得到内外参
2、设置标定板描述文件
gen_caltab (7, 7, 0.004, 0.5, 'D:/实战课/斜拍.descr', 'caltab.ps')
3、计算比例当量(物体实际距离/像素距离)
Pixcle:=0.05/261
4、转换外参
set_origin_pose (CameraPose, -0.098, -0.05, 0.001, Newpose)
原始外参 坐标系往X方向平移量 坐标系往Y方向平移量 标定板厚度 新的外参
显示出原始外参坐标系和新的外参坐标系
把新外参坐标系平移到左上角,自己慢慢改参数试
disp_3d_coord_system (WindowHandle1, CameraParameters, CameraPose, 0.05)
disp_3d_coord_system (WindowHandle1, CameraParameters, Newpose, 0.05)
5、生成映射图
gen_image_to_world_plane_map (Map, CameraParameters, Newpose, 2048, 1536, 2048, 1536, Pixcle, 'bilinear')
输出map图 内参 新外参 要转换图像宽高 map图像宽高 比例当量 映射类型
6、斜拍图片转正
map_image (GrayImage, Map, ImageMapped)
原图 映射图 转正后图像


 1万+
1万+


 被折叠的 条评论
为什么被折叠?
被折叠的 条评论
为什么被折叠?
 到【灌水乐园】发言


