


简单跑通YOLOV5
最近一直都在跑yolov5,理论来说跑通并不难,但是这个过程在云计算平台上我还是遇到了各种各样的问题,然后也是第一次使用云计算平台,导致也是花费了不少时间。
云计算平台选择
我自己是使用过两个平台
1,飞浆
好处:几乎可以说得上免费了,每天都会送算力,反正我在使用过程中是花不完每天送的算力的。同时上面也提供了数据集,可以无需下载直接使用。
坏处:数据集稍微大一点,每次就需要解压,感觉速度也算不上快。
2.openbays
好处:速度比较快,可以选择的显卡类型多,还有个自动调参的功能,数据集大了也没关系。
坏处:就是要钱,除了A100之外,到也不算很贵。
yolov5的下载
检查是否下载成功
运行里面的detect.py文件,如果正常运行,yolov5-master里面会有一个runs文件夹,里面有一个detect文件夹,里面能找到对应的exp文件夹,里面有这样的图片
 如果失败了,自己找一下原因。我只能说,可能是没下载完!!我就是没下载完,被困了好久,下载过程不要中断!!解决方法就是再下一次,如果不是这个问题,就需要你自己去找一下。
数据集准备
自己制作数据集
如果选择这种方式的话,有很多标签方法,我自己是下了一个readme
readme
但是这种方法我自己还没用过,所以就不介绍了,大家可以自己探索一下。
下载数据集
提供数据集的网站有很多,大家可以自己找自己需要的数据集
1、魔搭社区:https://modelscope.cn/datasets
2、百度AIstudio:https://aistudio.baidu.com/datasetoverview
3、阿里天池:https://tianchi.aliyun.com/dataset/
4、极市平台:https://www.cvmart.net/dataSets
5、Kaggle:https://www.kaggle.com/datasets
6、paperswithcode:https://paperswithcode.com/datasets
7、聚数力:http://dataju.cn/Dataju/web/home
8、AMiner Dataset:https://www.aminer.cn/data/
9、https://opendatalab.com/
10、datafountain:https://www.datafountain.cn/datasets?category=16&page=
格式转换
找数据集是一个比较麻烦和费时间的事情,由于不管是自己制作的还是下载的数据集,它的标签格式都不一定是你想要的格式,这里就涉及了格式转换问题。(yolov5只认txt格式的标签)

类似这样的文件,第一个是标签类型,后面四个是坐标
自己制作数据集
如果是readme打的标的话,出来的是json文件,转换代码如下:
import json
import os

name2id =  {'hero':0,'sodier':1,'tower':2}#标签名称


def convert(img_size, box):
    dw = 1. / (img_size[0])
    dh = 1. / (img_size[1])
    x = (box[0] + box[2]) / 2.0 - 1
    y = (box[1] + box[3]) / 2.0 - 1
    w = box[2] - box[0]
    h = box[3] - box[1]
    x = x * dw
    w = w * dw
    y = y * dh
    h = h * dh
    return (x, y, w, h)


def decode_json(json_floder_path, json_name):
    txt_name = 'C:\\Users\\86189\\Desktop\\' + json_name[0:-5] + '.txt'
    #存放txt的绝对路径
    txt_file = open(txt_name, 'w')

    json_path = os.path.join(json_floder_path, json_name)
    data = json.load(open(json_path, 'r', encoding='gb2312',errors='ignore'))

    img_w = data['imageWidth']
    img_h = data['imageHeight']

    for i in data['shapes']:

        label_name = i['label']
        if (i['shape_type'] == 'rectangle'):
            x1 = int(i['points'][0][0])
            y1 = int(i['points'][0][1])
            x2 = int(i['points'][1][0])
            y2 = int(i['points'][1][1])

            bb = (x1, y1, x2, y2)
            bbox = convert((img_w, img_h), bb)
            txt_file.write(str(name2id[label_name]) + " " + " ".join([str(a) for a in bbox]) + '\n')


if __name__ == "__main__":

    json_floder_path = 'C:\\Users\\86189\\Desktop\\哈哈哈\\'
    #存放json的文件夹的绝对路径
    json_names = os.listdir(json_floder_path)
    for json_name in json_names:
        decode_json(json_floder_path, json_name)
网上找的数据集
1.如果直接是txt,也需要查看是否有5个值,没有的话要自己转换。
2,如果是json,coco类型的,代码如下:
#COCO 格式的数据集转化为 YOLO 格式的数据集
#--json_path 输入的json文件路径
#--save_path 保存的文件夹名字,默认为当前目录下的labels。

import os
import json
from tqdm import tqdm
import argparse

parser = argparse.ArgumentParser()
#这里根据自己的json文件位置,换成自己的就行
parser.add_argument('--json_path', default='/home/xue/PycharmProjects/pythonProject/YOLOv5/coco/datasets/annotations/instances_train2017.json',type=str, help="input: coco format(json)")
#这里设置.txt文件保存位置
parser.add_argument('--save_path', default='/home/xue/PycharmProjects/pythonProject/YOLOv5/coco/datasets/images', type=str, help="specify where to save the output dir of labels")
arg = parser.parse_args()

def convert(size, box):
    dw = 1. / (size[0])
    dh = 1. / (size[1])
    x = box[0] + box[2] / 2.0
    y = box[1] + box[3] / 2.0
    w = box[2]
    h = box[3]
#round函数确定(xmin, ymin, xmax, ymax)的小数位数
    x = round(x * dw, 6)
    w = round(w * dw, 6)
    y = round(y * dh, 6)
    h = round(h * dh, 6)
    return (x, y, w, h)

if __name__ == '__main__':
    json_file =   arg.json_path # COCO Object Instance 类型的标注
    ana_txt_save_path = arg.save_path  # 保存的路径

    data = json.load(open(json_file, 'r'))
    if not os.path.exists(ana_txt_save_path):
        os.makedirs(ana_txt_save_path)

    id_map = {} # coco数据集的id不连续!重新映射一下再输出!
    with open(os.path.join(ana_txt_save_path, 'classes.txt'), 'w') as f:
        # 写入classes.txt
        for i, category in enumerate(data['categories']):
            f.write(f"{category['name']}\n")
            id_map[category['id']] = i
    # print(id_map)
    #这里需要根据自己的需要,更改写入图像相对路径的文件位置。
    list_file = open(os.path.join(ana_txt_save_path, 'train2017.txt'), 'w')
    for img in tqdm(data['images']):
        filename = img["file_name"]
        img_width = img["width"]
        img_height = img["height"]
        img_id = img["id"]
        head, tail = os.path.splitext(filename)
        ana_txt_name = head + ".txt"  # 对应的txt名字,与jpg一致
        f_txt = open(os.path.join(ana_txt_save_path, ana_txt_name), 'w')
        for ann in data['annotations']:
            if ann['image_id'] == img_id:
                box = convert((img_width, img_height), ann["bbox"])
                f_txt.write("%s %s %s %s %s\n" % (id_map[ann["category_id"]], box[0], box[1], box[2], box[3]))
        f_txt.close()
        #将图片的相对路径写入train2017或val2017的路径
        list_file.write('./images/train2017/%s.jpg\n' %(head))
    list_file.close()
3.如果是xml格式的,代码如下:
import xml.etree.ElementTree as ET
import pickle
import os
from os import listdir, getcwd
from os.path import join


def convert(size, box):
    # size=(width, height)  b=(xmin, xmax, ymin, ymax)
    # x_center = (xmax+xmin)/2        y_center = (ymax+ymin)/2
    # x = x_center / width            y = y_center / height
    # w = (xmax-xmin) / width         h = (ymax-ymin) / height

    x_center = (box[0] + box[1]) / 2.0
    y_center = (box[2] + box[3]) / 2.0
    x = x_center / size[0]
    y = y_center / size[1]

    w = (box[1] - box[0]) / size[0]
    h = (box[3] - box[2]) / size[1]

    # print(x, y, w, h)
    return (x, y, w, h)


def convert_annotation(xml_files_path, save_txt_files_path, classes):
    xml_files = os.listdir(xml_files_path)
    # print(xml_files)
    for xml_name in xml_files:
        # print(xml_name)
        xml_file = os.path.join(xml_files_path, xml_name)
        out_txt_path = os.path.join(save_txt_files_path, xml_name.split('.')[0] + '.txt')
        out_txt_f = open(out_txt_path, 'w')
        tree = ET.parse(xml_file)
        root = tree.getroot()
        size = root.find('size')
        w = int(size.find('width').text)
        h = int(size.find('height').text)

        for obj in root.iter('object'):
            difficult = obj.find('difficult').text
            cls = obj.find('name').text
            # if cls not in classes or int(difficult) == 1:
            #     continue
            cls_id = classes.index(cls)
            xmlbox = obj.find('bndbox')
            b = (float(xmlbox.find('xmin').text), float(xmlbox.find('xmax').text), float(xmlbox.find('ymin').text),
                 float(xmlbox.find('ymax').text))
            # b=(xmin, xmax, ymin, ymax)
            # print(w, h, b)
            bb = convert((w, h), b)
            out_txt_f.write(str(cls_id) + " " + " ".join([str(a) for a in bb]) + '\n')


if __name__ == "__main__":
    # 把forklift_pallet的voc的xml标签文件转化为yolo的txt标签文件
    # 1、需要转化的类别
    classes = ['People', 'Car', 'Bus', 'Motorcycle', 'Lamp', 'Truck']
    # 2、voc格式的xml标签文件路径
    xml_files1 = r'D:\Technology\Python_File\yolov5\M3FD\Annotation_xml'
    # xml_files1 = r'C:/Users/GuoQiang/Desktop/数据集/标签1'

    # 3、转化为yolo格式的txt标签文件存储路径
    save_txt_files1 = r'D:\Technology\Python_File\yolov5\M3FD\Annotation_txt'

    convert_annotation(xml_files1, save_txt_files1, classes)
如果还有其他格式,可以在csdn上面查找对应代码。
划分训练集,验证集,测试集
这里我也提供一下代码:
import os
import random
import shutil

def split_dataset(srcDir, trainDir, valDir, split_ratio=0.6):
    """
    将数据集划分为训练集和验证集,并保存到相应的文件夹中。

    Parameters:
    - srcDir: 原始数据集文件夹路径,包含图像和标签文件。
    - trainDir: 训练集文件夹路径,包含 'images' 和 'labels' 子文件夹。
    - valDir: 验证集文件夹路径,包含 'images' 和 'labels' 子文件夹。
    - split_ratio: 数据集划分比例,默认为 0.9,表示将 90% 的数据用于训练集,10% 用于验证集。
    """
    os.makedirs(os.path.join(trainDir, 'images'), exist_ok=True)
    os.makedirs(os.path.join(trainDir, 'labels'), exist_ok=True)
    os.makedirs(os.path.join(valDir, 'images'), exist_ok=True)
    os.makedirs(os.path.join(valDir, 'labels'), exist_ok=True)

    # 获取数据集中所有文件的列表
    file_list = os.listdir(srcDir)
    random.shuffle(file_list)

    # 根据划分比例计算训练集和验证集的边界索引
    split_index = int(len(file_list) * split_ratio)
    train_files = file_list[:split_index]
    val_files = file_list[split_index:]

    # 将训练集数据移动到相应文件夹
    for file in train_files:
        if file.endswith('.jpg'):
            img_src = os.path.join(srcDir, file)
            label_src = os.path.join(srcDir, file[:-4] + '.txt')
            shutil.move(img_src, os.path.join(trainDir, 'images', file))
            shutil.move(label_src, os.path.join(trainDir, 'labels', file[:-4] + '.txt'))

    # 将验证集数据移动到相应文件夹
    for file in val_files:
        if file.endswith('.jpg'):
            img_src = os.path.join(srcDir, file)
            label_src = os.path.join(srcDir, file[:-4] + '.txt')
            shutil.move(img_src, os.path.join(valDir, 'images', file))
            shutil.move(label_src, os.path.join(valDir, 'labels', file[:-4] + '.txt'))

if __name__ == '__main__':
    # 输入文件夹路径
    srcDir = r'/home/xue/PycharmProjects/pythonProject/YOLOv5/coco/datasets/images/test'
    trainDir = r'/home/xue/PycharmProjects/pythonProject/YOLOv5/coco/datasets/images/test1'
    valDir = r'//home/xue/PycharmProjects/pythonProject/YOLOv5/coco/datasets/images/val'

    # 调用函数划分数据集
    split_dataset(srcDir, trainDir, valDir)
这里只能一个集分为两个,所以需要操作两次才能分开。在使用这个代码的时候,txt文件和图片要在一个文件夹里面。
最后数据集的整体tree就是下面这样的

image下面有test,train,val三个文件夹,每个文件夹下面又有images和labels(划分训练集的代码会自动给分好)
参数文件
在yolov5-master下面有一个data文件夹里面是数据的参数文件,随便复制一个到数据集文件夹同目录下。
修改这个文件的名字和里面的内容。
名字自己取一个
内容如下:
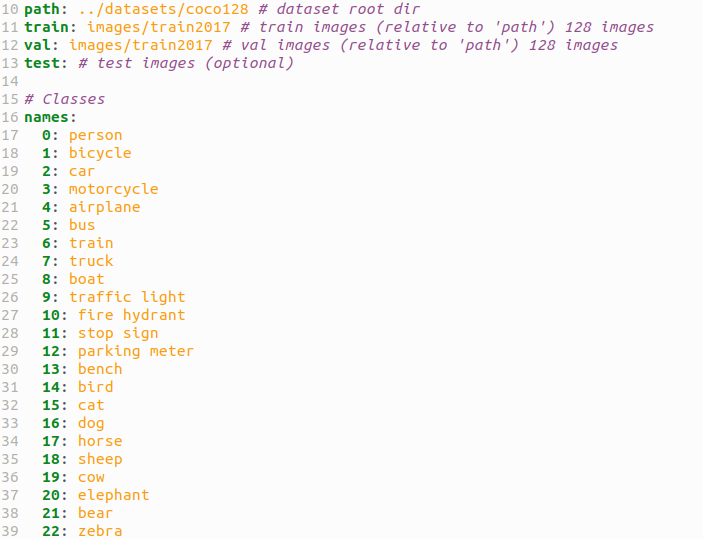
path:是会添加在train和test,val路径前面的,如果三个有相同可以写在path下面,如果没有就可以删去。train三个是指你数据集的train文件夹的位置,建议用相对位置,另外两个同理。
这里还缺了一个nc种类个数,names是标签对应的名字。
我写出来的效果是下面这样
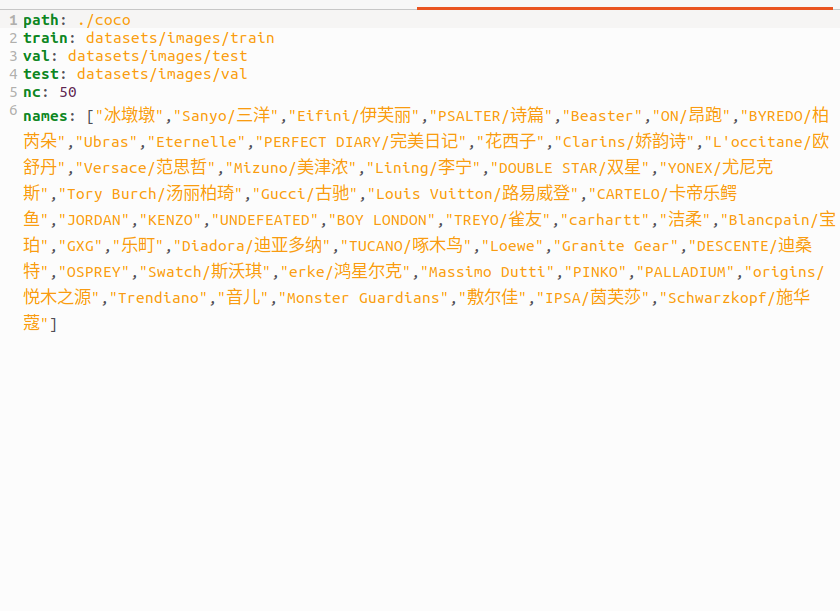
names里面不要空格!!会报错!!
每个:之后要空格!!!
模型文件
在yolov5-master下面有一个models文件夹,在里面选择你需要的模型文件复制到数据集文件夹同目录下。
可以参考这个效果
修改里面的内容
只要改一个nc就可以了,改成你的种类数量。
train文件

我框了几个可能要改的和必须要改的。
第一个和第二个是模型,第一个是在训练的时候会下载的,第二个是之前改的那个模型文件,所以这里也是需要填写那个文件的路径。
第三个是之前的参数文件,也是需要填写文件路径。第四个优化器可以考虑改,不知道的话就用默认的。第五个看自己需要改。epochs和batch-size都是在代码里面改的,个人觉得这里改没必要。
改完之后要保存!!!
jupyter代码运行
下载requirement.txt环境
这个文件里面是需要的环境直接运行
!pip install -r yolov5-master/requirements.txt -i http://pypi.doubanio.com/simple/ --trusted-host pypi.doubanio.com
这里很可能出现问题!!
到不是这里报错,而是在后面训练的时候报错大概率是这里的问题!
!python yolov5-master/train.py --epochs 100 --batch-size 64
这个是训练代码,在这里改轮数和batch-size,这里有各种报错,我遇到的。
1.CUDA error: no kernel image is available for execution on the device
CUDA kernel errors might be asynchronously reported at some other API call,so the stacktrace below might be incorrect.
For debugging consider passing CUDA_LAUNCH_BLOCKING=1.
这个好像是gpu问题,具体怎么解决的,我也不太清楚,反正我换了个显卡就好了。
2.GET was unable to find an engine to execute this computation
这个是环境问题,就是requirement.txt里面的torch版本大了,改为1.x就好了
3.torch.cuda.OutOfMemoryError: CUDA out of memory. Tried to allocate 236.00 MiB. GPU 0 has a total capacity of 16.00 GiB of which 136.00 MiB is free. Process 50595 has 15.87 GiB memory in use. Of the allocated memory 14.61 GiB is allocated by PyTorch, and 77.44 MiB is reserved by PyTorch but unallocated. If reserved but unallocated memory is large try setting PYTORCH_CUDA_ALLOC_CONF=expandable_segments:True to avoid fragmentation. See documentation for Memory Management (https://pytorch.org/docs/stable/notes/cuda.html#environment-variables)
这个把batch改小
实际还遇到了其他问题,找不到报错了,还有opencv版本问题,反正遇到问题大概率是版本问题,在csdn上面查找是不错的方法。
运行detect
!python /home/aistudio/yolov5-master/detect.py --weights /home/aistudio/yolov5-master/runs/train/exp17/weights/best.pt --source /home/aistudio/data/data265376/coco/datasets/images/test/images/0377b7899dffa167a6754f41ac78c40e.jpg
权重是训练之后最好的,去检测一个图片
train和detect运行之后都在runs里面
注意
不同云平台去跑一个代码,遇到的环境问题也不一样!
差不多运行起来就是这样了!我现在在研究调参,后续会发布我学习的成果。


 3998
3998


 被折叠的 条评论
为什么被折叠?
被折叠的 条评论
为什么被折叠?
 到【灌水乐园】发言


