


前言
在之前完成了对ZARA界面的仿写,这篇博客简单做一下总结。仿写主要实现了ZARA的三个界面,因此本篇播客也将分为三个界面来讲解和展示仿写的内容
推荐页

如图所示,这个界面主要要实现的就是无限轮播图,这里的无限轮播图实质上是一个UIScrollView滚动视图控件,而要实现无限轮播的功能,我们的思路是让他滚动到第三张图时,让第一张图成为他的下一张图。要实现这个功能,我们需要调用滚动视图的协议。
我们创建五张图片
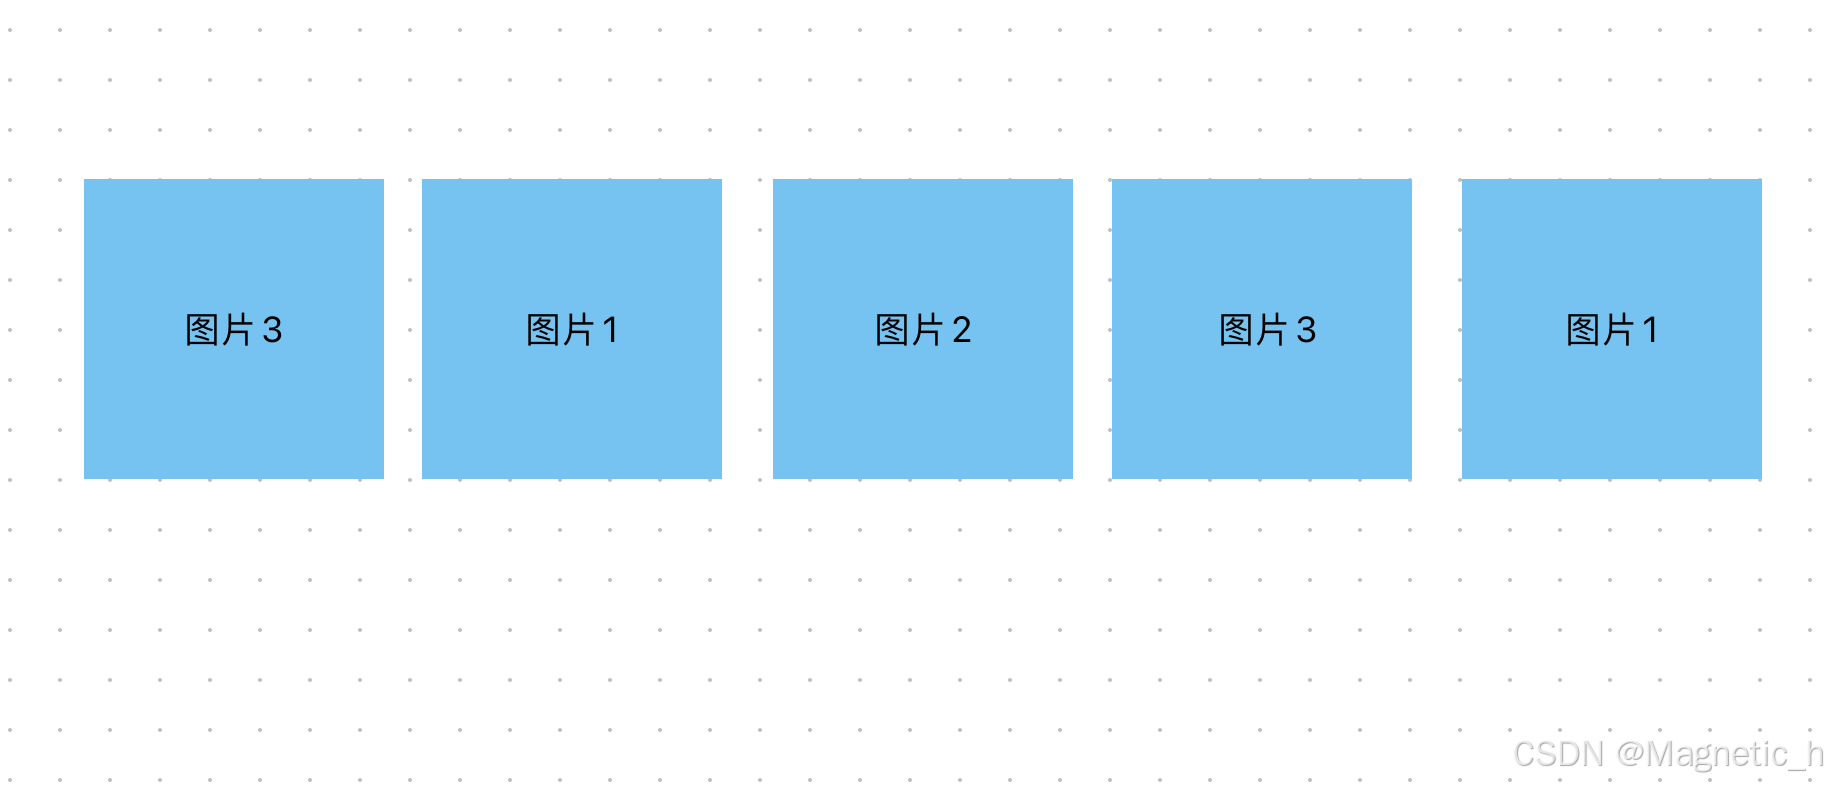
我们按顺序称呼五张图片分别为第一二三四五张图片
我们要做到当滑动到第五张图片时,视图自动滑动到第一张图片,当在第一张图片往左滑时,视图自动滑动到图片2,也就是第三张图片
- (void)scrollViewDidScroll:(UIScrollView *)scrollView {
    CGFloat contentOffsetX = scrollView.contentOffset.x;
    CGFloat screenWidth = CGRectGetWidth(scrollView.frame);
    CGFloat contentWidth = scrollView.contentSize.width;

    if (contentOffsetX >= contentWidth - screenWidth) {
        [scrollView setContentOffset:CGPointMake(screenWidth, 0) animated:NO];
    } else if (contentOffsetX < screenWidth - scrollView.frame.size.width) {
        [scrollView setContentOffset:CGPointMake(contentWidth - 2 * screenWidth, 0) animated:NO];
    }
}
这段代码需要写在滚动视图协议的函数里,需要先声明当前视图控制器遵守的协议
这样就可以实现滚动视图的无限轮播了,还可以加上定时器,使滚动视图自动进行无限轮播。
分类页

这个页面还是要实现一个滚动视图,本质和推荐页的滚动视图是一样的。除此之外,本页面还需要创建一个分栏控件,并实现分栏控件与滚动视图的同步。
先说一下分栏控件的外观,要改变分栏控件字体的颜色,这里需要使用字典来保存字体的状态
NSDictionary* normalAttributes = @{NSForegroundColorAttributeName: [UIColor whiteColor]};
    [_segControl setTitleTextAttributes:normalAttributes forState:UIControlStateNormal];
    NSDictionary* selectedAttributes = @{NSForegroundColorAttributeName: [UIColor orangeColor]};
    [_segControl setTitleTextAttributes:selectedAttributes forState:UIControlStateSelected];
这样就可以实现改变分栏控件字体的颜色
接下来分别来实现分栏控件控制滚动视图和滚动视图控制分栏控件
在推荐页滚动视图代码的基础上添加代码将滚动视图的偏移量转化成分栏控件的索引,从而达到通过滚动视图控制分栏控件
NSInteger selectedIndex = (double)(contentOffsetX / _scrollView.frame.size.width + 0.5);
    if (selectedIndex == 3) {
        selectedIndex = 0;
    }
    if (selectedIndex != _segControl.selectedSegmentIndex) {
        NSLog(@"%lu", selectedIndex);
        _segControl.selectedSegmentIndex = selectedIndex;
    }
在分栏控件的函数里可以实现通过改变索引来控制滚动视图的效果
- (void)indexChange:(UISegmentedControl*)segmentedControl {
    //获取选中的索引
    NSInteger selectindex = segmentedControl.selectedSegmentIndex;
    //获取滚动视图
    UIScrollView* scrollView = self.scrollView;
    //计算视图的偏移量
    CGFloat offsetX = selectindex * scrollView.bounds.size.width;
    CGFloat offsetY = scrollView.contentOffset.y;
    //设置滚动视图的偏移量
    [scrollView setContentOffset:CGPointMake(offsetX, offsetY) animated:YES];
}
“我的”页
这个页面本质上其实就是一个数据视图tableView,在这里注意自定义cell的使用,可以通过对cell索引的判断,来通过一个自定义cell实现头像部分和下面设置部分的布局。
除此之外,还需要在选中第一个单元格时添加事件,该事件需要推出一个新的界面,新的界面同样是一个数据视图。
cell类:
- (instancetype)initWithStyle:(UITableViewCellStyle)style reuseIdentifier:(NSString *)reuseIdentifier {
    self = [super initWithStyle:style reuseIdentifier:reuseIdentifier];
    self.label = [[UILabel alloc] init];
    [self.contentView addSubview:self.label];
    self.imageView = [[UIImageView alloc] init];
    [self.contentView addSubview:self.imageView];
    self.enter = [[UIImageView alloc] init];
    [self.contentView addSubview:self.enter];
    self.account = [[UILabel alloc] init];
    [self.contentView addSubview:self.account];
    return self;
}
获取cell:
- (UITableViewCell*) tableView:(UITableView *)tableView cellForRowAtIndexPath:(NSIndexPath *)indexPath {
    UITableViewCell *cell;
    cell = [_tableView dequeueReusableCellWithIdentifier:@"myCell"];
    myCell *mycell = (myCell*)cell;
    mycell.label.text = [_arrayData objectAtIndex:indexPath.row + indexPath.section];
    if (indexPath.row + indexPath.section == 0) {
        CGSize size = CGSizeMake(100, 100);
        UIGraphicsBeginImageContextWithOptions(size, NO, 0.0);
        [_imageArray[indexPath.row + indexPath.section] drawInRect:CGRectMake(0, 0, size.width, size.height)];
        UIImage *resizedImage = UIGraphicsGetImageFromCurrentImageContext();
        UIGraphicsEndImageContext();
        mycell.imageView.image = resizedImage;
        mycell.label.font = [UIFont systemFontOfSize:32.00];
        mycell.label.frame = CGRectMake(130, 0, 500, 80);
        mycell.imageView.frame = CGRectMake(10, 10, 100, 100);
        mycell.enter.frame = CGRectMake(350, 50, 30, 30);
        mycell.account.text = @"账号:a37214567";
        mycell.account.textColor = [UIColor grayColor];
        mycell.account.frame = CGRectMake(130, 80, 150, 30);
    } else {
        mycell.label.frame = CGRectMake(50, 10, 60, 30);
        mycell.imageView.frame = CGRectMake(10, 10, 30, 30);
        mycell.enter.frame = CGRectMake(350, 10, 30, 30);
        mycell.imageView.image = [_imageArray objectAtIndex:indexPath.row + indexPath.section];
    }
    mycell.enter.image = [UIImage imageNamed:@"进入.jpg"];
    return cell;
}
UIGraphicsBeginImageContextWithOptions(size, NO, 0.0);
        [_imageArray[indexPath.row + indexPath.section] drawInRect:CGRectMake(0, 0, size.width, size.height)];
        UIImage *resizedImage = UIGraphicsGetImageFromCurrentImageContext();
        UIGraphicsEndImageContext();
这里的这一段代码其实是在对图片进行重新绘制,以调整图片的大小,使得整个界面更美观。
这里不用对cell强转,直接创建该类型的变量就可以了。
总结
这就是zara仿写的主要内容,总的来说还是比较简单的,许多时间其实是花在调整控件的外观上面,要实现的功能不多,不过刚开始写可能会有点迷茫。


 442
442

 被折叠的 条评论
为什么被折叠?
被折叠的 条评论
为什么被折叠?
 到【灌水乐园】发言


