


vue3+ts+pinia+vite+element-plus
1. 技术栈介绍
本次创建项目需要接触到5个东西:Vue3、TypeScript、vite、pinia,element-plus 咱们来逐一解释。
- 作为前端常用三大框架(Vue、React、Angular)之一,Vue在2020年9月18日正式发布了Vue3.0,简称Vue3
- JavaScript我们都知道,而Typescript则是JavaScript的超集,即可编译成JavaScript,相当于是在JavaScript上面加了类型约束
- vite是一种新型前端构建工具,同样出自尤大之手。使用webpack的可以看看vite,突出一个字:快
- pinia可作为vue3项目的数据存储共享,不仅API更加简洁,而且可配合ts使用,更好的实现类型推导
2. 安装pnpm
同一个包 pnpm 只会安装一次,磁盘中只有一个地方写入,后面再次使用都会直接使用
//安装pnpm
npm i pnpm -g

//切换国内镜像
pnpm config set registry https://registry.npmmirror.com/

//安装依赖
pnpm install 包名

//全局安装
pnpm install 包名 -g
如果安装依赖出错:
ERR_PNPM_REGISTRIES_MISMATCH This modules directory was created using the following registries configuration: {“default”:“https://registry.npmjs.org/”}. The current configuration is {“default”:“https://registry.npmmirror.com/”}. To recreate the modules directory using the new settings, run “pnpm install”.
解决方案:
pnpm install
pnpm install pnpm -g
3. 创建项目
// 创建项目 my-vue
npm create vite@latest
// 进入项目目录
cd my-vue3
4. 安装依赖包
// 安装依赖包
pnpm install
5. 运行项目
// 运行项目
pnpm run dev
6. 安装vscode插件volar
- ts 对应的volar
7. vite.config.ts配置路径别名和服务器代理
1.配置 vite.config.ts
注意: 配置完后,1. path找不到模块 2. @路径别名无效 3. 个别同学还会出现其它错误
解决文案在最后
import { defineConfig } from 'vite'
import vue from '@vitejs/plugin-vue'
import * as path from 'path'
import { resolve } from 'path'
// https://vitejs.dev/config/
export default defineConfig({
  plugins: [vue()],
  resolve: {
    //设置别名
    alias: {
      "@":path.resolve(__dirname,'src')
    }
  },
    server: {
    proxy: {
      "/api": {
        target: "http://localhost:3001",
        changeOrigin: true,
        rewrite: (path) => path.replace(/^\/api/, ""),
      },
    },
  },
})
2.报错解决方案
1.找不到模块“path”或其相应的类型声明
解决方案
//安装node的类型声明文件包
pnpm add @types/node -D
引入ts时加扩展名报错的问题
问题,加了扩展名就报错
//报错
import {IProps} from '@/type/common.ts'
//不报错
import {IProps} from '@/type/common'
加扩展名不报错的解决方案:
tsconfig.json中添加
"allowImportingTsExtensions": true
2.路径别名@无效的情况
解决方案:
修改tsconfig.json
{
  "compilerOptions": {
   // ......
    //************************************************baseUrl和paths都需要配置--开始
    // 解析非相对模块名的基准目录
    "baseUrl": "./",
    // 模块名到基于 baseUrl的路径映射的列表。ts文件中使用@
    "paths": {
      "@": ["src"],
      "@/*": ["src/*"]
    }
    //************************************************baseUrl和paths都需要配置--结束
  },
  "include": ["src/**/*.ts", "src/**/*.d.ts", "src/**/*.tsx", "src/**/*.vue"],
  "references": [{ "path": "./tsconfig.node.json" }]
}
3.引入vue文件找不到
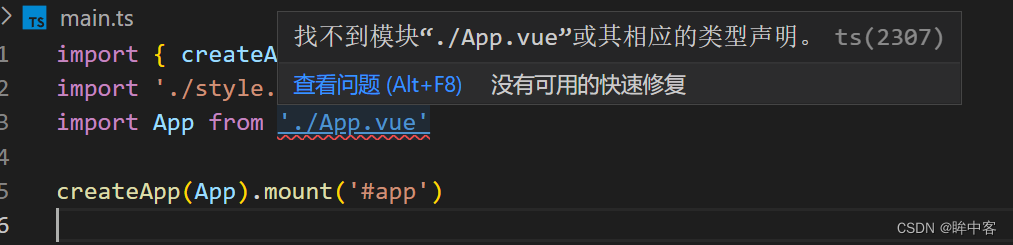
解决方案:
在src/vite-env.d.ts中添加代码
declare module "*.vue" {
    import type { DefineComponent } from "vue";
    const vueComponent: DefineComponent<{}, {}, any>;
    export default vueComponent;
}
4.ts.config.ts{}大括号上报红
解决方案: 关掉vscode重启
5.引入element-plus组件报红
解决方案: 同下面的6

6.vite.config.ts中报红
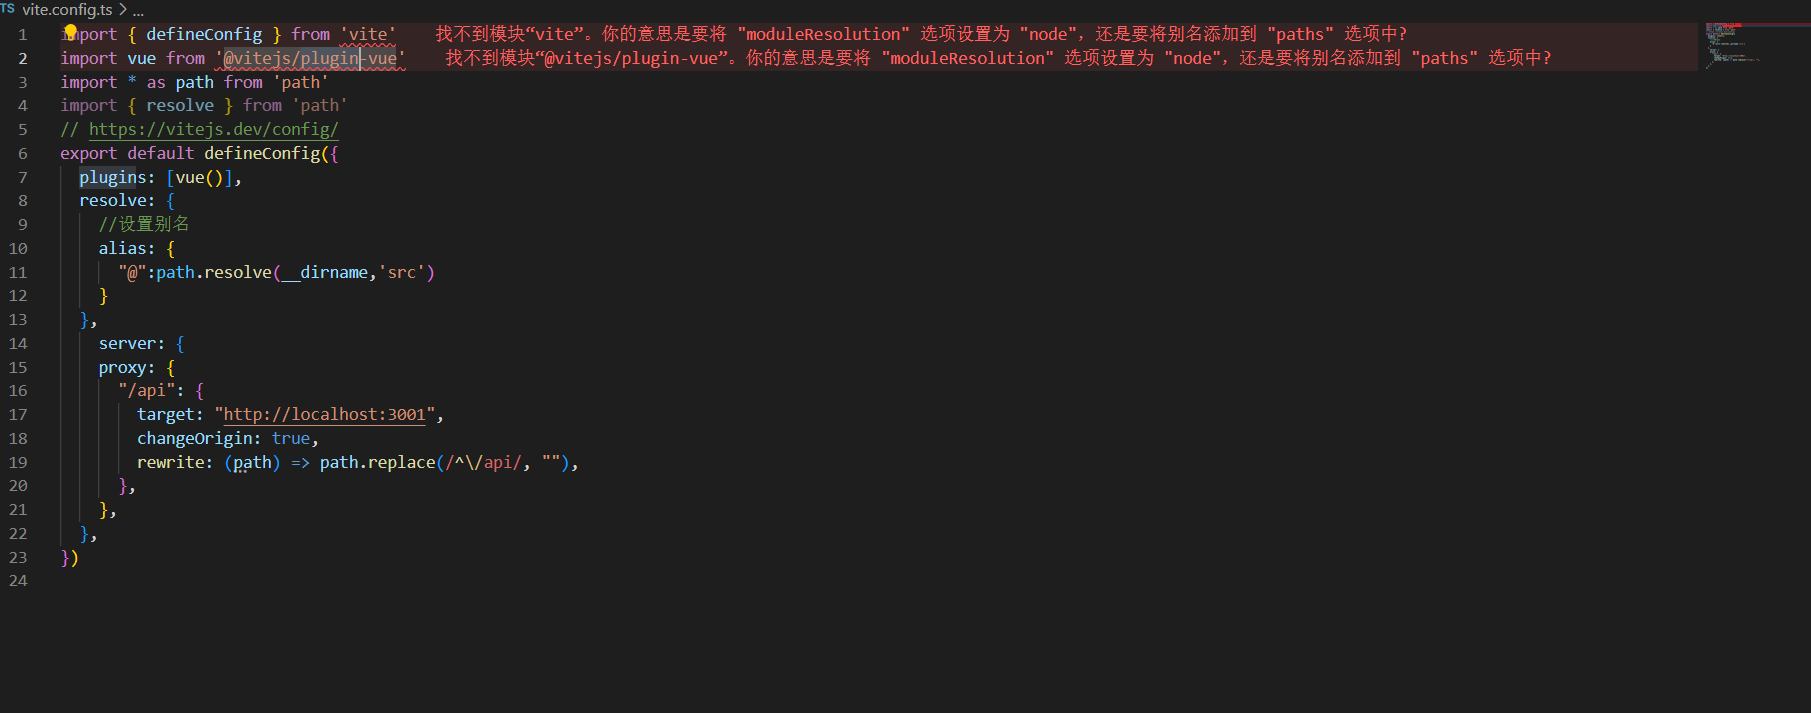
解决方案
修改ts.config.ts
// 改之前
"moduleResolution": "bundler",
// 改之后
"moduleResolution": "node",

// 这句话可以删除,从 TypeScript 3.8 开始,这个选项已经被废弃了
"allowImportingTsExtensions": true,
修改tsconfig.node.json
// 改之前
"moduleResolution": "bundler",
// 改之后
"moduleResolution": "node",
8. 快速生成vue3的模板
vscode - 文件 - 首选项 - 配置用户代码片段 - 新建全局用户代码片段文件 - 命名为vue3, - 回车
粘入以下代码
{
    "Print to console": {
        "scope": "vue", //指定文件类型,只有.vue文件可以触发
        "prefix": "v3", //自定义触发指令,我这里设置输入v3按下回车即可快速生成模板
        "body": [ //定义模板内容
            "<script setup lang='ts'>",
            "",
            "</script>",
            "",
            "<template>",
            "    <div class=\"$1\">",
            "       $2",
            "    </div>",
            "</template>",
            "",
            "<style lang='scss' scoped>",
            "",
            "</style>"
        ],
        "description": "Log output to console"
    }
}
9. sass报错
vite有内置的sass配置信息,所以直接安装sass即可
pnpm install sass
10. 父向子传值
defineProps()
interface Props {/* ... */}

defineProps<Props>()
接口或对象字面类型可以包含从其他文件导入的类型引用,但是,传递给 defineProps 的泛型参数本身不能是一个导入的类型
- Parent.vue
<script setup lang='ts'>
import { ref } from 'vue';
import Child from './Child.vue'
const user = ref("李四")
</script>


<template>
  <div class="test">
    <p>{{ user }}</p>
    <Child :user="user"/>
    <!-- <p><button @click="count++">修改数据</button></p> -->
  </div>
</template>

<style lang='scss' scoped>

</style>
Child.vue
<script setup lang='ts'>

interface Props {
  user: string
  age?: number
}


//在ts中调用要返回props
// const props = defineProps<Props>()
// console.log(props.user)

</script>

<template>
    <div class="">
       <!-- child-----{{ props.user }} -->
       child-----{{ user }}
    </div>
</template>

<style lang='scss' scoped>

</style>
withDefaults()
设置props默认值
案例代码
- parent.vue
<script setup lang='ts'>
import { ref } from 'vue';
import Child from './Child.vue'
const parentUser = ref("张爸爸")
const user = ref('张三')
const list = ref([2,3])
</script>


<template>
  <div class="test">
    <p>parentUser---{{ parentUser }}</p>
    <p>user---{{ user }}</p>
    <Child ></Child>
    <hr>
    <Child :user="user" :list="list"></Child>
  </div>
</template>

<style lang='scss' scoped>

</style>
child.vue
<script setup lang='ts'>

    interface Props {
        user: string,
        list: number[]
    }
    const props = withDefaults(defineProps<Props>(),{
        user: '刘培强',
        list: ()=>[1,1,1]
    })

</script>

<template>
    <div class="">
        <p>user: {{user}}</p>
        <p>list: {{list}}</p>
        <!-- <p @click="change">改变父组件的数据</p> -->
    </div>
</template>

<style lang='scss' scoped>

</style>
11. 子向父传值
defineEmits()
案例代码
- parent.vue
<script setup lang='ts'>
import { ref } from 'vue';
import Child from './Child.vue'
const parentUser = ref("张爸爸")
const getData = (newValue: string)=>{
  parentUser.value = newValue
}
</script>


<template>
  <div class="test">
    <p>parentUser---{{ parentUser }}</p>
    <Child @change="getData"></Child>
    <hr>
  </div>
</template>

<style lang='scss' scoped>

</style>
child.vue
<script setup lang='ts'>
// 运行时
// const emit = defineEmits(['change', 'update'])

// 基于类型
const emit = defineEmits<{
    (e: 'change', newValue: string): void
    // (e: 'update', value: string): void
}>()

const changeData = (newValue: string) => {
    emit("change", newValue)
}
</script>

<template>
    <div class="">
        <p @click="changeData('均11113333')">改变父组件的数据</p>
    </div>
</template>

<style lang='scss' scoped>

</style>
12. 路由
1. 安装路由
npm i vue-router
2. 创建路由组件
3. 创建src/router/index.ts
import { createRouter, createWebHistory, RouteRecordRaw } from 'vue-router'

// Array<RouteRecordRaw> 类型声明
const routes: Array<RouteRecordRaw> = [
  {
    path: '/',
    name: 'home',
    component: () => import("@/pages/layout/index.vue"),
    redirect: '/dashboard',
    children: [{
      path: 'dashboard',
      component: () => import("@/pages/dashboard/index.vue"),
    }]
  },
  {
    path: '/charts',
    name: 'charts',
    component: () => import("@/pages/layout/index.vue"),
    children: [
      {
        path: 'pie',
        component: () => import("@/pages/charts/pie.vue"),
      },
      {
        path: 'bar',
        component: () => import("@/pages/charts/bar.vue"),
      }
    ]
  },
  {
    path: '/login',
    name: 'login',
    component: () => import('@/pages/login/index.vue')
  },
  {
    path: '/404',
    component: () => import('@/pages/notFound/index.vue')
  },
   {
    path: "/:pathMatch(.*)*",
    component: () => import('@/pages/notFound/index.vue')
  },
]

const router = createRouter({
  history: createWebHistory(import.meta.env.BASE_URL),
  routes
})

export default router
注意事项
- import.meta.env.BASE_URL 获取环境变量
13. api封装
1. api/config.ts
import axios from "axios" //第一步:导入axios
import { ElLoading, ElMessage } from 'element-plus'
//定义类型
let loading: any;
//开启loading
function startLoading() {
    //@ts-ignore
    loading = ElLoading.service({
        lock: true,
        text: '拼命加载中....',
        background: "rgba(0,0,0,0.7)",
    })
}
//关闭loading
function endLoading() {
    loading.close();
}

//第二步:创建axios实例
const service = axios.create({
    baseURL: 'http://localhost:5000',
    timeout: 50000//超时时间
})

//第三步 请求拦截

service.interceptors.request.use((config) => {

    // 在发送请求之前做些什么 验证token之类的
    // console.log("请求的数据:", config);
    if (sessionStorage.token) {
        // 不再加common
        config.headers.Authorization = 'Bearer ' + sessionStorage.token
    }
    //开启loading
    startLoading();
    return config;
}, (error) => {
    //关闭loading
    endLoading();
    return Promise.reject(error)
}
)

// //第四步 响应拦截
service.interceptors.response.use((response) => {
    //关闭loading
    endLoading();
    return response
},
    (error) => {
        //关闭loading
        endLoading();
        const { code } = error;

        if (code == "ERR_NETWORK") {
            //@ts-ignore
            ElMessage.error("没网");
        } else if (code == 401) {
            //@ts-ignore
            ElMessage.error("token过期啦,请重新登陆");
            sessionStorage.clear
            window.location.reload()
        } else {
            ElMessage.error(error?.response?.data?.msg);
        }

        //@ts-ignore
        // return Promise.reject(error);
    }
)
export default service;
2. api/types.ts
export interface IAccount{
    account: string,
    pw: string
}
export interface IClassInfo{
    readonly classId ?: number,
    className?: string,
    classroom?: string,
    gender?: number,
    ht?: string,
    payStatus?: number,
    page?: Number
}
15. api/http.ts
import axios from './config'
import type { IAccount,IClassInfo } from './types'
//用户登录
// 第一种写法
// export const login = data => axios.post("/login", data)

// 第二种写法
export function login(data: IAccount) {
    return axios({
        url: '/login',
        method: "post",
        data
    })
}
参考更加完善的ts+axios封装: https://zhuanlan.zhihu.com/p/452946486
14. vite不能热更新
vite.config.js中加入
export default defineConfig({
  resolve: {...},
  plugins: [...],
  // 加入以下代码
  server: {
    hmr:true  //禁用或配置HMR连接
  }
})
15. 安装pinia
符合直觉的 Vue.js 状态管理库 (状态管理工具) 替代vuex,
只有vue3才支持pinia
pinia中没有mutations
pnpm add pinia
pnpm add pinia-plugin-persist // pinia数据持久化
16. 使用pinia
创建store/index.ts
import { createPinia } from 'pinia'
import persist from 'pinia-plugin-persist'

const pinia = createPinia()
pinia.use(persist)
export default pinia
main.ts
import { createApp } from 'vue'
import './style.css'
import App from './App.vue'
//引入store
import pinia from "@/store/index";
//在应用中注册store
createApp(App).use(pinia).mount('#app')
定义Store
src/store/userStore.ts
import { defineStore } from "pinia";

interface UserType {
    name: string,
    age: number
}
interface UserStoreType  {
    user: string,
    userList: UserType[],
    count: number
}
export const useUserStore = defineStore("user", {
  state: () => {
    return {
      user: "",
      userList: [],
      count: 10,
    } as UserStoreType
  },

  getters: {
    double: (state) => state.count * 2,
  },
  //pinia中没有mutations,可以通过action直接修改store数据,
  // 而且action中可以有异步操作
  // 和vuex比较,没有mutations,也没有modules
  actions: {
    increment() {
      this.count++;
      console.log(this.double);
    },
  },
  // 持久化插件配置
  // 持久化
  persist: {
    enabled: true,
    // 缓存所有state, key值为存入localStorage的键名
    // strategies: [
    //     {
    //         key: 'userkey',
    //         storage: localStorage,
    //         // storage: sessionStorage,
    //     }
    // ],

    // 缓存部分state,如果没有key值,则用store的id作为key值
    strategies: [
        {
            key: 'token',
            storage: localStorage,
            // storage: sessionStorage,
            //指定部分需要缓存的数据
            paths: ['count']
        }
    ]
}
});
组件中使用
<script setup lang="ts">
// storeToRefs 是 Vue 3 中的一个辅助函数,它的作用是将响应式的数据对象转换成一组响应式的引用。
import { storeToRefs } from 'pinia'
import { useUserStore } from '../../store/userStore'
import { useThemeStore } from '../../store/themeStore'
// 可以在组件中的任意位置访问 `store` 变量 ✨
const userStore = useUserStore()
const themeStore = useThemeStore()

// const { count,double } = storeToRefs(userStore)
// const { increment} = userStore

const { themeColor,num } = storeToRefs(themeStore)
const { changeThemeColor, changeNum} = themeStore
</script>

<template>
    <div class="console">
        <h3>console</h3>
        <p>{{ userStore.count }}</p>
        <p>{{ userStore.double }}</p>
        <p><button @click="userStore.increment">增加</button></p>

        <p>{{ themeColor }}</p>
        <p>{{ num }}</p>
        <p><button @click="changeThemeColor('a')">增加</button></p>
        <p><button @click="changeNum(1)">增加</button></p>
    </div>
</template>

<style lang="scss" scoped></style>
17.特别注意的细节
1. Ref的使用场景
- 定义数据为空数组后,给数组赋值,会有ts类型检查提示
//.....
const list = ref([])  //list被推断为never类型
list.value = [23,45,67]  //不能将number类型赋值给never类型


//解决方案: 加上Ref关键字,帮助ts类型推导
const list:Ref = ref([])
//.....
2. 类型定义
- 定义模板引用
const charts: Ref = ref<HTMLElement>()
18. 在项目中使用TS的四种情况
-
在当前文件中根据需求直接定义类型
interface IAccount { account: string; pw: string; } -
在外部的*.ts中拆分类型声明,可以被多个文件共享
export interface IAccount { account: string; pw: string; } -
用import直接引入库文件提供好的现成的类型声明 “vue-router的类型”
// 其中RouteRecordRaw,RouterHistory是类型声明 import { createRouter, createWebHistory, RouteRecordRaw,RouterHistory} from "vue-router"; // 或者分开引入 import { createRouter, createWebHistory } from "vue-router"; import type { RouteRecordRaw, RouterHistory } from "vue-router"; -
直接在*.d.ts中声明的全局类型,在文件中使用时不需要引入,直接使用
declare interface IAccount {
  account: string;
  pw: string;
}
19. 项目中使用ts的意义
像 TypeScript 这样的类型系统可以在编译时通过静态分析检测出很多常见错误。这减少了生产环境中的运行时错误,也让我们在重构大型项目的时候更有信心。通过 IDE 中基于类型的自动补全,TypeScript 还改善了开发体验和效率。
Vue 本身就是用 TypeScript 编写的,并对 TypeScript 提供了一等公民的支持。所有的 Vue 官方库都自带了类型声明文件,开箱即用
20. ts+ provide+inject
<script setup lang="ts">
import {inject} from 'vue'
/**
  在祖先组件中定义provide的格式
     // 创建一个可响应的数据对象
      const myData = reactive({
        count: 100,
        increment() {
          this.count++
        }
      })

      // 提供数据和方法
      provide('myData', myData)
 */

interface MyData {
  count: number
  increment: () => void
}
const myData = inject('myData') as MyData | undefined

</script>

<template>
  <!-- 使用可选链操作符访问属性和方法 -->
   <div class="bar" @click="myData?.increment">
       bar---{{ myData?.count }}
   </div>
</template>

<style lang="scss" scoped>

</style>
21. login中的ts
<template>
    <el-form ref="ruleFormRef" :model="ruleForm" :rules="rules" label-width="120px" class="demo-ruleForm" :size="formSize"
        status-icon>
        <el-form-item label="账号" prop="account">
            <el-input v-model="ruleForm.account" />
        </el-form-item>

        <el-form-item label="密码" prop="pw">
            <el-input v-model="ruleForm.pw" />
        </el-form-item>

        <el-form-item>
            <el-button type="primary" @click="submitForm(ruleFormRef)">
                提交
            </el-button>
            <el-button @click="resetForm(ruleFormRef)">重置</el-button>
        </el-form-item>
    </el-form>
</template>

<script lang="ts" setup>
import { reactive, ref } from 'vue'
import type { FormInstance, FormRules } from 'element-plus'
import type { IAccount } from '../../types/api';
import { _login } from '../../api/user'
import { ElMessage } from 'element-plus'
import { useRouter } from 'vue-router';

const router = useRouter()
const formSize = ref('default')

const ruleFormRef = ref<FormInstance>()

const ruleForm = reactive<IAccount>({
    account: '',
    pw: '',
})

const rules = reactive<FormRules<IAccount>>({
    account: [
        { required: true, message: '请填写', trigger: 'blur' },
        { min: 3, max: 5, message: '在3-5个字符', trigger: 'blur' },
    ],
    pw: [
        {
            required: true,
            message: '请填写',
            trigger: 'blur',
        },
    ]
})

const submitForm = async (formEl: FormInstance | undefined) => {
    if (!formEl) return
    await formEl.validate(async (valid, fields) => {
        if (valid) {
            console.log('submit!')
            console.log(ruleForm);
            let res = await _login(ruleForm)
            let { code, token } = res.data
            if (code === 0) {
                sessionStorage.setItem("token", token)
                router.push("/")
                ElMessage({
                    message: '登录成功',
                    type: 'success',
                })
            } else {
                //失败
                ElMessage({
                    message: '登录失败',
                    type: 'error',
                })
            }
        } else {
            console.log('error submit!', fields)
        }
    })
}

const resetForm = (formEl: FormInstance | undefined) => {
    if (!formEl) return
    formEl.resetFields()
}

</script>
22. props和emit + ts
interface Props {
    collapse: boolean
}
defineProps<Props>()


const emit = defineEmits<{
  (e: 'toggle'): void
}>()
const toggle = () => {
    emit("toggle")
}
23. 面包屑导航中的ts
<script setup lang="ts">
import { ref, watch, Ref } from 'vue';
import { useRoute, RouteMeta } from 'vue-router'
const route = useRoute()

interface ItemType {
    title: string,
    path: string
}

//因为MetaType是基于RouteMeta类型的修改,要使用extends
interface MetaType extends RouteMeta{
    title: string,
    home: string
}
const list: Ref<ItemType[]> = ref([])

watch(route, (to) => {
    list.value = []
    // console.log(to)  // /dashborad/monitor
    to.matched.forEach(item => {
        let { title, home: path } = item.meta as MetaType  //类型断言
        list.value.push({
            title,
            path
        })
    })
}, {
    immediate: true
})
</script>

<template>
    <div class="bread">
        <el-breadcrumb separator="/">
            <el-breadcrumb-item :to="{ path: '/dashboard/console' }">首页</el-breadcrumb-item>
            <el-breadcrumb-item v-for="item in list" :to="{ path: item.path }">{{ item.title }}</el-breadcrumb-item>

        </el-breadcrumb>
    </div>
</template>

<style lang="scss" scoped></style>
25. Tabs标签页中的ts
<script setup lang="ts">
import { watch, ref,Ref } from 'vue';
import { useRoute, useRouter,RouteLocationNormalizedLoaded } from 'vue-router';
const route = useRoute()
const router = useRouter()
// tabList = [{},{},{}]
interface TabItem {
    title: string,
    path: string
}
const tabList: Ref<TabItem[]> = ref([])
const activeIndex = ref(0)
//判断是否重复
const isRepeat = (to: RouteLocationNormalizedLoaded) => {
    return tabList.value.some(item => item.path === to.fullPath)
}

watch(route, (to) => {
    console.log(to)
    //先判断是否重复
    if (!isRepeat(to)) {
        //不重复
        tabList.value.push({
            title: to.meta.title as string,
            path: to.fullPath
        })
        activeIndex.value = tabList.value.length - 1
    } else {
        // 重复
        activeIndex.value = tabList.value.findIndex(item => item.path === to.fullPath)
    }
}, {
    immediate: true
})

//跳转
const jump = (item: TabItem) => {
    router.push(item.path)
}
//关闭
const handleClose = (index: number) => {
    //删除前面的
    if (index < activeIndex.value) {
        tabList.value.splice(index, 1)
        activeIndex.value = activeIndex.value - 1
        return;
    }
    if (index === activeIndex.value && index !== tabList.value.length - 1) {
        tabList.value.splice(index, 1)
        router.push(tabList.value[activeIndex.value].path)
        return;
    }
    //判断当前删除的是最后一个,而且是高亮的
    if (index === tabList.value.length - 1 && index === activeIndex.value) {
        //是最后一个
        tabList.value.splice(index, 1)
        activeIndex.value = tabList.value.length - 1
        router.push(tabList.value[activeIndex.value].path)
        return;
    }
    //删后面的
    if (index > activeIndex.value) {
        tabList.value.splice(index, 1)
    }

}
</script>

<template>
    <div class="tabs">
        <!-- <el-tag type="danger" closable>Tag 3</el-tag>
        <el-tag type="info" closable>Tag 3</el-tag> -->
        <el-tag v-for="(item, index) in tabList" :type="activeIndex === index ? 'danger' : 'info'" closable
            @click="jump(item)" @close="handleClose(index)">{{ item.title }}</el-tag>
    </div>
</template>

<style lang="scss" scoped></style>
26. Echarts中的ts
<script setup lang="ts">
import * as echarts from 'echarts';
import { onMounted, ref, computed,Ref } from 'vue';
let box = ref<HTMLElement | null >(null)
let category = ref<string[]>([])
let list: Ref<number[]> = ref([])

let option = computed(() => {
    return {
        title: {
            text: 'ECharts 入门示例'
        },
        tooltip: {},
        xAxis: {
            data: category.value
        },
        yAxis: {},
        series: [
            {
                name: '销量',
                type: 'bar',
                data: list.value
            }
        ]
    }
})

let myChart;
onMounted(() => {
    myChart = echarts.init(box.value as HTMLElement);
    myChart.setOption(option.value);
    window.addEventListener("resize",()=>{
        console.log(1111)
        myChart.resize()
    })
})
onMounted(() => {
    myChart.showLoading()
    setTimeout(() => {
        let goodsData = {
            category: ['一月', '二月', '三月'],
            list: [34, 78, 90]
        }
        category.value = goodsData.category
        list.value = goodsData.list
        myChart.setOption(option.value);
        myChart.hideLoading()
    }, 3000)
})
</script>

<template>
    <div class="bar" ref="box" style="width:400px; height:400px;border:1px solid #000;">
        bar
    </div>
</template>

<style lang="scss" scoped></style>
27. HomeData中的ts
<script setup lang="ts">
import { onMounted, ref } from 'vue';
import { _getHomeData } from '../../../api/home'
interface ItemType {
    readonly Id: number,
    title: string,
    count: number,
    time: string
}
let dataList = ref<ItemType[]>([])
let iconList = ref(['Message','Compass','Crop','CircleCheck'])
onMounted(async () => {
    try {
        let res = await _getHomeData()
        let { code, list } = res.data
        if (code === 0) {
            dataList.value = list
        } else {
            alert('没数据')
        }
    } catch (err) {
        // console.log('错误')
    }

})
</script>

<template>
    <div class="home-data">
        1111
        <el-row :gutter="20">
            <el-col :span="6" v-for="(item,index) in dataList" :key="item.Id">
                <!-- <el-icon><Message /></el-icon> -->
                <!-- <el-icon>{{iconList[0]}}</el-icon> -->
                <component :is="iconList[index]"></component>
                <p>{{ item.title }}</p>
                <p>{{ item.count }}</p>
                <p>{{ item.time }}</p>
            </el-col>
        </el-row>
    </div>
</template>

<style lang="scss" scoped>
.home-data {
    margin: 10px;

    .el-col {
        border: 1px solid #000;
    }
    svg {
        width:50px;
        height: 50px;
    }
}
</style>
28. ts + 富文本编辑器
<script setup lang="ts">
import '@wangeditor/editor/dist/css/style.css' // 引入 css
import { onBeforeUnmount,  shallowRef,computed } from 'vue'
import { Editor, Toolbar } from '@wangeditor/editor-for-vue'
import  { IEditorConfig} from "@wangeditor/editor";
// 编辑器实例,必须用 shallowRef
const editorRef = shallowRef()

//接收props

const props = defineProps({
   html: String
})
const emit = defineEmits()
// 内容 HTML
const valueHtml = computed({
   get: ()=>{
      return props.html
   },
   set: (value)=>{
      emit("update:html",value)
   }
})

//定义模式
const mode = 'simple' // 或 'simple'

// 默认按模式来显示工具栏
const toolbarConfig = {}

//配置上传图片的接口
// 初始化默认配置
const editorConfig : Partial<IEditorConfig>= {
    placeholder: '请输入内容...',
    MENU_CONF: { }
}


if (typeof editorConfig.MENU_CONF !== 'undefined'){
    editorConfig.MENU_CONF['uploadImage'] = {
    server: '/api/upload',
    fieldName: 'file',
    headers: {
        Authorization: 'Bearer ' + sessionStorage.getItem("token"),
    },
    // 上传之前触发
    onBeforeUpload(file: File) { // TS 语法
        // onBeforeUpload(file) {    // JS 语法
        // file 选中的文件,格式如 { key: file }
        return file

        // 可以 return
        // 1. return file 或者 new 一个 file ,接下来将上传
        // 2. return false ,不上传这个 file
    },

    // 上传进度的回调函数
    onProgress(progress: number) {  // TS 语法
        // onProgress(progress) {       // JS 语法
        // progress 是 0-100 的数字
        console.log('progress', progress)
    },
    // 自定义插入图片
    customInsert(res: { url:string }, insertFn: (arg0: string) => void) {  // TS 语法
        // customInsert(res, insertFn) {                  // JS 语法
        // res 即服务端的返回结果
        let { url } = res
        // 从 res 中找到 url alt href ,然后插入图片
        insertFn(url)
    }
}
}


// 组件销毁时,也及时销毁编辑器
onBeforeUnmount(() => {
    const editor = editorRef.value
    if (editor == null) return
    editor.destroy()
})

interface Ieditor{

}
const handleCreated = (editor:Ieditor) => {
    editorRef.value = editor // 记录 editor 实例,重要!
    //打印所有默认配置
    // console.log(editor.getConfig()["MENU_CONF"])
}

</script>

<template>
  <div style="border: 1px solid #ccc">
    <Toolbar
      style="border-bottom: 1px solid #ccc"
      :editor="editorRef"
      :defaultConfig="toolbarConfig"
      :mode="mode"
    />
    <Editor
      style="height: 500px; overflow-y: hidden;"
      v-model="valueHtml"
      :defaultConfig="editorConfig"
      :mode="mode"
      @onCreated="handleCreated"
    />
  </div>
</template>

<style lang="scss" scoped></style>
29. ts + Excel导入导出
//导出Excel表格的表头设置
const jsonFields = {
    'type': '序号',
    'userName': '姓名',
    'age': '年龄',
    'phone': '手机号',
    'createTime': '注册时间',
}

const excelData = convert_excel_data(tableData, jsonFields);

//定义类型
interface tHeaderType {
  [key: string]: string
}

//把英文表头换为中文
export function convert_excel_data(excelData, tHeader: tHeaerType) {
  return excelData.map((item) => {
    const obj = {};

    for (const k in item) {
      if (tHeader[k]) {
        obj[tHeader[k]] = item[k];
      }
    }
    return obj;
  });
}


 911
911

 被折叠的 条评论
为什么被折叠?
被折叠的 条评论
为什么被折叠?
 到【灌水乐园】发言


