


 本文介绍了Vue3.0中生命周期钩子的变化,包括beforeDestroy和destroyed的更名,以及CompositionAPI的新特性。同时讲解了optionsAPI和CompositionAPI的使用,以及provide和inject机制在组件间的通信。此外,还涵盖了VueRouter的配置和使用,如不同类型的路由历史和编程式导航。
一.声明周期
vue2.0的生命周期

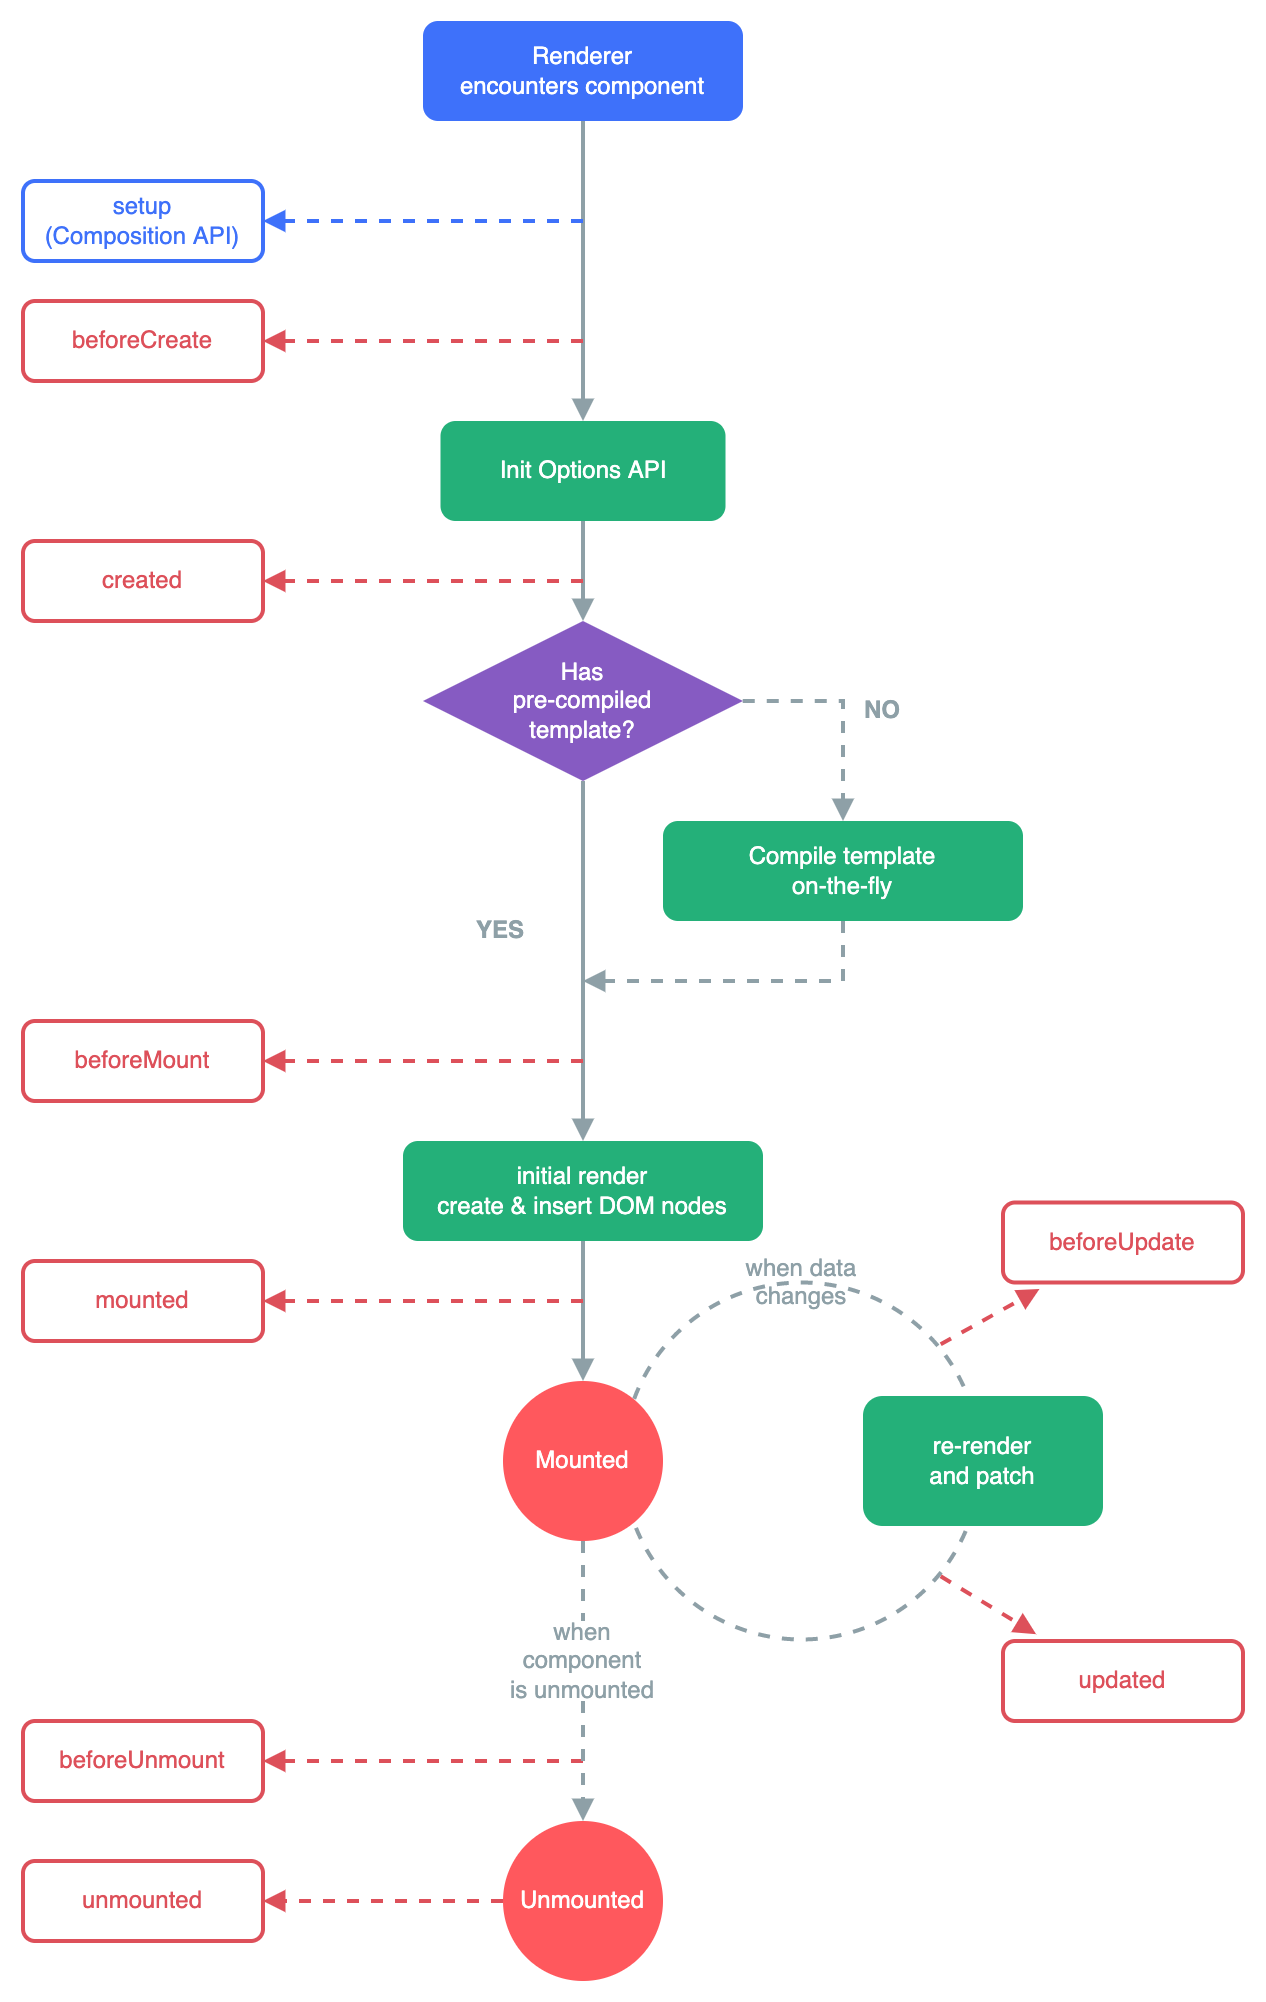
vue3.0的生命周期
参考文档:生命周期钩子 | Vue.js
-
Vue3.0中可以继续使用Vue2.x中的生命周期钩子,但有两个被更名:
-
beforeDestroy改名为beforeUnmount -
destroyed改名为unmounted
-
-
Vue3.0也提供了 Composition API 形式的生命周期钩子,与Vue2.x中钩子对应关系如下:
-
beforeCreate===>setup() -
created=======>setup() -
beforeMount===>onBeforeMount -
mounted=======>onMounted -
beforeUpdate===>onBeforeUpdate -
updated=======>onUpdated -
beforeUnmount==>onBeforeUnmount -
unmounted=====>onUnmounted
-
选项式对比组合式

生命周期函数基本使用
-
导入生命周期函数
-
执行生命周期函数,传入回调
<scirpt setup>
import { onMounted } from 'vue'
onMounted(()=>{
  // 自定义逻辑
})
</script>
执行多次
生命周期函数执行多次的时候,会按照顺序依次执行
<scirpt setup>
import { onMounted } from 'vue'
onMounted(()=>{
// 自定义逻辑
})
onMounted(()=>{
// 自定义逻辑
})
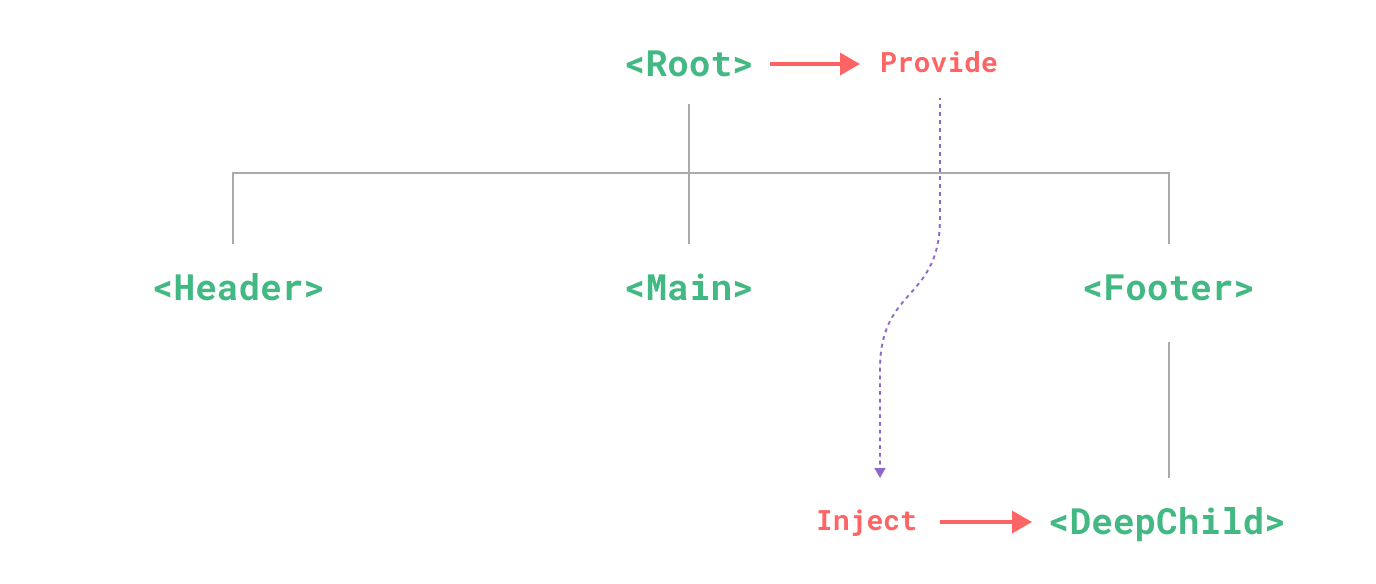
</script>组合式API - provide和inject
作用:实现祖与后代组件间通信
套路:父组件有一个
provide选项来提供数据,后代组件有一个inject选项来开始使用这些数据实现步骤:
顶层组件通过
provide函数提供数据底层组件通过
inject函数提供数据
具体写法:
1.祖组件中:
import {provide, reactive} from "vue"
setup(){
	......
    let car = reactive({name:'奔驰',price:'40万'})
    provide('car',car)
    ......
}
2.后代组件中:
import { inject } from 'vue';
setup(props,context){
	......
    const car = inject('car')
    return {car}
	......
}
自定义hook函数
-
什么是hook?—— 本质是一个函数,把setup函数中使用的Composition API进行了封装。
-
类似于vue2.x中的mixin。
-
自定义hook的优势: 复用代码, 让setup中的逻辑更清楚易懂。
-
refs
我们需要在组件渲染初期通过ref() 暴露一个ref值(null),在虚拟dom算法中,如果虚拟dom节点中的ref键对应渲染上下文中的ref()暴露的ref值,则虚拟dom的相应元素或者组件实例将被分配给该ref的值。
- 案例:绘制跟随鼠标移动的图片
- 新建hooks/points.js文件
import {ref,reactive,onMounted,onBeforeUnmount} from "vue" export default ()=>{ // 1.使用ref定义绑定dom节点ref值的变量 let box = ref(null) // 2.使用reactive初始化图片定位位置 let points = reactive({ x:0, y:0 }) // 3.定义修改图片定位位置方法 function change(info){ points.x = info.clientX points.y = info.clientY } // 4.组件挂载完毕监听鼠标移动实时修改图片定位位置 onMounted(()=>{ box.value.addEventListener('mousemove',change) }) // 5.组件销毁移除监听鼠标移动 onBeforeUnmount(()=>{ box.value.removeEventListener('mousemove',change) }) // 5.暴露数据和方法 return { box, points } } -
components/points.vue页面使用
<template>
    	<div>
            <div ref="box" class="box">
                <img
                     src="../../public/favicon.ico"
                     :style="{position:'absolute',top:points.y+'px',left:points.x+'px'}"
                     >
            </div>

        </div>
    </template>

    <script>
        // 引入具有绘制跟随鼠标移动功能的hooks
        import usePoints from "../hooks/points"
        export default {

            // 实现实时获取元素内鼠标位置的功能
            setup(){
                // 1.获取钩子函数中的数据
                let {box,points} = usePoints()
                // 2.导出数据
                return{box,points}
            }
        };
    </script>

    <style scoped>
        .box{
            width: 100vw;
            height: 300px;
            background: orangered;
            position: fixed;
            top: 0;
            left: 0;
        }
    </style>
路由router
-
安装命令
-
npm install vue-router@4
-
-
路由两种模式:
-
hash: createWebHashHistory()
-
history:createWebHistory()
-
-
创建路由实例
-
Vue2.x 创建路由是通过
new VueRouter()来创建,Vue3 是由createRouter()创建;
-
路由配置文件
// 1.按需引入路由模块 路由模式
import {createRouter,createWebHashHistory,RouteRecordRaw} from "vue-router";
import login from "../views/login.vue";
import index from "../views/index.vue";
// 2.创建路由规则
const routes:RouteRecordRaw[]=[
{
path:"/login",
component:login
},
{
path:"/",
component:index,
children:[
{
path:"home",
component:()=>import("../views/home.vue")
},
{
path:"cate",
component:()=>import("../views/cate.vue")
},
{
path:"cart",
component:()=>import("../views/cart.vue")
},
{
path:"user",
component:()=>import("../views/user.vue")
},
{
path:"/",
redirect:"home"
}
]
},
]
// 3.根据路由规则创建路由实例
const router = createRouter({
history:createWebHashHistory(),
routes
})
// 4.导出路由实例
export default router
//5.在项目入口文件引入并使用(use())
main.js文件:
import router from "./router"
app.use(router).mount('#app')
//6.设置路由出口
路由语法
-
路由出口(和router3保持一致)
-
router-view
-
-
路由跳转(和router3保持一致)
-
router-link
-
编程式
-
push
-
replace
-
go
-
-
-
路由传参(和router3保持一致)
-
search
-
动态路由
-
命名路由
-
-
注意事项
-
setup函数中使用路由语法
-
import {useRoute,useRouter} from "vue-router"
-
useRoute() ===> this.$route
-
useRouter() ===> this.$router
-
-
-
非setup函数中使用路由语法
-
this.$router
-
this.$route
-
-


 3588
3588


 被折叠的 条评论
为什么被折叠?
被折叠的 条评论
为什么被折叠?
 到【灌水乐园】发言


