


一、视频处理
1.定义一个全局变量来保存视频路径
save_video = None
canvas = None
face_dir = None
2.选择视频并自动识别人脸
def xz_video():
    global save_video
    file_path = filedialog.askopenfilename(title="选择视频",
                                   filetypes=(("视频文件", "*.mp4;*.avi;*.mkv;*.mov"),
                                                      ("所有文件", "*.*")))
    if file_path:
        save_video = file_path
        sb_video()
3.识别视频并在Canvas上显示
def sb_video():
    global save_video, canvas, face_dir
    if save_video:
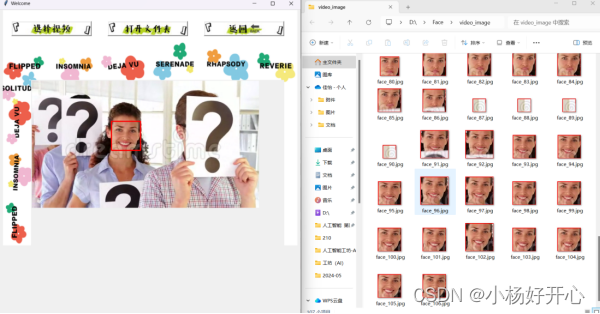
3.1创建保存人脸的文件夹
   if not face_dir:
        face_dir = 'video_image'
        if not os.path.exists(face_dir):
            os.makedirs(face_dir)
3.2加载视频
video_capture = cv2.VideoCapture(save_video)
3.3初始化Canvas,设置画布的宽度高度以及位置
  canvas = tk.Canvas(win, width=640, height=480)
    canvas.place(x=80,y=180)
    try:
3.4初始化变量
 face_count = 0

        while True:
3.5抓取一帧视频
   ret, frame = video_capture.read()
            if not ret:
                break
3.6转换颜色从BGR到RGB
rgb_frame = frame[:, :, ::-1]
3.7查找图像中的人脸位置
face_locations = face_recognition.face_locations(rgb_frame)
3.8在每个检测到的人脸周围画框
  for top, right, bottom, left in face_locations:
                cv2.rectangle(frame, (left, top), (right, bottom), (0, 0, 255), 2)
3.9裁剪人脸并保存
  face_image = frame[top:bottom, left:right]
                face_path = os.path.join(face_dir, f'face_{face_count}.jpg')
                cv2.imwrite(face_path, face_image)
                face_count += 1
3.10转换OpenCV图像格式到PIL图像格式
  pil_image = Image.fromarray(frame[:, :, ::-1])
            photo = ImageTk.PhotoImage(image=pil_image)
3.11在Canvas上显示图像
canvas.create_image(0, 0, anchor=tk.NW, image=photo)
        win.update_idletasks()
        win.update()

        if cv2.waitKey(1) & 0xFF == ord('q'):
            break
finally:
3.12释放视频
video_capture.release()
3.13如果路径存在,则打开文件
def open_face():
    if face_dir and os.path.exists(face_dir):
        os.startfile(face_dir)
3.14返回指定界面---->动态处理
def close():
    subprocess.Popen(["python", "动态处理.py"])
win.destroy()
运行结果:
设置窗口、按钮、背景图片等这些操作在之前的文章里发过哦~此处省略…


 7063
7063

 被折叠的 条评论
为什么被折叠?
被折叠的 条评论
为什么被折叠?
 到【灌水乐园】发言


