


给顶部最左边的日历图标设置点击事件实现页面跳转
需要展示页面内容示例图:
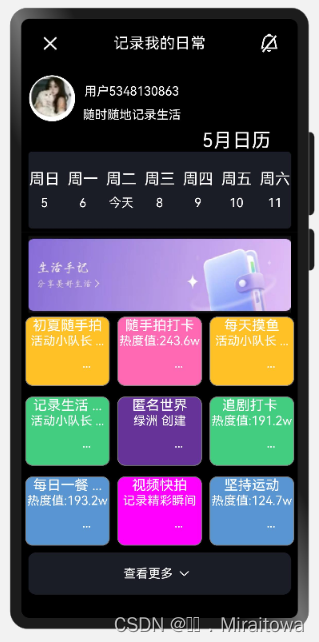
6.1.1.设置页面头部内容
新建一个页面命名为MydailyPage ,给整个页面设置背景属性
代码如下:
@Entry
@Component
struct MydailyPage {
build() {
Column() {
}
.height('100%')
.backgroundColor(Color.Black)
}
}
(1)自定义变量的值
代码示例:
@State message: string = '记录我的日常'
@State name :string='用户5348130863'
@State title:string ='随时随地记录生活'
(2)在build里面添加内容
Row() {
Image($r("app.media.quxiao1")).width(25).height(25)
Text(this.message)
.fontSize(20)
.fontColor(Color.White).margin(20)
Image($r("app.media.wurao1")).width(25).height(25)
}
.justifyContent(FlexAlign.SpaceAround)
.width('100%')
运行效果:

(3)利用线性布局绘制用户名以及头像
代码示例:
Row(){
Image($r('app.media.meme')).width(60).height(60)
.borderRadius(50).margin({left:10})
Column(){
Text(this.name) .fontColor(Color.White).margin(12)
Text(this.title) .fontColor(Color.White)
}
}
.width('100%')
.height(80)
6.1.2.利用线性布局添加日历内容,并添加border属性
(1)定义一个head类用来封装
class head{
weekend: string
num:string
constructor( weekend: string,num:string) {
this.weekend =weekend
this.num=num
}
}
(2)自定义一个clender的列表用来封装内容
@Provide clender:Array<head> =[
new head('周日','5'),
new head('周一','6'),
new head('周二','今天'),
new head('周三','8'),
new head('周四','9'),
new head('周五','10'),
new head('周六','11'),
]
(3)利用ForEach循环渲从而减少代码量
代码示例:
Row(){
Text('5月日历').fontColor(Color.White).fontSize(25)
}.margin({left:200})
Row({space:10}){
ForEach(this.clender,(item:head)=>{
Column({space:10}){
Text(item.weekend).fontColor(Color.White).fontSize(20)
Text(item.num).fontColor(Color.White)
}
})
} .border({ style: BorderStyle.Solid, width: 1, radius: 5, color: '#1a1d26' })
.backgroundColor('#1a1d26' )
.height(100)
.width('95%')
给Row容器添加border属性,从而实现效果
6.1.3.利用list组件以及ForEach循环渲染
(1)定义recoder类用来封装
代码示例:
class recoder{
title:string
content :string
color:string
constructor( title:string,content :string, color?:string) {
this.title = title
this.content = content
this.color=color
}
}
(2)自定义构建函数list列表
代码示例:
@Provide life:Array<recoder> =[
new recoder('初夏随手拍','活动小队长 ...','#FFC125'),
new recoder('记录生活 ...','活动小队长 ...','#43CD80'),
new recoder('每日一餐 ...','热度值:193.2w','#ff5995d0'),
new recoder('随手拍打卡','热度值:243.6w','#FF69B4'),
new recoder('匿名世界','绿洲 创建','#663399'),
new recoder('视频快拍','记录精彩瞬间','#ff00ff'),
new recoder('每天摸鱼','活动小队长 ...','#FFC125'),
new recoder('追剧打卡 ','热度值:191.2w','#43CD80'),
new recoder('坚持运动','热度值:124.7w','#ff5995d0'),
]
(3)创建构造函数Sharelife
代码示例:
@Builder function Sharelife(item:recoder){
Column(){
Text(item.title).fontSize(18).fontColor(Color.White)
Text(item.content).fontColor(Color.White)
Button('...').backgroundColor(Color.Transparent).margin({left:50})
}.border({ style: BorderStyle.Solid, width:1, radius: 10, color:Color.Grey })
.width(110).height(90)
.backgroundColor(item.color)
.margin(5)
}
(4)利用list,ForEach循环渲染
代码示例:
Divider().height(10)
Image($r('app.media.lifebook')).width('95%').height(100)
Row(){
List(){
ForEach(this.life,(item:recoder)=>{
ListItem(){
Sharelife(item)
}
})
}.listDirection(Axis.Horizontal)
.lanes(3) //设置行数
}.width('100%')
.height('40%')
6.1.4. 设置底部内容
代码示例:
Row(){
Text('查看更多').fontColor(Color.White)
Image($r('app.media.select')).width(30)
}.height('7%').width('95%')
.justifyContent(FlexAlign.Center)
.border({ style: BorderStyle.Solid, width: 1, radius: 10, color: '#1a1d26' })
.backgroundColor('#1a1d26')
6.2 .给页面添加路由实现跳转
(1)给MicrBlogPage和MydailyPage页面导包
代码示例:
import router from '@ohos.router';
(2)回到MicrBlogPage页面添加点击事件
代码如下:
Row() {
Image($r('app.media.sign_in')).fancy().margin({ top: 20, left: 20 })
.onClick(() => {
router.pushUrl({
url: 'pages/HQ/MydailyPage'
}, router.RouterMode.Single, (err) => {
if (err) {
console.log(`路由失败,errCode:${err.code}errMsg:${err.message}`)
return;
}
console.info('Invoke replaceUrl succeeded.');
})
})
}
.zIndex(10)
(3)给MydailyPage里面的图片也添加点击事件
Image($r("app.media.quxiao1")).width(25).height(25)
.onClick(()=>{
//路由返回上一页
router.back();
})
这样即可实现跳转效果
(4) 利用弹窗组件给勿扰图片设置点击效果
代码示例:
Image($r("app.media.wurao1")).width(25).height(25)
.onClick(()=>{
AlertDialog.show({
message:'开启消息通知,每天提醒我来打卡',
autoCancel: true,
alignment: DialogAlignment.Center,
gridCount: 5,
primaryButton: {
value: '取消',
fontColor:'black',
action: () => {
console.info('Callback when the first button is clicked')
}
},
secondaryButton: {
value: '确定',
fontColor:'#FB8845',
action: () => {
console.info('Callback when the second button is clicked')
}
}
})
})
运行效果: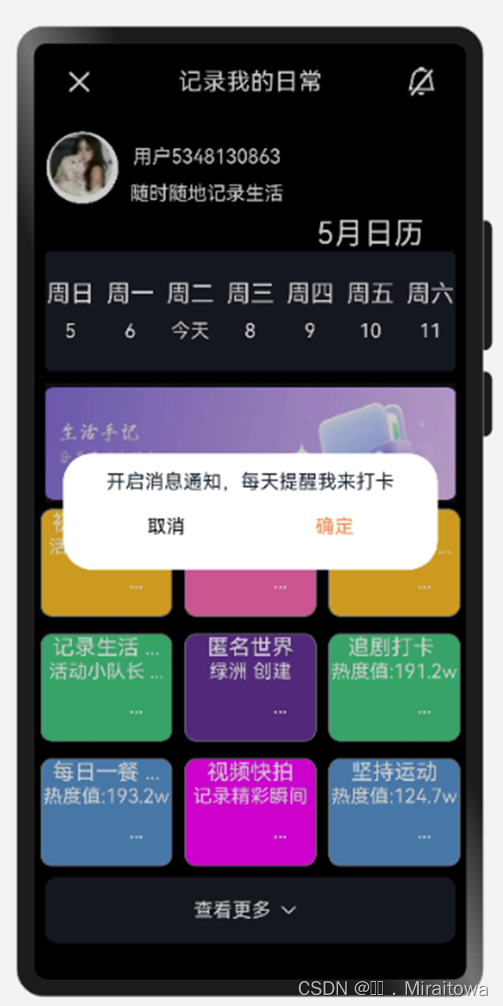


 3211
3211


 被折叠的 条评论
为什么被折叠?
被折叠的 条评论
为什么被折叠?
 到【灌水乐园】发言


