


给下面的图标添加点击事件实现页面跳转

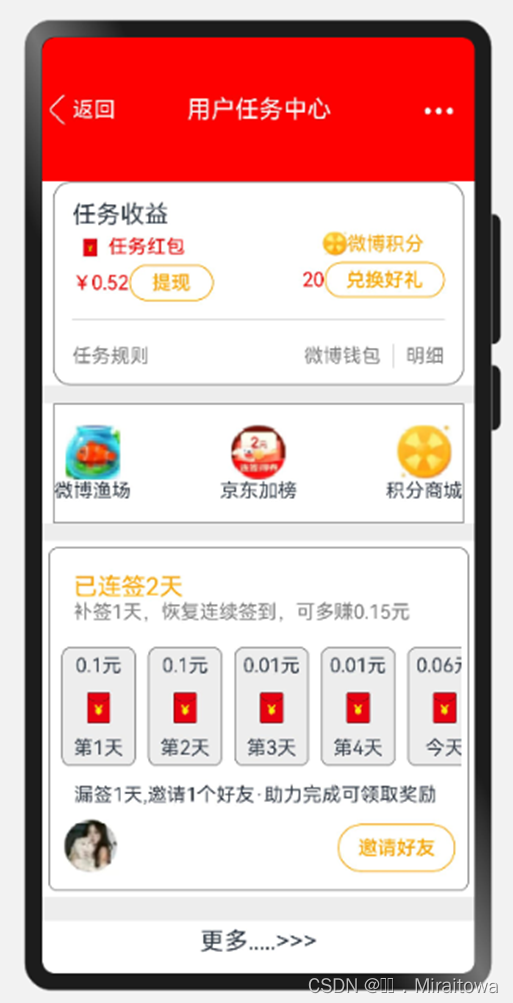
6.3新建一个用户任务中心页面
效果图:
6.3.1.设置顶部内容
代码示例:
Row({space:5}){
Row(){
Image($r('app.media.back')).width(25).height(25)
Text('返回').fontColor(Color.White).fontSize(18)
}
Text('用户任务中心').fontColor(Color.White).fontSize(20)
Button('...').backgroundColor(Color.Transparent).fontSize(40).margin({bottom:20})
}.backgroundColor(Color.Red)
.height(120)
.width('100%')
.justifyContent(FlexAlign.SpaceBetween)
6.3.2.利用线性布局border属性实现
代码示例:
Column(){
Text('任务收益').fontSize(20)
Row(){
Column(){
Row(){
Image($r('app.media.red')).width(30).height(30)
Text('任务红包').fontColor(Color.Red)
}
Row(){
Text('¥0.52').fontColor(Color.Red)
Button('提现').fontColor(Color.Orange).backgroundColor(Color.Transparent)
.width(70).height(30).border({style: BorderStyle.Solid, width: 1, radius: 15, color: Color.Orange})
}
}.alignItems(HorizontalAlign.Start)
Column({space:5}){
Row(){
Image($r('app.media.count')).width(20).height(20)
Text('微博积分').fontColor(Color.Orange)
}
Row(){
Text('20').fontColor(Color.Red)
Button('兑换好礼').fontColor(Color.Orange).backgroundColor(Color.Transparent)
.width(100).height(30).border({style: BorderStyle.Solid, width: 1, radius: 15, color: Color.Orange})
}
}
}.justifyContent(FlexAlign.SpaceBetween)
.width('100%')
Divider().strokeWidth(1).margin({top:15})
Row(){
Text('任务规则').fontColor(Color.Grey)
Row({space:10}){
Text('微博钱包').fontColor(Color.Grey)
Divider().vertical(true).height(20)
Text('明细').fontColor(Color.Grey)
}
}.margin({top:20}).width('100%')
.justifyContent(FlexAlign.SpaceBetween)
}.alignItems(HorizontalAlign.Start)
.width('95%').padding(15).height(170)
.backgroundColor(Color.White)
.border({ style: BorderStyle.Solid, width: 1.1, radius: 15, color: Color.Grey })
Row().height(15).width('100%').backgroundColor('#EDEDED')
运行效果:

6.3.3.运用forEach循环渲染
(1)定义count类封装
class count{
image: ResourceStr
name:string
constructor(image: ResourceStr,name:string) {
this.image = image
this.name = name
}
}
(2)构建自定义组件User列表
@State User:Array<count> =[
new count($r('app.media.fish'),'微博渔场'),
new count($r('app.media.pound'),'京东加榜'),
new count($r('app.media.count'),'积分商城'),
]
(3)循环渲染 代码
Row(){
ForEach(this.User,(item:count)=>{
Column(){
Image(item.image).height(45).width(45)
Text(item.name)
}
})
}.justifyContent(FlexAlign.SpaceBetween)
.backgroundColor(Color.White).width('100%')
.height(100).width('95%')
.border({ style: BorderStyle.Solid, width: 1, color: Color.Grey })
Row().height(15).width('100%').backgroundColor('#EDEDED')
6.3.4.运用线性布局,list组件绘制签到内容
(1)设置已连签的文本内容
Column(){
Text('已连签2天').fontSize(20).fontColor(Color.Orange)
Text('补签1天,恢复连续签到,可多赚0.15元').fontColor(Color.Grey)
}.alignItems(HorizontalAlign.Start)
.width('100%').padding(15)
(2)ForEach循环渲染
1.定义Sign类封装
class Sign{
title:string
image: ResourceStr
content :string
constructor(title:string,image: ResourceStr,content :string) {
this.title=title
this.image=image
this.content =content
}
}
2.定义userSign列表函数
@State userSign:Array<Sign> =[
new Sign('0.1元',$r('app.media.red'),'第1天'),
new Sign('0.1元',$r('app.media.red'),'第2天'),
new Sign('0.01元',$r('app.media.red'),'第3天'),
new Sign('0.01元',$r('app.media.red'),'第4天'),
new Sign('0.06元',$r('app.media.red'),'今天'),
new Sign('0.06元',$r('app.media.red'),'连续奖'),
]
3.循环渲染 代码
List() {
ForEach(this.userSign, (item: Sign) => {
ListItem(){
Column() {
Text(item.title)
Image(item.image).width(50).height(50)
Text(item.content)
} .border({ style: BorderStyle.Solid, width: 1,radius: 8, color: Color.Grey })
.padding(5).margin(5)
.backgroundColor('#EDEDED')
}
})
}.listDirection(Axis.Horizontal).height('15%')
(3)设置漏签内容
Column(){
Text('漏签1天,邀请1个好友·助力完成可领取奖励 ').padding(5)
Row(){
Image($r('app.media.meme')).width(50).height(50)
Button('邀请好友').backgroundColor(Color.White).fontColor(Color.Orange)
.border({ style: BorderStyle.Solid, width: 1,color: Color.Orange })
}.justifyContent(FlexAlign.SpaceBetween)
.width('100%').padding(5)
}
6.3.5.设置底部内容
代码示例:
Row().height(20).width('100%').backgroundColor('#EDEDED')
Text('更多.....>>>').fontSize(20).padding(5)
6.3.6.给Row添加边框属性
整体代码:
Row(){
Column() {
Column(){
Text('已连签2天').fontSize(20).fontColor(Color.Orange)
Text('补签1天,恢复连续签到,可多赚0.15元').fontColor(Color.Grey)
}.alignItems(HorizontalAlign.Start)
.width('100%').padding(15)
List() {
ForEach(this.userSign, (item: Sign) => {
ListItem(){
Column() {
Text(item.title)
Image(item.image).width(50).height(50)
Text(item.content)
} .border({ style: BorderStyle.Solid, width: 1,radius: 8, color: Color.Grey })
.padding(5).margin(5)
.backgroundColor('#EDEDED')
}
})
}.listDirection(Axis.Horizontal).height('15%')
Column(){
Text('漏签1天,邀请1个好友·助力完成可领取奖励 ').padding(5)
Row(){
Image($r('app.media.meme')).width(50).height(50)
Button('邀请好友').backgroundColor(Color.White).fontColor(Color.Orange)
.border({ style: BorderStyle.Solid, width: 1,color: Color.Orange })
}.justifyContent(FlexAlign.SpaceBetween)
.width('100%').padding(5)
}
}
.border({ style: BorderStyle.Solid, width: 1,radius: 8, color: Color.Grey })
.padding(5).margin(5)
}
Row().height(20).width('100%').backgroundColor('#EDEDED')
Text('更多.....>>>').fontSize(20).padding(5)
6.4 给userTaskPage页面添加路由实现跳转
(1)给红包图片添加点击事件
均先给两个页面添加导包
import router from '@ohos.router';
回到MicrBlogPage页面添加点击事件
代码示例:
Image($r('app.media.red')).fancy().width(40)
.onClick(() => {
router.pushUrl({
url: 'pages/HQ/userTaskPage'
}, router.RouterMode.Single, (err) => {
if (err) {
console.log(`路由失败,errCode:${err.code}errMsg:${err.message}`)
return;
}
console.info('Invoke replaceUrl succeeded.');
})
})
(2)给Text文本返回添加点击事件
代码如下:
Text('返回').fontColor(Color.White).fontSize(18)
.onClick(()=>{
router.back();
})


 2062
2062


 被折叠的 条评论
为什么被折叠?
被折叠的 条评论
为什么被折叠?
 到【灌水乐园】发言


