


Contents
- 2024.2.27 Tuesday
- 1. Creating a SpringMVC Project
- 2024.2.28 Wednesday
- 1.5 Create and write the HelloServlet class to handle user requests
- 1.6 Create a directory named jsp, located under the WEB-INF folder
- 1.7 Create the Helloservlet.java file
- 1.8 Register the Servlet in web.xml
- Create a jsp file in the web folder
- 1.9 Download and Configure Tomcat, Launch Test
- 1.10 Open (links may vary by individual)
- 2024.2.29 Thursday
- 2 What Is Spring MVC
2024.2.27 Tuesday
1. Creating a SpringMVC Project
The development tool used is IntelliJ IDEA
1.1 Create a Blank Project
Roughly as the following screenshot:

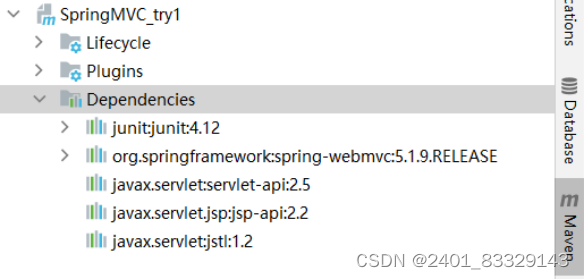
1.2 Add Dependencies in pom
(Wait for download and check)
<!-- Import dependencies -->
    <dependencies>

        <dependency>
            <groupId>junit</groupId>
            <artifactId>junit</artifactId>
            <version>4.12</version>
        </dependency>
        <dependency>
            <groupId>org.springframework</groupId>
            <artifactId>spring-webmvc</artifactId>
            <version>5.1.9.RELEASE</version>
        </dependency>
        <dependency>
            <groupId>javax.servlet</groupId>
            <artifactId>servlet-api</artifactId>
            <version>2.5</version>
        </dependency>
        <dependency>
            <groupId>javax.servlet.jsp</groupId>
            <artifactId>jsp-api</artifactId>
            <version>2.2</version>
        </dependency>
        <dependency>
            <groupId>javax.servlet</groupId>
            <artifactId>jstl</artifactId>
            <version>1.2</version>
        </dependency>

    </dependencies>
After the download is complete, check by opening Maven-Dependencies on the right side
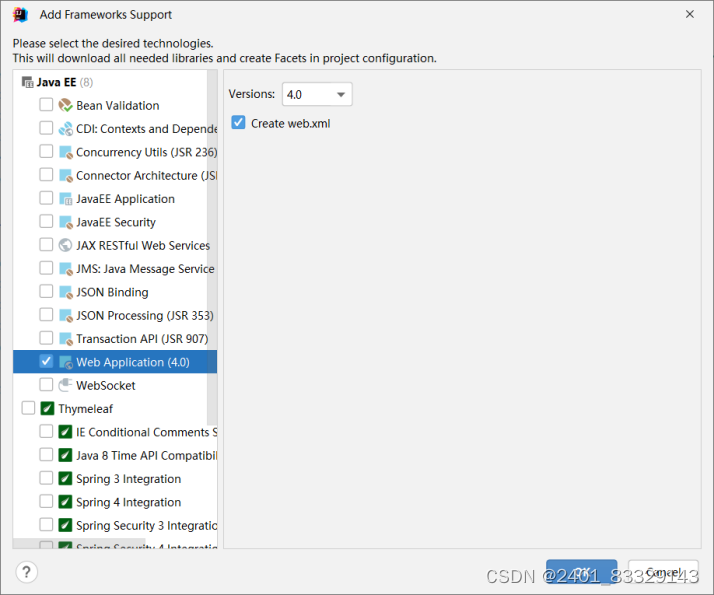
1.3 Establish a module: named springmvc-01-servlet, add support for Web app


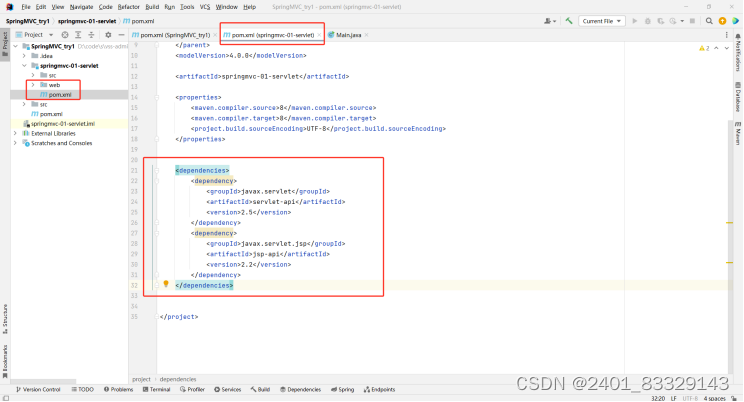
1.4 Import servlet and jsp jar dependencies
Click to open the pom.xml file of the newly created module and add the corresponding dependencies. Note that you should add these within the existing <dependencies></dependencies>. The reason for adding the dependencies again is to be extra sure (as the springmvc-01-servlet subfile has already inherited some SpringMVC dependencies).
2024.2.28 Wednesday
1.5 Create and write the HelloServlet class to handle user requests
import javax.servlet.ServletException;
import javax.servlet.http.HttpServlet;
import javax.servlet.http.HttpServletRequest;
import javax.servlet.http.HttpServletResponse;
import java.io.IOException;
// To become a Servlet type, just extend it
public class HelloServlet extends HttpServlet { // Implement Servlet interface
// Use the shortcut ctrl+o here to override
@Override
protected void doGet(HttpServletRequest req, HttpServletResponse resp) throws ServletException, IOException {
//1. Get frontend parameters
String method = req.getParameter("method");
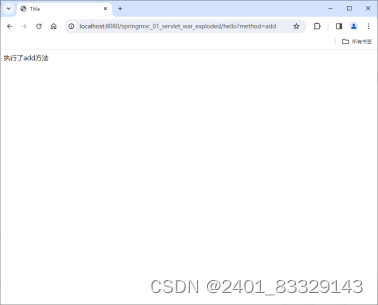
if (method.equals("add")){
req.getSession().setAttribute("msg","Executed add method");
}
if (method.equals("delete")){
req.getSession().setAttribute("msg","Executed delete method");
}
//2. Call the business layer
// There's no business logic in this example
//3. View forwarding or redirection to a page, invisible pages to users are located in WEB-INF, visible pages are in the web folder
req.getRequestDispatcher("/WEB-INF/jsp/test.jsp").forward(req,resp);
}
@Override
protected void doPost(HttpServletRequest req, HttpServletResponse resp) throws ServletException, IOException {
// Call doGet to achieve reuse
doGet(req,resp);
}
}
1.6 Create a directory named jsp, located under the WEB-INF folder

Create a file named test.jsp in this package

<%@ page contentType="text/html;charset=UTF-8" language="java" %>
<html>
<head>
    <title>Title</title>
</head>

<body>
<%-- Fetch data --%>
${msg}
</body>

</html>
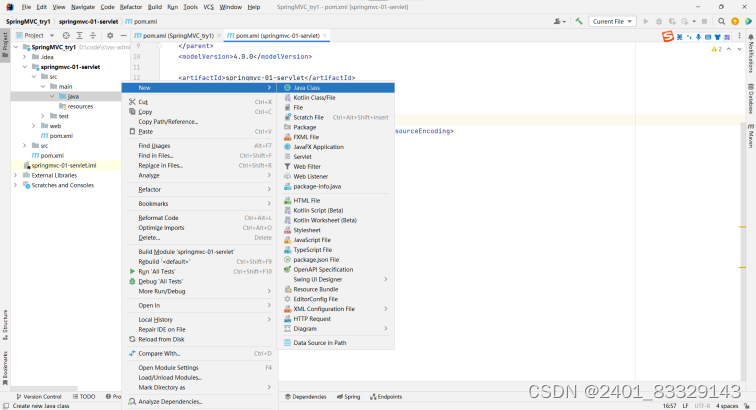
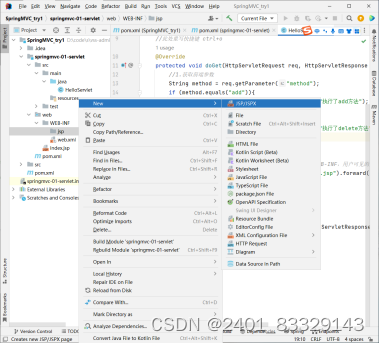
1.7 Create the Helloservlet.java file
Create a package in Src-main-java


1.8 Register the Servlet in web.xml
<?xml version="1.0" encoding="UTF-8"?>
<web-app xmlns="http://xmlns.jcp.org/xml/ns/javaee"
         xmlns:xsi="http://www.w3.org/2001/XMLSchema-instance"
         xsi:schemaLocation="http://xmlns.jcp.org/xml/ns/javaee http://xmlns.jcp.org/xml/ns/javaee/web-app_4_0.xsd"
         version="4.0">

    <servlet>
        <servlet-name>hello</servlet-name>
        <servlet-class>com.kuang.servlet.HelloServlet</servlet-class>
    </servlet>

    <servlet-mapping>
        <servlet-name>hello</servlet-name>
        <url-pattern>/hello</url-pattern>   <!--   Accessing the hello page will redirect to the HelloServlet file     -->
    </servlet-mapping>

<!-- Other configurations are as follows -->
    <!--    <session-config>-->
    <!--        <session-timeout>15</session-timeout>   //15 minutes is the timeout period-->
    <!--    </session-config>-->

    <!--    Configure the welcome page, default is index.jsp
        <welcome-file-list>
            <welcome-file>index.jsp</welcome-file>
        </welcome-file-list>-->
</web-app>
Create a jsp file in the web folder


<%@ page contentType="text/html;charset=UTF-8" language="java" %>
<html>
<head>
    <title>Title</title>
</head>

<body>
<%--请求处理表单相关的,需要提交到Servlet--%>
<form action="/hello" method="post">
  <input type="text" name="method">
  <input type="submit">
</form>
</body>
</html>
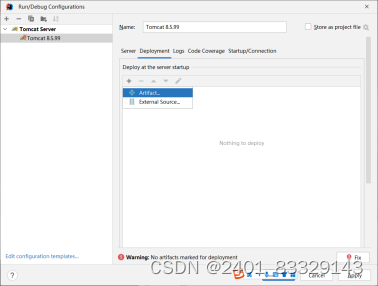
1.9 Download and Configure Tomcat, Launch Test
Referenced the following tutorials:
IDEA 添加 Tomcat
全网最详细的Tomcat安装和配置教程,图文详解


Click on artifact, then click apply.
If the trial run produces the error “address localhost:1099 is already in use,” attempt to close all windows that failed to open the webpage, then retry clean-package-run.
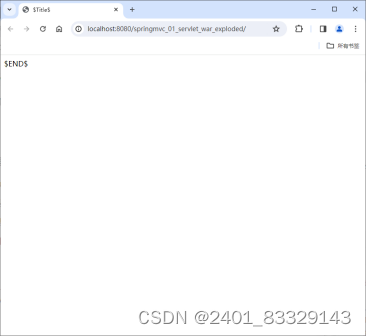
1.10 Open (links may vary by individual)
http://localhost:8080/springmvc_01_servlet_war_exploded/
http://localhost:8080/springmvc_01_servlet_war_exploded/hello

http://localhost:8080/springmvc_01_servlet_war_exploded/hello?method=add
http://localhost:8080/springmvc_01_servlet_war_exploded/hello?method=delete

2024.2.29 Thursday
1.11 What an MVC Framework Should Do
- Map URLs to Java classes or methods of Java classes.
- Encapsulate data submitted by users.
- Process requests—invoke related business processing—encapsulate response data.
- Render the response data in
.jsp/htmlor other presentation layer data.
Common Server-Side MVC Frameworks
Struts, Spring MVC, ASP.NET MVC, Zend Framework, JSF; common frontend MVC frameworks: Vue, AngularJS, React, Backbone; MVC has evolved into other patterns such as MVP, MVVM, etc.
MVC与MVVM的区别
2 What Is Spring MVC
2.1 Overview
2.1.1 Spring MVC is part of the Spring Framework, a lightweight web framework based on Java for implementing MVC.
2.1.2 Refer to the official documentation:
https://docs.spring.io/spring-framework/docs/5.2.0.RELEASE/spring-framework-reference/web.html#spring-web
Review historical versions:
https://docs.spring.io/spring-framework/docs/4.3.24.RELEASE/spring-framework-reference/html/
2.1.3 Why Learn Spring MVC
- Because of the characteristics of Spring MVC:
- Lightweight and easy to learn
- Efficient, based on the request-response MVC framework
- Good compatibility with Spring, integrated seamlessly (since Spring is a container, it can register all the beans (classes) used in Spring MVC)
- Convention over configuration (almost non-modifiable in use)
- Powerful features: RESTful, data validation, formatting, localization, themes, etc.
- Simple and flexible
- The Spring web framework revolves around the DispatcherServlet [Dispatch Servlet]:
- The role of the DispatcherServlet is to distribute requests to different handlers. From Spring 2.5 onwards, users of Java 5 or above can use annotation-based development, which is very straightforward.
- The reason to learn is also because SpringMVC is good, simple, convenient, easy to learn, and naturally and seamlessly integrated with Spring (using Spring IoC and Aop), supports simple JUnit testing, supports Restful style, and has exception handling, localization, internationalization, data validation, type conversion, interceptors, etc.
- The most important point is that it’s widely used by many people and companies.

2.2. Central Controller
2.2.1. Spring’s web framework is designed around the DispatcherServlet
The role of the DispatcherServlet is to distribute requests to different handlers. Starting with Spring 2.5, users of Java 5 or above can adopt an annotation-based controller declaration method.
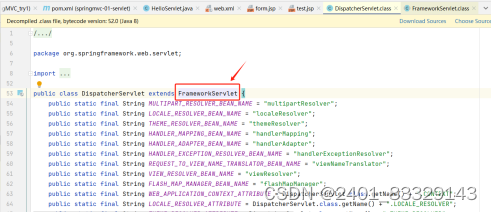
2.2.2. Like many other MVC frameworks, Spring MVC framework
is request-driven, centered around a central Servlet that dispatches requests and provides other functionalities, DispatcherServlet is an actual Servlet (inheriting from the HttpServlet base class).
The official documentation explains as follows:
Spring’s web MVC framework is, like many other web MVC frameworks, request-driven, designed around a central Servlet that dispatches requests to controllers and offers other functionality that facilitates the development of web applications. Spring’s DispatcherServlet, however, does more than just that. It is completely integrated with the Spring IoC container and as such allows you to use every other feature that Spring has.
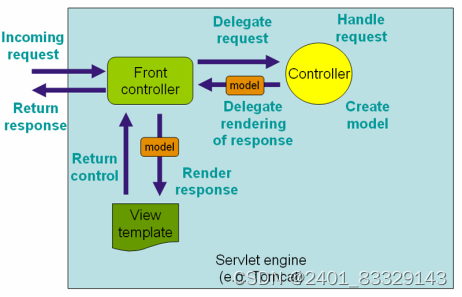
The request processing workflow of the Spring Web MVC DispatcherServlet is illustrated in the following diagram. The pattern-savvy reader will recognize that the DispatcherServlet is an expression of the “Front Controller” design pattern (this is a pattern that Spring Web MVC shares with many other leading web frameworks).
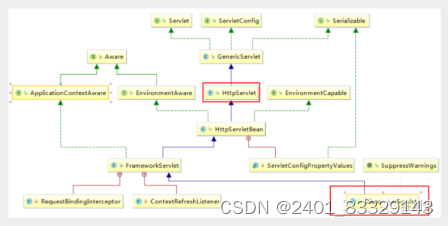
2.2.3. Checking the dispatcherServlet steps for any file
- Double-click the shift key, enter dispatcherServlet


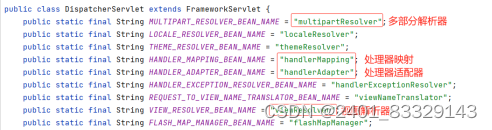
Many definitions have been encapsulated
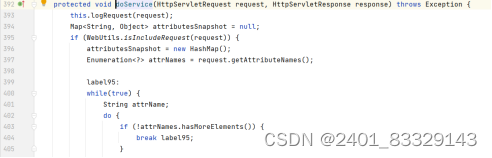
Taking doService as an example (for illustration only)

2.2.4. The principle of SpringMVC
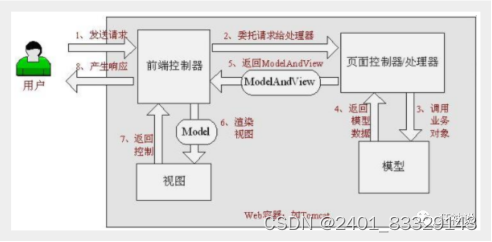
- When a request is initiated, it is intercepted by the front controller, which generates a proxy request based on the request parameters, finds the actual controller corresponding to the request, the controller processes the request, creates a data model, accesses the database, responds to the central controller with the model, the controller renders the view result using the model and view, returns the result to the central controller, and then returns the result to the requester.
2.3. The execution principle of SpringMVC
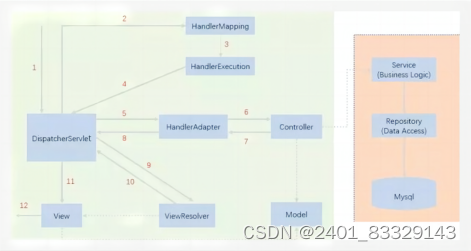
The diagram represents a more complete workflow of SpringMVC, where solid lines indicate the technology provided by the SpringMVC framework, not requiring developer implementation, and dashed lines indicate what developers need to implement.
2.3.1. Brief analysis of the execution process (following the sequence of steps 1~12 in the diagram above)
- DispatcherServlet represents the front controller, which is the control center of the entire SpringMVC. The user makes a request, and DispatcherServlet receives and intercepts the request.
We assume the request URL is: http://localhost:8080/SpringMVC/hello

- http://localhost:8080 is the server domain name.
SpringMVCis the web site deployed on the server.helloindicates the controller.- Through analysis, the above URL represents: a request for the hello controller on the SpringMVC site on the localhost:8080 server. (If there is also a project name, it will be displayed in the URL as well.)
-
HandlerMappingis the handler mapping. DispatcherServlet calls
HandlerMapping, which based on the request URL, finds the Handler.

-
HandlerExecution represents the specific Handler, mainly used to find controllers based on the URL, such as the
hellocontroller mentioned above.

-
HandlerExecutionpasses the parsed information to DispatcherServlet, such as resolving controller mappings. -
HandlerAdapteris the processor adapter, which executes the Handler according to specific rules. -
Handlerlets the specific Controller execute.

Clicking on the controller shows it is a function interface, which has been overridden in the HelloController method. -
Controllerreturns the specific execution information to HandlerAdapter, such as ModelAndView.
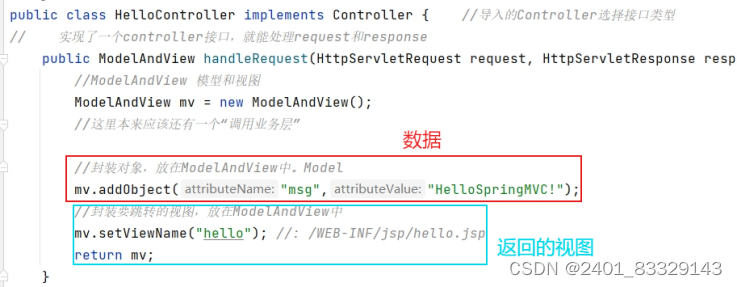
-
HandlerAdapterpasses the view logic name or model to DispatcherServlet. -
DispatcherServletcalls the ViewResolver to resolve the logical view name passed by HandlerAdapter.
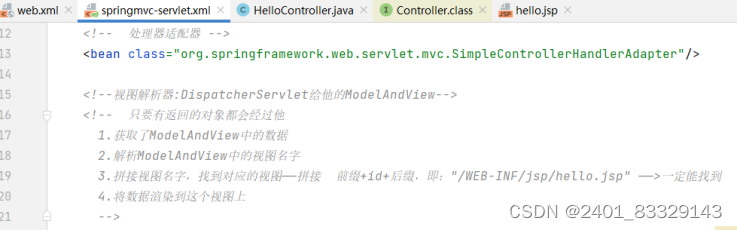
- The ViewResolver passes the resolved logical view name to DispatcherServlet.
- DispatcherServlet, based on the view result resolved by the ViewResolver, calls the specific view.
- Finally, the view is presented to the user.
- Summary answer (interview answer): The front controller accepts and intercepts user requests, finds the corresponding Controller handler based on the request, the handler calls the business layer and returns information to the front controller, then the front controller calls the view resolver to find the corresponding view and render the data.


 被折叠的 条评论
为什么被折叠?
被折叠的 条评论
为什么被折叠?
 到【灌水乐园】发言


